13 Spring 3d Craft Ideas for Seasonal Decor: Fresh, Fun, Diy!
Ready to breathe new life into your space with playful, eye-catching crafts? These 13 spring 3D ideas are easy, adorable, and totally Pinterest-worthy. Trust me, your home will glow with fresh color, texture, and a little whimsy all season long.
1. 3D Paper Flower Ball Centerpiece
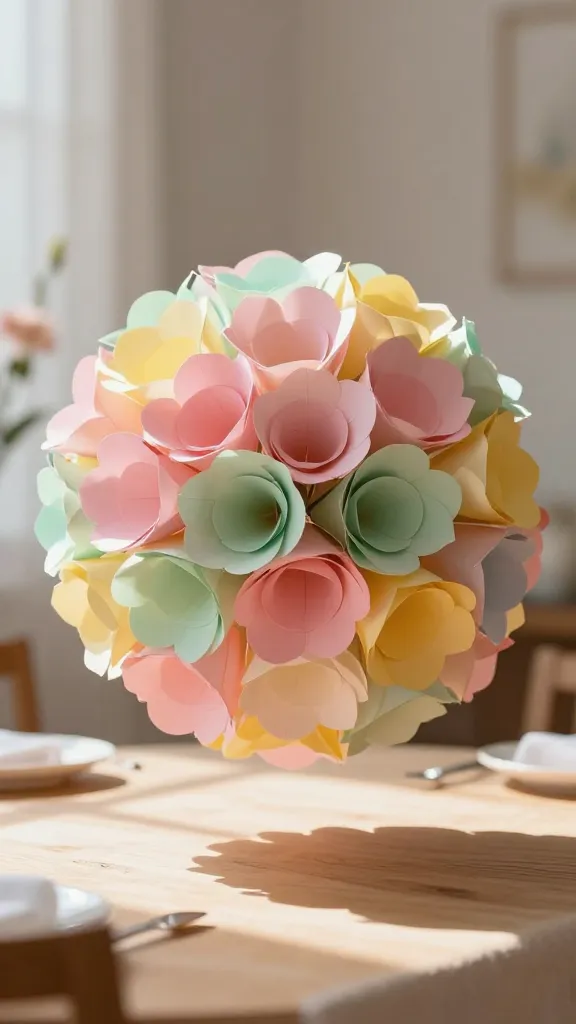
Imagine a floating bouquet of paper petals forming a soft, sculptural ball as a centerpiece. This 3D paper flower ball adds volumetric charm to your dining table or coffee nook. It’s surprisingly simple and incredibly delightful to craft.
Materials Needed
• Colored cardstock or tissue paper
• Floral wire or string
• Hot glue gun and glue sticks
• Scissors
• Foam ball or styrofoam globe
How to Make It
• Cut numerous petal shapes in varied sizes from your colors.
• Slightly curl the edges with a pencil to add dimension.
• Glue petals around the foam ball in layers, building a lush, 3D bloom.
• Attach a loop of floral wire or string to hang or place within a shallow vase.
Pro Tips / Styling Ideas
• Mix pastel palettes for a soft spring vibe or go bold with citrus tones for a playful punch.
• Hang above a dining table for a floating floral moment or set on a tray with candles for a dramatic centerpiece.
Who would love it / When to use it
— Florists-in-training and color-curious decorators alike. Perfect for Easter gatherings or a spring tablescape refresh.
2. DIY 3D Painted Birdhouse Wall Art
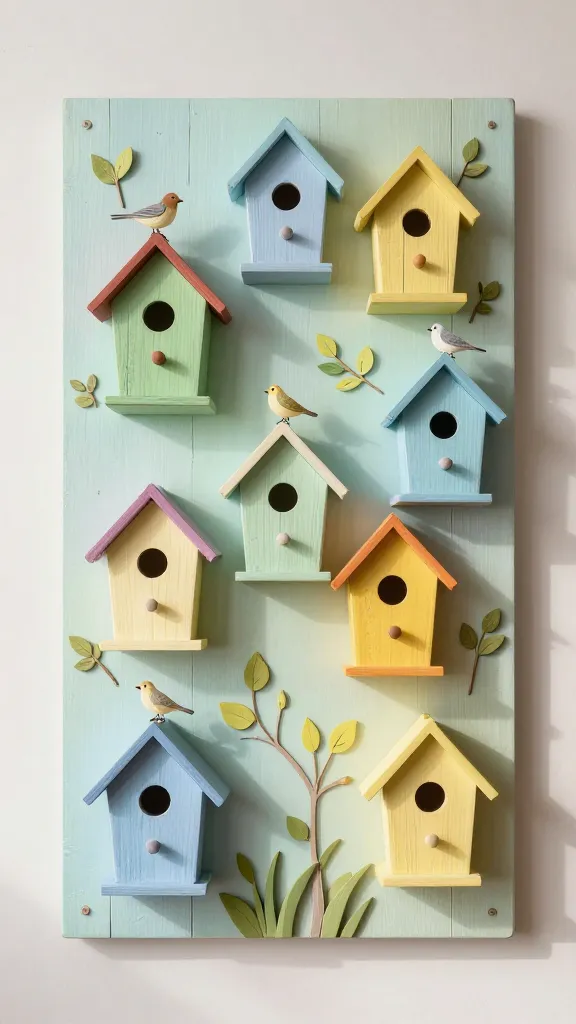
Turn a plain wall into a woodland gallery with this 3D painted birdhouse scene. Layered houses, tiny birds, and leafy cutouts create depth and whimsy that instantly brightens any wall.
Materials Needed
• Thin wood panels or a thick poster board
• Acrylic paints in spring hues
• Foam brush subset and fine liner brushes
• Masonry nails or mounting strips
• Cardstock birds and leaf templates
How to Make It
• Paint several small houses in different colors, layering blues, greens, and yellows.
• Create 3D faces for the houses using little door cutouts or raised platforms with foam padding.
• Add paper birds and leaf cutouts glued along a faux branch strip you mount across the panel.
Pro Tips / Styling Ideas
• Use a weathered wood look to give a cozy cottage vibe.
• Frame it or mount directly on the wall for a bold architectural statement.
Who would love it / When to use it
— Nature lovers and gallery wall enthusiasts. Great for living rooms, bedrooms, or hallways.
3. 3D Eco-Woody Sprout Garland
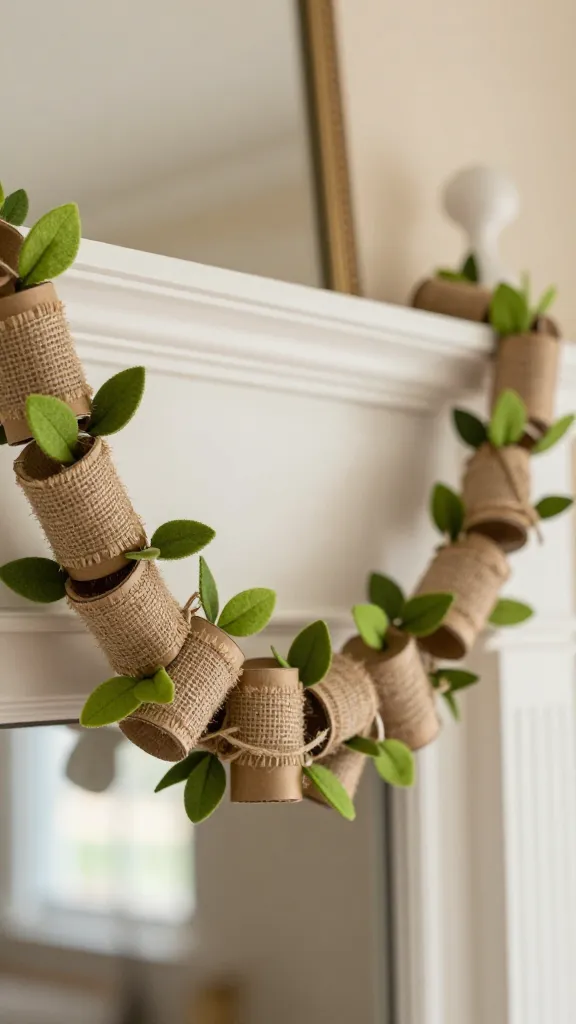
Spruce up mantels and doorways with a 3D garland inspired by spring sprouts. Think tiny forest cylinders or cardboard tubes wrapped in burlap with tiny green leaves for a woodland vibe.
Materials Needed
• Cardboard tubes (toilet paper or wrapping paper cores)
• Burlap ribbon
• Green felt or craft foam leaves
• Hot glue gun
• Needle and thread (optional)
How to Make It
• Cut the tubes into short segments and wrap with burlap, securing ends with glue.
• Cut tiny leaf shapes and glue them along the tubes to mimic sprouts.
• Link the segments with string or thread to form a long garland.
Pro Tips / Styling Ideas
• Alternate colors between fresh greens and tan burlap for texture.
• Drape over a mantel, staircase, or along a mirror frame for a woodland touch.
Who would love it / When to use it
— Fans of rustic charm and low-cost decor. A perfect spring doorway or window feature.
4. 3D Origami Flower Wall Panels
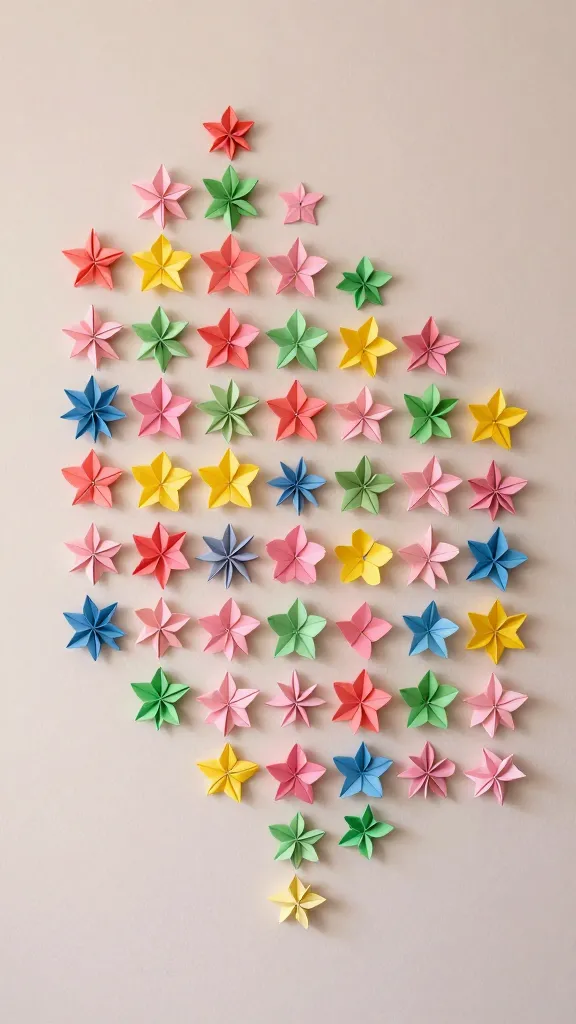
Transform a wall into a garden with 3D origami flowers arranged in a panel. Each folded bloom pops against a soft background, giving you a modern, graphic floral look.
Materials Needed
• Colored origami paper or square craft paper
• Foam board or thick poster board
• Double-sided tape or glue dots
• Scissors
How to Make It
• Fold dozens of paper flowers in different sizes using a simple origami petal pattern.
• Mount flowers on foam board in a repeating or organic cluster pattern.
• Leave space between blooms for a contemporary, airier feel.
Pro Tips / Styling Ideas
• Create a color gradient from blush to mint for a fresh spring vibe.
• Use a matte black or soft gray background to let colors pop.
Who would love it / When to use it
— Modern decor lovers and craft enthusiasts wanting a statement wall behind a console or bed.
5. 3D Foam Felt Fruit Garland
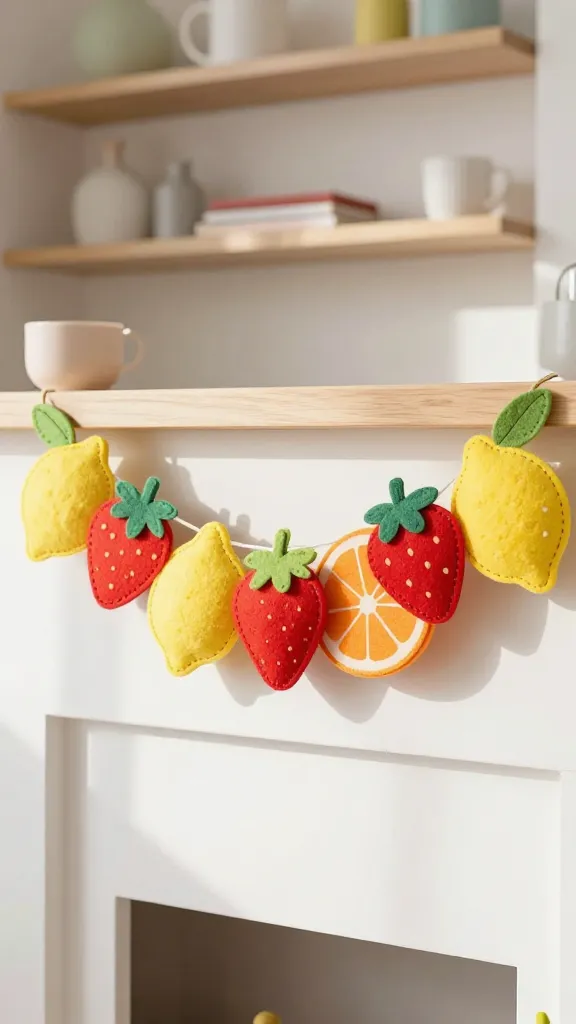
Brighten shelves with a playful 3D foam felt fruit garland. Oversized lemons, strawberries, and oranges bring a cheerful, summery energy to spring days.
Materials Needed
• Foam sheets in assorted fruit colors
• Sharp scissors
• Hot glue gun or fabric glue
• Jute twine or ribbon
How to Make It
• Cut fruit shapes with a little seam allowance and attach a small felt leaf.
• Stack pieces and glue to create a 3D puffed look.
• String with twine into a garland and hang across a mantel or window.
Pro Tips / Styling Ideas
• Vary sizes for a playful, organic rhythm.
• Mix glossy felt with matte for texture contrast.
Who would love it / When to use it
— Kitchen nooks and bright, kid-friendly spaces. Great for seasonal photo backdrops too.
6. 3D Paper Butterflies on a Curtain
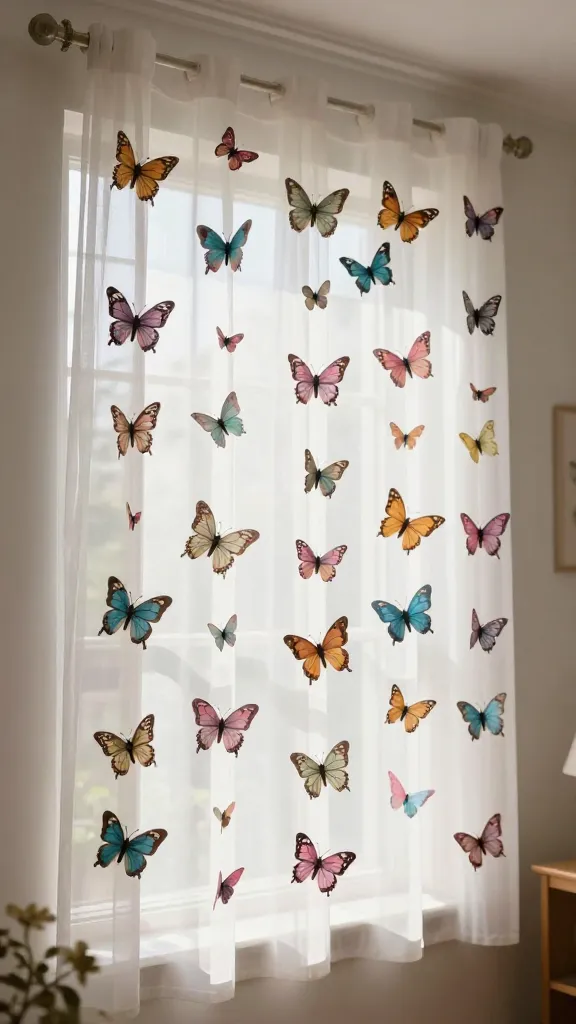
Bring the outdoors inside with a fluttering curtain of 3D paper butterflies. Layered wings and tiny bodies create a delicate, living look without live insects.
Materials Needed
• Colored paper or vellum
• Thin wire or fishing line
• Scissors
• Hot glue
How to Make It
• Cut butterfly shapes with two pairs of wings and a small body.
• Create a slight crease in the center of the wings to give dimension.
• Attach wings to fine wire frames and suspend along a curtain rod or across a bay window.
Pro Tips / Styling Ideas
• Alternate colors from lilac to teal for a dreamy gradient.
• Space the butterflies at different heights for a natural flutter effect.
Who would love it / When to use it
— Renters and seasonal decorators who want a non-permanent, stunning window treatment.
7. 3D Moss Ball Terrarium Topper
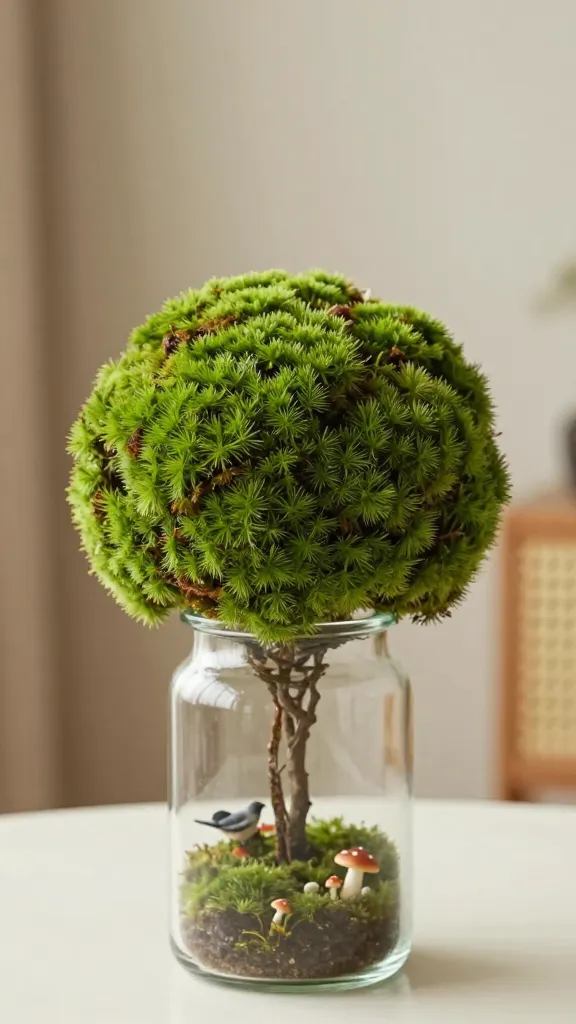
Turn any glass jar or vase into a tiny, living-looking garden with a 3D moss ball topper. It reads as artful, organic, and a touch of whimsy for shelves or dining tables.
Materials Needed
• Preserved moss or reindeer moss
• Small foam or polystyrene ball
• Hot glue
• Mini figurines or decorative pebbles (optional)
How to Make It
• Glue moss around the foam ball, building a lush sphere.
• Add tiny elements like a miniature bird or mushrooms for personality.
• Place the moss ball atop a narrow-neck vase or inside a tall glass jar as a mini terrarium topper.
Pro Tips / Styling Ideas
• Pair with pastel glass jars for a whimsical display.
• Rotate toppers with seasons to keep a fresh look.
Who would love it / When to use it
— Green thumbs and tabletop stylists seeking compact, tactile decor.
8. 3D Cardboard Cityscape Wall Art
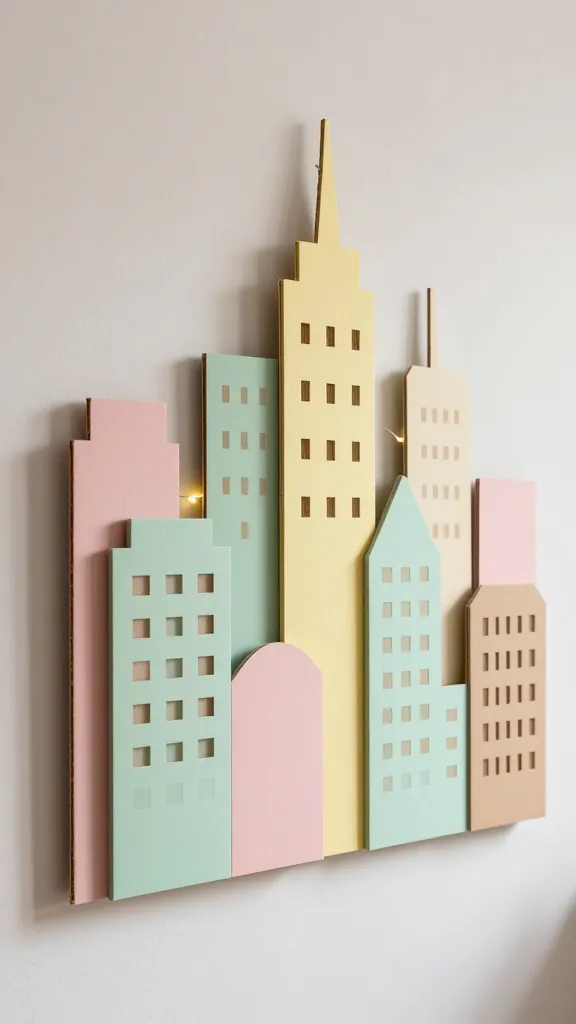
Give your wall a playful urban twist with a 3D cardboard cityscape. Layered building silhouettes cast soft shadows, delivering a bold graphic statement with a spring vibe.
Materials Needed
• Recycled cardboard
• Craft knife or scissors
• Acrylic paints
• Glue or double-sided tape
• Optional: string lights
How to Make It
• Cut building shapes in varying heights from cardboard strips.
• Glue layers onto a backing board in staggered depths for a 3D skyline.
• Paint with soft spring tones or metallic accents for a modern edge.
Pro Tips / Styling Ideas
• Leave the skyline unpainted or white on top of a colored wall for a stark, chic look.
• Add small LED string lights behind to create a glowing city glow.
Who would love it / When to use it
— Minimalists and urban decor fans. Great for living rooms, home offices, or entryways.
9. 3D Felt Cloud Mobile
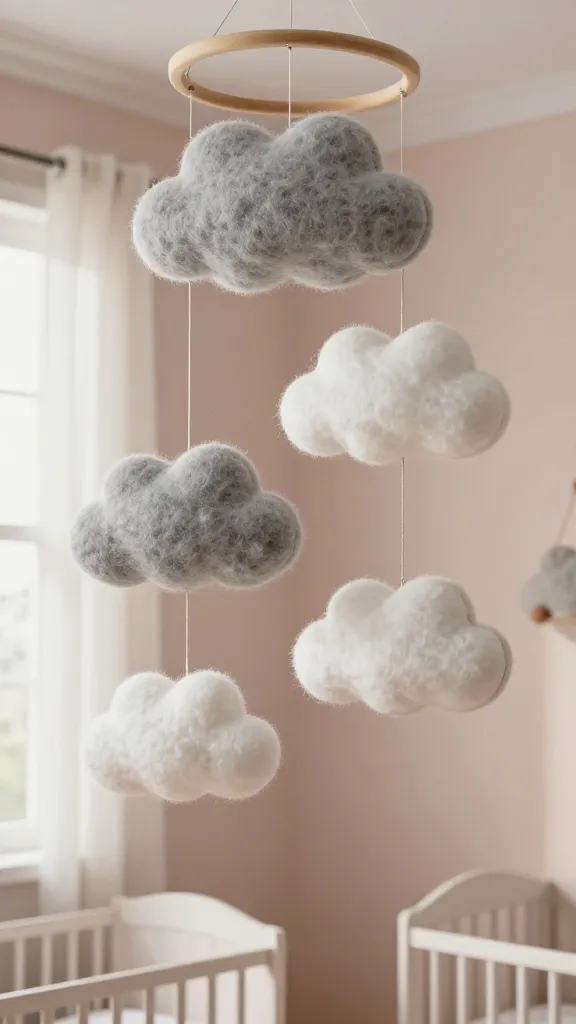
Sky above, art below. A hanging 3D felt cloud mobile adds softness and whimsy to nurseries, kids’ rooms, or dreamy corners.
Materials Needed
• Grey, white, and pastel felt
• Stuffing or recycled fabric scraps
• Craft glue or fabric glue
• Embroidery hoop or wooden ring
• String
How to Make It
• Sew or glue felt into puffy cloud shapes, stuffing lightly for dimension.
• Layer several cloud pieces along strings tied to a ring.
• Hang as a mobile or mount on a wall as a 3D cloud sculpture.
Pro Tips / Styling Ideas
• Use varying sizes for depth and whimsy.
• Add tiny raindrop beads or star accents for extra charm.
Who would love it / When to use it
— nurseries, kids’ rooms, or anyone craving soft, dreamy decor.
10. 3D Ceramic-Lace Flower Tray
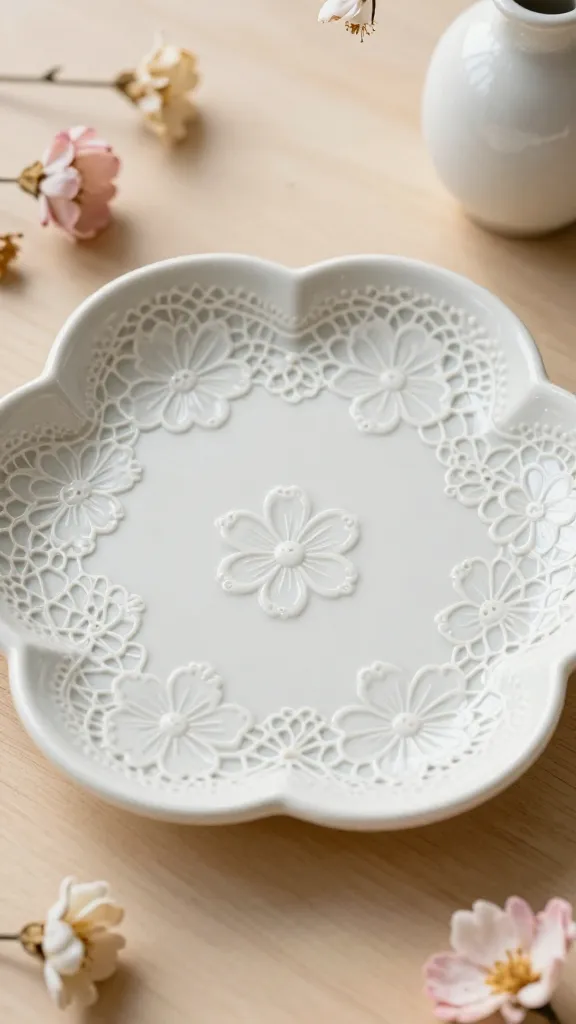
Combine the delicate beauty of lace with the earthy texture of ceramic to create a functional 3D flower tray. A gorgeous catchall with spring floral vibes.
Materials Needed
• Air-dry clay or porcelain clay
• Lace or doily
• Rolling pin or smooth bottle
• Paints or glaze
• Clear sealant
How to Make It
• Roll clay into a thin sheet and press lace into the surface to imprint a floral pattern.
• Cut a shallow tray shape, smooth edges, and peel away the lace.
• Bake or air-dry, then paint or glaze for a glossy finish.
Pro Tips / Styling Ideas
• Match glaze with your kitchen or bathroom color palette for cohesion.
• Use as a jewelry tray, soap dish, or tea-light holder.
Who would love it / When to use it
— Crafters who adore handmade ceramics and light, romantic textiles.
11. 3D Coral Tote Planter Kit
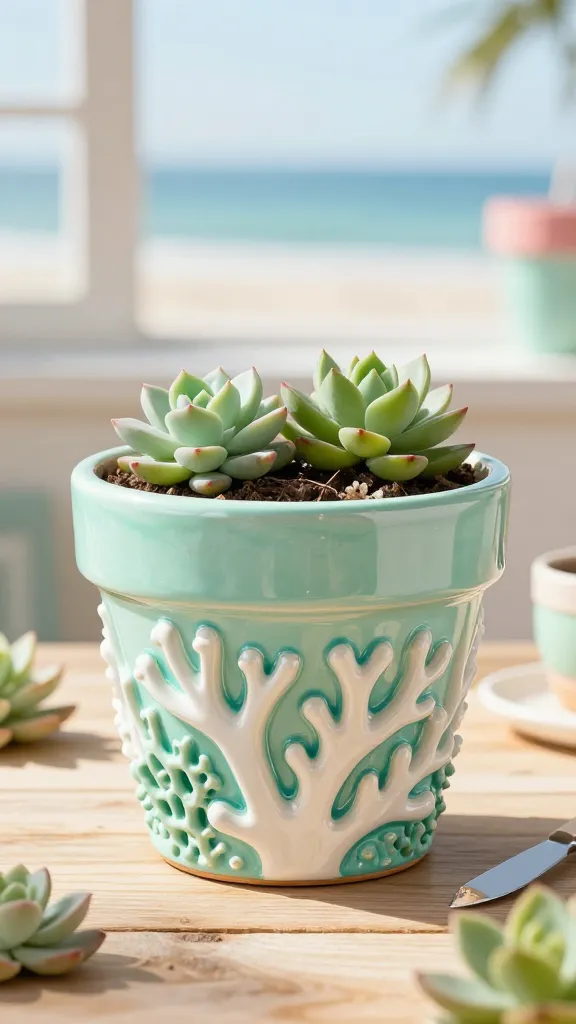
Turn an ordinary planter into a coral garden with 3D textured acrylics and stacked layers. Happy, beachy vibes meet spring freshness for an unexpected decor twist.
Materials Needed
• Ceramic planter or terracotta pot
• Acrylic paints in coral, mint, and white
• Palette knife or comb tool
• Clear sealant
How to Make It
• Layer paint in streaks and stipple to create coral-like texture.
• Add raised details with a pale accent color to mimic 3D coral strands.
• Seal and plant a small succulent or flowers inside.
Pro Tips / Styling Ideas
• Place several planters on a tray to form a micro-garden display.
• Use mint and blush tones to keep the look soft and spring-ready.
Who would love it / When to use it
— Plant lovers and those who want a coastal-inspired spring vignette.
12. 3D Velvet Ribbon Rosette Wall Panels
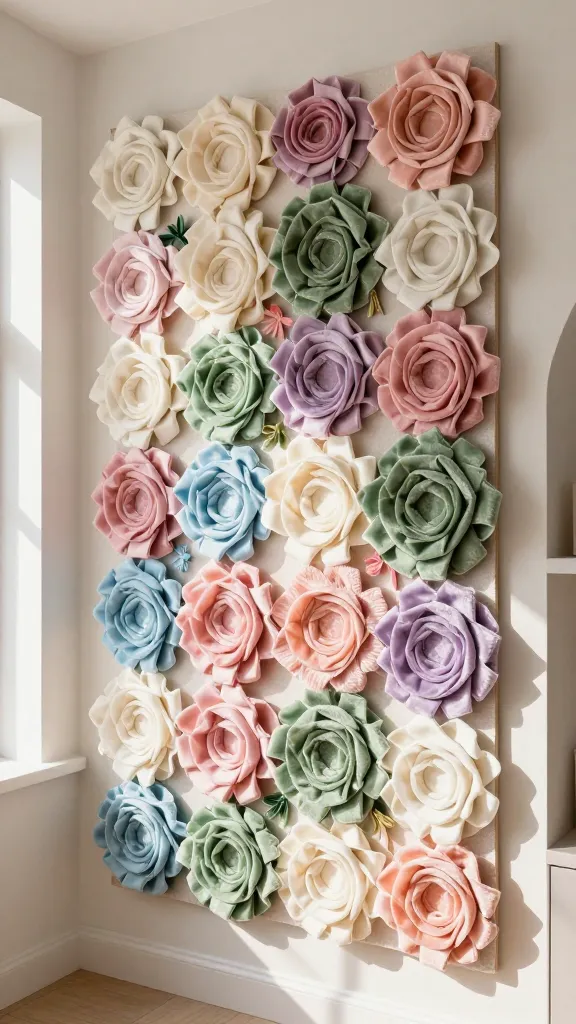
Luxuriate a wall with 3D velvet ribbon rosettes arranged in a blooming cluster. Rich texture and soft light reflect beautifully in spring sun.
Materials Needed
• Velvet ribbon in assorted colors
• Scissors
• Hot glue gun
• Cardboard or foam board backing
How to Make It
• Roll velvet into small rosettes and secure with glue.
• Arrange rosettes on backing in a floral pattern and glue in place.
• Mount onto wall with adhesive strips or nails.
Pro Tips / Styling Ideas
• Create color blocks with two or three complementary hues.
• Keep the rosettes slightly varied in size for a more organic feel.
Who would love it / When to use it
— Glam lovers and textile enthusiasts. Perfect for feature walls in living rooms or bedrooms.
13. 3D Clay Bird Bath Table Decor
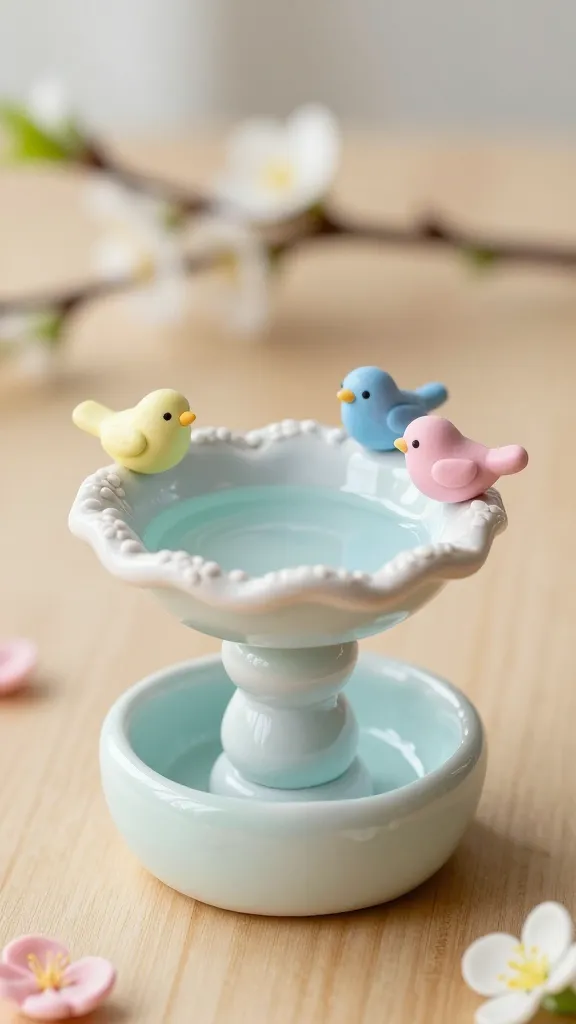
Finally, a small, charming 3D clay bird bath centerpiece that doubles as a table accent. A tiny paradise for birds and a big hit for spring tablescapes.
Materials Needed
• Air-dry clay or polymer clay
• Small bowl or shallow ceramic dish
• Paints, glaze, or acrylics
• Gloss sealant
How to Make It
• Mold a shallow dish shape from clay to fit the bowl’s rim, creating a mini bath.
• Add decorative textures around the rim and edges.
• Bake or air-dry, then paint with a spring palette and seal.
Pro Tips / Styling Ideas
• Place atop a pedestal stand for height variation.
• Pair with tiny ceramic birds or faux moss for a natural look.
Who would love it / When to use it
— Charm-seekers and tabletop display lovers seeking a sweet, tiny garden moment.
Conclusion: These 13 spring 3d craft ideas are designed to spark joy and spark creativity. Pick one you adore, or unleash a full spring decor blitz and sprinkle a little magic around your home. You’ll love how doable and rewarding these projects are—easy to customize, beautifully unique, and totally Instagram-worthy. Get crafting and let your space bloom this season!