8 Fun Clay Craft Ideas for Beginners
Ready to dive into clay without the overwhelm? These eight unique ideas are perfect for beginners—fun to make, gorgeous to display, and totally Pinterest-worthy. Trust me, you’ll want to start today.
Let’s get messy in the most delightful way. Each project sparks creativity, uses simple supplies, and yields a finished piece you’ll be proud to show off.
1. Rustic Painted Clay Plant Markers That Look Handwritten
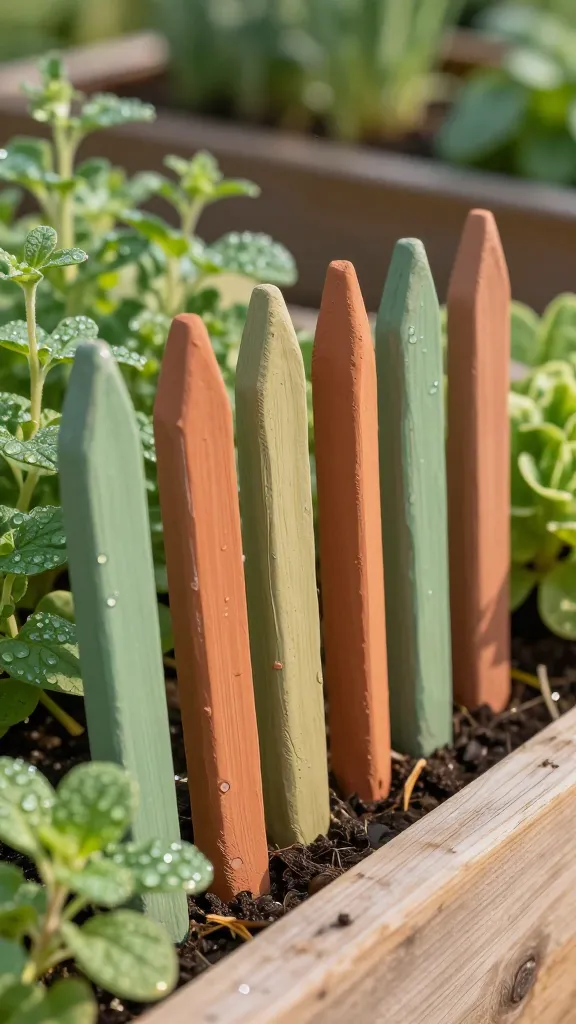
Imagine a neat row of plant markers that look like tiny, artisanal signs. These clay markers are adorable, durable, and super practical for your herbs and veggies. The colors pop against green leaves, and the rustic lettering adds charm.
Materials
- Air-dry clay or polymer clay
- Acrylic paints in earthy tones
- Fine-tip paint pens
- Sealer (optional)
How to Make It
- Knead small sticks of clay into slender, flat shapes about 1/8 inch thick.
- Shape a pointed end for easy insertion into soil.
- Let dry completely, then paint a soft base color.
- Write plant names or initials with a fine pen, and seal if desired.
Pro Tips / Styling Ideas
- Keep fonts playful—handwritten cursive or block letters both look fantastic.
- Pair with a few contrasting marker colors for a cheerful garden row.
Who will love it? Green thumbs and home gardeners who want a cute, organized garden space.
2. Mini Clay geometric Jewelry Dangles
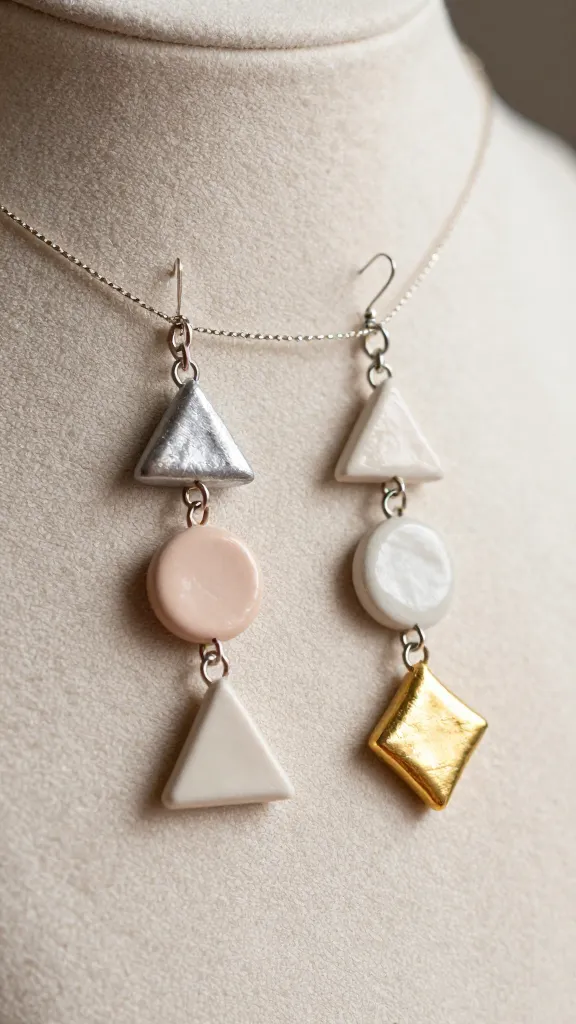
Small, statement-making shapes that catch light and spark joy. These geometric clay charms swing gently from earring hooks or a delicate necklace chain for a modern, artsy vibe.
Materials
- Air-dry clay or polymer clay
- Jump rings
- Earring hooks or necklace chain
- Acrylic paints or metallic pens
How to Make It
- Roll clay into tiny shapes: triangles, circles, or diamonds.
- Poke a small hole for the jumping ring or attach a bail.
- Bake (if polymer) or air-dry, then paint with bold or metallic accents.
Pro Tips / Styling Ideas
- Choose a cohesive color palette—think blush pinks, taupes, and gold.
- Pair with a simple outfit to let the shapes shine.
Who will love it? Accessory lovers and DIY jewelry makers who want to start small.
3. Cozy Clay Coasters With Embossed Florals
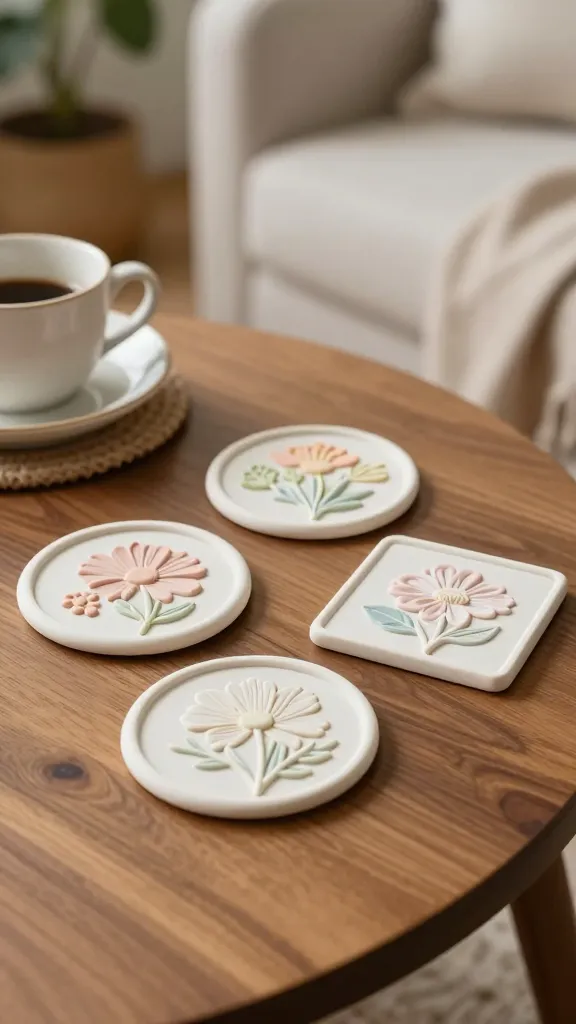
A set of soft, textured coasters that look boutique-chic on any coffee table. The embossed florals bring a touch of garden-inspired elegance to everyday use.
Materials
- Air-dry clay or ceramic clay
- Rolling pin or bottle
- Texture tools or leaf backs
- Acrylic paints, brushes, and sealer
How to Make It
- Roll clay to 1/4 inch thick; cut into round or square shapes.
- Gently press floral textures into the surface for a pressed look.
- Let dry, color softly, and seal to protect from moisture.
Pro Tips / Styling Ideas
- Vary sizes for an imperfect, handmade set that still feels curated.
- Match with a small plant and a candle for a styled vignette.
Who will love it? Anyone who enjoys cozy, tactile home decor and thoughtful hostess gifts.
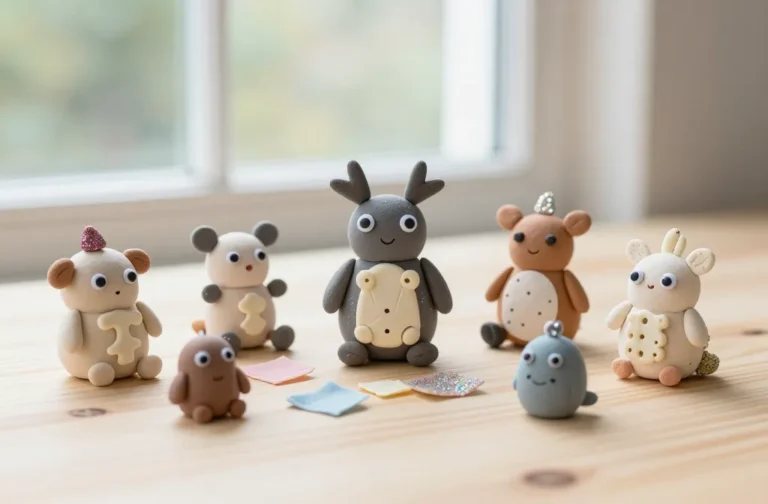
4. Cute Animal Magnets That Bring a Smile
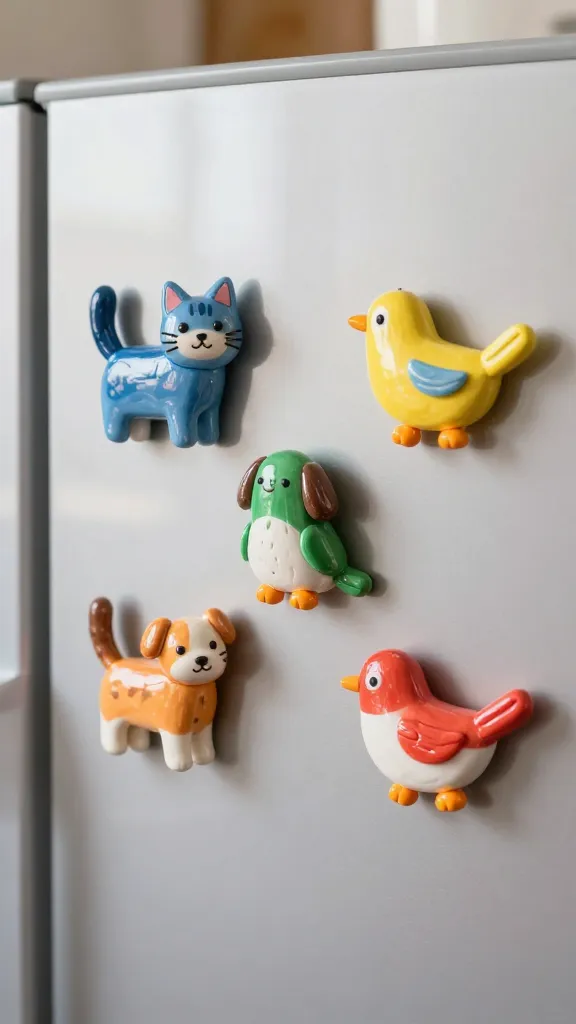
Harbor a touch of whimsy with little clay animals that cling to the fridge or a magnetic board. Fun to make, charming to display, and surprisingly sturdy when sealed.
Materials
- Air-dry clay or polymer clay
- Magnet discs or small magnets with adhesive
- Non-toxic paint and fine brushes
- Sealant (optional)
How to Make It
- Shape tiny animals—cats, dogs, birds, or fantastical creatures.
- Attach a magnet piece to the back before curing (or after with strong adhesive).
- Paint with bright colors and add minimal details for personality.
Pro Tips / Styling Ideas
- Create a buddy duo set (two animals that “hang out” together).
- Place them on a metal tray or bulletin board for a playful gallery wall feel.
Who will love it? Families with kids, roommates, and anyone who wants a little daily cheer on the fridge.
5. Light-Weight Clay Wall Banners
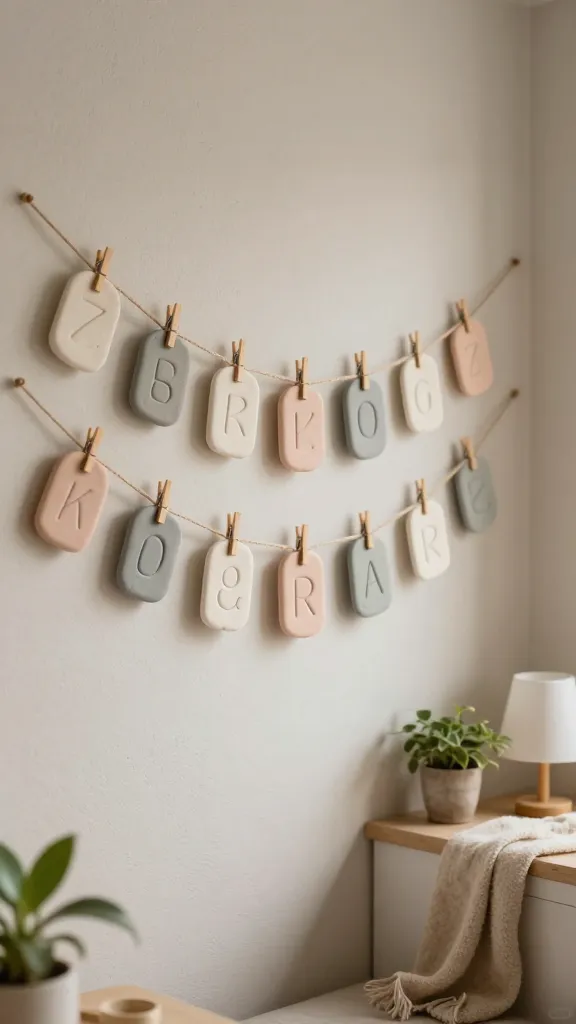
These mini banners feel festive yet minimal—perfect for balconies, shelves, or above a reading nook. Lightweight, customizable, and endlessly cute when strung with twine.
Materials
- Air-dry clay
- Acrylic paints or markers
- Thin string or baker’s twine
- Small clothespins or clips
How to Make It
- Roll small, flat tags; cut into rectangular shapes with rounded corners.
- Decorate with initials, simple icons, or abstract shapes.
- Poke a hole at the top of each tag and thread with twine.
Pro Tips / Styling Ideas
- Hang in a row along a window or above a desk for a cheerful focal point.
- Swap signs seasonally—“hello,” “yay,” or “sunny days.”
Who will love it? Decor lovers looking for a playful, low-cost wall project.
6. Plush-Look Clay Bud Vases
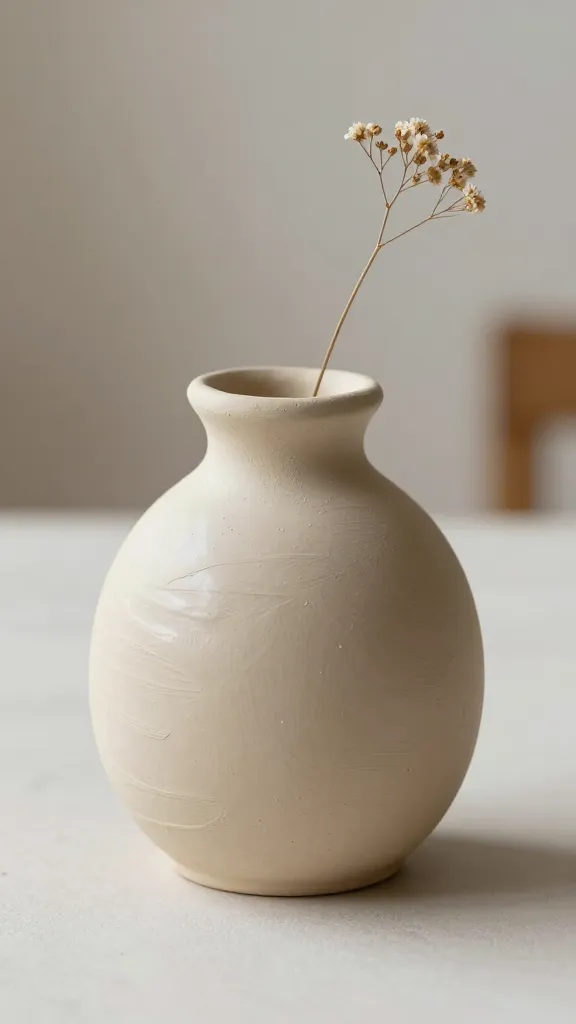
Small, squat vases that resemble a soft, squeezable cushion. They’re perfect for one or two stems and add a tactile, sculptural element to shelves or tables.
Materials
- Air-dry clay or polymer clay
- Mini silicone molds (optional for texture)
- Gloss glaze or sealant
- Water and a tiny plant sprig or dried flower
How to Make It
- Shape a short, rounded body with a slightly tapered opening.
- Use a mold or your fingers to add gentle texture across the surface.
- Dry, seal, and add a single stem for a clean, modern look.
Pro Tips / Styling Ideas
- Group with taller pieces for contrast and interest.
- Match glaze with your room palette for a cohesive vibe.
Who will love it? Plant enthusiasts and anyone wanting a sculptural mix of nature and craft.
7. Sensory Clay Bead Garland
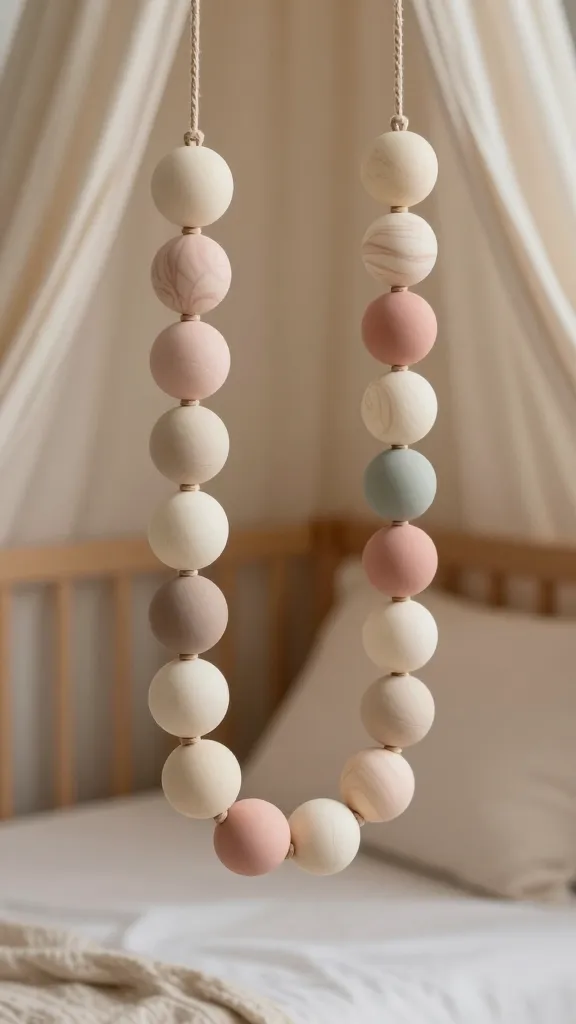
A string of chunky beads in soft tones—great for nurseries, living rooms, or a bedroom canopy. It’s tactile, calming, and looks effortless-yet-polished hanging above a bed or window.
Materials
- Air-dry clay, rolled into spheres or ovals
- String or twine
- Beading needle or helpful poking tool
- Acrylic paint (optional)
How to Make It
- Roll several bead shapes, varying sizes for a natural rhythm.
- Face each bead with a color twist or simple marbling.
- Let dry, then string them with a sturdy knot between beads.
Pro Tips / Styling Ideas
- Use natural-toned paints to keep it soothing and cohesive.
- End with a gentle tassel or bow for a finishing touch.
Who will love it? Anyone craving tactile decor that doubles as a playful DIY project.
8. Whimsical Clay Birds on a Branch Wall Art
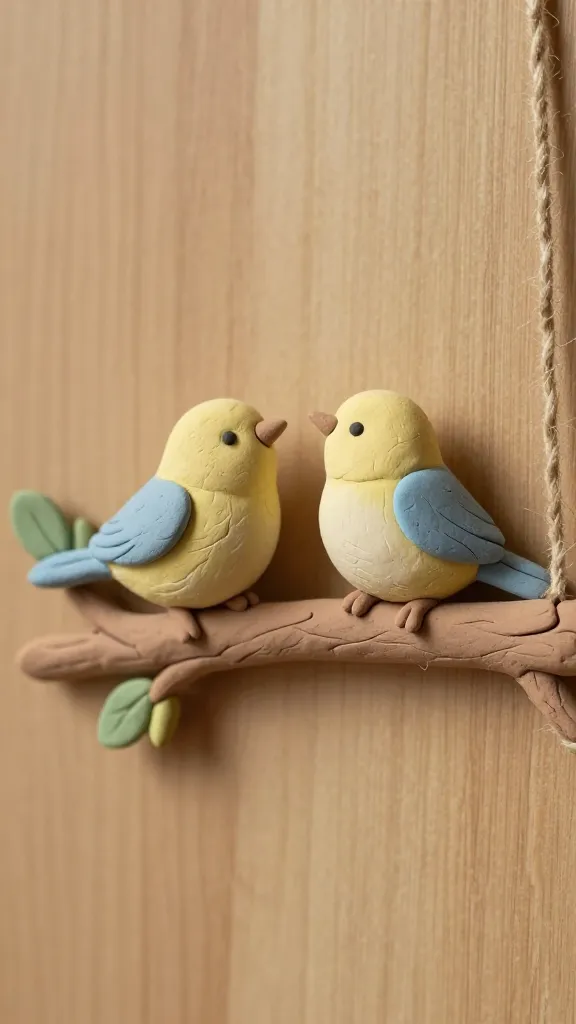
A tiny woodland scene you can hang on a wall—two or three birds perched on a branch, perched drama included. This project brings nature-inspired charm into any room.
Materials
- Air-dry clay
- Brown paint or clay for the branch
- Black and colored paints for birds
- Jute or string for hanging
How to Make It
- Form a slender branch with a few offshoots; let dry.
- Shape tiny birds with rounded bodies and small beaks; attach to the branch when jointed.
- Paint with simple colors—think soft yellows, blues, or pastels.
Pro Tips / Styling Ideas
- Group with other nature-inspired art for a cohesive gallery wall.
- Use a mix of matte and slightly glossy finishes to add depth.
Who will love it? Nature lovers, nursery designers, and anyone who wants a serene, storybook scene on the wall.
Conclusion
There you have it—eight completely unique, beginner-friendly clay crafts that are as cute as they are doable. Each project brings a tangible sense of accomplishment and a touch of handmade magic to your space. Pick one (or all eight) and start crafting—you’ll be hooked before you know it.