21 Craft Ideas Birthday on a Budget: Creative Budget Moments
Ready to turn a budget into pure party magic? These 21 DIY crafts prove that you don’t need to splurge to throw a memorable birthday bash. Each idea is a fully unique project you can DIY in a weekend, with style that’s totally Pinterest-worthy. Let’s get crafty and celebratory—trust me, you’ll love this.
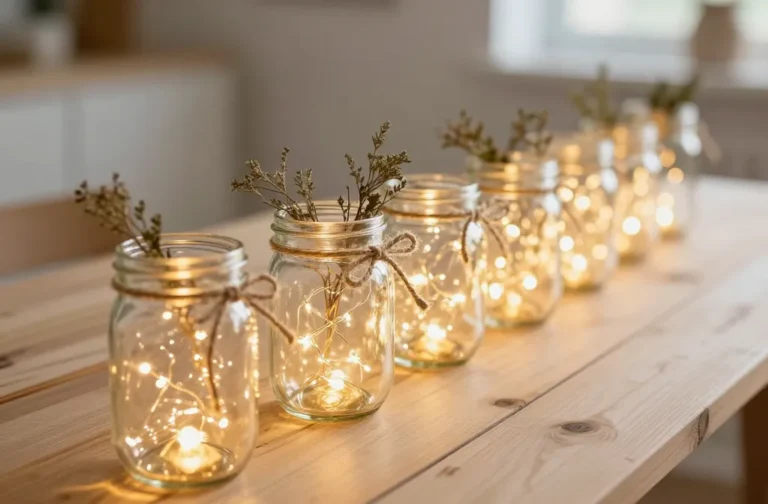
1. Rustic Mason Jar Lanterns: Soft Glow for a Cozy Birthday Night
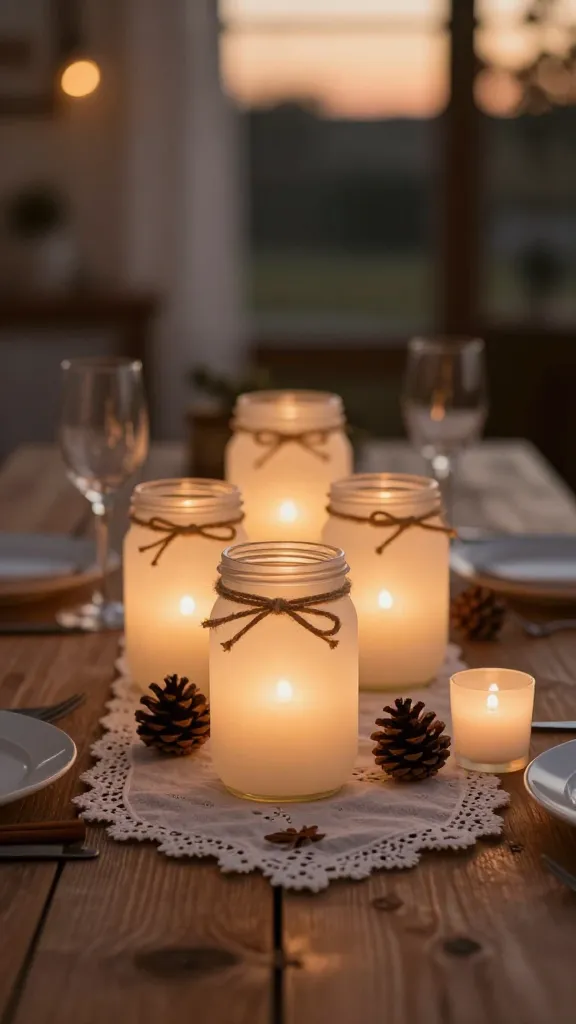
Picture this: warm, amber light flickering through frosted jars, a tablescape that feels gathered and intentional. These mason jar lanterns are simple, chic, and perfect for intimate birthday vibes.
Materials Needed
- Glass mason jars (various sizes)
- Tea light candles or LED votives
- Jute twine
- Frosted glass spray or chalky paint (optional)
How to Make It
- Spray the jars with frosted spray for a dreamy glow, if you want a softer look.
- Wrap twine around the necks and tie a bow for a rustic touch.
- Place a tea light inside and set them along the table or porch steps.
Pro Tips / Styling Ideas
- Line them with burlap runners and mini pinecones for a woodland vibe.
- Group in odd numbers for visual impact; mix heights with small jars on stacked books.
Who would love it? Anyone craving cozy, intimate birthday moments—especially outdoors or in a cozy living room nook.
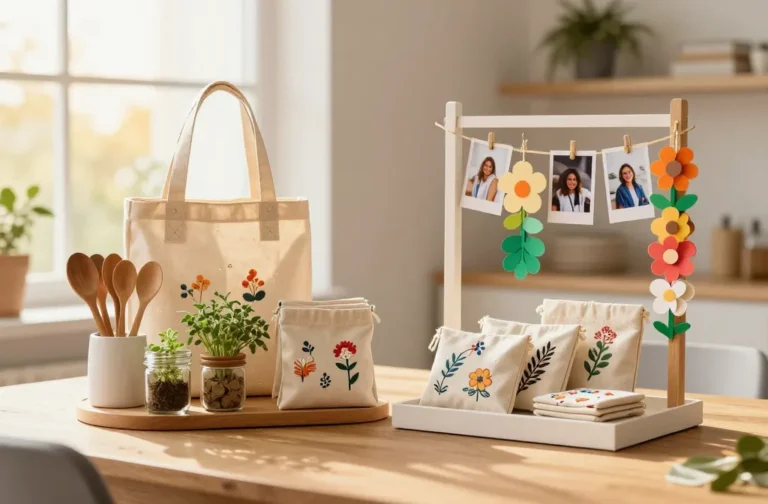
2. Confetti Burst Photo Garland: Sweet Celebrations on a String
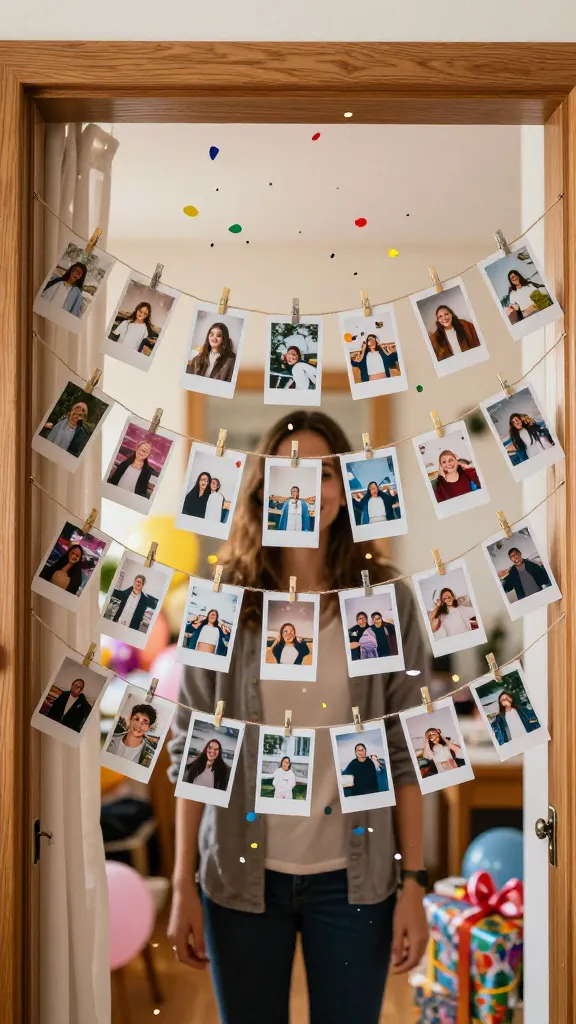
A playful, festive banner that doubles as decor and a memory board. This confetti garland makes photos pop and party spaces feel instantly alive.
Materials Needed
- Strings or twine
- Printed photos or printable mini polaroids
- Colored paper confetti or punched shapes
- Mini clothespins
How to Make It
- Attach photos at intervals with clothespins.
- Sprinkle confetti shapes between photos for a burst of color.
- Hang across a wall or doorway for a high-impact backdrop.
Pro Tips / Styling Ideas
- Use a color palette that matches the party theme for a cohesive look.
- Switch in new photos for ongoing celebrations—perfect for milestone birthdays.
Who would love it? Photo lovers, social planners, anyone who enjoys a playful, picture-perfect vibe.
3. Marbleized Paper Hats: Glam Party Gear On a Budget
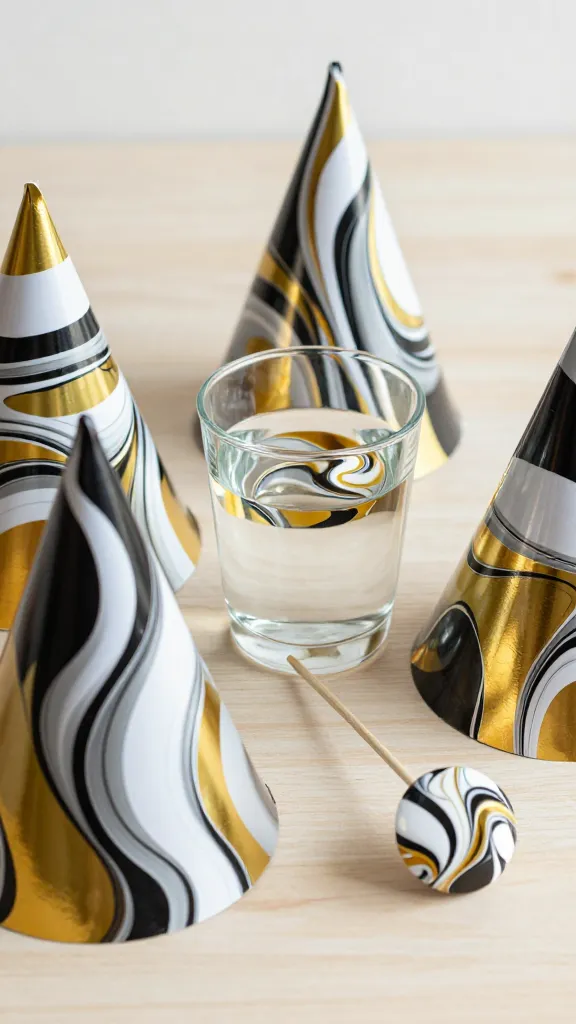
Elevate party caps with a quick marbleizing technique—no expensive craft store runs needed. These hats scream “celebration” as soon as you pop them on.
Materials Needed
- Plain paper party hats
- Nontoxic acrylic paints (black, white, gold or any two-toned combo)
- Water
- Plastic cups and skewers
How to Make It
- Fill cups with water and swirl in a few drops of paint to create a marbled effect.
- Dip the hat rims or panels, then lift and let dry on a flat surface.
- Seal with a light spray to prevent smudging.
Pro Tips / Styling Ideas
- Add metallic paint for extra luxe sheen.
- Pair with handwritten name tags for a personalized touch.
Who would love it? Party hosts, bold birthday guests, any celebration where photo ops demand standout accessories.
4. Balloon Shadow Box Flower Wall: Big Impact, Tiny Budget
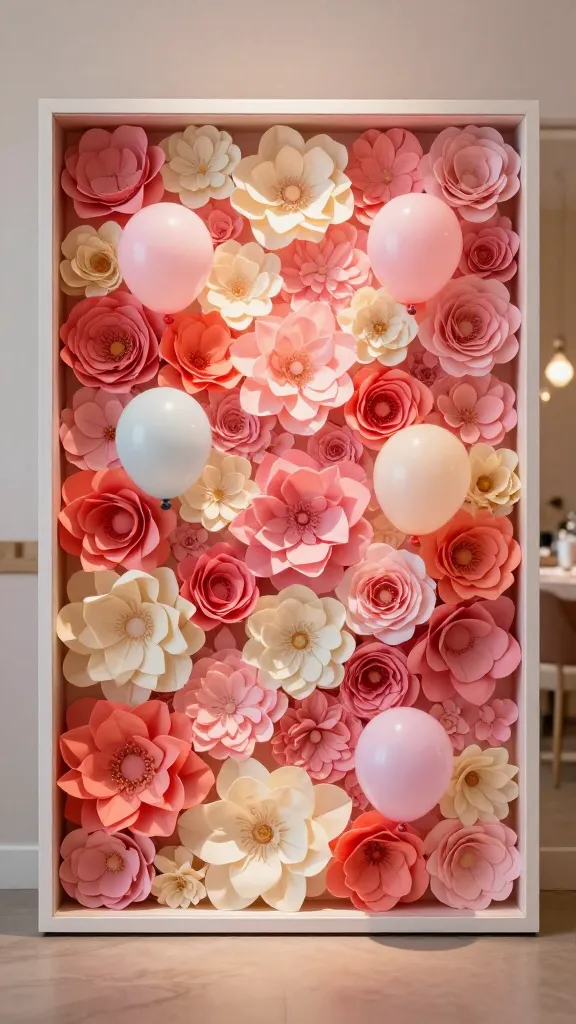
Turn a stack of balloons into a dramatic floral wall using a shadow box frame. It’s bold, whimsical, and totally photogenic without breaking the bank.
Materials Needed
- Shadow box frame
- Colored tissue paper or paper dumplings (for petals)
- Assorted balloons (small to medium)
How to Make It
- Arrange tissue petals inside the shadow box to create a lush backdrop.
- Inflate balloons slightly and tuck them among petals for depth.
Pro Tips / Styling Ideas
- Choose colors that match the party palette for a seamless look.
- Use a removable adhesive strip so you can reuse the frame later.
Who would love it? Color lovers, photo backdrops fans, anyone wanting a show-stopping entrance or wall focal point.
5. DIY Felt Tassel Garland: Colorful Fun to Hang Anywhere

A budget-friendly garland that adds texture and whimsy. Felt tassels sway with every breeze and brighten up any space.
Materials Needed
- Assorted colors of felt
- Scissors
- Needle and thread or hot glue
- Twine or ribbon
How to Make It
- Cut felt into long strips, loop and knot or glue into tassels.
- Attach tassels to twine at varying intervals.
Pro Tips / Styling Ideas
- Twist two colors together for a gradient effect.
- Hang above dessert table or along a patio railing.
Who would love it? DIY enthusiasts, classroom party planners, anyone who enjoys a cheery, craft-store-free decor piece.
6. Upcycled Book Page Banner: Literary Chic for a Birthday Corner
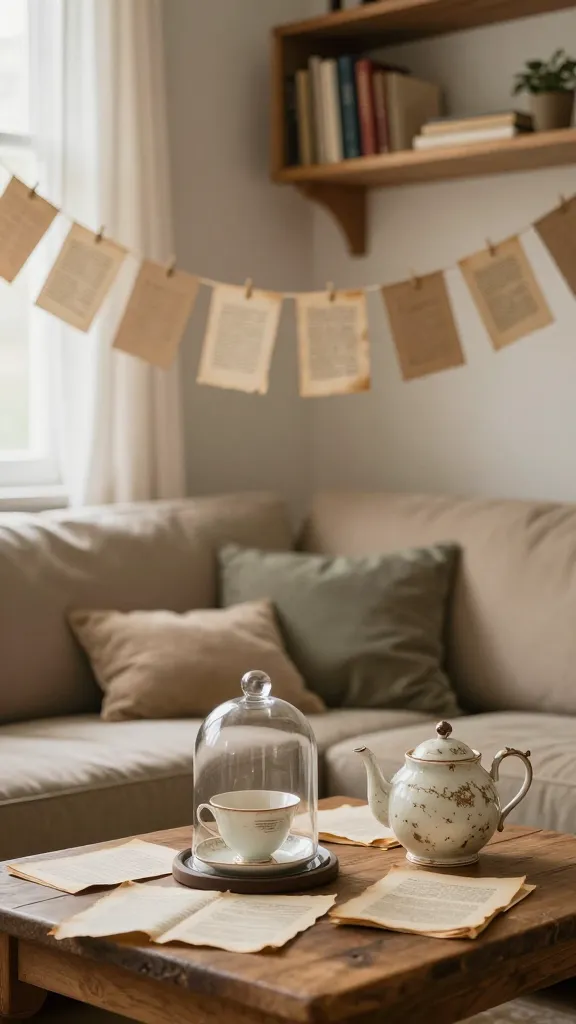
Turn old pages into a literary-inspired banner that looks library-cozy and totally unique. It’s eco-friendly and incredibly stylish.
Materials Needed
- Old books or vintage pages
- Cardstock or kraft paper
- String or twine
How to Make It
- Cut letters from kraft paper to spell out the birthday message.
- Glue letters onto cardstock pennants and string them together with pages peeking through.
Pro Tips / Styling Ideas
- Ink the edges of pages for a antiqued look.
- Pair with a vintage teacup centerpiece for a literary vibe.
Who would love it? Bookworms, teachers, and anyone who loves a warm, cozy corner with a touch of whimsy.
7. DIY Tie-Dye Cupcake Wrappers: Sweet Swirl Delights

Spice up standard cupcakes with tie-dye wrappers that scream party energy. It’s easy, fun, and totally customizable.
Materials Needed
- Cupcake liners
- Food-safe dye or markers
- Glitter accents (optional)
How to Make It
- Dip or color the liners in your dye, then let dry before baking.
- Add a light glitter dust for extra sparkle.
Pro Tips / Styling Ideas
- Coordinate liner colors with the birthday theme.
- Stack a few mini liners for mini desserts on a dessert board.
Who would love it? Baking fans, color lovers, hosts seeking a playful edible detail.
8. Painted Plant Jar Centerpieces: Green touches, big wow
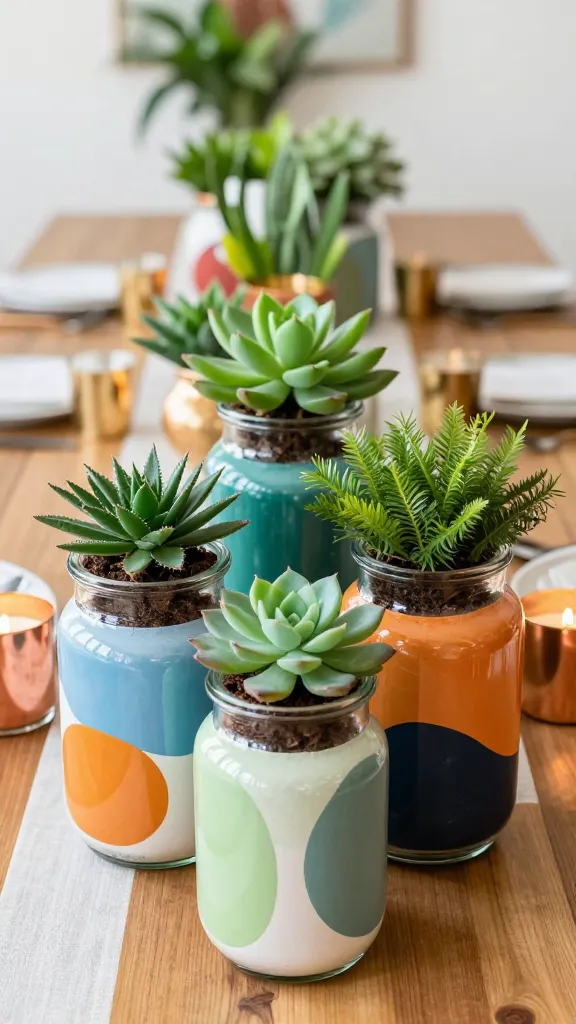
Jazz up simple glass jars with bold paint and a few fresh greens. These centerpieces bring life, literally, to any table.
Materials Needed
- Glass jars or small vases
- Acrylic paints (metallics or matte hues)
- Succulents or small houseplants
How to Make It
- Paint jars in a color block or abstract pattern.
- Fill with soil and plant your greens, trimming as needed.
Pro Tips / Styling Ideas
- Add a copper or gold accent for a luxe vibe.
- Line them along a tablescape with accompanying candles.
Who would love it? Plant lovers, home decor enthusiasts, anyone wanting a fresh party backdrop.
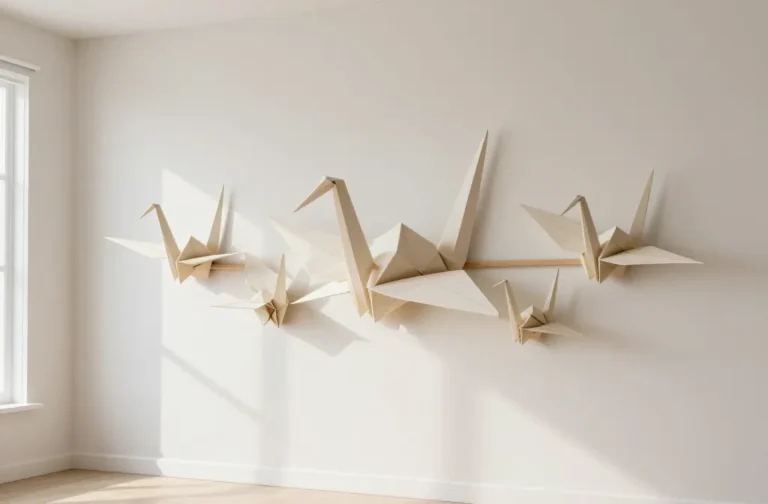
9. Minimalist Paper Airplane Wall Art: Quirky & Whimsical
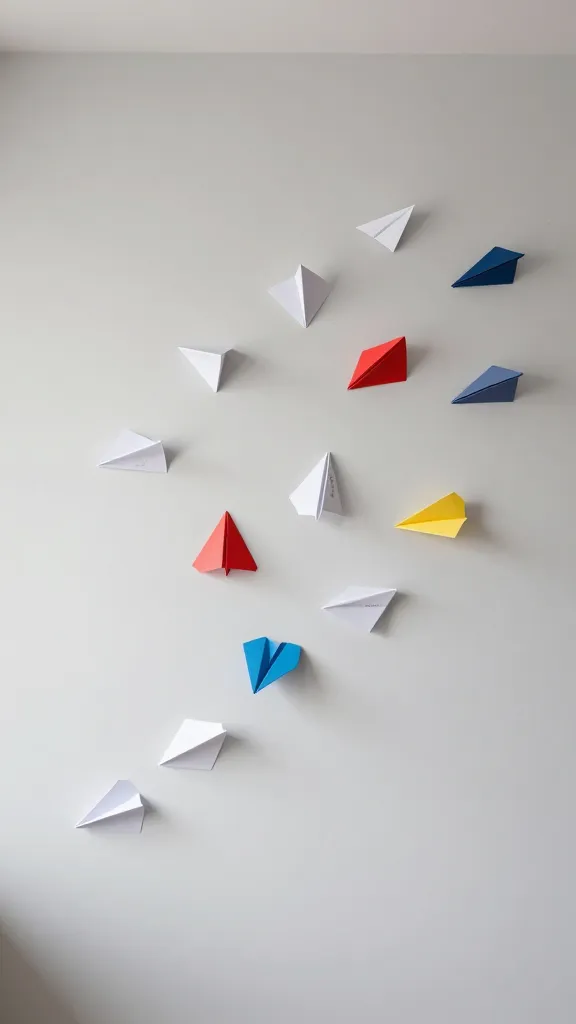
Turn a stack of paper airplanes into an artful wall installation that’s playful and modern. Seriously, it’s surprisingly chic.
Materials Needed
- Colored printer paper or card stock
- Adhesive mounting strips
How to Make It
- Fold a clean, sharp paper airplane shape for each piece.
- Mount on the wall in a scattered yet harmonious pattern.
Pro Tips / Styling Ideas
- Use a monochrome palette for a sleek look, or mix bold colors for whimsy.
- Add tiny handwritten birthday messages on some planes for a personal touch.
Who would love it? Minimalists, teens, or anyone who enjoys playful wall decor.
10. Candy Jar Diorama: Sweet Scene in a Glass
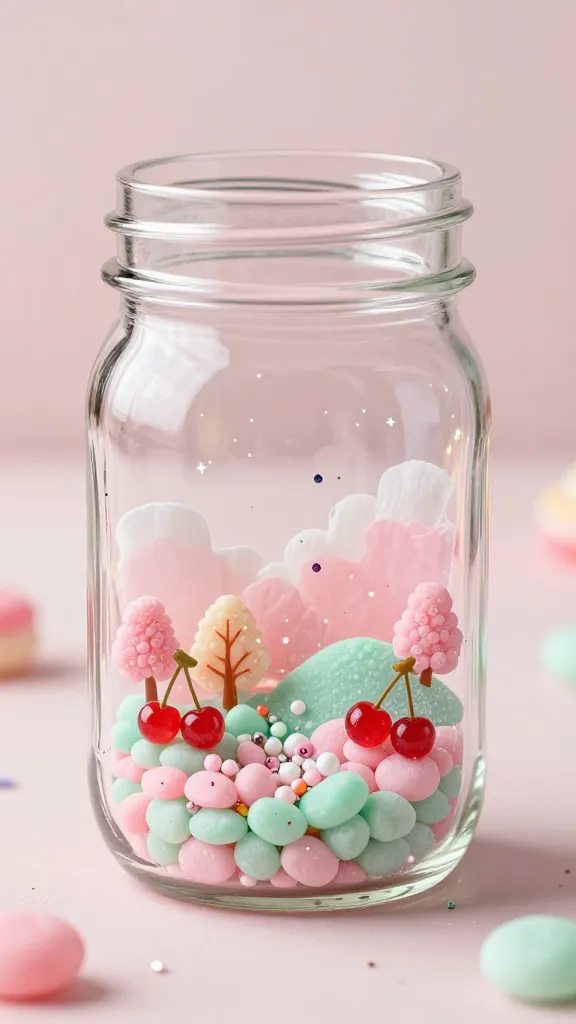
Create a tiny, sweet diorama inside a mason jar—think candy, tiny cherries, and pastel skies. It’s dessert meets décor in a single stylish vessel.
Materials Needed
- Clear jar with lid
- Miniature candy, beads, confetti
- Colored tissue paper
How to Make It
- Layer tissue paper, candy, and sparkles to build a scene inside the jar.
- Seal with the lid and decorate the outside with a ribbon.
Pro Tips / Styling Ideas
- Swap in seasonal colors for a birthday milestone theme.
- Use as a centerpiece or party favor display.
Who would love it? Sweet-tooths and fans of cute, compact decor pieces.
11. Lantern-Penguin LED Lanterns: Quirky Night Lights for the Party
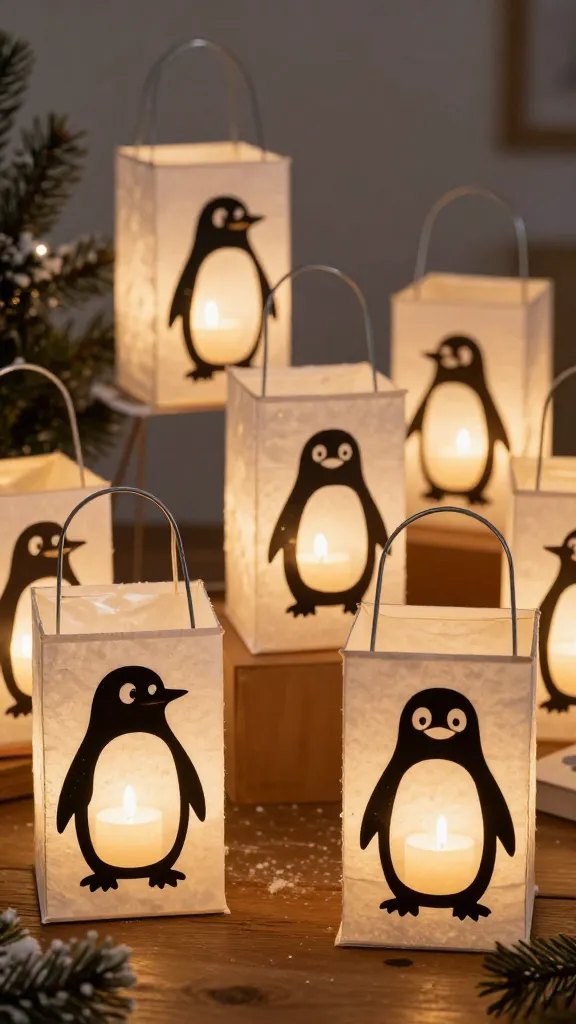
Turn plain lanterns into character-filled party accents by adding cute penguin silhouettes. It’s playful, practical, and budget-savvy.
Materials Needed
- Plain lanterns (paper or metal)
- Black construction paper
- Glue or double-sided tape
How to Make It
- Cut penguin shapes from black paper and attach to the lanterns.
- Place LED candles inside for safe, soft glow.
Pro Tips / Styling Ideas
- Group in clusters with a few larger lanterns for drama.
- Switch to winter silhouettes for holiday themes.
Who would love it? Families, kids’ party hosts, anyone who enjoys whimsical lighting.
12. Chalkboard Menu Boards: Handy, Handy, Handy
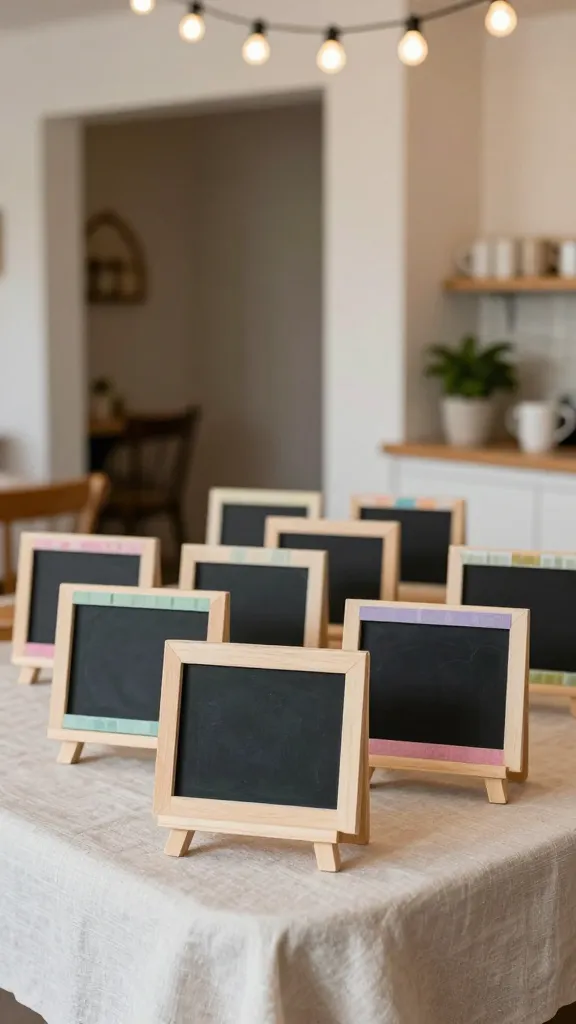
Give your birthday bash a touch of cafe-chic with mini chalkboard signs. They’re stylish, reusable, and incredibly practical.
Materials Needed
- Small chalkboards or plywood cutouts
- White chalk or chalk markers
How to Make It
- Decorate with the day’s menu, welcome messages, or name tags.
- Wipe clean and reuse for another celebration.
Pro Tips / Styling Ideas
- Dress with a border of washi tape in coordinating colors.
- Place near the entrance for a friendly welcome.
Who would love it? Hosts who love a personal touch and guests who appreciate clarity and charm.
13. mirrored Cloud Dream Centerpiece: Soft, Ethereal Glow
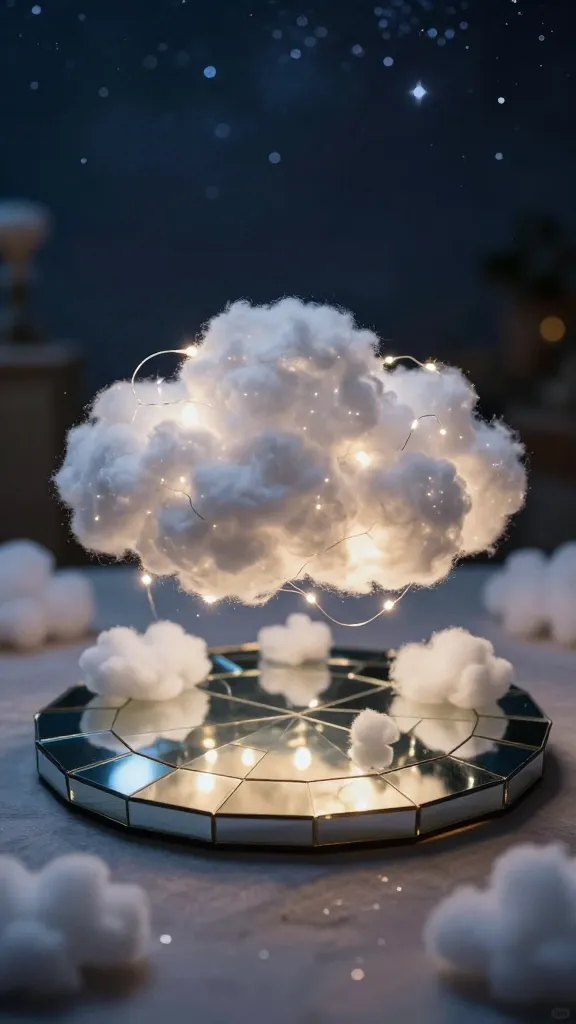
Craft a dreamy centerpiece using mirrored discs and cotton cloud shapes for a celestial birthday vibe that feels magical.
Materials Needed
- Small mirror tiles or mirrored tray
- White felt or cotton batting (for clouds)
- LED fairy lights
How to Make It
- Arrange mirror tiles as a base and scatter cotton clouds above with lights tucked in.
- Dim the room and enjoy the soft reflection play.
Pro Tips / Styling Ideas
- Coordinate with starry decor for a night-sky theme.
- Use different cloud sizes for depth.
Who would love it? Dreamers, romantics, and anyone who adores a touch of magic on a table.
14. Customizable Sticker Wall Frames: Personalize the Party Minute-by-Minute
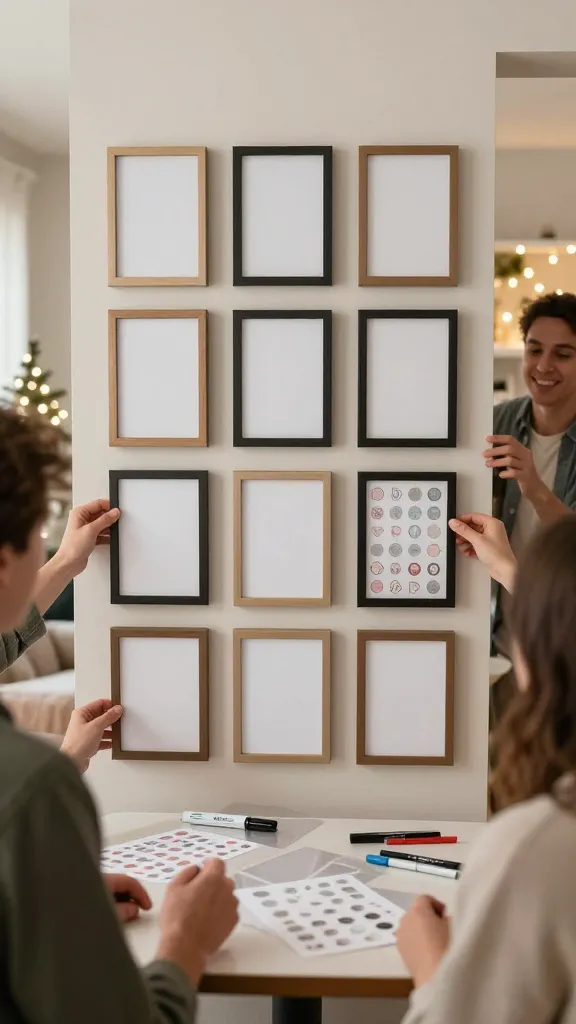
Frame a gallery wall with removable, customizable stickers that guests can fill with messages. It combines décor and guest participation in one shot.
Materials Needed
- Photo frames
- Printable stickers or sticker paper
- Markers or pens
How to Make It
- Print shapes and letters to spell birthday messages.
- Put them in frames and let guests write notes on the stickers directly.
Pro Tips / Styling Ideas
- Place frames around a backdrop to invite messages from guests.
- Swap in new messages for future birthdays to keep it fresh.
Who would love it? Sentimental types, planners, and anyone who enjoys interactive decor.
15. Paper Rosette Party Hats: Crisp, Couture Party Accessories
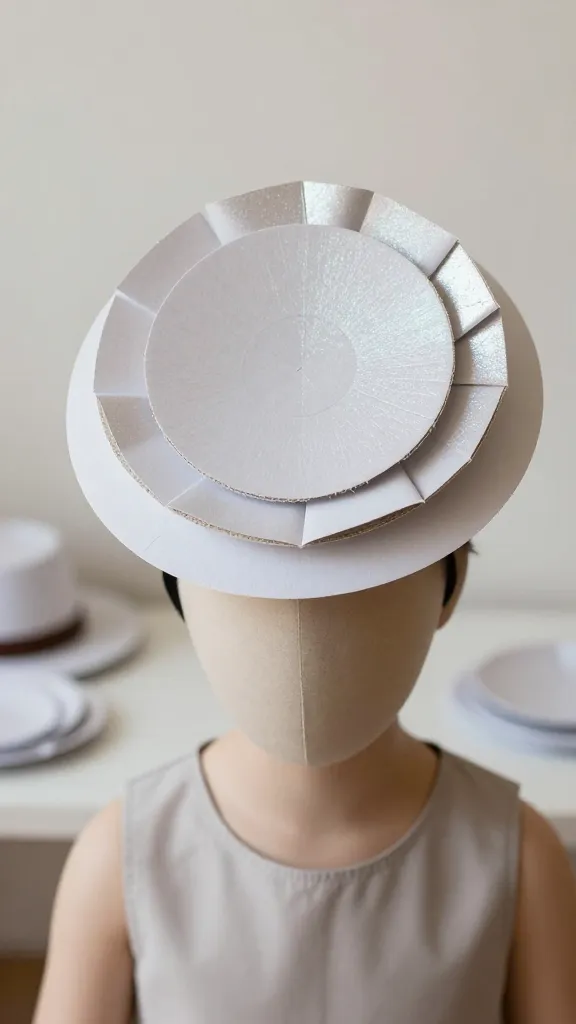
Make paper rosettes that become elegant hats with a modern twist. They’re chic enough for a stylish party, yet affordable to produce in bulk.
Materials Needed
- Circular paper sheets or cardstock
- Glue or double-sided tape
- Elastic or headband bases
How to Make It
- Fold and glue circles into rosettes, then mount them on headbands.
- Pair with simple dresses or casual outfits for a playful contrast.
Pro Tips / Styling Ideas
- Dust with a light spray of metallic glitter for shimmer.
- Use different sizes for a layered effect.
Who would love it? Fashion-forward hosts, party guests who love a stylish prop, and anyone craving couture vibes.
16. Resin-Free Citrusy Coasters: Sunny Surfaces, Zero Resin
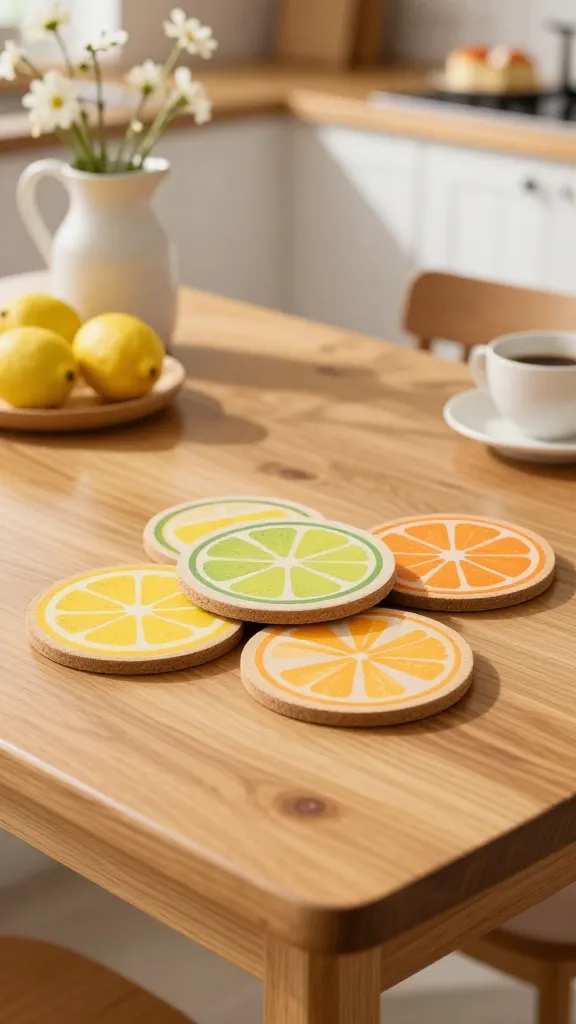
Brighten coffee tables with hand-painted, citrus-inspired coasters. No resin, no fuss—just sunny vibes and easy cleaning.
Materials Needed
- Cork or ceramic tiles
- Acrylic paints and sealant
- Painter’s tape
How to Make It
- Paint bold citrus wedges or abstract shapes on tiles, seal with a protective coat.
- Let dry fully before use.
Pro Tips / Styling Ideas
- Match colors to the party palette for a cohesive table.
- Group three to five on the dessert table for a bright focal point.
Who would love it? Coffee lovers, hosts who value practical decor, and anyone who enjoys a sunny splash of color.
17. Upcycled Tin Can Lanterns: Industrial Glow on a Dime
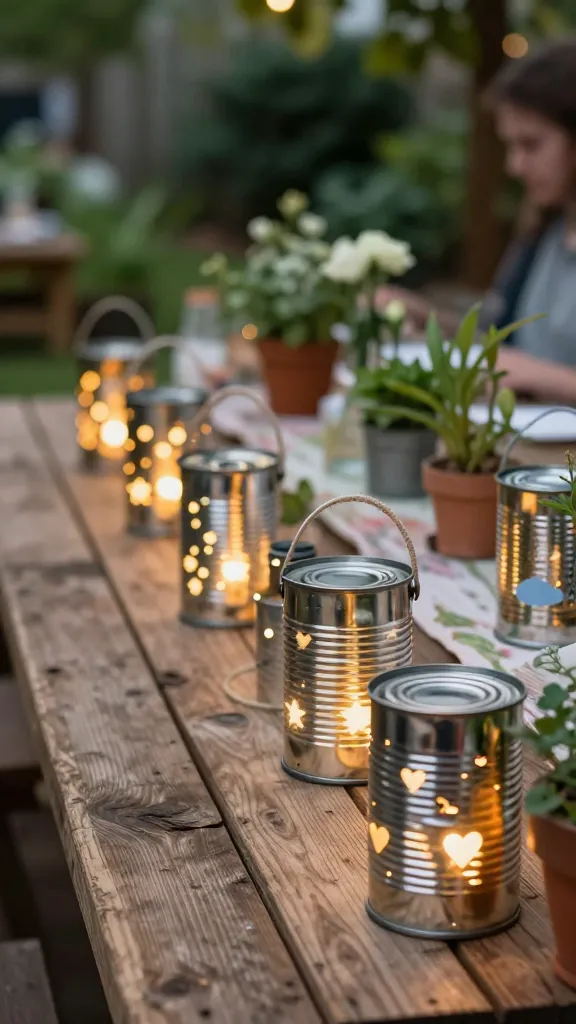
Turn boring cans into glowing lanterns with a few holes punched for light patterns. They’re eco-friendly, rustic, and surprisingly luminous.
Materials Needed
- Empty tin cans
- Nail, hammer or punch
- Candle or LED tealight
How to Make It
- Punch small heart or star shapes into sides.
- Place a candle inside and set them along pathways or on a table.
Pro Tips / Styling Ideas
- Use chalkboard paint on the outside to write birthday messages.
- Group with greenery for a garden party look.
Who would love it? DIY lovers, eco-conscious crafters, and anyone who enjoys warm, ambient lighting.
18. Glow-in-the-Dark Party Cups: Nighttime Nods to Fun

Prepare surprise glow cups for a late-night toast. They glow softly, adding a fun twist to after-dark celebrations.
Materials Needed
- Clear plastic cups
- Glow-in-the-dark paint or powder mixed with a clear sealant
How to Make It
- Paint the rims or inner walls with glow pigment and seal.
- Charge under light before serving drinks for a glow-ready effect.
Pro Tips / Styling Ideas
- Coordinate with neon-styled decor and dark table settings.
- Offer a guided “glow toast” moment for photos.
Who would love it? Night owls, teens, and anyone who loves a little after-hours whimsy.
19. Sunscreen-Safe Floral Crowns: Blooming Birthday Headpieces
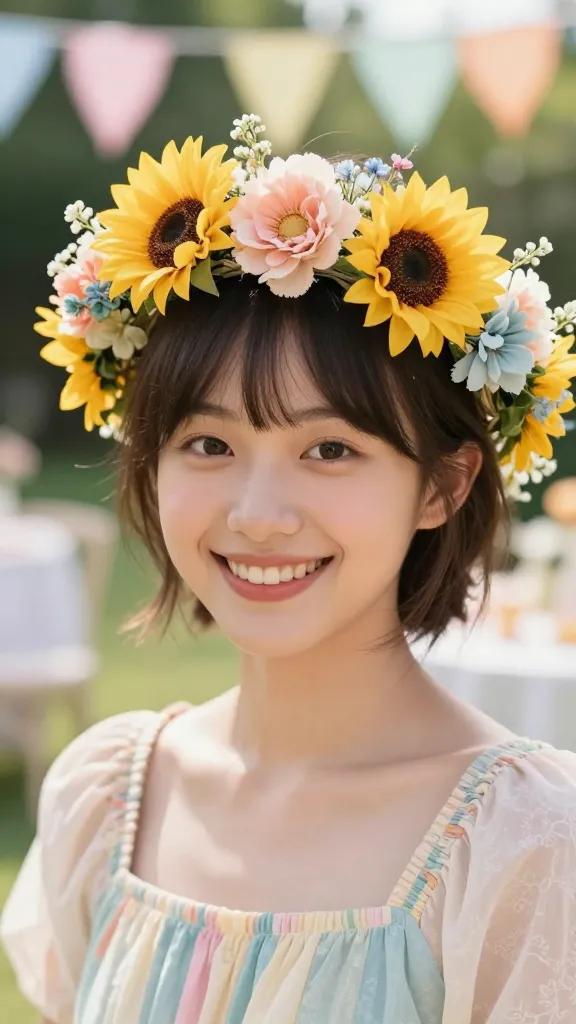
Craft lightweight flower crowns with safe, skin-friendly materials. They look wedding-day gorgeous but fit perfectly with a playful birthday vibe.
Materials Needed
- Floral wire or flexible headbands
- Preserved flowers or silk flowers
- Floral tape
How to Make It
- Shape a lightweight crown frame and wrap with flowers using floral tape.
- Secure with a gentle fit that won’t pinch.
Pro Tips / Styling Ideas
- Coordinate with the birthday outfit or party colors.
- Include a mix of big blooms and tiny filler flowers for texture.
Who would love it? Guests who adore a fairytale touch, and the birthday person who loves a wearable keepsake.
20. DIY Ribbon Curtain Backdrop: Dramatic Entrance, Tiny Budget
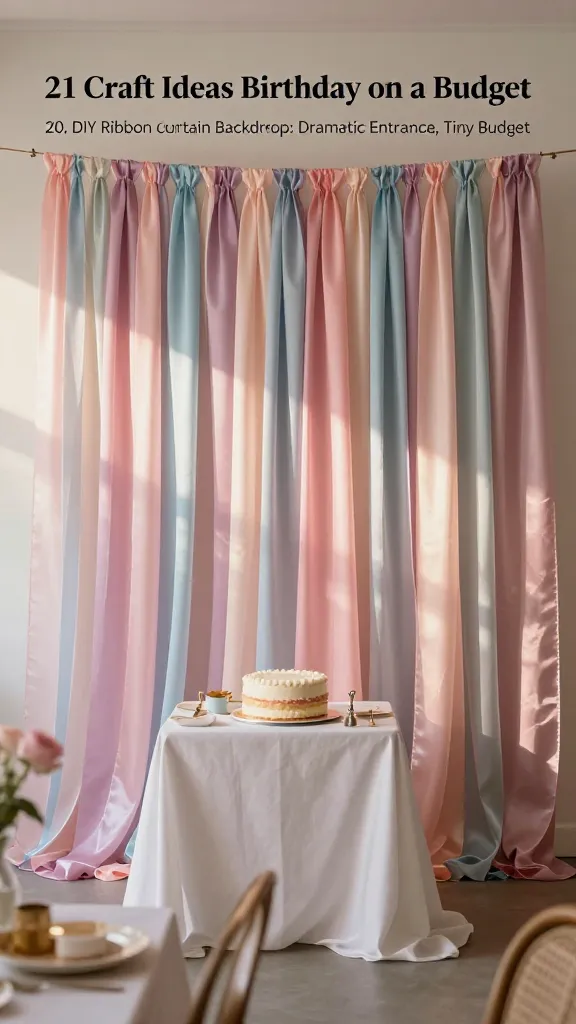
A billowy curtain backdrop makes for dramatic photos without a huge price tag. Ribbon, fabric strips, and a simple frame do the trick.
Materials Needed
- Lightweight curtain rod or ceiling-mounted dowel
- Satin ribbons or fabric strips in chosen colors
How to Make It
- Attach ribbons in a looped pattern along the rod or frame.
- Let the ribbons cascade to the floor for a dreamy effect.
Pro Tips / Styling Ideas
- Keep color blocks cohesive to compliment the cake and table settings.
- Hug the backdrop with a floral or balloon garland for added drama.
Who would love it? Couple-photo fans, event stylists, and anyone who loves a big visual impact on a budget.
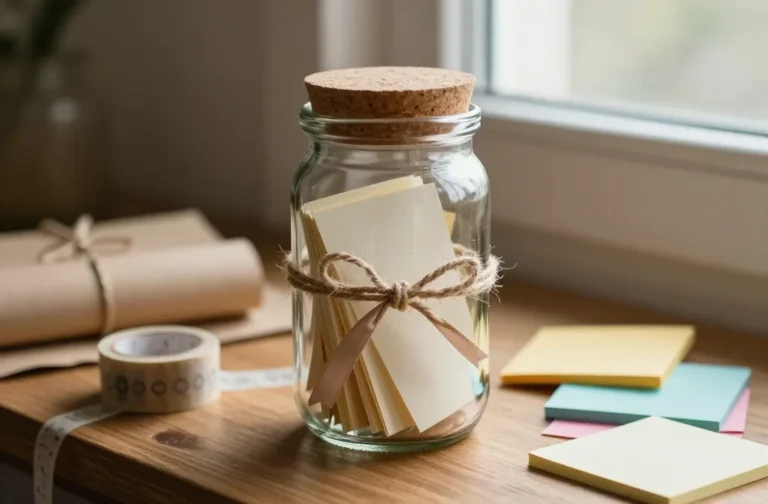
21. Chalk-Talk Gift Tags: Personal Notes in a Pretty Package
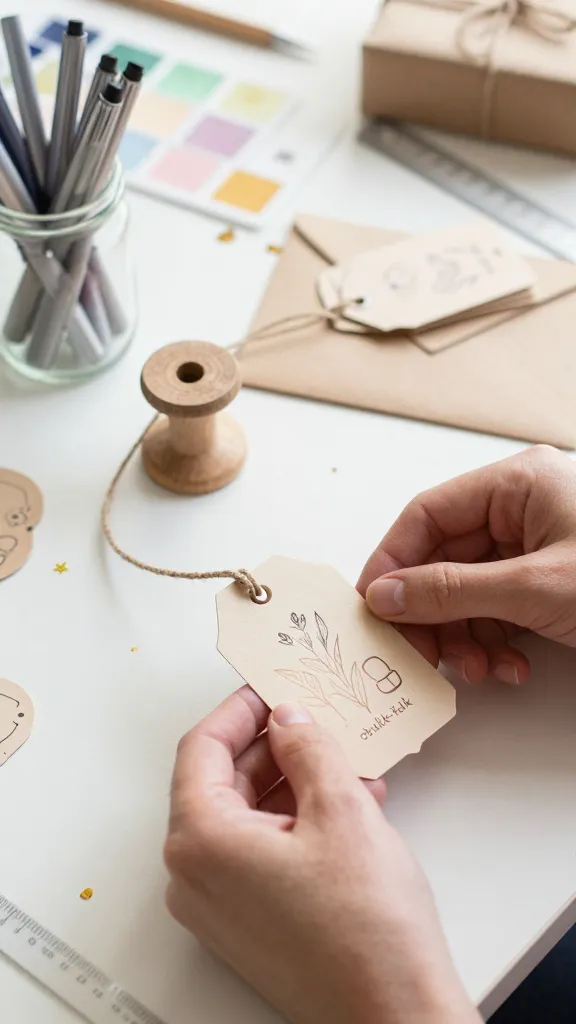
Finish every gift with chic, handmade tags that guests can keep as a memento. It’s personal, practical, and wallet-friendly.
Materials Needed
- Cardstock or thick paper
- Chalk markers or metallic pens
How to Make It
- Cut tags, punch holes, and decorate with names, dates, or mini doodles.
- Attach to favors, gifts, or place settings with string.
Pro Tips / Styling Ideas
- Use a consistent color palette for a cohesive look.
- Include a small inspirational quote for a personal touch.
Who would love it? Gift-givers, organizers, and anyone who believes small details make a big difference.
Conclusion
These 21 Craft Ideas Birthday On A Budget prove that you don’t need a sky-high budget to create a celebration that shines. Pick one, or dive into all of them—the results look absolutely luxe and feel incredibly personal. So gather your supplies, choose your vibe, and start crafting a birthday you’ll proudly pin, share, and remember.