7 Festive Christmas Crafts for 5-Year-Olds to Make This Holiday
Ready for a merry crafting spree with little hands? These seven projects are quick, bright, and totally kid-friendly—perfect for tiny elves who love glitter, color, and a splash of magic. Trust me, your holiday photos will thank you.
Each idea is fully distinct, so you’ll have a week of crafty fun without any overlap. Let’s dive into seven original, kid-approved masterpieces that celebrate the season in style.
1. Bubble-Wath Christmas Window Clings: Frosty Doodles on the Glass
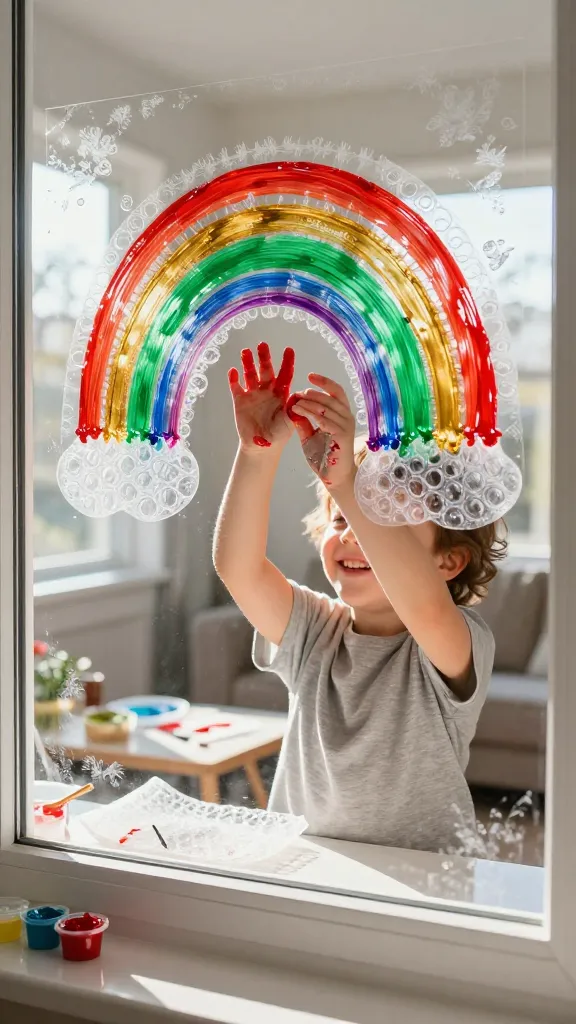
Picture this: a sunny morning, window frost turned into a rainbow of shapes, and your 5-year-old proudly announcing the day’s theme. This project turns simple bubble wrap prints into festive window art that sticks without tape, cleans up in a flash, and adds a pop of color to everyday light. It’s quirky, tactile, and surprisingly easy.
Materials Needed
- Bubble wrap in a few small sheets
- White school glue
- Acrylic paint in Christmas colors (red, green, gold, silver)
- Clear contact paper or reusable window clings base
- Paintbrushes and a small sponge
How to Make It
- Squeeze glue onto the bubble wrap and press a dab of paint using a brush to create tiny “frosty” shapes and patterns.
- Press the painted bubble wrap onto a sheet of contact paper or cling sheet and gently lift away, leaving a bubbly print.
- Repeat with different colors to build a cheerful mini-window scene—think candy canes, stars, and snowflakes.
Pro Tips / Styling Ideas
- Seal finished prints with a light spray of clear acrylic to help colors pop against winter light.
- Seasonal shapes—stars, bells, trees—look especially magical when you layer small clings in a collage.
End note: This is perfect for a bedroom or kitchen window. Your little artist will love seeing their art greet visitors every day.
2. Sock-Puppet Snow Friends: A Cuddle-Worthy Duo or Trio
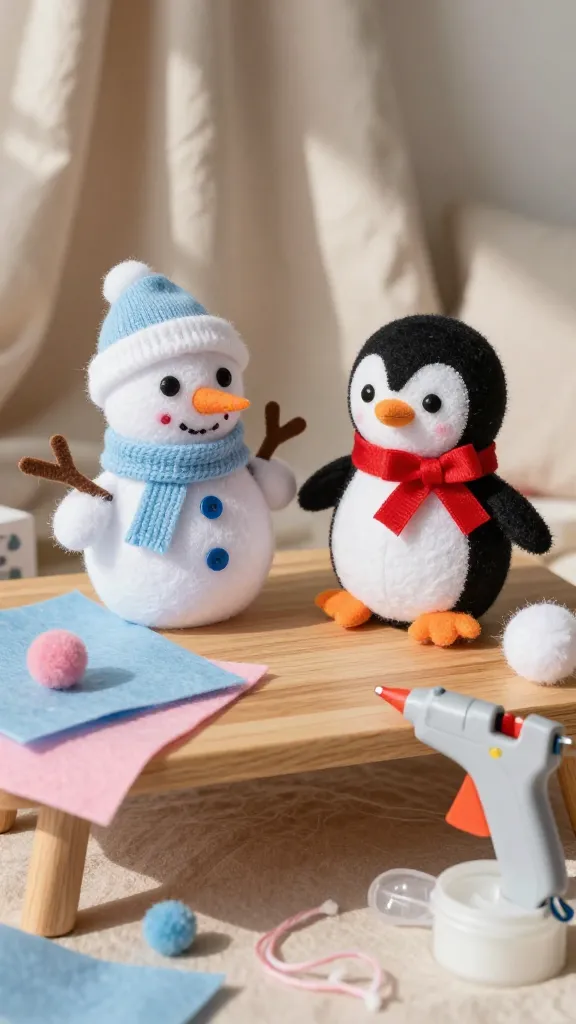
Who knew a simple sock could become a friendly snowman or penguin? This project sparks imagination, invites storytelling, and doubles as a fun pom-pom and felt adventure in one tiny crafting corner. It’s cute, cozy, and totally shareable.
Materials Needed
- Old or thrifted socks (clean, soft, white works wonders)
- Googly eyes or felt circles
- Colored felt, scraps, and a bit of stuffing
- Craft glue or hot glue (adult supervision)
- Buttons, ribbon, or yarn for accessories
How to Make It
- Fill the toe portion with a small amount of stuffing to form the snow face and head; secure with a tight stitch or glue.
- Decorate with felt eyes, a carrot nose cut from orange felt, and a scarf made from scrap fabric or ribbon.
- Create a little winter scene by giving your snow friend a mitten or tiny hat from felt, then glue on buttons as a button-down belly or coat details.
Pro Tips / Styling Ideas
- Arrange as a whimsical mantle trio or line up along a shelf for a sleepy, snowy vibe.
- If you’re out of stuffing, crumpled tissue paper works just fine—keep it fluffy and fun.
End note: The more friends you make, the merrier the display becomes. A snuggly family of snow pals makes for irresistibly cute photos.
3. Peppermint Spoon Ornaments: Sweetly Tiny Tree Charms
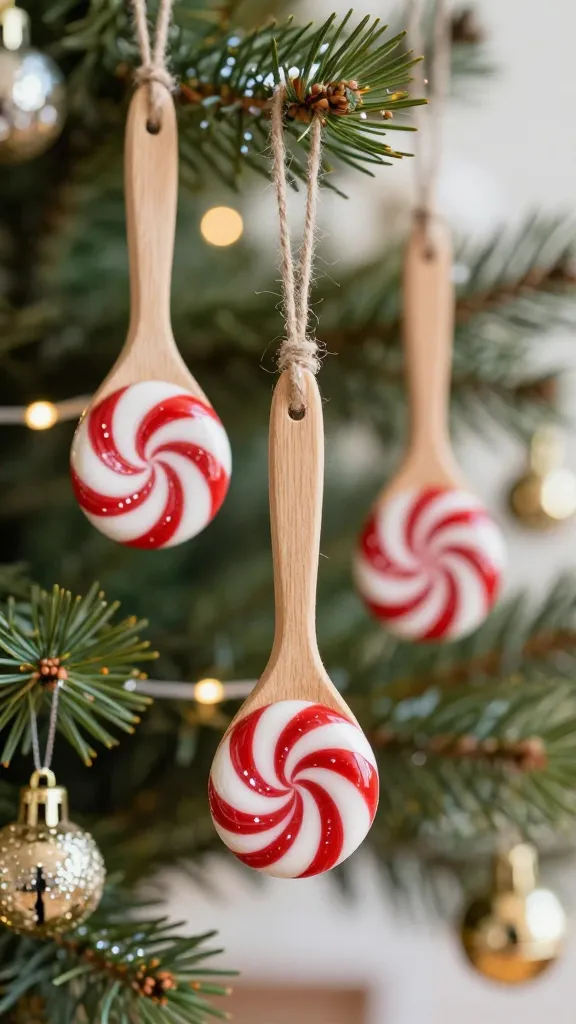
Imagine tiny, peppermint-swirled spoons hanging on the tree, catching the light with a candy-crisp shine. This project blends everyday materials with a dash of whimsy, turning ordinary spoons into adorable, seasonal keepsakes. Seriously, your tree will feel like a sweet-tooth wonderland.
Materials Needed
- Small wooden spoons (or plastic craft spoons)
- Red and white acrylic paint
- Ribbon or twine for hanging
- Glue (hot glue or craft glue)
- Optional: tiny beads or bells for a little jingle
How to Make It
- Paint the handles red with a white stripe near the bowl to mimic a peppermint swirl.
- Seal with a quick matte finish or kids-friendly varnish if available, and let dry.
- Tie a small loop of ribbon at the end of the handle for hanging; add beads or bells for extra charm.
Pro Tips / Styling Ideas
- Pair with mini candy decor on the tree or a garland for a candy-cane theme.
- Gift a set to grandparents or teachers as a handmade, edible-memory-inspired ornament.
End note: A bright, tasty-looking ornament that’s easy for little hands to manage. Perfect for a tree that looks like a holiday parade of tiny peppermint wonders.
4. Sparkly Pinecone Owls: Woodland Christmas Buddies
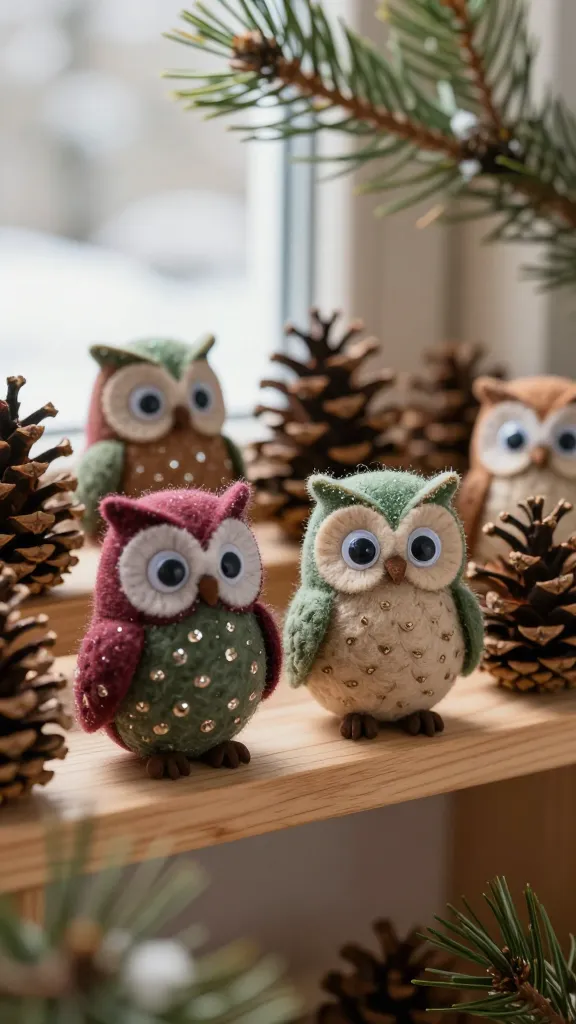
Imagine tiny pinecone owls perched on a shelf, their “feathers” made from glitter and felt. They’re adorable, kid-friendly, and surprisingly simple to create. These owls add texture and whimsy to any winter nook, and they’re sturdy enough to become a yearly keepsake.
Materials Needed
- Small pinecones
- Colored felt (variety for wings, belly, and ears)
- Googly eyes
- Glue (hot glue or wood glue)
- Glitter or sparkly paint (optional)
How to Make It
- Attach felt pieces to the pinecone to form wings, belly, and ears. Use glue to secure.
- Glue on two googly eyes near the head area. Add a small triangle beak from felt.
- Optionally dust the pinecone tips with a pinch of glitter for a snowy sparkle.
Pro Tips / Styling Ideas
- Place a string at the back to hang as a woodland ornament on the tree or garland.
- Set a few on a windowsill with a tiny faux snow bed for a cozy forest vibe.
End note: These owls are a charming nod to winter nature, and kids will love naming them after their favorite forest pals.
5. Paper-Cut Snowflake Family Portraits: Peel-Back Perfection
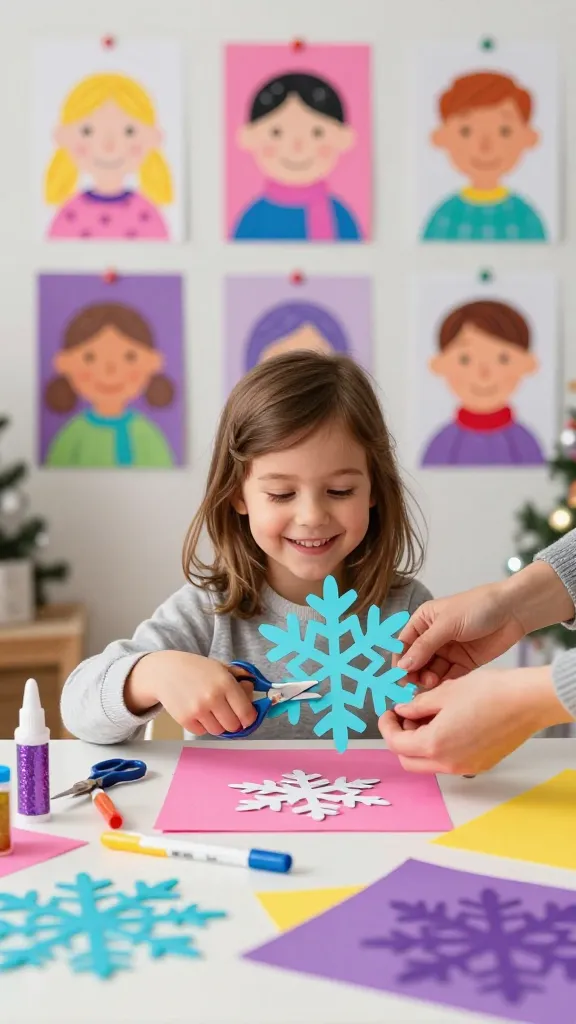
Who doesn’t love a delicate snowflake? But this version is crafted with kid-friendly cuts, bold colors, and a family twist. Each snowflake becomes a portrait of a family member, turning paper into a cheerful seasonal gallery you can rotate all December long. It’s artsy, interactive, and totally adorable.
Materials Needed
- Colorful construction paper or scrap scrapbook paper
- Child-safe craft scissors (with supervision)
- Markers or crayons
- Glue or tape
- Optional: glitter glue and sequins for extra sparkle
How to Make It
- Fold a square of paper to create a simple snowflake cut; open to reveal a unique pattern.
- Draw a festive family portrait within the snowflake’s center—think silly faces or cartoon vibes.
- Decorate with markers and optional glitter, then mount on a wall or string to hang as a garland.
Pro Tips / Styling Ideas
- Let each family member contribute a snowflake with their own color palette for a unified yet vibrant display.
- Punch a hole and thread a ribbon to turn each one into a hanging ornament.
End note: A playful blend of art and portraiture, this craft doubles as a memory keeper you’ll treasure long after the holidays.
6. Cinnamon-Orange Scented Mock-Tree Ornaments: Aroma Meets Aesthetic
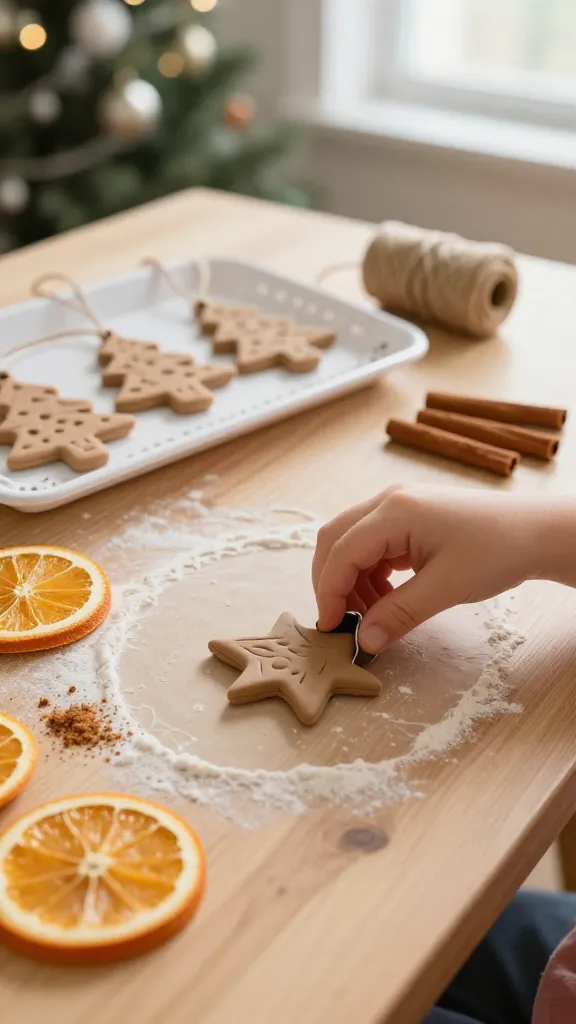
There’s nothing like a warm scent wafting through the house during December. This project crafts simple, kid-safe ornaments infused with cinnamon and orange—perfume the room and look fabulous on the tree. It’s a sensory delight that doubles as a festive activity you’ll want to repeat every year.
Materials Needed
- Air-dry clay or salt-dough mix
- Orange slices (dried) or orange essential oil
- Ground cinnamon
- Cord string or ribbon for hanging
- Cookie cutters (stars, trees, circles) for fun shapes
How to Make It
- Roll the dough and cut shapes with cookie cutters; make a small hole at the top for hanging.
- Place orange slices into the shapes or mix a drop of essential oil into the dough, then dust with cinnamon.
- Bake or air-dry until hard; thread with ribbon and hang on the tree.
Pro Tips / Styling Ideas
- Pair with a cinnamon-scented garland or place near a warm light to release aroma gradually.
- Store in a breathable bag between seasons to keep the scent alive as long as possible.
End note: A cozy, fragrant addition that smells like holiday cheer. The kids will love watching the dough harden and the house fill with cinnamon magic.
7. Felt Bubble-Wrap Christmas Cards: Tiny Hands, Big Hearts
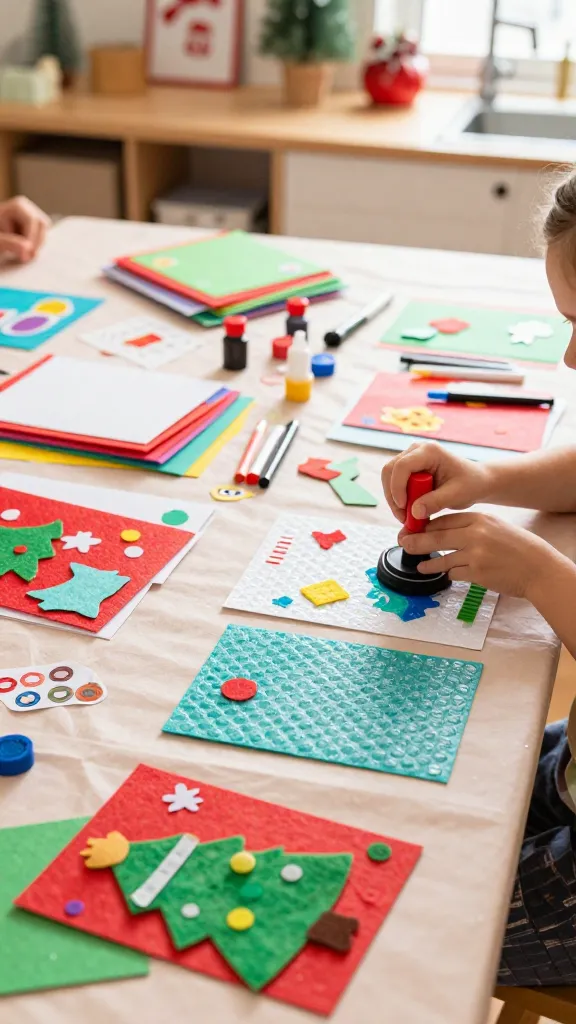
Wrap up a batch of handmade cards featuring bubbly textures and bold colors. Your 5-year-old can help stamp, color, and collage each card—great for sending love to family far away or gifting to teachers and friends. It’s thoughtful, interactive, and ultra-tidy—no glitter explosion required.
Materials Needed
- Blank card stock or folded construction paper
- Bubble wrap pieces
- Acrylic paint in festive colors
- Markers, stickers, and small cut-out shapes
- Glue or glue sticks
How to Make It
- Paint a light layer of color on the bubble wrap with a brush or sponge.
- Press the bubble wrap onto the card to create a bubbly texture print—repeat with different colors for a candy-colored card.
- Decorate with simple drawings and messages like “Merry Christmas!” or “Happy Holidays.”
Pro Tips / Styling Ideas
- Let kids sign their name with a big marker to claim authorship proudly.
- Keep a small, neat supply kit close by: a few markers, a glue stick, and a splash of stickers for quick finishes.
End note: A batch of heartwarming cards that double as keepsakes. Your little one’s smiling face on the front is worth a thousand store-bought greetings.
Conclusion
These seven Festive Christmas Crafts for 5-Year-Olds to Make This Holiday are designed to spark creativity, ease, and holiday joy. Each idea is unique, kid-friendly, and optimized for Pinterest-worthy results that you’ll want to pin, save, and recreate year after year. So grab the supplies, rally the blankies for a cozy crafting session, and let the little elves lead the way—you’ll be amazed by what they create.
Ready to start? Pick one (or all seven) and dive into a world of color, texture, and twinkle. The holidays are crammed with reasons to craft together, and these projects prove it’s not only possible but incredibly fun.