7 Spring Toilet Paper Roll Crafts
Spring is here, and so is the call to create cute, budget-friendly decor that actually looks like a million bucks. If you’ve got a stash of empty toilet paper rolls, you’re about to become a crafting wizard. Trust me, these seven ideas are fast, fun, and seriously satisfying.
1. Blooming Paper Roll Flower Garden Wall Hanging
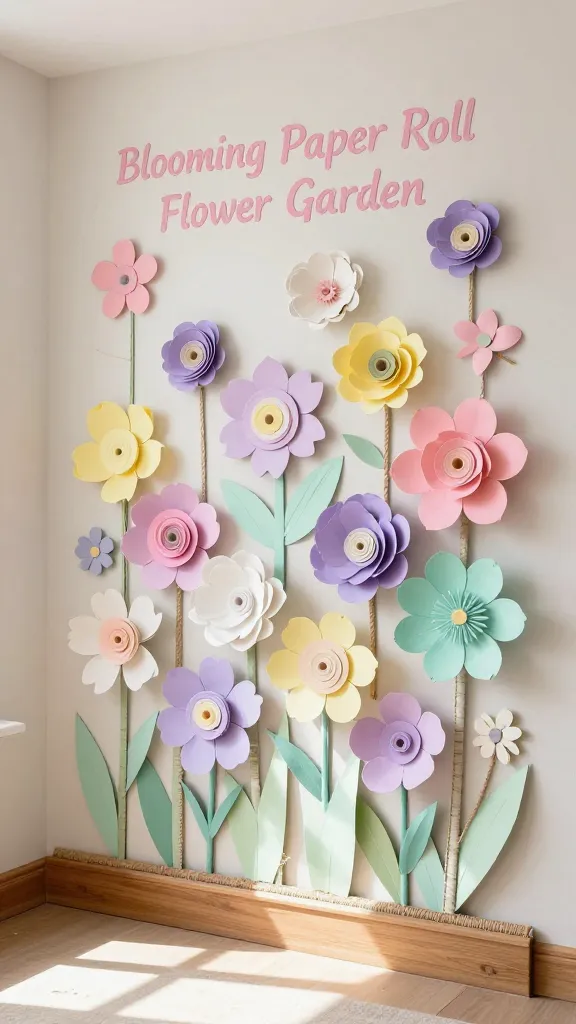
Picture a wall swarming with cheerful blooms in soft pastels, all crafted from repurposed rolls. This DIY turns scraps into a meadow of color that instantly elevates a blank space. It’s light, airy, and perfect for a spring entryway or living room nook.
Materials Needed
- Toilet paper rolls (6–12, depending on your display size)
- Acrylic paints in pink, yellow, lavender, mint, and white
- Paintbrushes and a small sponge brush
- Cardboard or a wooden hutch frame for the base
- Jute twine or ribbon for hanging
- PVA glue or hot glue
How to Make It
- Flatten a roll slightly, then cut leaf shapes from the sides so you have a petal look when opened.
- Paint each petal a bright spring color; let dry, then twist the petals into little flowers.
- Glue the flowers onto a base made from cardboard or a wooden frame. Layer for depth, and tuck a few leaves in for dimension.
- Hang the finished piece on a wall using twine and admire the pop of color from every angle.
Pro Tips / Styling Ideas
- Use a gradient of colors to create a sunrise effect across the wall.
- Add tiny centers with yellow dots of paint or yellow buttons for texture.
Aimed at nature lovers and home editors alike, this garden wall hanging shines in living rooms and sunny kitchens. You’ll love this if you crave a cheerful, garden-like vibe without any real gardening.
2. Tiny Terrarium Ornaments Made From Cardboard-Free Rolls
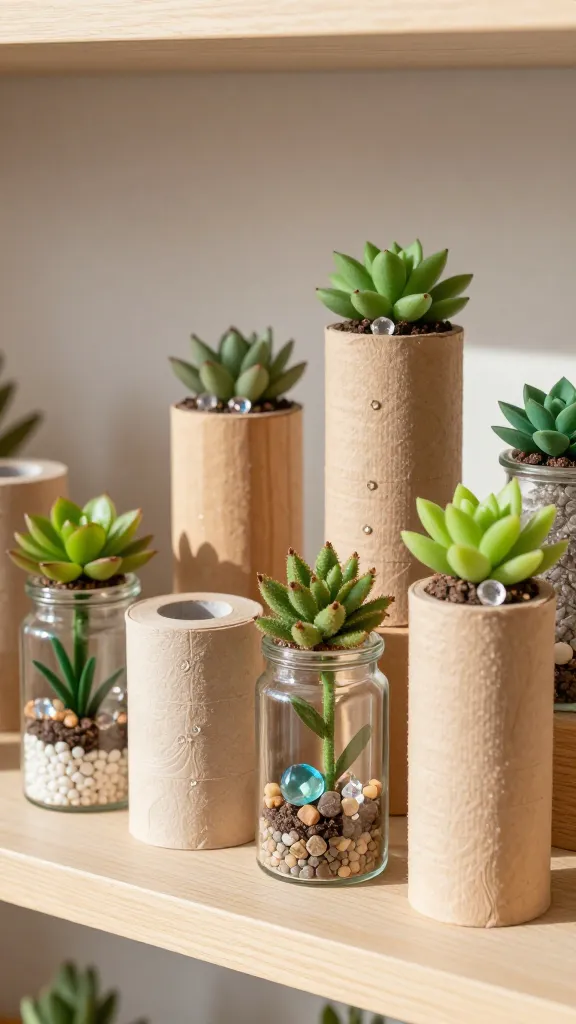
Bring a splash of faux greenery to your shelves with miniature terrariums crafted from toilet paper rolls. They’re quirky, cute, and look surprisingly chic in a cluster.
Materials Needed
- Toilet paper rolls
- Glass jars or acrylic gems
- Mini faux plants or felt scraps shaped like succulents
- Clear glue or hot glue
- Mini decorative pebbles
- Acrylic paints (optional) for painted bases
How to Make It
- Cut a roll into short cylinder segments or leave intact for taller pieces.
- Line the bottom with pebbles for drainage, then add faux plants or felt succulents.
- Place in a shallow tray or lantern for display, or mount on a painted wooden base for extra charm.
Pro Tips / Styling Ideas
- Paint the outside of the roll in earthy tones to mimic glass terrariums.
- Group three to five pieces on a tray with a few small moss tufts for a playful vignette.
Who would love this? Any plant lover, apartment dweller, or desk DJ who needs a tiny green escape without the real dirt. It’s seriously a micro-green upgrade for shelves or coffee tables.
3. Spring Themed Napkin Ring Buds From Rolled Paper
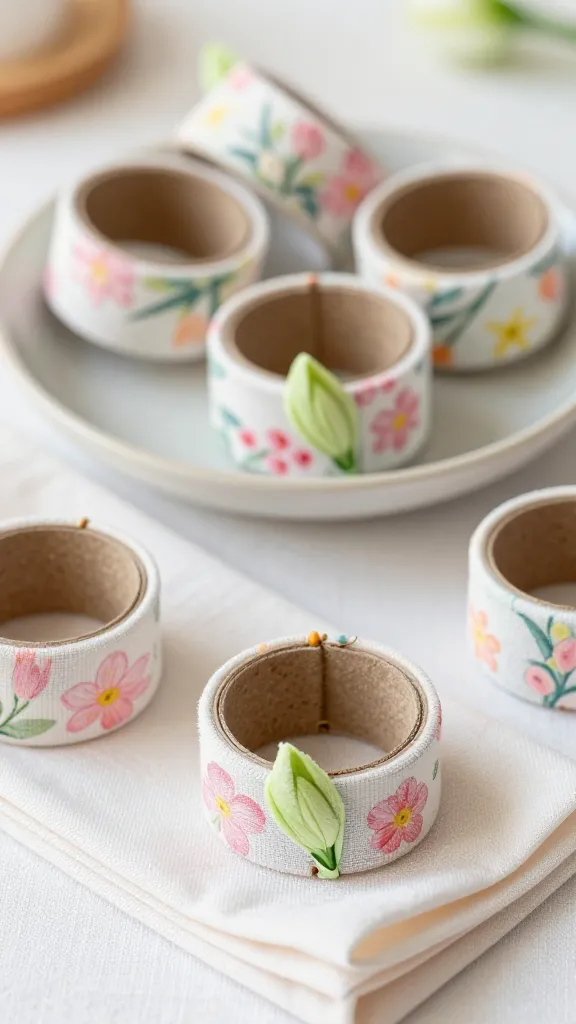
Yes, napkin rings can be stunning again with a fresh spring twist. Turn boring dinner settings into a party of petals with these floral bud napkin rings.
Materials Needed
- Toilet paper rolls, cut into 1.5-inch rings
- Fabric scraps in floral patterns or pastel colors
- Hot glue or fabric glue
- Green floral tape or pipe cleaners
- Acrylic paint (optional for bases)
How to Make It
- Wrap each ring with fabric, securing the ends with glue.
- Twist a green pipe cleaner or floral tape around the center to form a bud stem.
- Attach a tiny fabric flower or felt blossom to the ring’s outer side for a delicate bloom.
Pro Tips / Styling Ideas
- Mix and match patterns for a lively tablescape or keep to one cohesive pastel palette for a romantic look.
- Pair with matching place cards for a garden-party vibe.
Perfect for Easter dinners, spring brunches, or a seasonal tablescape refresh. These rings are lightweight, inexpensive, and incredibly pretty at close range.
4. Colorful Mini Lanterns With Painted Rolls
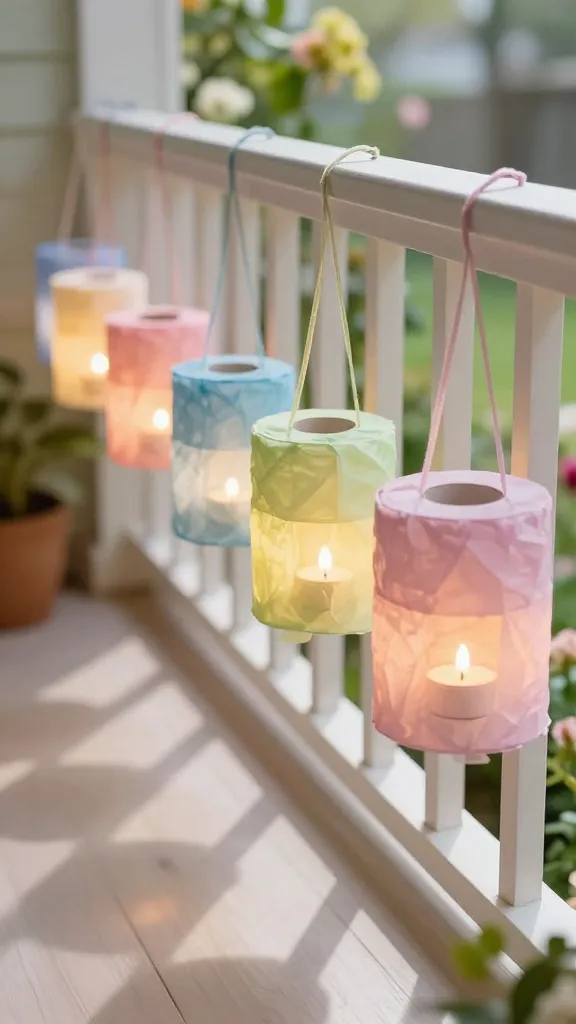
Let those bright colors glow! These mini lanterns illuminate any spring corners, balcony, or porch with a soft, warm mood. They’re easy to assemble and look gorgeous in a row.
Materials Needed
- Toilet paper rolls
- Translucent tissue paper in spring hues
- Mod Podge or clear-drying glue
- Candle-safe LED tea lights
- Ribbon or twine for hanging
- Scissors
How to Make It
- Cut the tissue paper into small squares, brush Mod Podge on the roll, and layer the tissue squares until the whole roll is covered.
- Let dry, then cut decorative patterns around the roll’s edge for a lantern look.
- Drop in an LED tea light and hang in windows, on the porch, or along a stair railing.
Pro Tips / Styling Ideas
- Use white tissue with a colored top layer for a gradient glow when lit.
- Group in varying heights for a dramatic display on a mantel or doorway.
These lanterns are a fantastic mix of cozy and playful, perfect for soft spring evenings. You’ll love sharing them at a weekend get-together or using them to brighten a late-night chat with friends online.
5. Whimsical Animal Magnets Using Rolled Paper Pieces
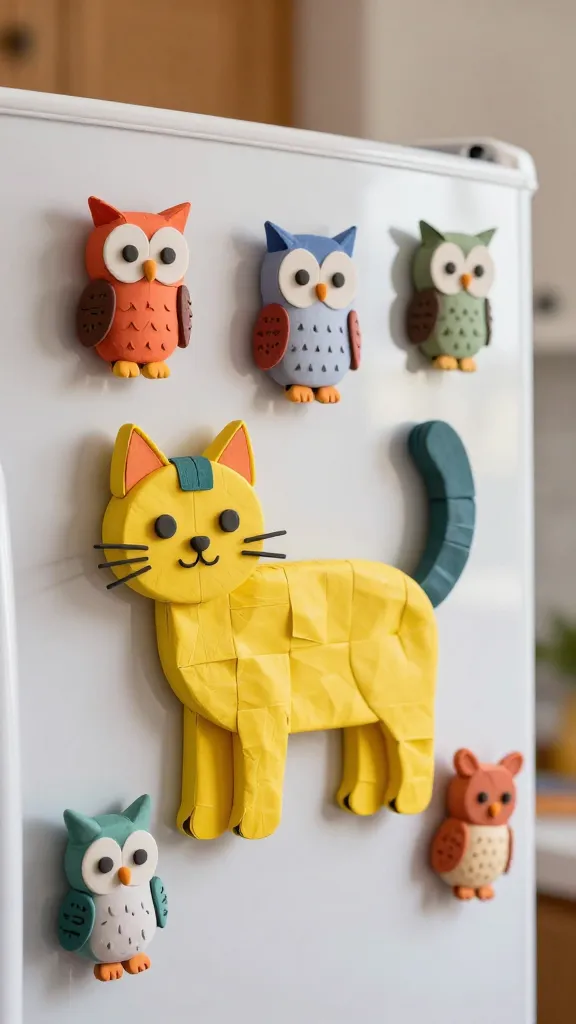
Turn plain fridge décor into a mini menagerie with these adorable animal magnets. They’re whimsical, kid-friendly, and surprisingly expressive—perfect for jars, boards, or magnetized walls.
Materials Needed
- Toilet paper rolls cut into small discs or rings
- Polymer clay or felt for ears, noses, and facial features
- Magnet strips or small magnets
- Acrylic paint in bold colors
- Hot glue
- Clear sealant spray (optional)
How to Make It
- Paint the rolled segments to become animal bodies (e.g., cats, owls, bears).
- Cut ears, noses, and features from clay or felt and glue on.
- Attach magnets to the back so they cling to metal surfaces.
Pro Tips / Styling Ideas
- Arrange a little zoo on a fridge with a magnetic perch for the flock.
- Use metallic accents for a playful, modern twist.
These magnets are a hit with kids and adults alike. They’re a creative gift for teachers, new homeowners, or anyone who loves a dash of personality on their fridge.
6. Springy Pom-Pom Garland From Rolled Essentials
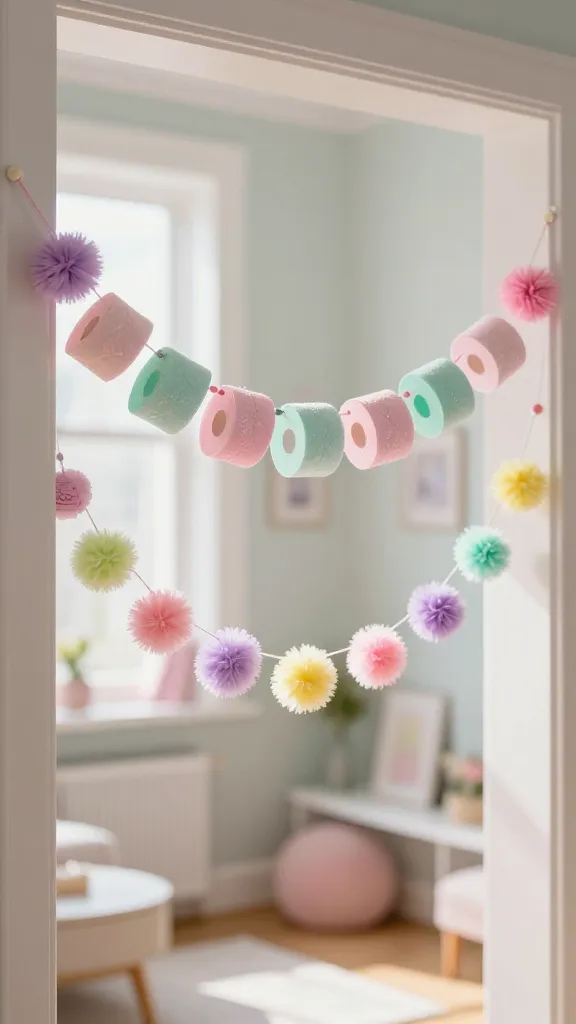
Garlands are the quick route to instant charm, and this pom-pom garland uses simple rolls as the base to save you time. It’s fluffy, festive, and endlessly versatile for doors, mantels, or festive stairs.
Materials Needed
- Toilet paper rolls
- Pom-pom maker or yarn scraps in pink, mint, lavender, and yellow
- Fishing line or twine
- Hot glue or fabric glue
- Small decorative elements (optional): beads or mini signs
How to Make It
- Cut the rolls into thin discs and cut a small groove in the center so you can push yarn through.
- Thread yarn or use a pom-pom maker to create fluffy pom-poms, then slide them onto the fishing line.
- Secure the ends of the line to a doorway frame, mantel, or window frame.
Pro Tips / Styling Ideas
- Space pom-poms asymmetrically to mimic a natural garland flow.
- Mix sizes for greater texture and interest.
Ideal for spring celebrations, baby showers, or a cheerful kitchen nook. It’s a simple, joyful upgrade that screams “you made this with love.”
7. Spring Nature Cards Display From Rolled Paper Cards
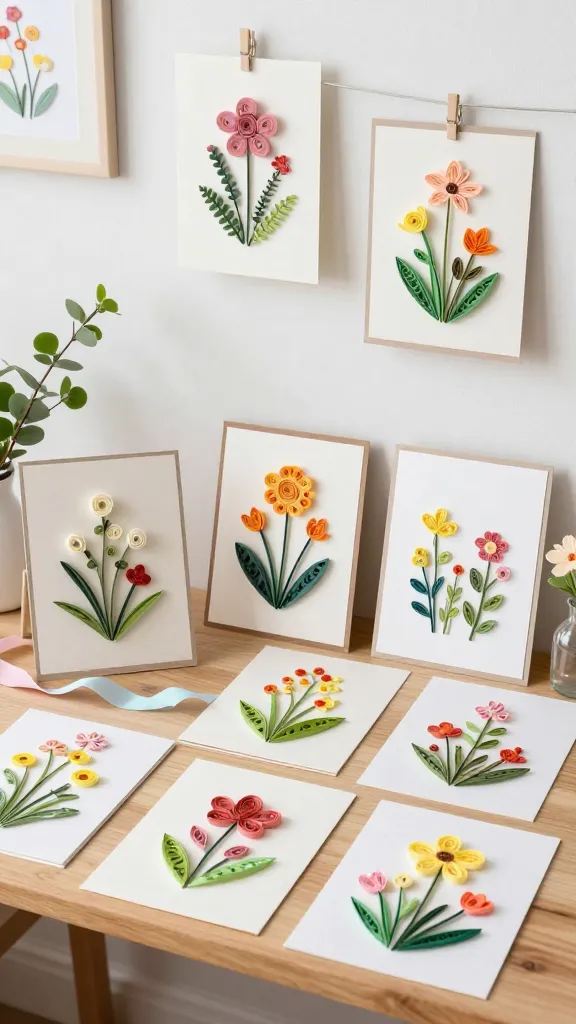
Capture the season’s mood with a collection of handmade nature cards crafted from rolled paper pieces. This display doubles as art and a mini gallery of spring motifs you can swap out as the season evolves.
Materials Needed
- Toilet paper rolls, cut into thin circles
- Colored paper, paint, and markers
- Glue and scissors
- Small frames or a wire photo display for hanging
How to Make It
- Roll and glue the circles to create petals, leaves, or stems—turn each into a tiny nature scene.
- Affix to a card base or mount on a coordinating background to form a mini gallery.
- Place in frames or a display board for rotating seasonal artwork.
Pro Tips / Styling Ideas
- Keep a consistent color story across all cards for a cohesive look.
- Swap in glitter glue for a bit of sunshine sparkle on sunny days.
These nature cards are a charming nod to spring that invite compliments. Great for gifting to a friend who loves handmade decor or for keeping your own mantel fresh and personal.
Conclusion
Seven bold, unique, and totally doable crafts from everyday toilet paper rolls—no overlaps, no repeats. Each idea is designed to be fast, budget-friendly, and Pinterest-ready, with that warm, personal touch that makes a space feel like yours. So, which one will you start with this weekend? Pick one or try them all—trust me, you’ll have a little spring magic to display in no time.