7 Super Easy Craft Ideas for Absolute Beginners
1. Rustic Autumn Leaf Wall Art You Can Assemble in Minutes
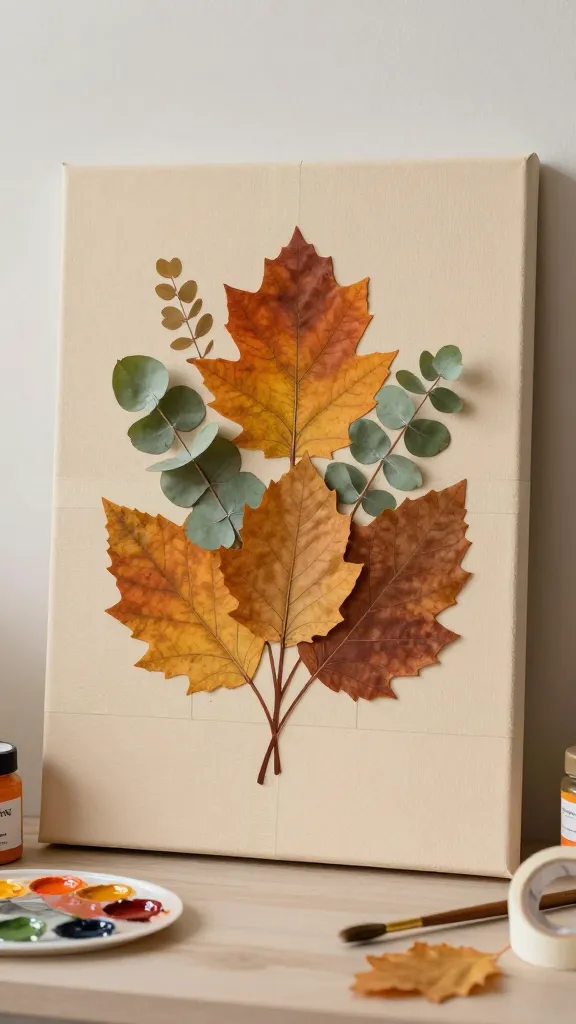
You walk into your space and boom—colorful, cozy vibes greet you from a single, simple project. This rustic leaf wall art looks surprisingly luxe, yet it’s totally beginner-friendly. FYI, the secret is layering textures and warm neutrals.
Materials Needed
- Canvas or sturdy poster board
- Pressed leaves or faux eucalyptus
- Acrylic paints in autumn hues
- Painter’s tape
- Mod Podge or clear craft sealant
How to Make It
- Lay out a simple leaf bouquet silhouette on your canvas using painter’s tape as a guide.
- Paint the background with soft, muted tones and let dry.
- Arrange and glue leaves in your chosen pattern, pressing gently.
- Seal with a light coat of Mod Podge for a subtle sheen.
Pro Tips / Styling Ideas
- Go monochrome or mix a few earthy tones for depth.
- Hang near natural light to make the colors pop.
- Pair with a wood shelf or a featured plant for a ready-made vignette.
Who would love this? Plant lovers, minimalists, and anyone wanting a quick, magazine-worthy wall upgrade. It’s cozy, approachable, and seriously satisfying.
2. Marble Effect Desk Organizer from Cardboard and Paint
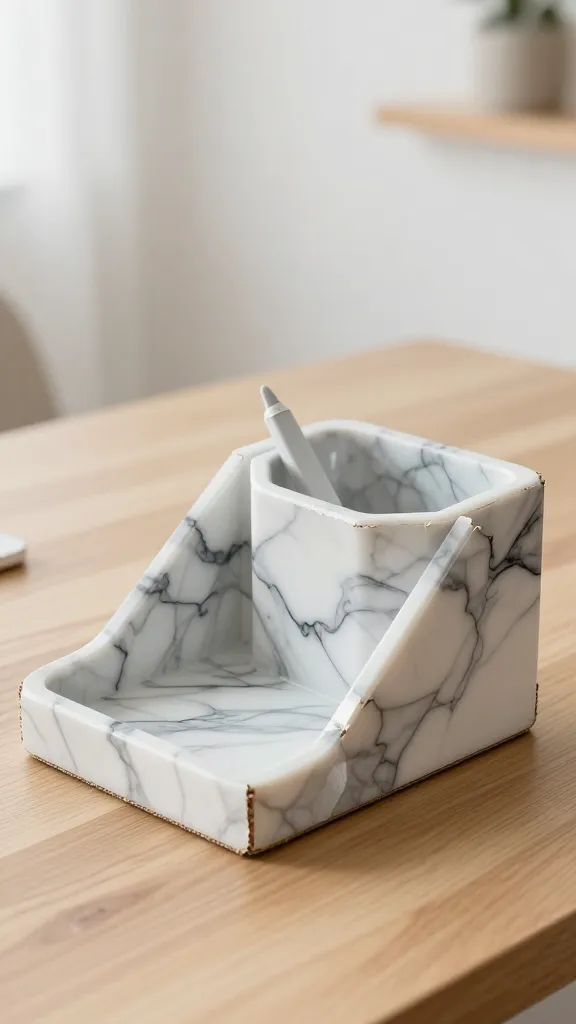
Imagine a chic desk accessory that took almost no time to make and looks like it cost a fortune. This marble effect desk organizer nails that vibe with plain cardboard and a little paint magic. Trust me, you’ll love the shimmer of a DIY win.
Materials Needed
- Cardboard box or cereal box
- White, black, and gray acrylic paints
- Painter’s tape
- Clear sealant spray
How to Make It
- Cut the box into compartments (small tray, pen holder, etc.).
- Mask areas to create irregular shapes for the marble look.
- Paint swirls of white, gray, and black, blending while wet.
- Seal for a durable finish that takes desk abuse.
Pro Tips / Styling Ideas
- Line the inside with foil or decorative paper for a pop of color.
- Air-dry between coats to avoid smudging the marble pattern.
- Pair with a small succulent and a metallic pen set for a polished desk corner.
Who would love this? Students, home offices, or anyone who wants a luxe look without the luxe price tag. It’s clever, practical, and perfectly Pinterest-worthy.
3. Colorful Fabric Bookmark Keepsakes
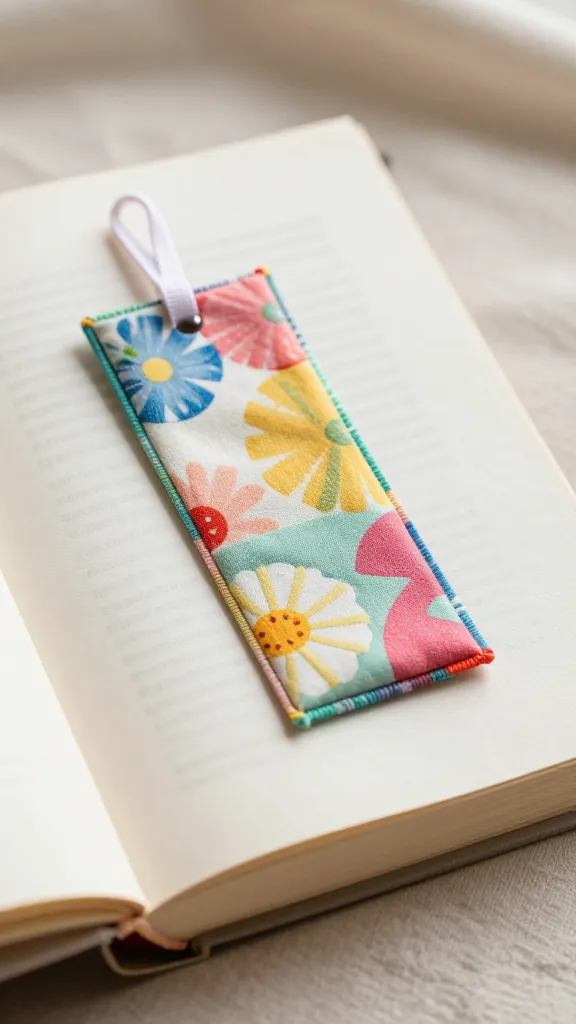
A book lovers’ dream that’s quick, useful, and adorably cheerful. These fabric bookmarks layer color and texture while staying flat and sturdy. Plus, they’re a breeze to customize with favorite patterns or quotes.
Materials Needed
- Two coordinating fabric scraps
- Fusible interfacing or thin cardboard
- Fabric glue or a sewing needle (optional)
- Ribbons, buttons, or charms for flair
How to Make It
- Cut fabric pieces slightly larger than your desired bookmark size.
- Adhere interfacing between the two fabrics for stiffness.
- Fuse or sew the edges for a clean finish.
- Attach a ribbon or charm at the top for personality.
Pro Tips / Styling Ideas
- Use fabric with tiny prints for a delicate look, or bold patterns for a playful vibe.
- Gift a set in a cute wrap with a library card note—instant sentiment.
- Add a tiny tassel or bead for a DIY-friendly bookmark you’ll actually use.
Who would love this? Avid readers, students, or anyone who wants a tiny, joyful craft that doubles as a thoughtful gift. It’s cozy, colorful, and seriously gifting-grade.
4. Mini Terrarium Jar Lanterns
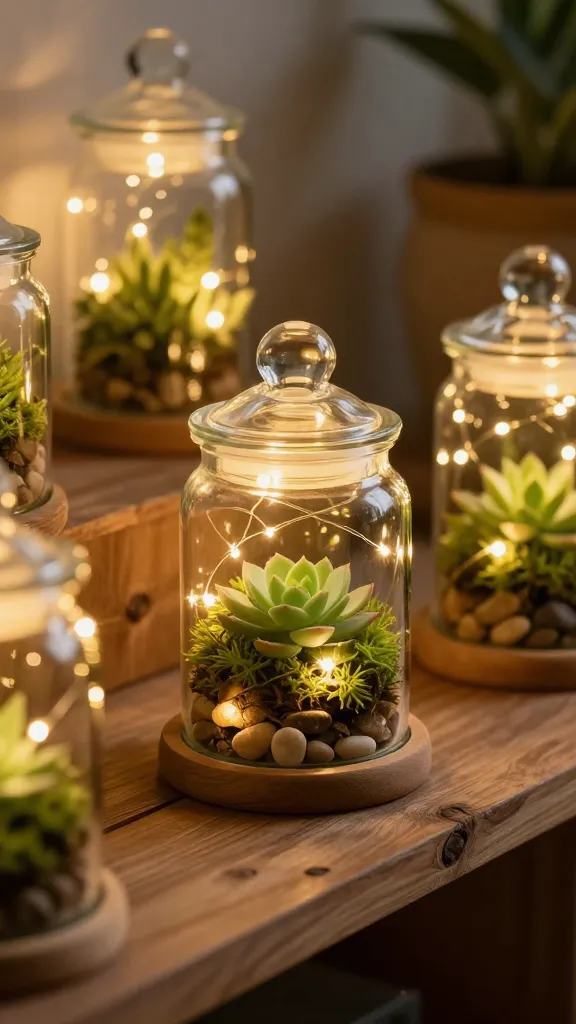
Glow up any shelf with these tiny terrarium lanterns. They look magical in the evening and take minutes to assemble. The secret is simple LED lights, glass jars, and a starry or botanical touch.
Materials Needed
- Small glass jars with lids
- Battery-operated fairy lights
- Dried moss, tiny pebbles, and fake succulents
- Double-sided tape or hot glue
How to Make It
- Layer a bit of pebbles in the jar for drainage and stability.
- Add moss and a tiny succulent or decorative item.
- Wind the fairy lights around the interior and nestle a few LEDs in place.
- Seal the lid (optional) and switch on for a warm glow.
Pro Tips / Styling Ideas
- Group them on a windowsill or bookshelf for a twinkling display.
- Experiment with different jar sizes for a varied cluster.
- Use warm white lights for a cozy, at-ease ambiance.
Who would love this? Night owls, cozers-at-heart, and anyone who loves ambient lighting with zero fuss. It’s bedside-ready, shelf-stopping, and seriously adorable.
5. Upcycled Tin Can Wind Chimes
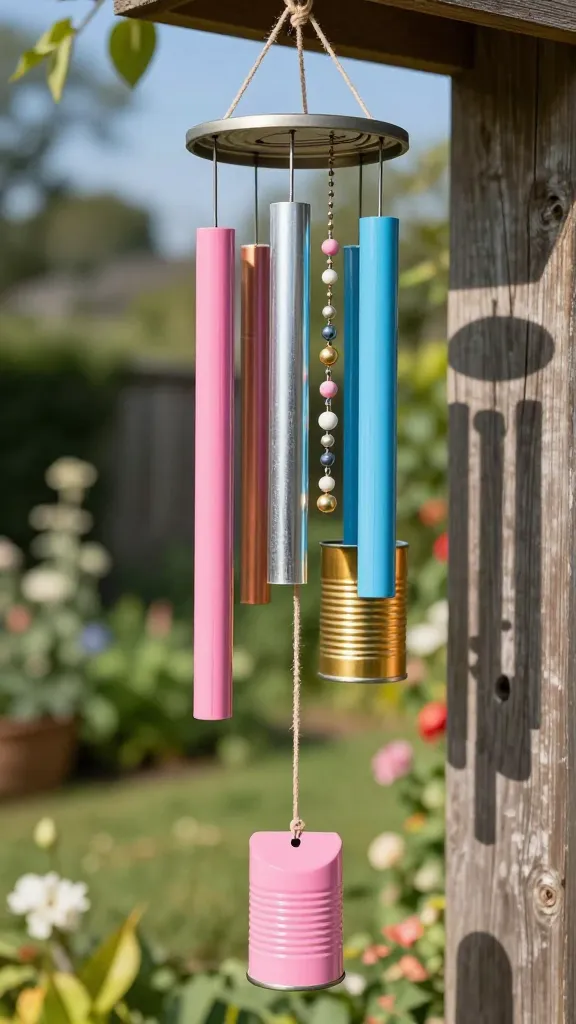
Turn scrap metal into music with these airy wind chimes. They’re surprisingly easy, recycle-friendly, and produce a gentle, melodic soundtrack for outdoor nooks or sunny balconies. FYI, paint them in bright hues or metallics to suit your space.
Materials Needed
- Clean tin cans (with labels removed)
- Hammer and nail or metal punch
- Twine or fishing line
- Acrylic paints and brushes
- Beads or charms for extra jingling fun
How to Make It
- Punch a small hole in the bottom of each can and thread line through, tying secure knots inside.
- Paint the cans in colors you love and let dry completely.
- Attach beads or charms to the strings for extra sparkle and sound.
- Hang in a breezy spot and enjoy the soft wind music.
Pro Tips / Styling Ideas
- Paint patterns like polka dots or chevrons for a playful vibe.
- Combine different can sizes for a musical rainbow of sound.
- Keep them outdoors away from direct contact with kids or pets for safety.
Who would love this? Outdoor lovers, backyard musicians, and anyone craving a breezy, whimsical accent piece. It’s sunny, spirited, and a little magical.
6. DIY Knit-Style Wall Pocket Organizer
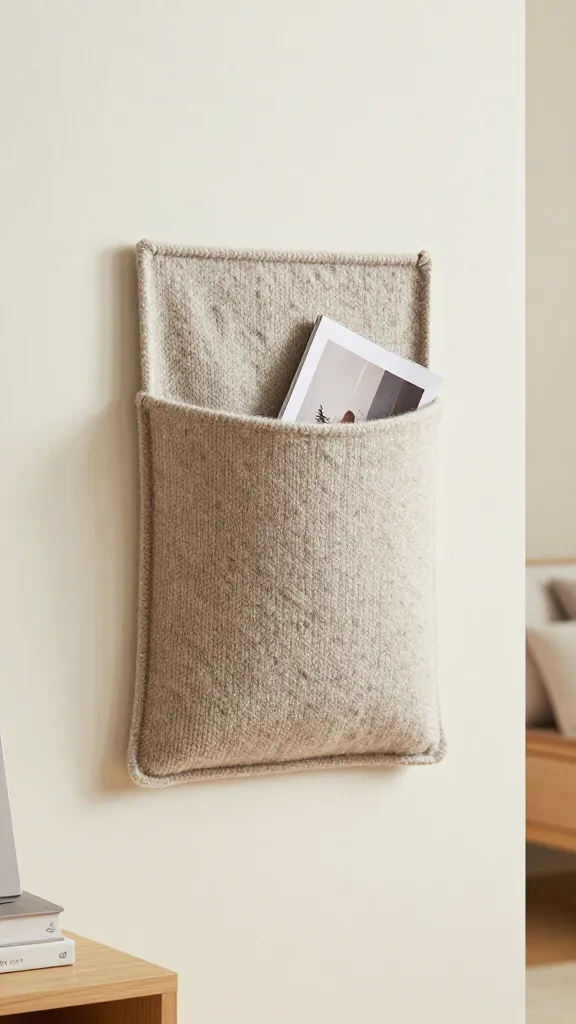
No knitting needles required—this faux knit wall pocket brings cozy texture to a bare wall. It looks like a chunky knit sweater without the commitment and stores mail, magazines, or small necessities in a chic, tactile way. Seriously, it’s as soothing as a warm beverage on a chilly day.
Materials Needed
- Felt or thick fabric in neutral tones
- Cardboard or thin foam board
- Fabric glue or sewing supplies
- Scissors and ruler
How to Make It
- Cut a large rectangle of fabric and a backing board to fit your wall space.
- Cut and glue fabric “stitches” to mimic a knit pattern, layering to create pockets.
- Attach fabric-covered backing to the board and secure with glue along the edges.
- Hang using picture hooks or adhesive strips.
Pro Tips / Styling Ideas
- Use different textures, like felt and knit-printed fabric, for depth.
- Designate pockets for keys, mail, or decorative mini plants.
- Pair with a warm-toned frame or a plant to anchor the look.
Who would love this? Apartment dwellers, entryway organizers, and anyone who appreciates a warm, tactile aesthetic. It’s homey, practical, and wonderfully tactile.
7. Elegant Glass Jar Hanging Lanterns
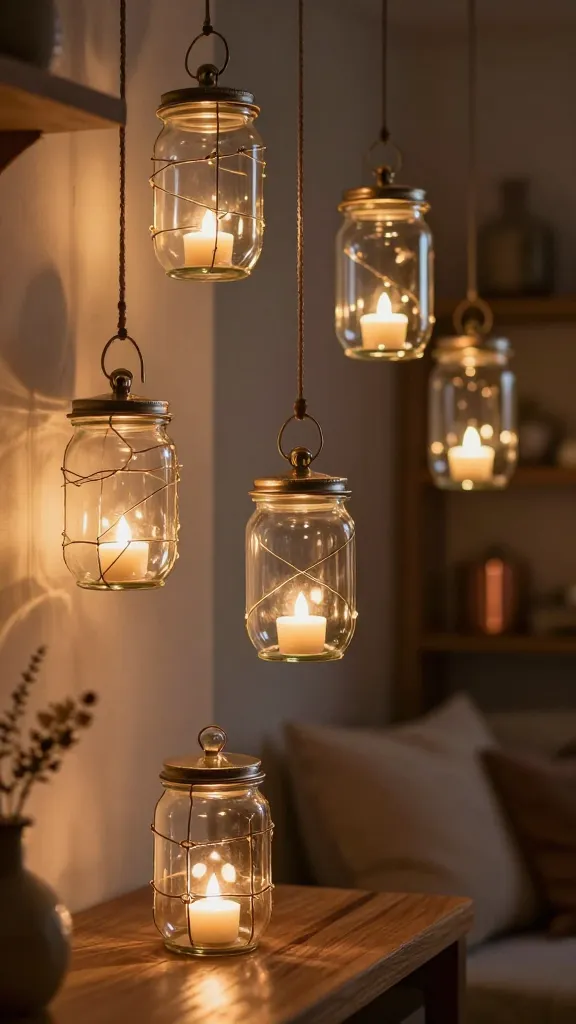
Soft light, glass, and a touch of metallics create instant romance. These hanging lanterns are as chic as they are easy, turning ordinary jars into a refined night-reading glow. You’ll adore the way the light plays across walls and shelves.
Materials Needed
- Empty glass jars with lids
- LED tea lights or small battery candles
- Metal wire, twine, or leather cord
- Spray paint or metallic paint (optional)
How to Make It
- Slip a small LED candle into the jar and secure with a lid if desired.
- Wrap the jar with wire or tie with cord to create a hanging loop.
- Optionally spray paint the lid or rim for a metallic finish.
- Hang in a cluster or along a porch for a soft, ambient glow.
Pro Tips / Styling Ideas
- Group with varying jar sizes for dynamic lighting.
- Line along a stair railing or above a doorway for a chic focal point.
- Use warm tones to add coziness and vintage vibes.
Who would love this? DIY enthusiasts who adore ambient lighting, renters who want stylish, temporary decor, and anyone craving a romantic, soft glow. It’s calming, classy, and incredibly Pinterest-ready.
Conclusion
These seven ideas prove that absolute beginners can craft gorgeous, usable pieces in a snap. Pick one to start, or tackle all seven for a week-long creative sprint. You’ll gain confidence, a dash of personality in your space, and a collection of handmade accents you’ll be proud to share. Ready to dive in? Grab a project, trust the process, and watch your space transform with a little DIY magic—you’ll love this journey!