8 Creative Glass Bottle Crafts to Upcycle
1. Moonlit Glass Bottle Terrarium Lanterns
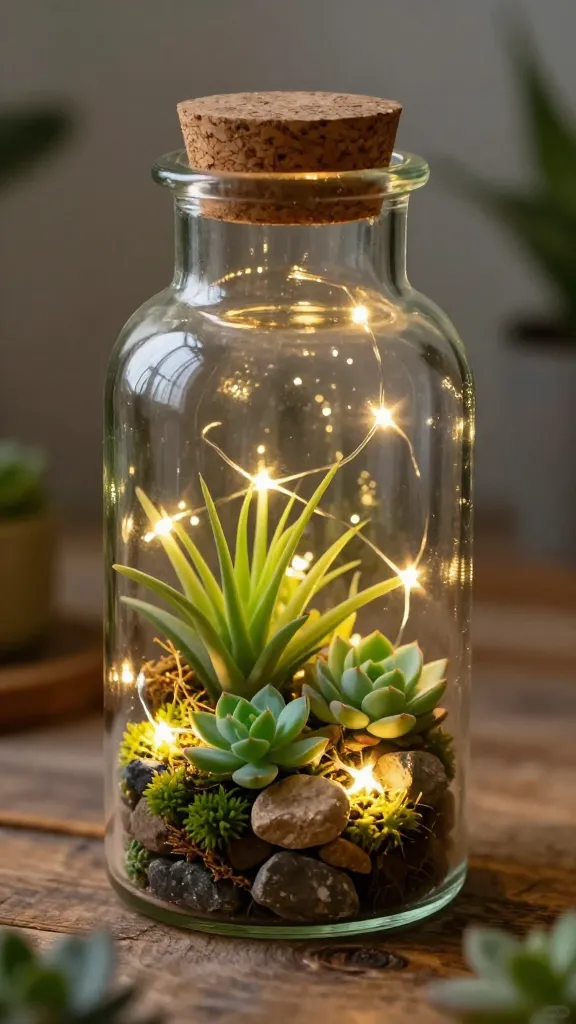
Picture this: a glass bottle glowing softly with tiny fairy lights and a pocketful of tiny succulents tucked inside. The finished piece feels dreamy, whimsical, and decidedly Pinterest-worthy. This one blends green-thumb charm with cozy ambiance, no heavy lifting required.
Materials Needed
- Assorted glass bottles with lids or corks
- Fairy string lights (battery-powered)
- Small succulent cuttings or air plants
- Rocks or gravel for drainage
- Decorative sand or moss (optional)
How to Make It
- Clean and dry the bottles thoroughly. Remove labels for a clean, modern look.
- Fill the bottom with a thin layer of rocks for drainage, then add a pinch of soil if you’re planting real plants.
- Insert a few fairy lights through the mouth of the bottle or wrap them around the outside for a glow you can control with a switch.
- Pop in tiny succulents or air plants. If you’re using real plants, keep watering minimal to avoid soggy soil.
- Optionally seal with a cork and place the bottle on a tray with moss for a grounded display.
Pro Tips / Styling Ideas
- Mix heights by clustering several bottles on a tray to create a herbal lantern vignette.
- Switch to LED candle votives for a safer, flickering effect.
- Use tinted bottle glass for a moody, magical vibe.
Who it’s for / When to use
Perfect for coffee tables, along the windowsill, or as a soft nightlight. If you love botanical vibes with a touch of magic, you’ll adore this.
2. Vintage Bottle Apothecary Jars with Painted Labels
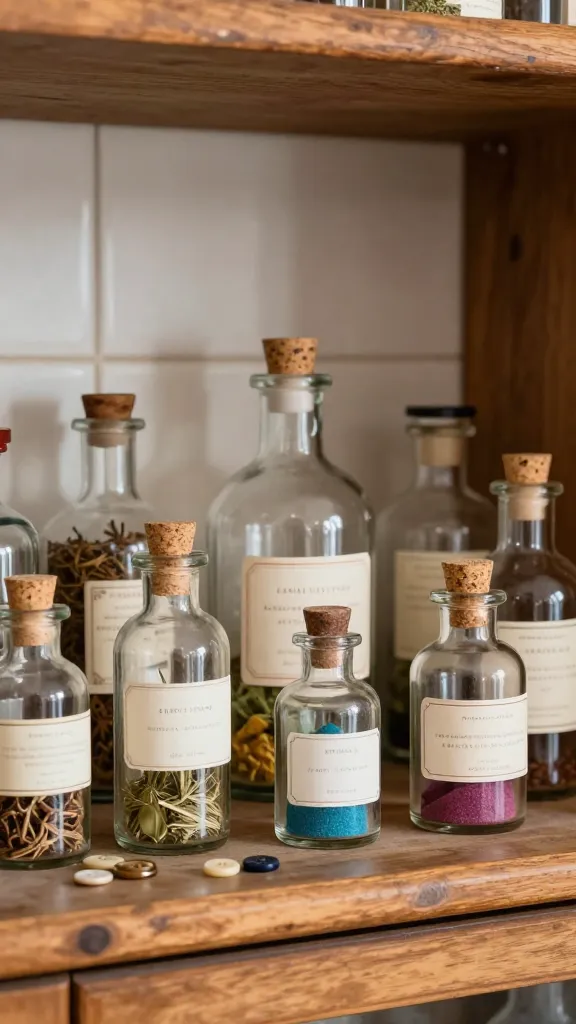
Dreaming of a curated shelvescape with a touch of old-world charm? These glass bottle apothecary jars add character and a wink of whimsy to any space. Easy, chic, and endlessly customizable.
Materials Needed
- Old glass bottles (varying shapes)
- White acrylic paint or chalk paint
- Fine-tipped permanent marker or painter’s tape for labels
- Small items to fill (buttons, dried herbs, colored sand)
How to Make It
- Clean bottles well; remove labels if possible. Sand lightly if needed for paint adhesion.
- Paint the outside with a matte white finish for a vintage look. Let dry completely.
- Apply faux label designs: write “Herbs,” “Spices,” or whimsical names using a fine marker or tape.
- Fill with small decor bits or dried botanicals to add texture and color.
Pro Tips / Styling Ideas
- Line them up by color or size on a floating shelf for a gallery-style display.
- Wrap the necks with jute twine or metallic string for extra character.
- Coordinate with metal or wood rustic frames for cohesive styling.
Who it’s for / When to use
Great for kitchen shelves, a vintage-themed bathroom, or a mantel display. If you adore antique vibes with a modern twist, this is your project.
3. Color-Block Glass Bottle Vases
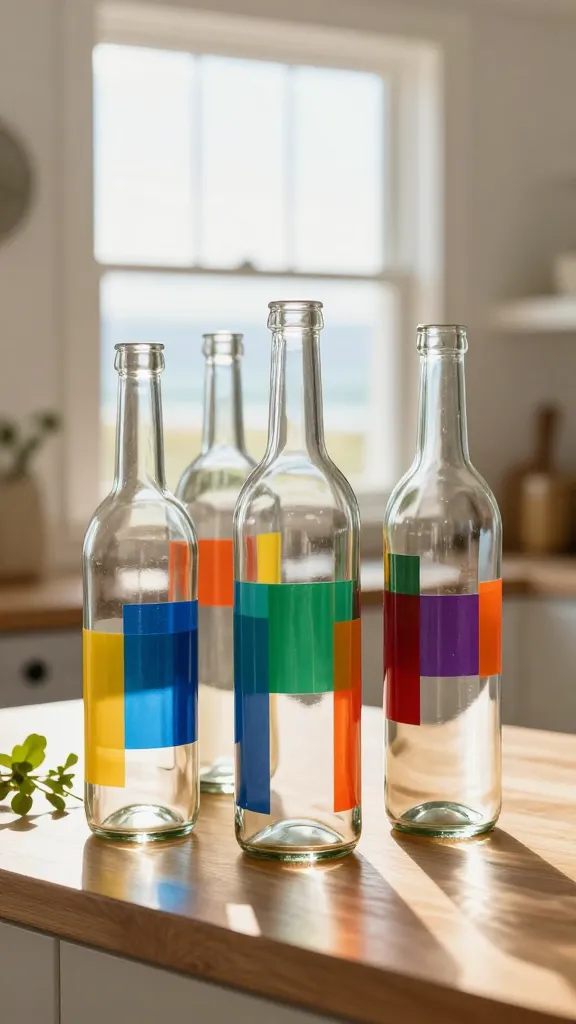
Bright, bold, and utterly summery—these color-block vases turn plain bottles into statement pieces. A splash of color can instantly elevate a dining table centerpiece or a bright bookshelf display. Seriously, it’s addictive to see the hues come alive.
Materials Needed
- Clear glass bottles
- Painter’s tape
- Acrylic craft paints in your chosen colors
- Small cosmetic sponges or brushes
How to Make It
- Clean and dry bottles; remove labels for clean edges.
- Apply painter’s tape in blocks or geometric patterns around the bottle.
- Paint the exposed sections in two or three bold colors. Let each color dry before removing tape.
- Remove tape carefully to reveal crisp color blocks.
Pro Tips / Styling Ideas
- Group in a trio with varying heights for a dynamic centerpiece.
- Fill with simple stems or dried grasses to keep the colors the star.
- Pair with brass accents or a white-washed wood tray for modern-casual vibes.
Who it’s for / When to use
For color lovers, party planners, and cheery home decorators. It’s a sunshiny project that makes any table pop.
4. Nautical Rope-Twined Bottles as Coastal Vases
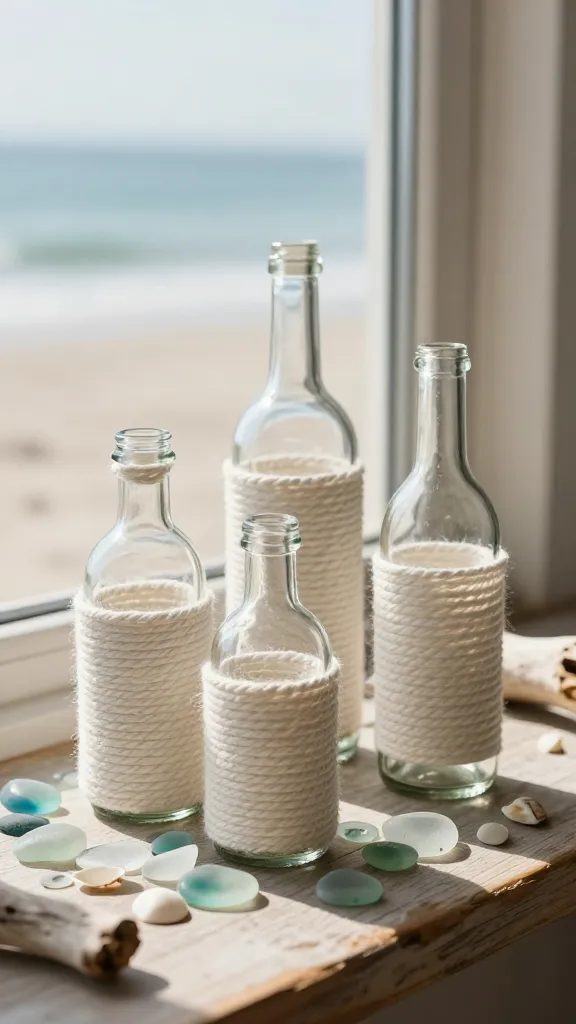
Salt air, sea glass, and soft rope twine—these bottles bring a breezy coastal touch to any room. Whip these up for a beachy vignette or a seashell-tinted centerpiece that feels endlessly relaxed.
Materials Needed
- Clear glass bottles
- Natural or white cotton rope
- Pace glue or hot glue gun
- Sea glass, shells, or small driftwood pieces (optional)
How to Make It
- Coat the bottle in glue and wrap the rope tightly from base to neck, securing ends with more glue.
- Layer additional rope twists for a thicker, nautical look.
- Optional: glue on a few sea-glass ornaments or shells for a beachy accent.
Pro Tips / Styling Ideas
- Place on a driftwood tray with linen napkins for a seaside tablescape.
- Use as a gift for a summer party—fill with a bouquet or a small plant.
Who it’s for / When to use
Perfect for coastal homes, sunlit kitchens, or a beach wedding tablescape. If you crave a relaxed, sea-kissed vibe, you’ll reach for this again and again.
5. Sparkling Glitter Bottle Luminaries
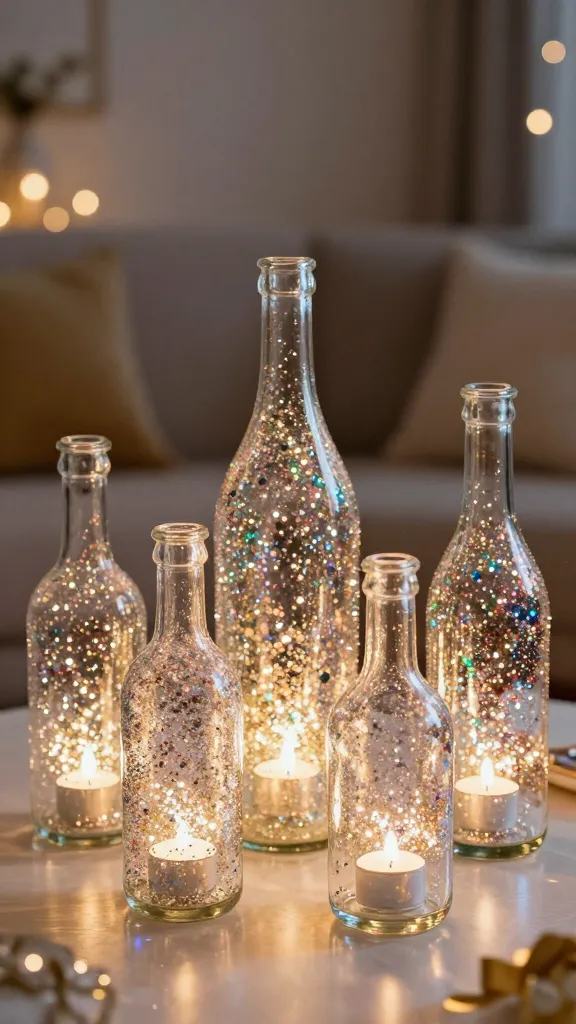
Glow up your evenings with glittery luminaries that sparkle without overpowering the room. These glass bottles become mini discos of light—fun for nights in, glam party vibes, or festive corners. Trust me, they’re addictive to make.
Materials Needed
- Clear glass bottles
- Fine glitter in your favorite colors
- Mod Podge or clear-drying craft glue
- Battery-operated tea lights
How to Make It
- Brush a thin layer of Mod Podge on the outside of the bottle.
- Sprinkle glitter generously, rotating to cover evenly. Tap off excess.
- Seal with a light coat ofMod Podge to lock the glitter in place.
- Place a battery tea light inside; switch on for a soft, shimmering glow.
Pro Tips / Styling Ideas
- Line a row of lit bottles along a mantel or dining table for a fairy-tale glow.
- Mix color types—silver, gold, and rose gold—for extra sparkle.
Who it’s for / When to use
Ideal for party décor, romantic dinners, or a whimsical night-light in a child’s room. If you love sparkle without the fuss, this is your craft.
6. Herb-Scented Diffuser Bottles
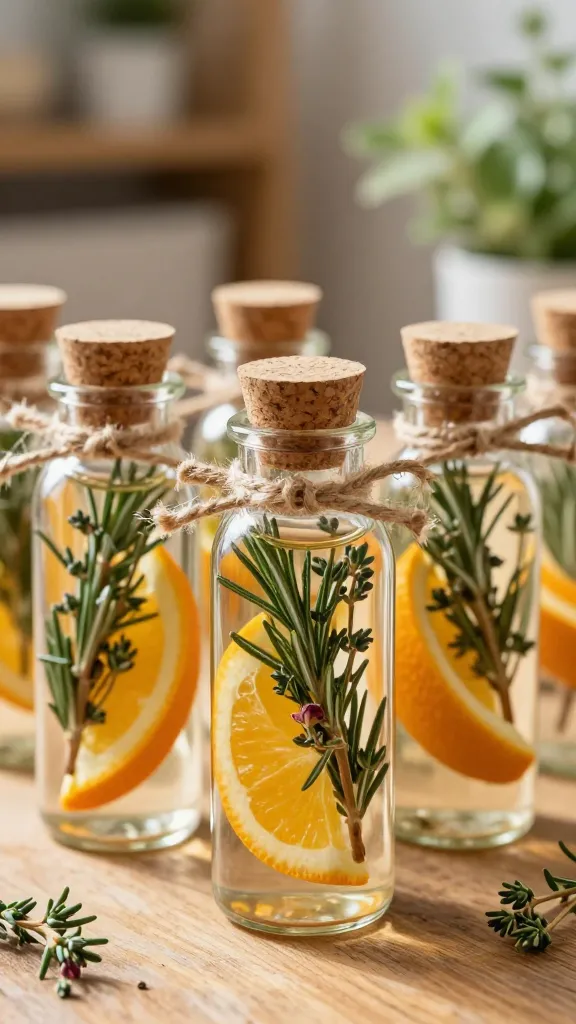
Upgrade your aroma game with sliced citrus and fresh herbs tucked into glass bottles. DIY diffuser bottles not only look gorgeous, they perfume the room with a cozy, herbaceous scent. Easy, useful, and beautifully practical.
Materials Needed
- Clear glass bottles with stoppers or corks
- Small dried herbs (rosemary, thyme) or citrus peels
- Essential oil blends (optional)
- Raffia or ribbon for a finishing touch
How to Make It
- Fill the bottle halfway with dried herbs and citrus peels for visual appeal.
- Top with a few drops of essential oil if you want a stronger scent, then seal with a cork.
- Decorate the neck with raffia or a pretty ribbon for a finished look.
Pro Tips / Styling Ideas
- Place near the entryway or bathroom for a welcoming scent on arrival.
- Group with small potted herbs for a cohesive, garden-in-a-bottle vibe.
Who it’s for / When to use
Great for kitchen counters, bathrooms, or as a thoughtful housewarming gift. If you love scents and greenery, you’ll adore this pairing.
7. Glittery Stencil Monogram Bottles
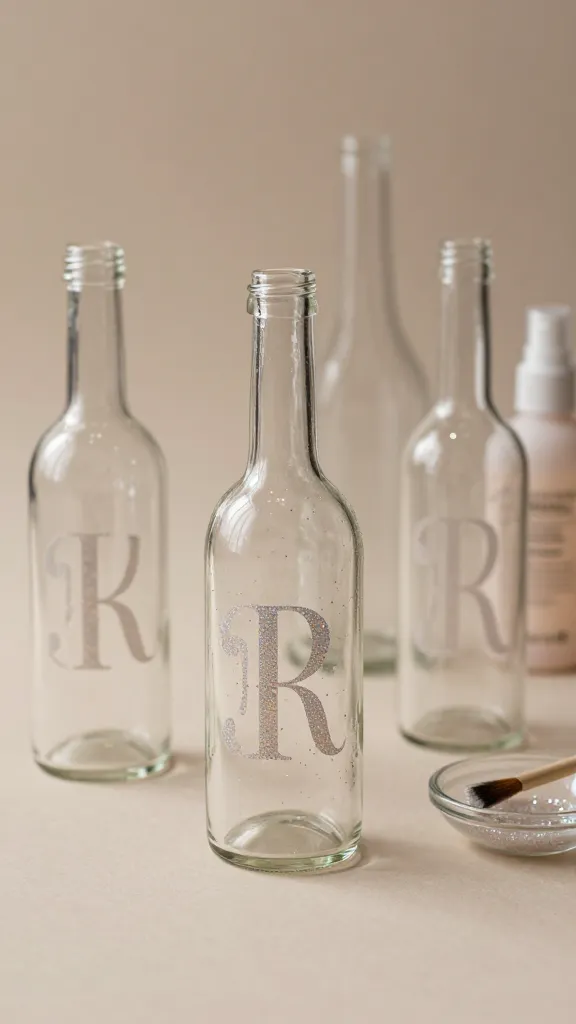
Make a personalized splash with monogrammed glitter bottles that scream you. It’s chic, minimalist, and perfect for gifting or sprucing up a coffee station. Simple shapes, big impact—trust me.
Materials Needed
- Clear glass bottles
- Stencil letters or contact paper cutouts
- Glitter, Mod Podge, and a small brush
- Water-based sealant spray (optional)
How to Make It
- Attach stencil letters to the bottle with painter’s tape or low-tack adhesive.
- Apply a thin layer of Mod Podge, then sprinkle glitter over the area. Tap off excess.
- Let dry, remove stencil, and seal with a light spray of sealant for long-lasting shine.
Pro Tips / Styling Ideas
- Pair with a matching color palette or metallic accents on a tray for a modern vanity shelf.
- Fill with a simple bouquet of white flowers for a clean, refined look.
Who it’s for / When to use
Excellent for quick gifts, bridesmaids’ party favors, or a stylish home display. If you love sleek typography and a little glitz, you’ll be hooked.
8. Upcycled Bottle Wind Chimes with Beachy Bells
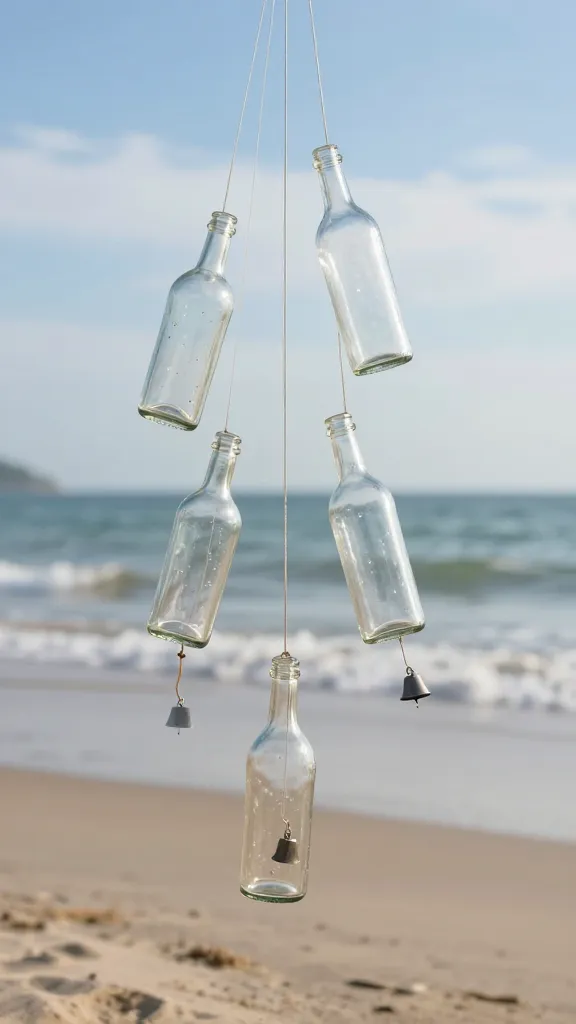
Turn everyday bottles into a gentle, melodic wind chime that sways with the breeze. The mix of glass tones and tiny bells creates a soothing, coastal mood that’s impossible to resist. It’s mermaid-approved DIY magic.
Materials Needed
- Clean glass bottles (various shapes)
- Fishing line or clear string
- Small metal bells or chimes
- Drill or hot glue (for attaching bells) and scissors
How to Make It
- Drill a small hole near the base of each bottle or glue a loop of string to the neck.
- Thread a line through each bottle, knotting securely to hold the weight.
- Attach a bell or chime at the bottom of each line, arranging by length to create a tiered effect.
- Hang the wind chime where it can catch the breeze—porch, balcony, or garden arch.
Pro Tips / Styling Ideas
- Group with other natural decor: driftwood, seashells, and soft textiles.
- Choose bells in a soft brass or antique finish for a calmer, classic look.
Who it’s for / When to use
Outdoor lovers, porch decorators, and anyone who enjoys a gentle soundtrack to their days. If you crave nature-inspired calm, this is your go-to project.
Conclusion
These 8 completely unique glass bottle upcycle crafts prove that a humble bottle can become a centerpiece, a lamp, a scent-filled keepsake, or a coastal charm. Which one will you try first—or will you tackle all eight? Gather your supplies, grab a friend, and dive into the satisfying world of upcycled glass art. You’ll love the creative rush, the cute displays, and how easy it is to add a personal touch to any space.