13 Boredom-Busting Summer Crafts for Tweens: Quick Wins
Summer break just got a glow-up. If you’re chasing quick, colorful wins that aren’t repeat-after-me crafts, you’ve landed in the right place. These 13 completely new ideas are crafted to spark creativity, be kid-friendly, and look totally Pinterest-worthy.
Ready to dive in? Let’s start crafting and turn sunny afternoons into standout DIY moments.
1. Celestial Night Sky Terrarium Jar
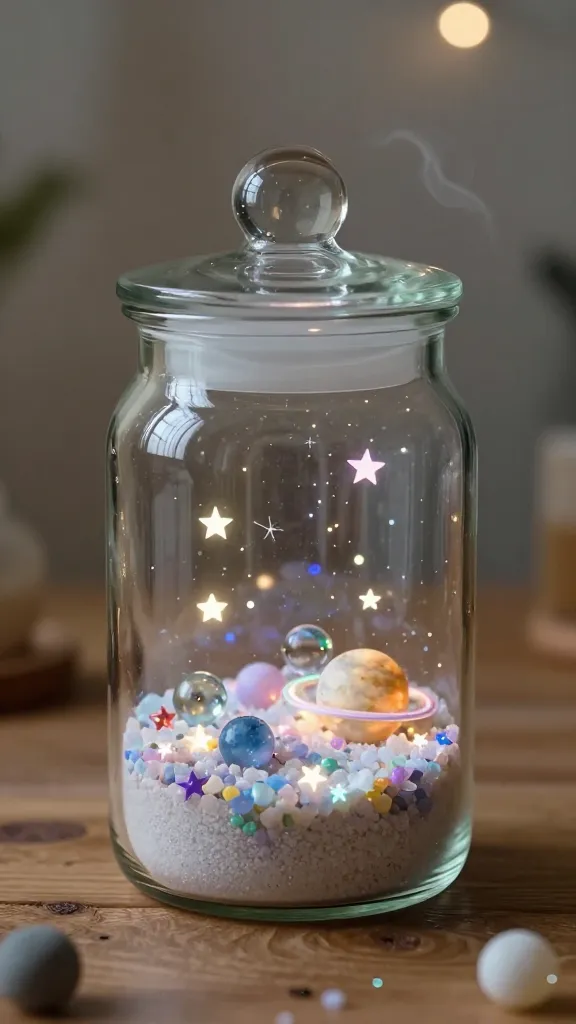
Imagine a tiny galaxy bottled up in a glass jar—stars twinkling, planets gliding, all within reach. This terrarium is not only adorable but a surprisingly calming craft that doubles as room decor or a dreamy gift.
Materials Needed
- Clear glass jar with lid
- Miniature stars, beads, and tiny planet charms
- White sand or colored gravel
- Glow-in-the-dark paint or stickers
- Waterproof adhesive
- Fine glitter (optional)
How to Make It
- Layer sand or gravel in the jar for a moonlit ground.
- Arrange star beads and planet charms using a dab of adhesive.
- Paint the lid with glow-in-the-dark accents so it shines at night.
- Close lid securely and shake gently to mix a touch of whimsy with weighty calm.
Pro Tips / Styling Ideas
- Tiered layers with different colored sands create an ombre cosmos.
- Place by a bedside lamp and watch it glow after sunset.
Who will love it: Fans of space, cozy decor, and tiny worlds. This is a perfect gift for BFFs, siblings, or a desk buddy who needs a little zen.
2. DIY Marbleized Fabric Wall Banner
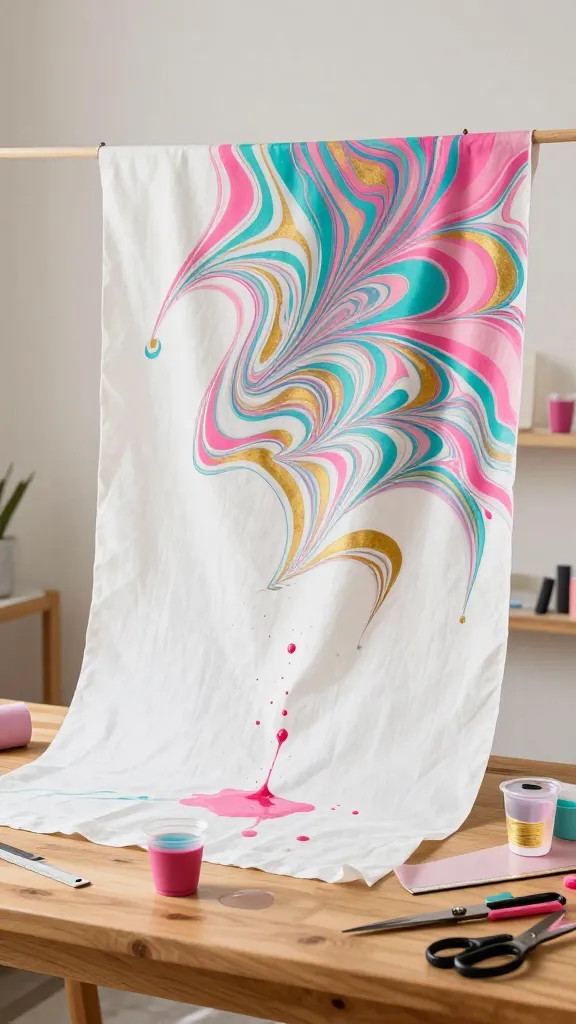
Marbled patterns are timeless, but you don’t need a fancy studio to pull off a swoon-worthy fabric banner. This project is bright, dynamic, and totally customizable to your room or vibe.
Materials Needed
- Plain cotton fabric trim (about 2–3 feet)
- Fabric paints in 2–3 colors
- Water and disposable cups
- Plastic wrap or saran wrap
- Ruler, fabric chalk, and scissors
How to Make It
- Lay fabric flat; mix colors with a little water to create a kaleidoscopic pool.
- Drop colors onto the fabric in random patterns, then swirl with a toothpick for marble veins.
- Cover with plastic wrap and press gently to blend without muddying colors.
Pro Tips / Styling Ideas
- Hang in a grid for a bold statement wall or prop it on a shelf as a pop of color.
- Use metallic paint for an extra punch of glam.
Who will love it: Color lovers and anyone wanting a quick, large-scale artwork without a big investment.
3. Upcycled Denim Plant Wraps
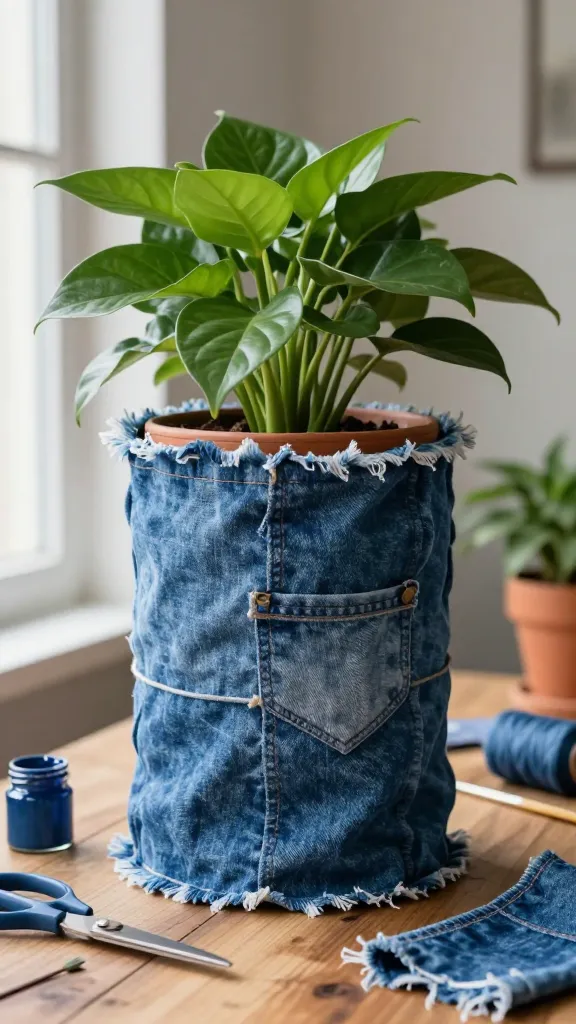
Turn old jeans into stylish plant sleeves that add texture, color, and a playful vibe to any greenery. It’s eco-friendly and fashion-forward all at once.
Materials Needed
- Old denim jeans
- Fabric scissors
- Fabric paint or embroidery floss
- Sewing needle or sewing machine (optional)
- Rubber bands or twine for securing
How to Make It
- Cut long strips from the denim legs; pocket accents make great little tags.
- Wrap around planters or pots, secure with bands or a quick stitch.
- Add simple embroidery or painted details for personality.
Pro Tips / Styling Ideas
- Mix light and dark denim for a patchwork look.
- Pair with succulents and a white-walled gallery corner.
Who will love it: Sneaky style buffs, plant parents, and anyone who loves a good reuse project.
4. Paper-Curtain Rainbow String Art
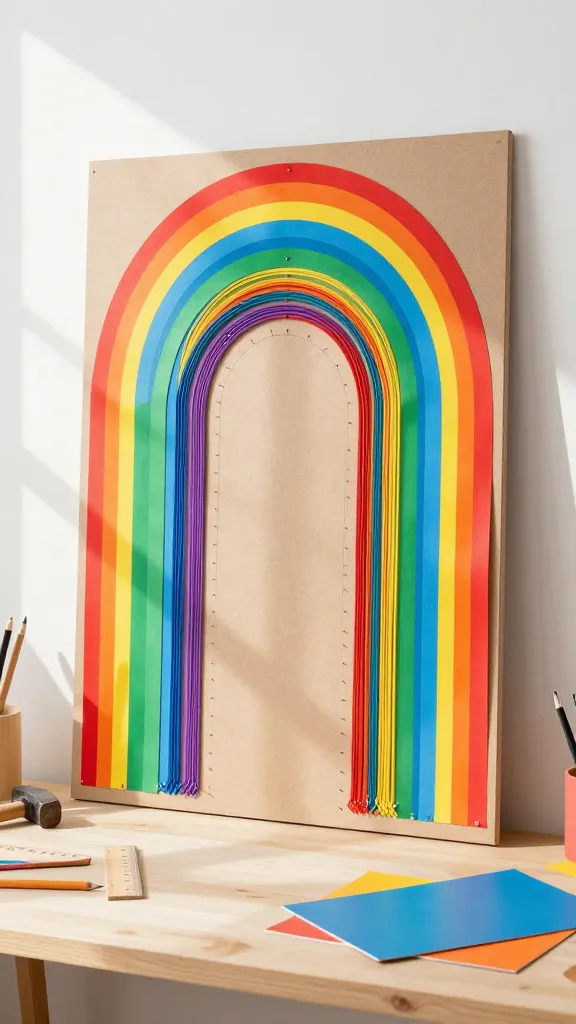
Bright, playful, and surprisingly simple, this is a modern twist on string art that uses paper strips as the canvas. It’s a cheerful focal point and a snap to assemble.
Materials Needed
- Cardstock or thick craft paper in rainbow colors
- Thin nails or push pins
- Sturdy board or foam board
- Colorful string or embroidery floss
- Hammer
- Ruler and pencil
How to Make It
- Create a simple letter or shape on the board using pencil marks.
- Nail the outline lightly, then weave string across to form a rainbow pattern against the paper backdrop.
- Glue the paper behind the board for a vibrant frame.
Pro Tips / Styling Ideas
- Use metallic strings for a sparkly effect.
- Hang near a window to catch sunbeam color splashes.
Who will love it: Teens who crave bold wall art and a project that looks impressive with minimal effort.
5. Mini Clay Creature Planters
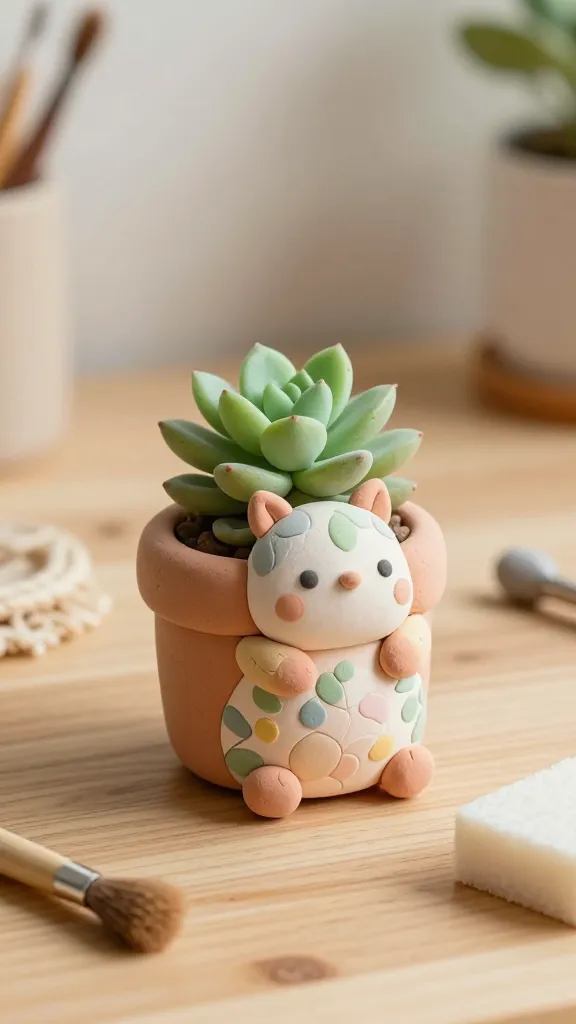
Tiny clay buddies that hold a plant and a story. These creatures bring whimsy to desks, shelves, or windowsills, and they’re perfect for budding sculptors.
Materials Needed
- Air-dry clay or polymer clay
- Small succulent or air plant pots
- Acrylic paints and brushes
- Sealant (optional)
How to Make It
- Sculpt small animal heads or whimsical shapes on a base that sits on the plant pot.
- Paint patterns and facial features once dry.
- Attach to the pot with a dab of clay or glue on the base.
Pro Tips / Styling Ideas
- Coordinate with a color palette—pastels for a soft look, neon for punch.
- Line a windowsill with several friends for a tiny zoo vibe.
Who will love it: Creative kids who love characters and a little artistry with a functional twist.
6. Glow-In-The-Dark Friendship Bracelets
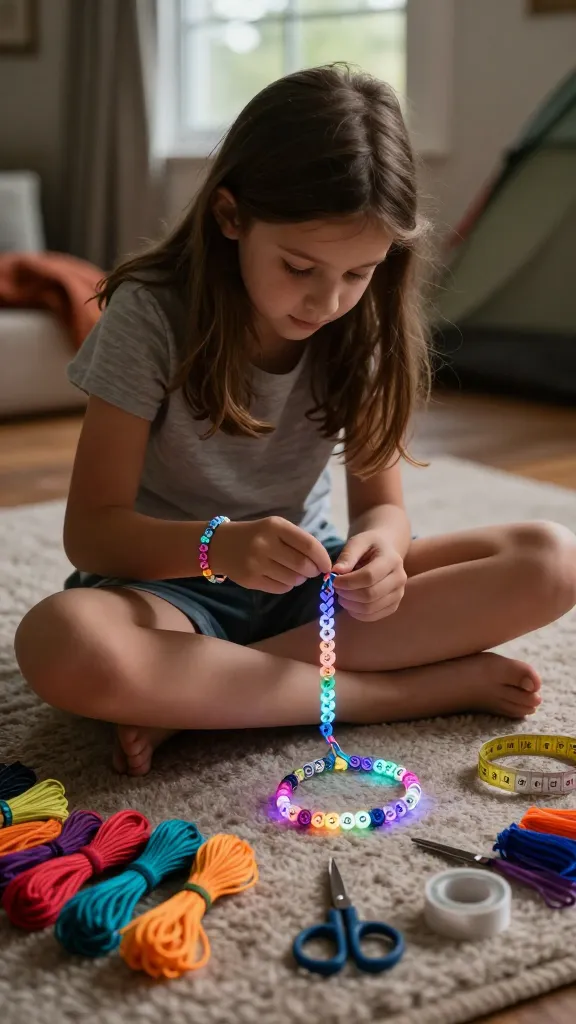
Classic bracelet-making with a glow-up. These are not only fun to weave but also practical for night-time adventures or campouts.
Materials Needed
- Bright embroidery floss in 3–4 colors
- Glow-in-the-dark thread or beads
- Scissors and tape
- Measuring tape or ruler
How to Make It
- Use a simple chevron or braid pattern to keep it toddler-simple but trendy for tweens.
- Work a small glow element into the design so the bracelet shines in the dark.
Pro Tips / Styling Ideas
- Gift a set to a group of friends with coordinated colors.
- Wear a glow bracelet for late-night hangouts to keep the vibe fun and safe.
Who will love it: Besties who want something meaningful to wear and share.
7. Tape-Resist Watercolor Cards
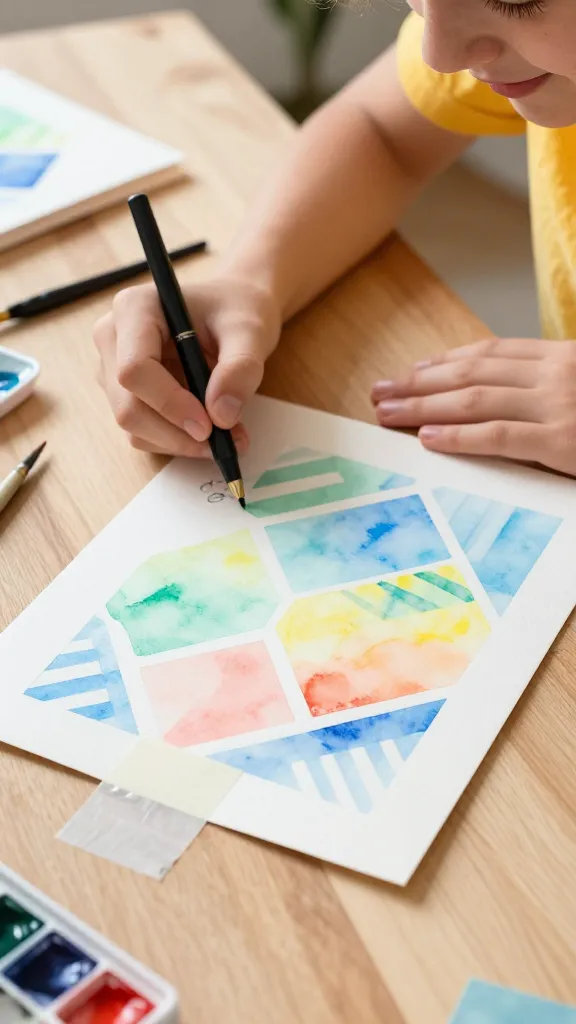
A postcard-worthy, no-mess painting project that doubles as heartfelt notes to family, friends, or neighbors.
Materials Needed
- Watercolor paper or sturdy cardstock
- Masking tape
- Watercolor paints
- Paintbrushes
- Pens for doodling on the finished card
How to Make It
- Place tape in bold stripes or geometric shapes on the paper.
- Watercolor wash over the exposed areas, then peel the tape away to reveal crisp lines.
- Jot a short note or doodle to finish.
Pro Tips / Styling Ideas
- Layer colors and let some bleed into the tape edges for a painterly effect.
- Stack a small set of these as a pantry of ready-to-send greetings.
Who will love it: Card makers, stationery nerds, and anyone who enjoys personalizing mail.
8. Botanical Resin Charms
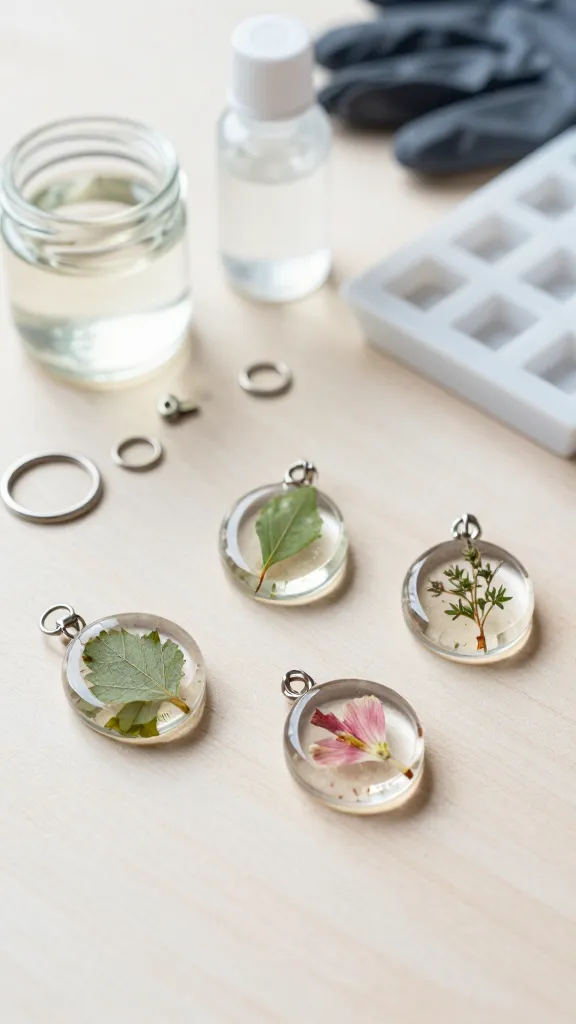
Natural wonders preserved in clear resin, captured as charms for bracelets, keychains, or zipper pulls. It’s a mini jewelry-maker’s dream with a touch of botanical magic.
Materials Needed
- Clear epoxy resin and hardener
- Tiny pressed leaves, petals, or herbs
- Silicone molds
- Keyring loops or necklace bails
- Gloves and a dust-free workspace
How to Make It
- Mix resin per package instructions; pour a thin layer into molds.
- Place a stabilized leaf or petal into each mold, then top with more resin.
- Attach hardware once fully cured.
Pro Tips / Styling Ideas
- Combine translucent colors for a glassy, beachy look.
- Include a tiny dried flower for a spring vibe all year round.
Who will love it: Jewelry lovers and anyone who appreciates nature preserved in art.
9. Sneaker-Tape Canvas Art
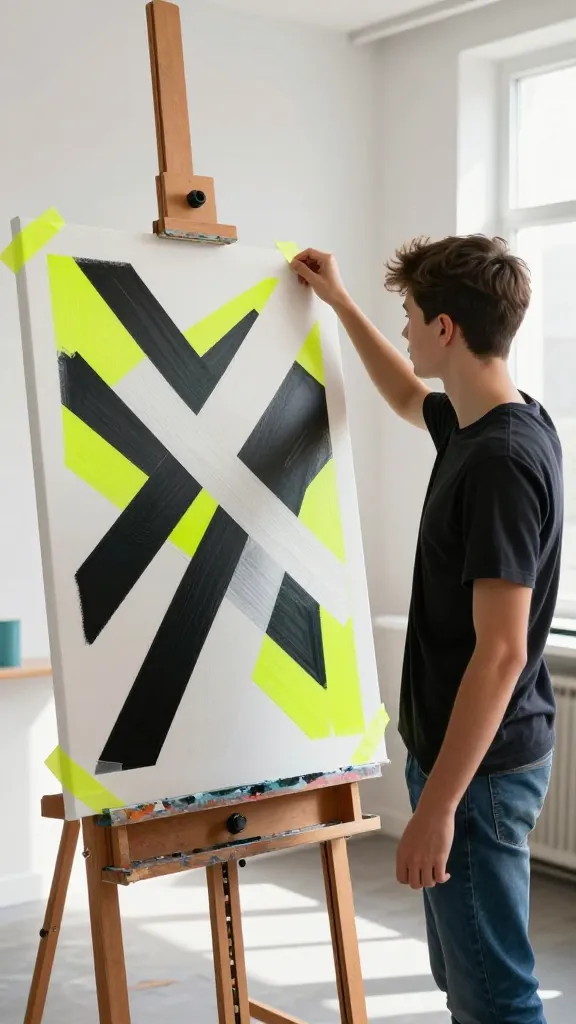
Turn a plain canvas into a street-art-inspired piece using bold painter’s tape. It’s a playful way to experiment with color blocking and geometry.
Materials Needed
- Blank canvas
- Painter’s tape (various widths)
- Acrylic paints
- Brushes and a sponge
How to Make It
- Lay out dynamic shapes with tape, then paint inside the taped areas.
- Peel tape away while paint is still slightly tacky for sharp edges.
Pro Tips / Styling Ideas
- Try a black background with neon tapes for a gallery vibe.
- Create a small series to form a wall mural feel.
Who will love it: Kids who like bold patterns and modern vibes, perfect for dorm rooms or teen dens.
10. Feathered Shadow Box Scenes

Create a tiny, tactile 3D scene using feathers, mini objects, and a shallow shadow box. It’s a nature-inspired, whimsical display piece.
Materials Needed
- Shallow shadow box frame
- Assorted feathers, miniature figures, dried moss
- Glue gun or craft glue
- Optional paint or markers for background
How to Make It
- Decorate the background if you want a sky or forest scene.
- Arrange feathers and small items to create a tiny landscape or creature.
- Glue pieces securely, then close the frame.
Pro Tips / Styling Ideas
- Use natural tones for a calming vignette or bright hues for a playful nook.
- Group a few shadow boxes together for a mini gallery wall.
Who will love it: Nature lovers and anyone craving a unique wall ornament with texture.
11. Ice-Dyed Tote Bags
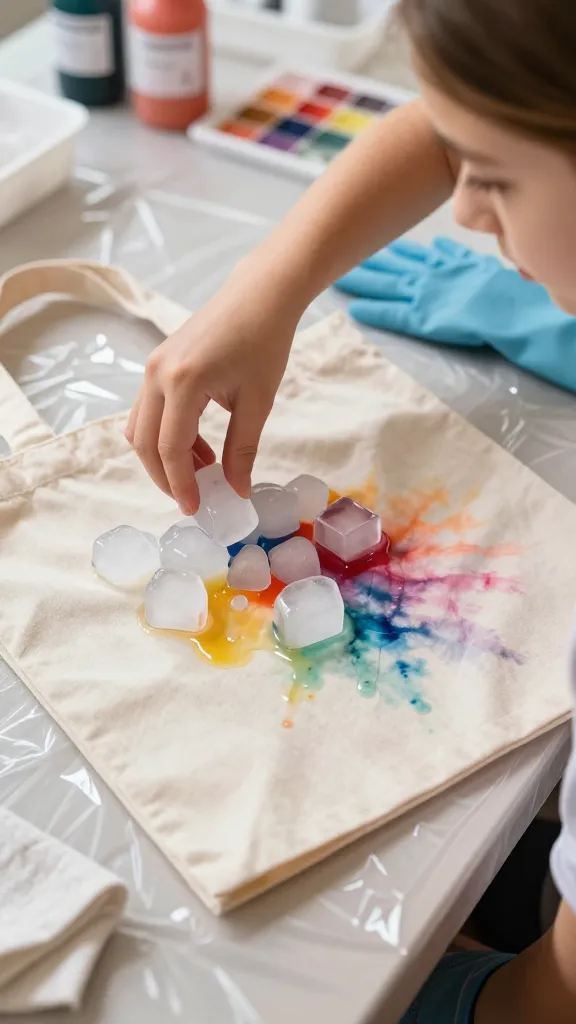
Ice-dyeing is like magic for tweens. It creates airy, one-of-a-kind patterns on fabric that are both wearable and gift-worthy.
Materials Needed
- Plain cotton tote bag
- Food coloring or dye
- Ice cubes
- Plastic sheet or tray to catch drips
- Rubber gloves and old towels
How to Make It
- Lay the tote on a tray, scatter ice on top, and drizzle dye over the ice.
- Let the ice melt and dye soak in; rinse and air dry.
Pro Tips / Styling Ideas
- Use complementary colors for a gradient effect.
- Pair with a matching pencil case or water bottle for a coordinated look.
Who will love it: Fashion-forward crafters who want a practical, stylish project.
12. Candy Jar Miniatures with Real Inclusions
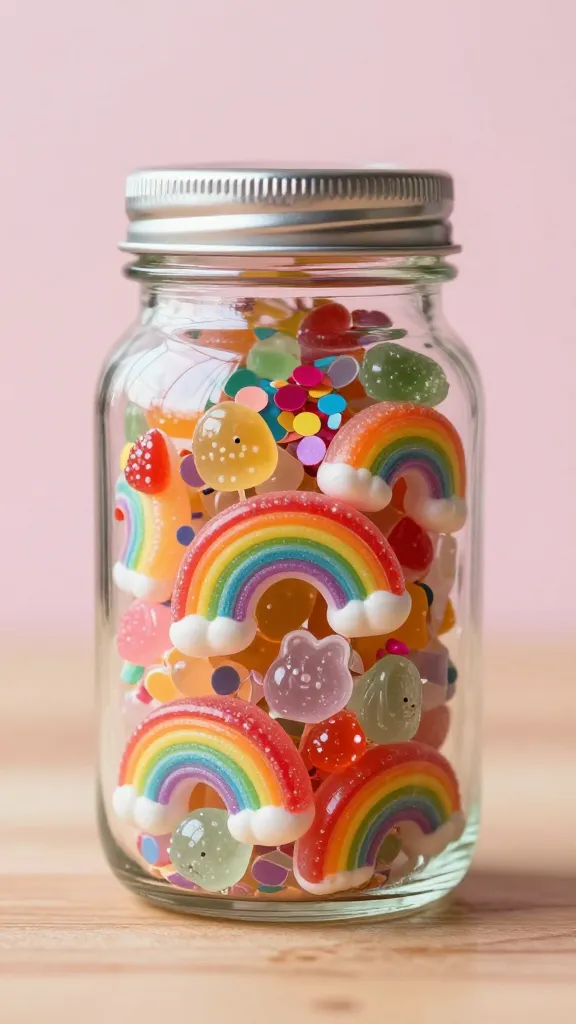
Freeze a little sweetness in resin or simple glass jars, but make it visually delightful with real candy bits, confetti, and mini figurines for a tiny edible-inspired world.
Materials Needed
- Small glass jars with lids
- Assorted candy shapes (not edible after curing if resin is used)
- Epoxy resin or glue
- Miniature figurines or decorations
How to Make It
- Layer decorations in the jar with a little glue or resin to hold things in place.
- Seal with the lid; add a tiny label with a fun name for the collection.
Pro Tips / Styling Ideas
- Use this as a desk accessory or a playful kitchen jar for tiny treats you can’t reach without a smile.
- Swap in seasonal colors for year-round charm.
Who will love it: Fans of miniatures, collectibles, and playful decor with a sweet twist.
13. Seasonal Scented Sachets in Quick-Cewl Shapes
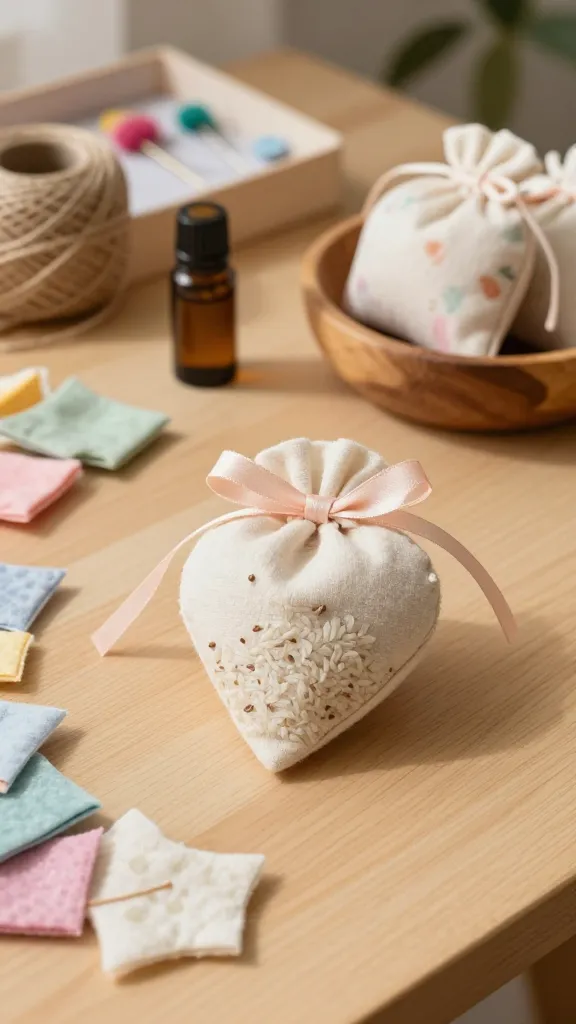
End the list with scent-sational, hand-sewn sachets that bring cozy vibes to drawers or desks. It’s a small project with big aroma and style payoff.
Materials Needed
- Small fabric scraps or felt
- Rice or flaxseed as filling
- essential oil drops (optional)
- Needle and thread or fabric glue
- Ribbon or twine for hanging
How to Make It
- Cut fabric into cute shapes (stars, hearts, or leaves).
- Fill with a pinch of scent and seal with an easy stitch.
- Attach ribbon to hang or tuck into drawers for a fresh scent.
Pro Tips / Styling Ideas
- Use different fabrics for a textured bouquet of scents and looks.
- Label with a tiny tag showing the scent and when to replace.
Who will love it: Anyone who wants a practical, delightful way to refresh spaces and clothes drawers.
Conclusion
These 13 completely unique, boredom-busting summer crafts for tweens prove that creativity can be fast, fun, and fabulous. Pick one to start or power through all of them for a full-on crafty summer archive you’ll want to pin, save, and reuse. Trust me—your future messy, colorful craft desk will thank you.