9 Minimalist Craft Ideas Painting Textured: Calm, Chic Projects
Ready to turn simple supplies into statement pieces with texture and calm, modern vibes? These minimalist, textured crafts prove you don’t need color chaos to make something unforgettable. Trust me—each idea is easy, chic, and totally Pinterest-worthy.
From wall art that whispers elegance to cozy decor with tactile punch, these projects are designed for quick wins and big impact. Let’s dive in and pick a favorite (or try them all and create a mini gallery). FYI: you’ll love how satisfying these are to finish.
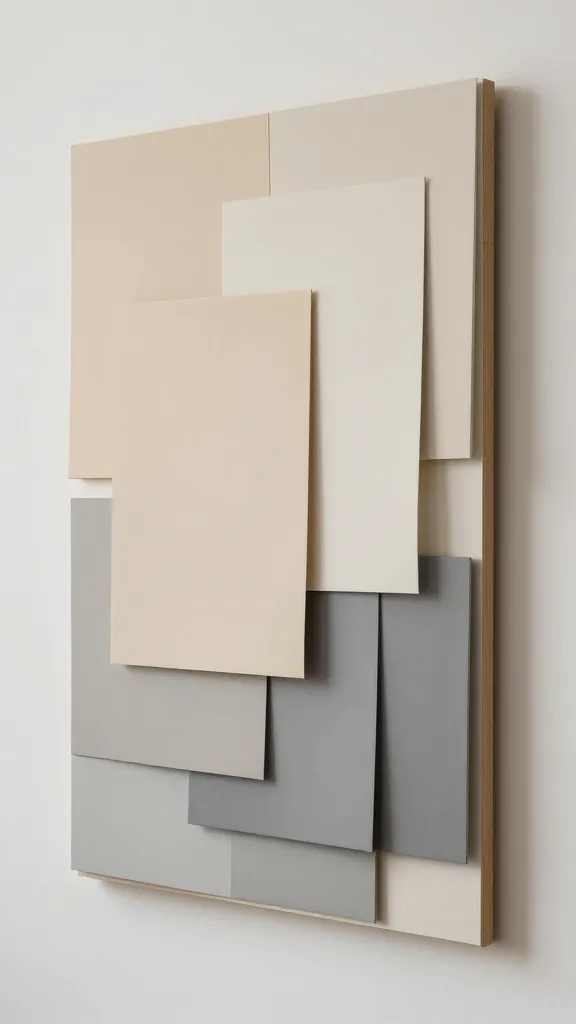
1. Textured Canvas Monochrome Landscape
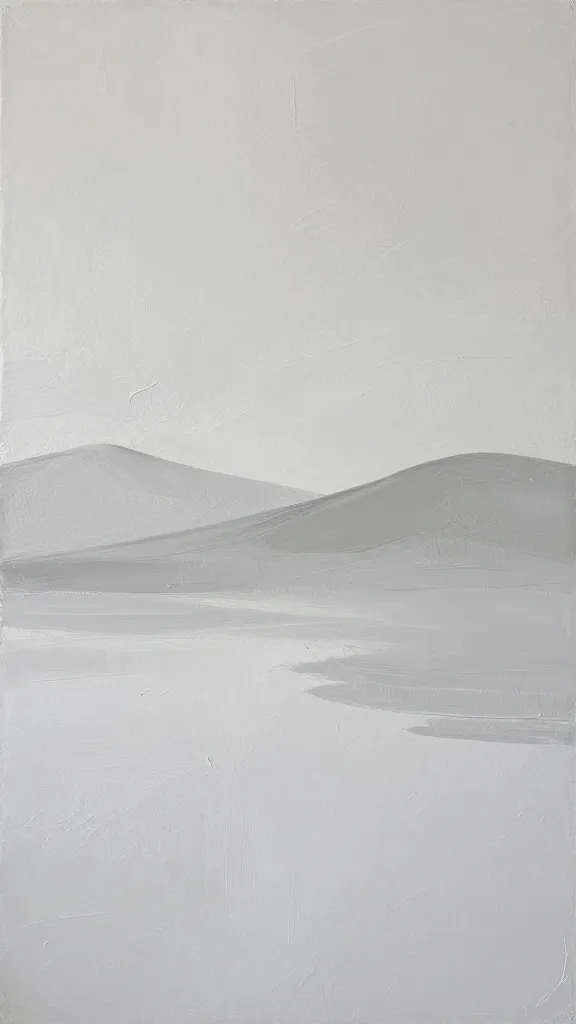
Picture a serene wall in soft gray tones, with gentle ridges of texture catching the light. This minimalist landscape uses a restrained palette and tactile brushwork to create depth without clutter. It feels calm, chic, and utterly gallery-ready.
Materials Needed
- Stretched canvas (8×10 or 12×16 works well)
- Acrylic paints (shades of white, gray, black)
- Modeling paste or heavy gel medium
- Palette knife or stiff-bristled brush
- Painter’s tape (optional for edge clean-up)
How to Make It
- Tape off a clean edge if you like crisp borders, then prime the canvas if you’re picky about texture adhesion.
- Mix a pale gray with a touch of white. Spread a thin base coat and let it dry.
- Dab modeling paste onto the canvas in light horizontal strokes to mimic distant hills. Build texture gradually—less is more, but you want visible ridges.
- Add darker gray accents in sparse patches to create depth. A few subtle black flecks near the horizon add drama.
- Finish with a light glaze of translucent white over the textured areas to unify the piece.
Pro Tips / Styling Ideas
- Hang in a minimalist gallery wall with other monochrome pieces.
- Pair with a thin black frame and a cool-toned room to maximize contrast.
End Note
For fans of clean lines and tactile art, this piece is a quiet, sophisticated addition. It’s ideal for living rooms or bedrooms where you want a calm focal point.
2. Soft Texture Wall Hoop Art
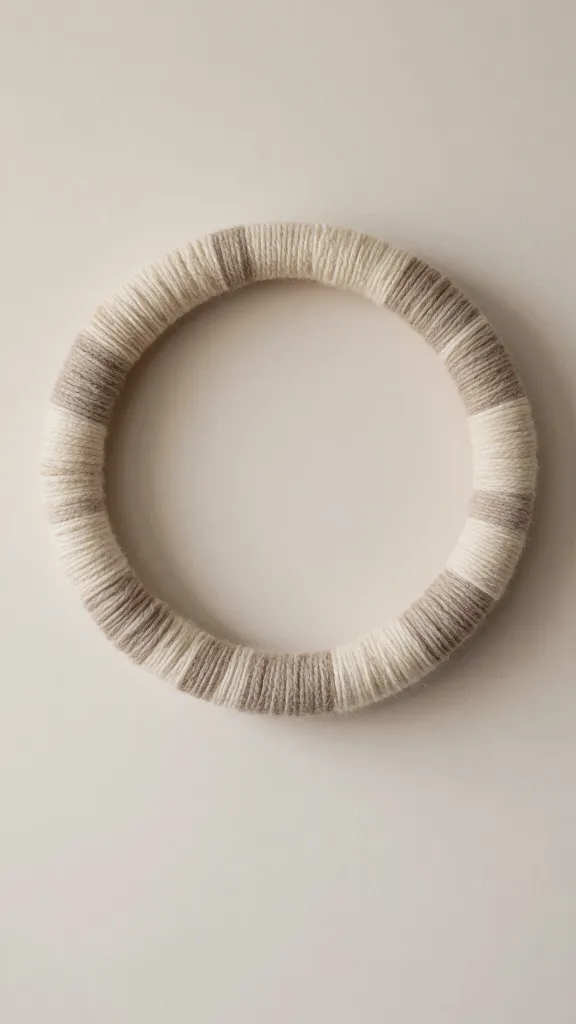
Imagine a round, airy anchor for a wall—smooth fabric, tactile yarn, and a dash of matte paint. This hoop art adds softness and texture without overwhelming a space.
Materials Needed
- Embroidery hoops (12–14 inches)
- Textured yarns (cotton, boucle, or chenille)
- Acrylic paint (neutral tones)
- Fusible web or fabric glue
- Scissors
How to Make It
- Pick a color palette of two neutrals and one accent. Paint a thin circle or leave natural wood tone for contrast.
- Wrap the hoop with textured yarn, layering in different stitches or tufted sections for variation.
- Use glue to secure loose ends. Add a few vertical stitches with a thin contrasting thread for subtle detail.
- Hang in a cluster or solo for a soft, tactile statement.
Pro Tips / Styling Ideas
- Mix sizes in a trio for a relaxed, curated look.
- Coordinate with throw pillows or a rug in the same palette for cohesion.
End Note
Cozy texture art that’s simple to execute and endlessly versatile. This would look amazing in a nursery, living room, or entryway.
3. Minimalist Painted Ceramic Coasters With Subtle Texture
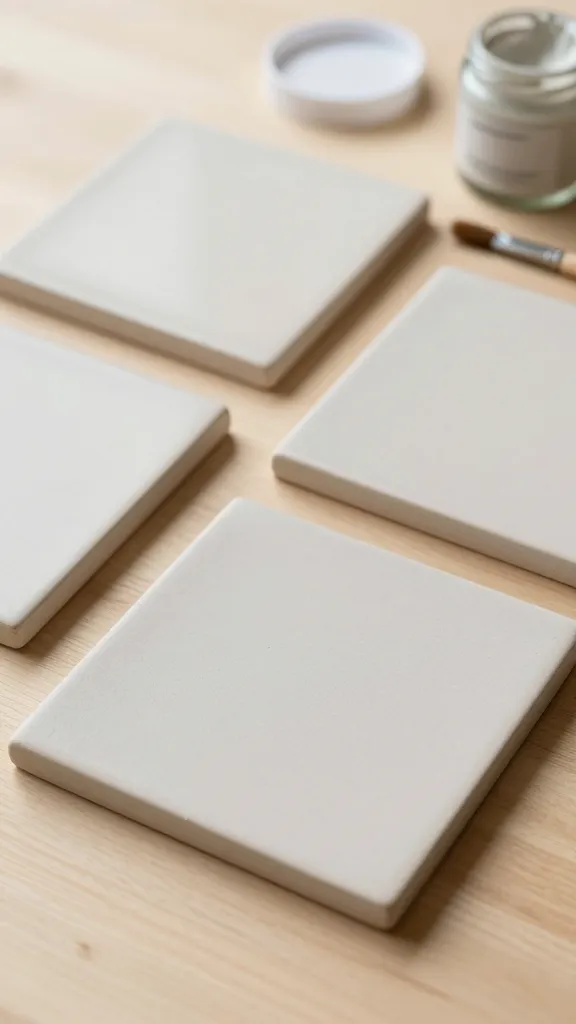
These coasters are not just functional; they’re small tactile canvases with raised textures that catch the light. A practical project that doubles as a chic gift.
Materials Needed
- Plain ceramic tiles (4×4 inches)
- Acrylic paints (neutral palette)
- Texture medium or sand for grit
- Clear sealant (matte)
- Paintbrushes and sponge
How to Make It
- Apply a light base color to each tile and let dry.
- Mix a small amount of texture medium with a contrasting color for a raised stripe or dot pattern.
- Use a sponge to dab texture onto the tile, creating a tactile surface without overpowering the look.
- Seal with a clear matte finish to protect the texture and keep it classy.
Pro Tips / Styling Ideas
- Pair with a matching napkin or placemat for a cohesive dinner setting.
- Gift with a set of coasters tied with a ribbon for a thoughtful present.
End Note
Understated, useful, and oddly satisfying to touch. These coasters are a daily reminder that texture can elevate the everyday.
4. Gravelly Glass Jar Vases With Painted Texture
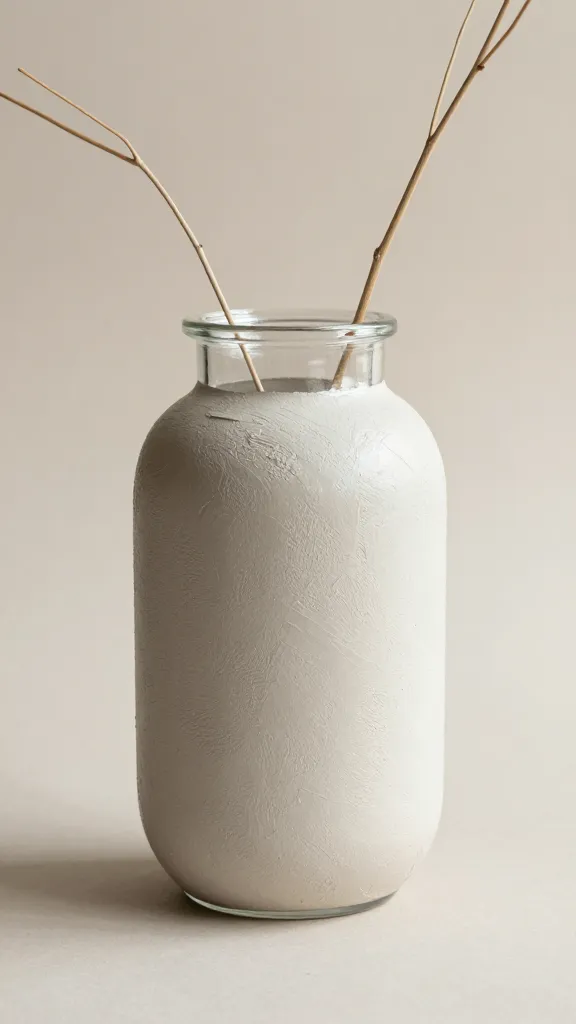
A simple glass jar becomes a sculptural piece with a painted, textured exterior. It’s minimalist, versatile, and surprisingly chic on a coffee table or shelf.
Materials Needed
- CLEAR glass jars or small vases
- Acrylic paints (matte neutrals like dove gray, warm white)
- Texture paste or sand mixed with paint
- Masking tape (optional for clean lines)
- Fresh or dried stems for styling
How to Make It
- Clean jars thoroughly. Tape off a top rim if you want a crisp edge.
- Create a textured layer by mixing texture paste with paint and applying in horizontal bands or a faux-marble swirl.
- Let it dry, then add a second light glaze to unify the texture variations.
- Fill with stems and style on a mantle or shelf.
Pro Tips / Styling Ideas
- Use a trio of jars in varying heights for visual rhythm.
- Coordinate with a neutral bouquet to keep the vibe calm and modern.
End Note
Textured jars that are as decorative as they are practical. They make a lovely centerpiece or a quiet desk accent.
5. Fabric-Wleck Wall Panel With Subtle Shading
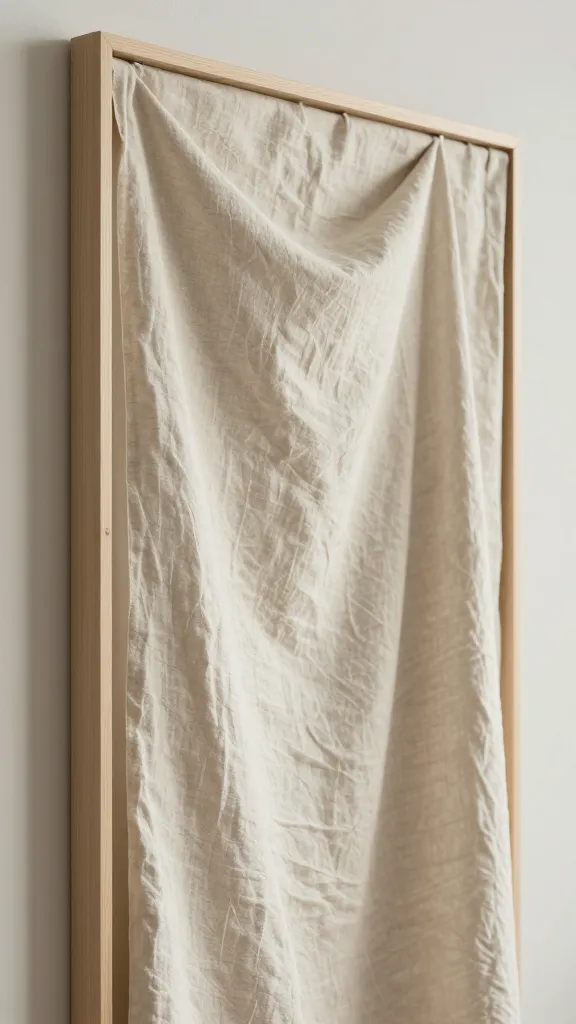
Think of a soft, fabric-panel wall piece that’s more sculpture than textile. A few layers of fabric, a hint of shading, and a minimalist frame create a refined, tactile statement.
Materials Needed
- Stiff fabric or linen canvas (small scale like 12×16 inches)
- Acrylic paints or fabric dyestuffs
- Thin wood frame and mounting hardware
- PVA glue or fabric glue
- Small heat gun or hair dryer (to set folds)
How to Make It
- Stretch fabric over the panel and secure with glue; let dry fully.
- Paint subtle shading in a corner or along one edge to create depth. Build gentle tonal changes rather than bold strokes.
- Create shallow pleats or folds by dampening tiny sections and pressing flat or pinching to create texture.
- Frame and mount in a softly lit space where texture catches the eye.
Pro Tips / Styling Ideas
- Hang near daylight to emphasize the fibers’ texture.
- Pair with light wood furniture and muted textiles for a serene look.
End Note
A tactile artwork that stays quiet but fascinates visitors. Perfect for a hallway or bedroom nook that needs a refined focal point.
6. Painted Stone Tablet With Engraved Texture
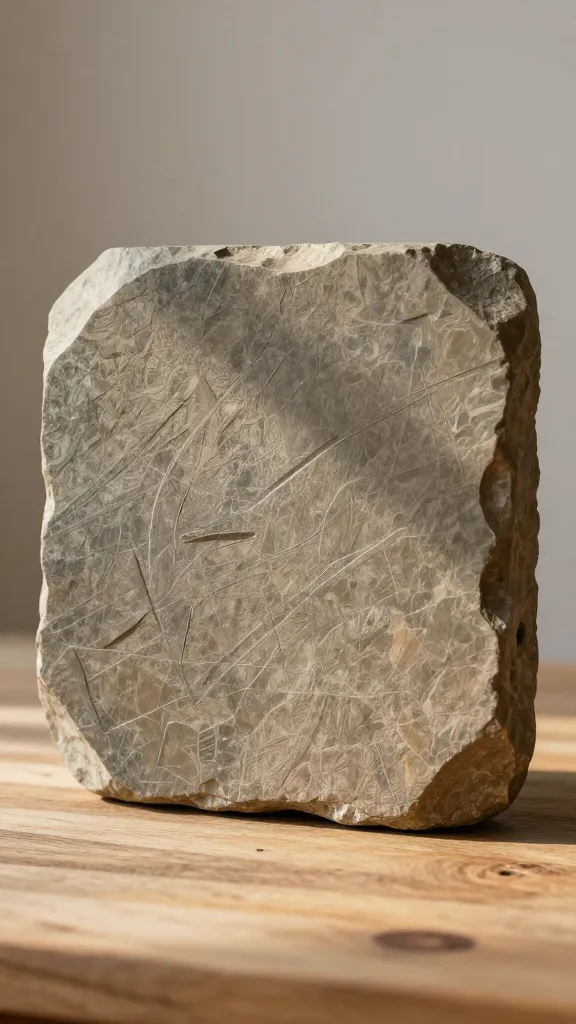
A flat stone transformed into a painting with engraved or pressed texture creates an earthy, minimalist centerpiece. It’s rugged, natural, and surprisingly easy.
Materials Needed
- Flat stone or slate piece (8×10 inches)
- Acrylic paints (earth tones)
- Wooden stylus or sculpting tool for engraving
- Topcoat sealer (matte)
How to Make It
- Sketch a simple, abstract design with a pencil on the stone.
- Engrave lines or shapes with a stylus to create texture that catches light differently than paint alone.
- Paint within the grooves with muted tones, wiping excess paint from the raised areas for a worn-in effect.
- Seal to protect and deepen the colors.
Pro Tips / Styling Ideas
- Display on a floating shelf with a few other granite-like textures for a rugged gallery vibe.
- Use as a rustic alternative to wall art in a kitchen or entryway.
End Note
Texture and earthiness combine for a grounded, minimalist piece that still feels luxe. It’s a conversation starter with a calm presence.
7. Minimalist Raised-Pattern Wood Block Decor
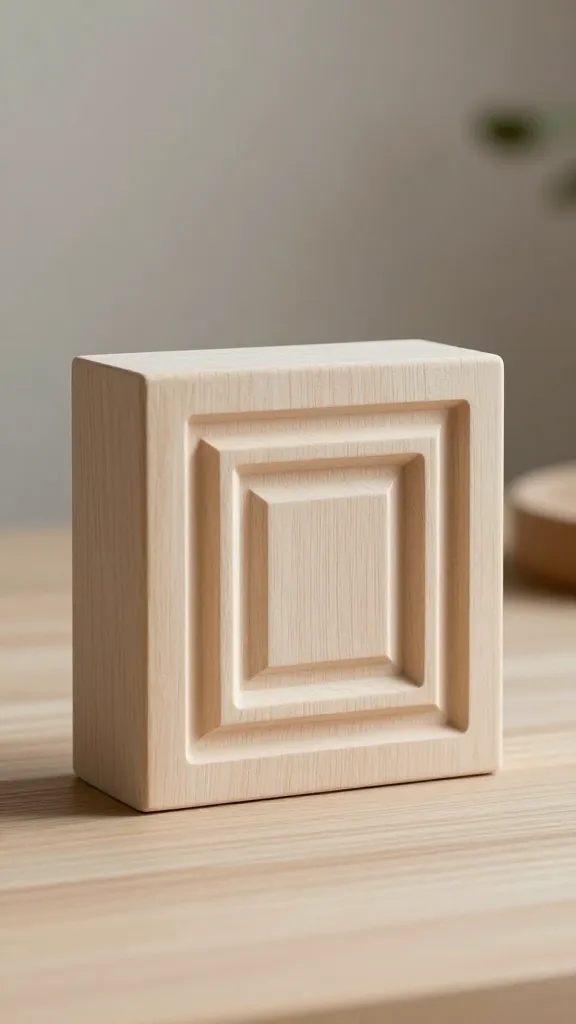
A smooth wood block with a carved, raised pattern offers a tactile focal point that plays with light and shadow. This project is surprisingly quick and highly customizable.
Materials Needed
- Unfinished wood block or small plank (about 6×6 inches)
- Acrylic paints (neutral tones) or wood stain
- Carving tool or knife for simple raised patterns
- Topcoat sealant
How to Make It
- Carve a simple geometric or organic pattern on one face of the block.
- Paint with a solid color or stain the wood for a natural look, then highlight raised areas with a lighter shade.
- Seal to protect and enhance the texture.
Pro Tips / Styling Ideas
- Group with other wood tones for a cohesive, warm mood.
- Place on a mantle or bookshelf where the light can reveal the carved texture.
End Note
Perfect for nature lovers and minimalist collectors alike. A small piece with big personality.
8. Textured Paper Mulp–Layered Card Art
Transform ordinary paper into a sculptural, textured wall piece using layered, painted sheets. It feels contemporary, light, and totally DIY-friendly.
Materials Needed
- Thick watercolor or mixed-media paper
- Acrylic paints (soft neutrals)
- Glue or double-sided tape
- Scissors or craft knife
How to Make It
- Cut multiple sheets into varying rectangular shapes, then paint each with subtle gradients.
- Adhere the sheets in a stacked, offset arrangement on a backing board or canvas to create layered depth.
- Finish with a light spray of matte sealer to unify the layers.
Pro Tips / Styling Ideas
- Try a monochrome palette with a whisper of ink or blue for intrigue.
- Hang in a narrow hallway or above a desk for a dynamic, modern vibe.
End Note
A clever transformation of simple paper into a sculptural piece that feels effortlessly chic. It’s a perfect weekend project for a quick uplift.
9. Subtle Texture Linocut Prints
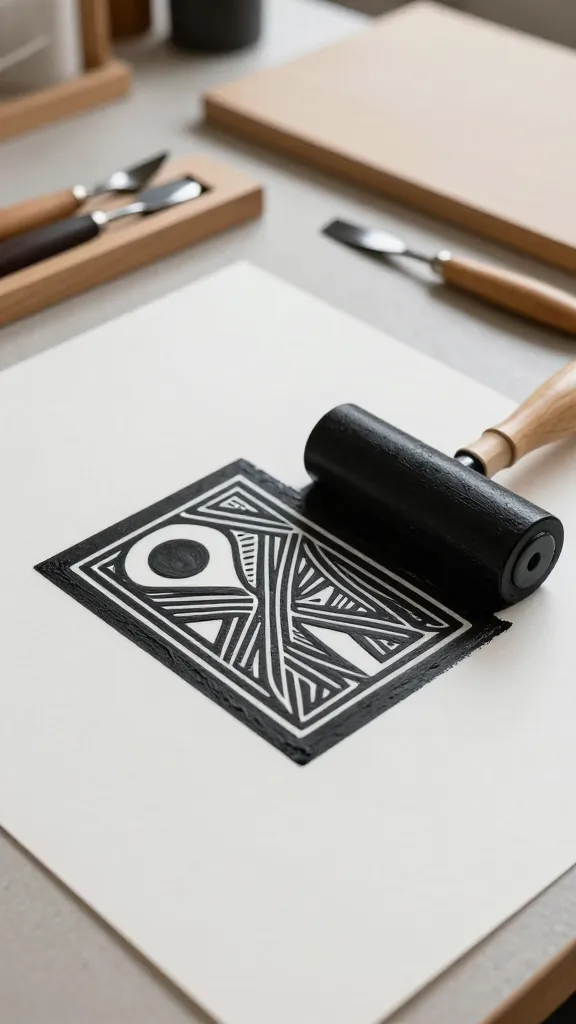
Give your walls a quiet, refined texture with a shallowly carved linocut print. It’s minimal, graphic, and deeply satisfying to pull a clean print you can frame simply.
Materials Needed
- Linoleum block or soft-cut linoleum
- Carving tools
- Ink and brayer
- Heavyweight paper (cold press or cotton rag)
- Mat board and frame for display
How to Make It
- Sketch a simple, abstract motif—think geometric lines or a single curved shape.
- Carve away negative space; keep the design bold but sparse.
- Roll ink onto the cut surface and press paper onto the block or use a press for even impressions.
- Let dry and mount with a clean frame for a sleek finish.
Pro Tips / Styling Ideas
- Make a small series in varying scales for a refined wall cluster.
- Use a consistent ink color to maintain the minimalist feel.
End Note
These prints blend craft with fine art vibes, offering texture, contrast, and quiet sophistication. A few frames and you’ve got a mini gallery with serious style.
Conclusion
There you have it—nine completely unique, minimalist craft ideas that harness texture for maximum impact. Each project is designed to be approachable, stylish, and perfectly shareable on social feeds. Pick one to start, or go wild and try them all—your space will thank you with a calmer, more tactile glow. Seriously, you’ll love the way texture changes everything. Have fun crafting!