15 Mouse Craft For Kids
15 Mouse Craft For Kids
Kids will love this Mouse Craft! It’s a fun and easy way to make a cute little mouse that can be used as a toy, or as a decoration.
All you need is some paper, scissors, glue, and a few other simple materials. This project is perfect for a rainy day, or any day when you need a little bit of creativity.
I have 4 kids and we love to do crafting together. These Mouse crafts are so fun! Try it out with your kids.
Paper Plate Mouse Craft
Materials
- Paper plate
- Paint or markers (optional)
- Glue gun (optional)
- Googly eyes (optional)
- Pipe cleaners (optional)
- Hole punch (optional)
Pom Mouse
You will need
- pom poms (you can use any color you like, but I like the bright colors)
- cardstock paper in white or another light color
- scissors and glue (optional)
Cut out your mouse shape from the cardstock paper in white or any other light-colored paper. The size of your mouse is up to you!
The more detailed the shapes, the longer it will take to cut them out but also more fun for kids who love crafts and activities with their hands!
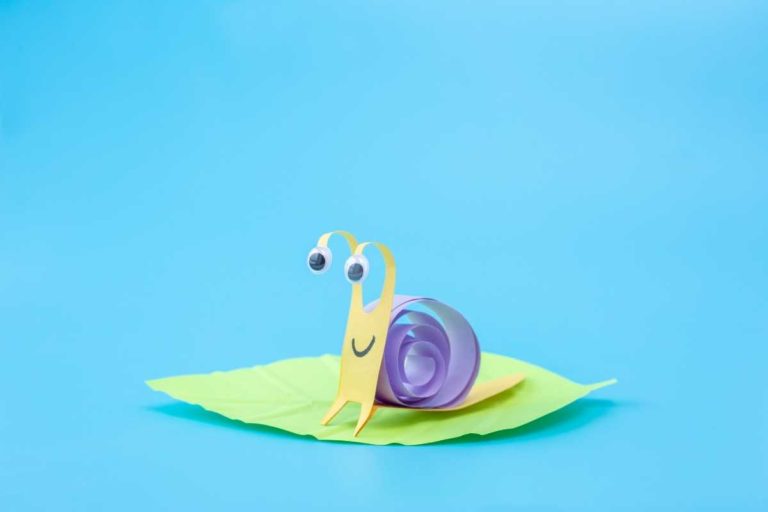
3D Paper Mouse
Pom Poms and Pom Poms on Head
- Tissue Paper Mice (this is a great beginner craft for kids)
- Apple Stamping Mice
- Handprint Easter Mice (these are SO cute!)
Paper Roll Mouse Craft
To make the body, cut out a toilet paper roll in the shape of a mouse.
Use markers to draw an outline of a mouse on the toilet paper roll and then cut it out with scissors or an Exacto knife (the latter is better for young children). Once you have your shape, use markers to add facial features such as ears, whiskers, and eyes!
You can also add some fun details like tails made from pipe cleaners or colored tape if you’d like!
Egg Carton Mouse Craft
To make an egg carton mouse, you will need
- A large egg carton
- Construction paper in colors of your choice
- Scissors (or a paper cutter if you have one)
- Glue and tape (optional)
To make your egg carton mouse
Cut out the bottom of the egg carton to create a hole large enough for your child’s hand to fit through.
If you do not have a paper cutter, this can be done by cutting along each side of the bottom and then folding it flat so that it becomes flattered on all sides except for where there is still an edge left around it. This will allow room for their hand to fit inside without being obstructed by any sharp edges or corners of the cardboard itself.
Once this has been done, decorate with painted faces and bodies using construction paper cut into different shapes such as squares or triangles for ears/feet, etc.
You can also add other features like paws using more pieces of colored construction paper glued onto them as well!
Tie Mouse To A Stick Puppet
This craft is all about making a mouse puppet out of a stick and string. First, draw a template of a mouse.
You can use any kind of stick or piece of wood that is thin enough to fit through the hole in the bottom of your mouse’s head and create an arch at the top of its body, as well as reach around its back.
Tie your string or ribbon at one end, so it will be easier to pull through once you’ve secured your wand with glue. Glue one end down on top and then pull it through until it reaches the other side before securing it in place with more glue. Use markers for eyes and mouth if you’d like!
Apple Stamping Mice
Use a stamp or cookie cutter to make the apple shape. If you’d like a more rounded shape,
find a round object that’s slightly smaller than your desired size and trace it with your apple stamp/cookie cutter on top of your rolled-out dough.
Use a knife to cut out two ears from the leftover dough and set them aside for now (you’ll need to make two of these).
Cut another small piece out of the remaining rolled-out dough for the face—this will be used for making eyes and mouth.
Using scissors, cut tiny triangles from each side of this piece until it looks like you have four small triangles that form an X shape at one end (this is where your mouse’s mouth will be).
At this point, it might look like there are too many pieces that don’t fit together nicely—don’t worry! Once you bake all these pieces together, everything should come together perfectly!
Tissue Paper Mice
Tissue paper mice are a great craft for kids because they are inexpensive to make, easy to assemble, and can be taken to school.
You will need.
- Tissue paper in various colors
- Construction paper in browns/beiges/white (if you want them to look like mice)
- Scissors or Exacto blade to cut out the shapes
First, you will want to cut out a long piece of brown construction paper. You may want two pieces of white construction paper if you only plan on making one mouse. Next lay down your tissue paper on top with the color facing down and roll it up into a ball.
This may be easier if someone helps you. Then cut off both ends until it resembles an egg shape with no bottom so that when it opens up it shows all the colors inside! That’s it! Your tissue-paper mouse is ready for playtime or as part of your craft project at school!
Handprint Mice
Handprint mice are a great craft to do with kids.
It’s easy to make and fun for kids to eat up the process of making them. To make handprint mice you will need:
- Paint or markers (to color the hands)
- Stamps (for the body)
- Paintbrushes (to paint in between mouse body parts)
- Hole punches (to create ears)
Button Mice Craft For Kids
- Use buttons for the eyes.
- Use buttons for ears.
- Use buttons for the nose.
- Use buttons for the mouth.
Use buttons for arms, or use yarn and pipe cleaners instead of buttons if you want your mouse to look more like a person or animal that has arms, not just a ball with stuff on it!
I used the same idea when making my cat craft (Link). You could also use pipe cleaners instead of yarn if you want this mouse to be in motion rather than just sitting there looking cute!
Also, use buttons for feet and tail: my kids were really excited about this part because they thought it looked like a “real” mouse!
Popsicle Stick Mouse Craft For Kids
What You’ll Need
- Craft sticks (in this case, popsicle sticks)
- Paint, glue, and/or markers
- Scissors or a craft knife (if you’re cutting the craft sticks yourself)
How To Make It
- Cut the popsicle sticks so that they are about 2 inches long.
- Paint them with your choice of color(s).
- Glue on the eyes and nose if you have them handy!
- Cut out any other shapes like ears from another piece of paper – these will be glued onto the mouse once it’s dry!
- Leave to dry overnight before displaying for all to see
TP Roll Mice
Here’s what you’ll need for this project
- An empty toilet paper roll
- A pair of scissors
- A glue stick (or white glue will work, too)
- 1 pair of googly eyes
if you don’t have plastic ones already, that is. If you do have them and they’re not in use for another craft project, then great! You’re all set!
- Black construction paper
one sheet should be more than enough for the 5 mice we’ll be making today.
- Red construction paper
again, one sheet should do it.
Yellow construction paper (optional)
if you want to make a mouse with a yellow body instead of black or red (or use both colors), then get yourself some yellow construction paper as well!
Babyfood Jar Lid Mouse Craft For Kids
- Use a baby food jar lid to make your mouse craft.
- Decorate the lid with paint, markers, or crayons.
- Attach a string around the middle of the jar lid with glue for the tail, or use another material for a different look (see below).
- You could also attach a paper clip and yarn tail using glue as well (see below).
Soda Bottle Mice
- Use a 2-liter soda bottle.
- Cut the bottle in half.
Glue the two halves together. It’s okay if there are gaps—it will add to the appeal of your mouse!
Use a hole punch to cut out the eyes and nose from construction paper or felt, then glue them in place on your mouse head with hot glue (or whatever type of glue you prefer).
Cut two circles for ears from construction paper or felt as well, and glue them onto either side of your mouse’s head using hot glue (or whatever type of adhesive you prefer).
These are so fun! Try it out with the kids.
These are so fun! Try it out with the kids. Have you ever tried making something from scratch?
It’s a great way to have fun, get creative, and make something new.
To start, make sure you have enough time to do it. And don’t forget about getting all the supplies needed for your project!
If you plan on doing this craft at home, remember to have plenty of space available too.
Conclusion
We hope you enjoyed our collection of mouse crafts for kids. We’ve included some traditional favorites as well as some new ideas that your kids will love! If you’re looking for more crafty projects, check out our other posts in the Crafts section of our blog or head over to Pinterest where there are hundreds more ideas waiting for you. Happy Crafting!