5 Creative Birthday Craft Ideas for Festive Decor
Birthdays demand sparkle, and these five unique crafts bring that party vibe home without the stress. You’ll love how quick and charming each project is, perfect for a DIY afternoon with friends or a cozy solo session. Trust me, your space will glow with birthday magic.
1. Paper-Petal Garland: Whimsical Blooms for Birthday Walls
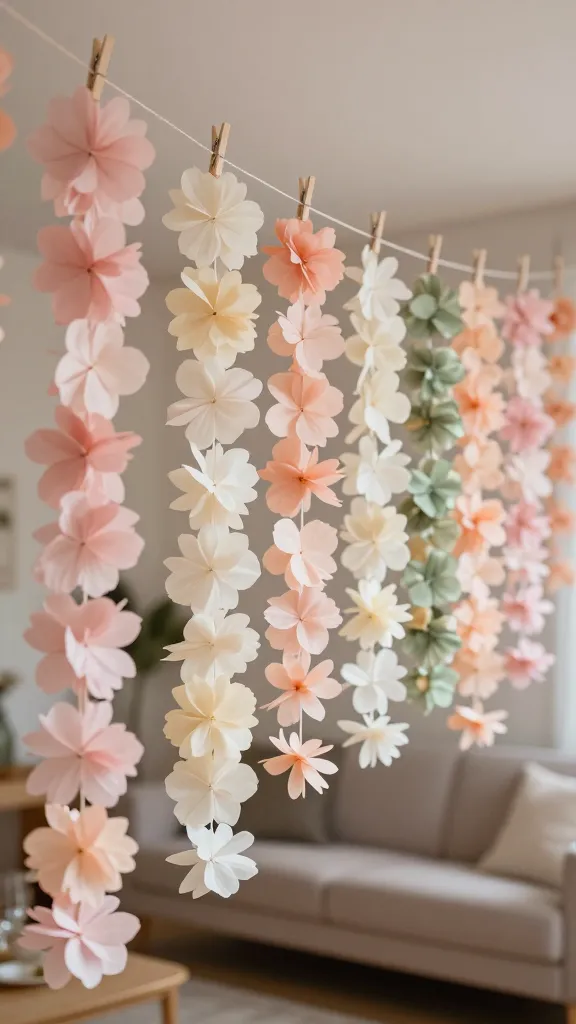
Imagine a ceiling or wall lined with soft, paper-petal flowers in your color palette—romantic, airy, and totally photogenic. This garland adds texture and a celebratory vibe to any party nook, from a living room lounge to a birthday backdrop photo spot.
- Materials
- Colored craft paper or tissue paper in 3–4 coordinating hues
- Scissors
- Clear fishing line or twine
- Glue or double-stick tape
- Optional: mini clothespins for hanging photography corners
How to Make It
- Cut circles from your paper, then snip the edges to form petals. An easy shape is a scalloped circle or a teardrop petal.
- Layer several circles into a blooming flower and secure at the center with a dab of glue.
- Attach a strip of string or fishing line along the back, spacing blooms every few inches.
- Flip it over and hang across a wall or doorway, adjusting the line to create a gentle arch.
Pro Tips / Styling Ideas
- Mix matte and metallic papers for subtle shimmer.
- Vary bloom sizes for depth—tiny buds paired with large blooms read lush.
- Combine with personalized photos or a birthday banner for a cohesive display.
End note: This is a crowd-pleaser for birthday parties, baby showers, or any festive corner of your home. You’ll love how easy it is to customize for the guest of honor.
Who would love it or when to use it: DIY-obsessed hosts, living room party corners, or a dreamy photo backdrop for a birthday at home.
2. Neon Balloon Photo Wall Panels
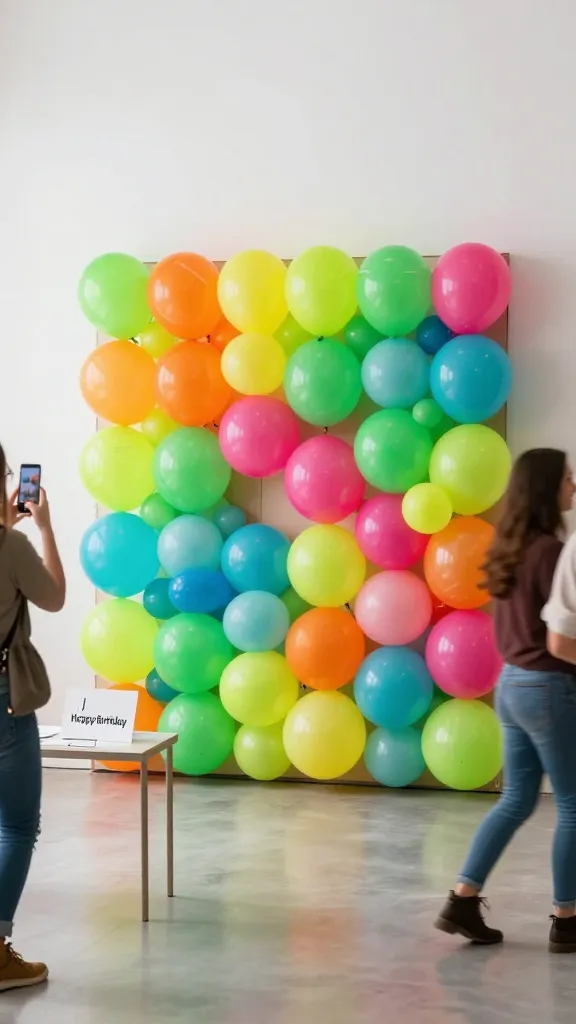
Step up the party pics with a bold, DIY photo wall made of balloon panels and a touch of neon flair. It looks entirely modern, yet it’s approachable enough for beginners. The result? A punchy focal point that invites guests to snap, smile, and swipe-worthy pics.
- Materials
- Modest pack of balloons in 2–3 colors, including one neon shade
- Cardboard or foam core panels to mount balloons
- Double-sided tape or removable adhesive strips
- Custom name cutouts or a “Happy Birthday” banner (optional)
How to Make It
- Inflate balloons to varying diameters for texture. Tie strings short enough to keep the panel neat.
- Affix balloons in a grid or abstract pattern on the panel, using tape to hold the bases in place.
- Layer neon balloons against calmer tones to make them pop, then add a string of fairy lights behind for glow.
- Place the panel on a wall or stand it on a lightweight easel for easy relocation.
Pro Tips / Styling Ideas
- Alternate glossy and matte balloons to create depth.
- Spell out the guest of honor’s name with paper cutouts or sticker letters across the panel.
- Backlight with warm LEDs to cast a fun halo at dusk or indoors.
End note: If you want a high-impact photo moment without heavy decor, this is your go-to. It screams party, but it’s simple to assemble and store.
Who would love it or when to use it: Social-media-savvy hosts, apartment celebrations, or a stylish party corner in a seasonally themed room.
3. Resin “Sweet Treat” Coasters: Glittery Birthday Keepsakes
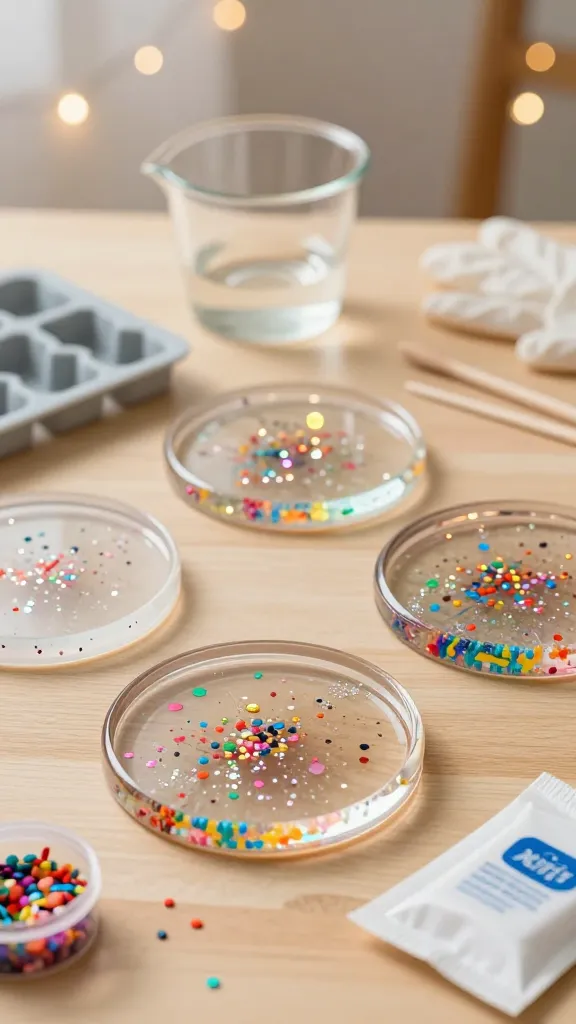
Turn ordinary coasters into sparkling birthday treasures with resin, confetti, and a pinch of edible-glitter charm. These coasters are practical, giftable, and totally celebratory—the kind of handmade gift that says “you deserve this little sparkle.”
- Materials
- Clear epoxy resin kit with hardener
- Silicone coaster molds
- Colored confetti, small sprinkles, or birthday-themed inclusions
- Mixing cups, stirring sticks, gloves
- Alcohol wipes for clean edges
How to Make It
- Prepare molds with a light spritz of release spray or a touch of oil.
- Pour a thin base layer of resin into each mold; sprinkle inclusions as desired.
- Add a second resin layer after the first cures for a seamless look.
- Let fully cure per resin instructions, then pop out and sand rough edges if needed.
Pro Tips / Styling Ideas
- Incorporate gold leaf flakes for a luxe vibe.
- Pair with a small gift tag or ribbon for a birthday present idea inside a hostess gift box.
- Mix clear and color-tinted resin for a candy-colored look.
End note: These coasters are sturdy keepsakes that double as decor. They’re a sweet reminder of the celebration every time you set down a cup.
Who would love it or when to use it: Crafters who enjoy a glossy finish, gift-givers seeking a usable handmade present, or a birthday brunch table accessory.
4. Fabric Banner Letters: Cozy, Customizable Birthday Says
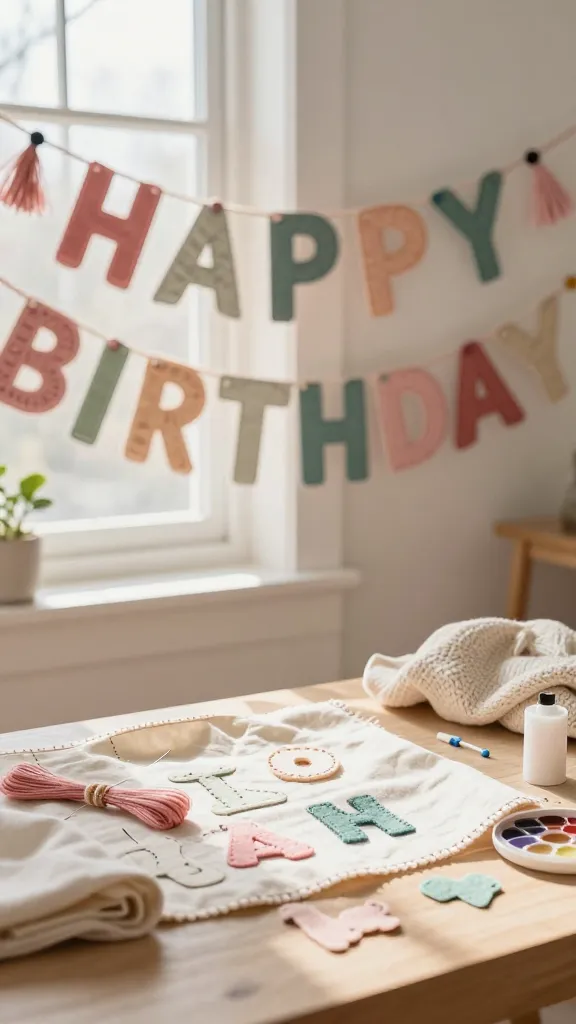
Welcome guests with a warm, handmade banner that spells out the birthday honoree’s name or a celebratory phrase. Soft fabrics, stitched edges, and cheerful colors read as comfy-chic—perfect for a cozy at-home party or a brunch gathering with friends.
- Materials
- Canvas or sturdy fabric in 3 colors
- Felt or fabric letter templates
- Embroidery floss, needle, fabric glue
- String or ribbon for hanging
- Optional: tiny decorative pom-poms, tassels
How to Make It
- Cut fabric into pennant shapes; set aside enough to spell your phrase.
- Trace and cut letters from a contrasting fabric or felt; bind edges with a simple stitch for a crisp look.
- Attach letters to the pennants with glue or thread them across the banner with a running stitch.
- String the banner along a wall, mantel, or doorway, adjusting spacing for balance.
Pro Tips / Styling Ideas
- Seasonal color combos (pastel for spring, jewel tones for fall dates).
- Add tiny tassels or crocheted accents at the banner tips for whimsy.
- Pair with a matching favor line or a dessert table backdrop to unify the scene.
End note: This banner adds a personal touch to any celebration and can be reused for multiple birthdays with a simple color swap or name change.
Who would love it or when to use it: Hosts who value handcrafted warmth, or a family birthday breakfast that feels extra special.
5. Festive Bottlecap Garden: Mini Vignettes for a Party Tablescape
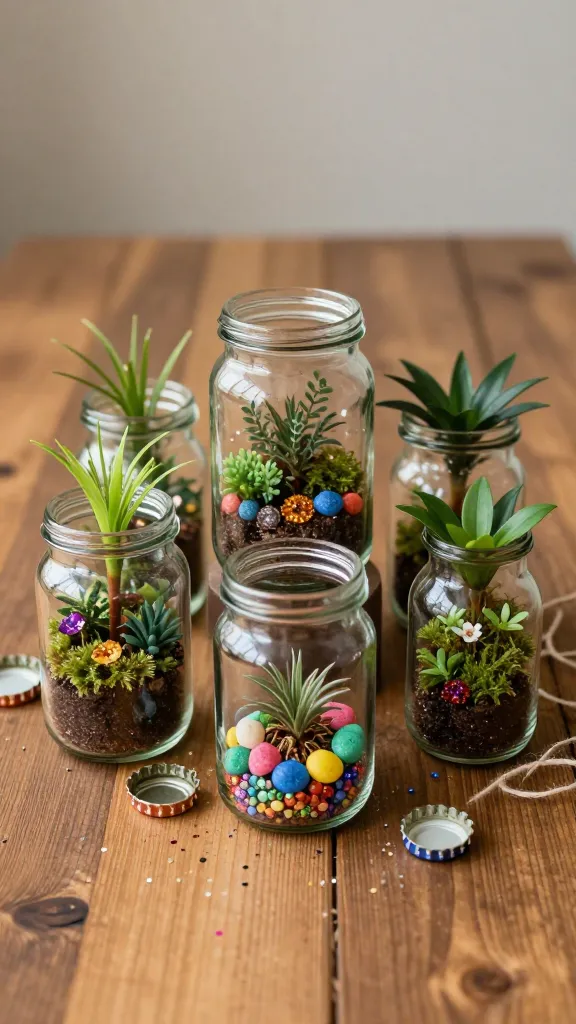
Turn everyday bottlecaps into tiny, portable garden scenes that serve as quirky party decor or take-home favors. Think miniature glass jars filled with glittery soil, tiny faux plants, and a hint of birthday whimsy. It’s strangely therapeutic to assemble and delightfully charming to display.
- Materials
- Clean metal bottlecaps, glass micro jars or mini vials
- Mini artificial plants, moss, colorful pebbles
- Fine glitter, tiny charms, or mini confetti
- Strong glue or hot glue gun
- Ribbon or twine for finishing touches
How to Make It
- Fill the bottom of each bottlecap with a thin layer of decorative filler (glitter or moss).
- Place a mini plant or themed charm in the center, pressing gently to secure.
- Seal with a dab of glue on the cap rim to prevent shifting.
- Attach a ribbon or twine so each mini garden can be hung or set on place settings.
Pro Tips / Styling Ideas
- Use a color palette that matches your party theme—emerald greens, blush pinks, or sunny yellows work beautifully.
- Line a dessert table with these as edible-looking centerpieces rather than traditional toppers.
- Group several together for a charming wall display or string along a mantle.
End note: These tiny gardens are unexpected, adorable, and surprisingly easy. They’ll spark conversations and make guests feel like you put in extra love for the celebration.
Who would love it or when to use it: People who enjoy micro-decor, guests who adore quirky finds, or a nature-inspired birthday theme.
Conclusion
Five completely unique birthday craft ideas, each with its own personality and purpose, ready to elevate your festive decor. Whether you’re chasing bold photo backdrops, cozy handmade accents, or playful keepsakes, these projects prove that creativity shines brightest when it’s shared. Dive in, pick a favorite—or tackle all five—and watch your birthday celebration become the talk of the town, pin-worthy and totally you.
Ready to start? Pick one idea tonight, or save this guide to tackle a different project each day leading up to the big celebration. You’ll love how fun, easy, and rewarding these crafts feel—and how they transform ordinary spaces into birthday magic.