8 Craft Ideas Beads
I’m obsessed with tiny glass glitter and the way a single bead can turn a bland project into something you actually want to wear. If you’re hunting for quick, satisfying crafts you can actually finish before the next episode ends, you’re in the right spot. 8 Craft Ideas Beads is your new favorite brainstorming buddy. We’ll mix color riffs, textures, and a dash of DIY magic. Ready to bead like a pro and still have fun? Let’s dive in.
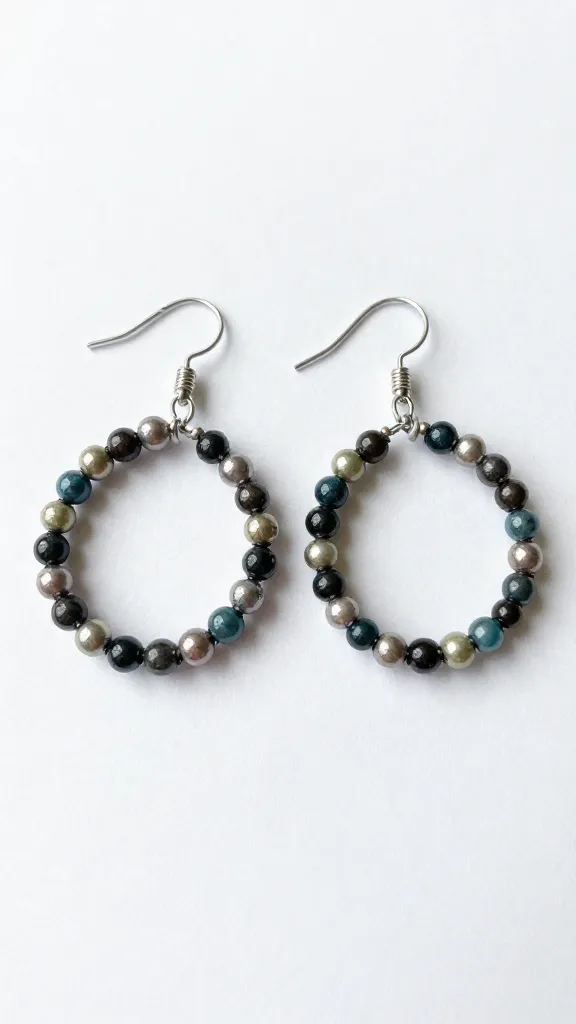
1. Beaded Hoop Earrings: Quick Sparkle on a Budget
Beads + hoops = instant accessory glow-up. This one’s my go-to when I want a polished look without breaking the bank.
– Pick a base: choose metal or wood hoops in a size you love.
– Pick a bead vibe: glass, seed beads, or small crystals for a glam finish.
– Stringing plan: a simple looping pattern works, but you can mix in tiny charms for personality.
Why it works: hoops are forgiving, beading is forgiving, and you can finish in under an hour if you keep your pattern simple. FYI, tiny seed beads streamlines the process and keeps the look cohesive.
Subsection: Pattern ideas that pop
– Symmetry: mirror-row beading for clean lines.
– Random but coordinated: pick 3 colors and scatter them, but keep one color as the anchor.
– Mixed textures: a sprinkle of shiny crystals among matte glass beads adds contrast.
2. Beaded Stackable Rings: Tiny Projects, Big Impact
Who doesn’t love a ring you can swap with outfits? Beaded rings are beginner-friendly and actually comfortable.
– Basics: elastic cord or memory wire makes sizing a breeze.
– Bead choices: use size 6/0 seed beads for a chunky look or go smaller for a delicate vibe.
– Design ideas: solid color band, color gradient, or a pattern like chevron.
Why it’s satisfying: you can stack several rings for a statement, and you can customize by finger or mood. IMO, these are perfect for gift-giving too.
3. Bead Embellished Hair Accessories: Hair, Don’t Care
Tiny beads on a headband, clip, or comb instantly elevates a plain accessory.
– Surface prep: clean surface and a steady hand help a lot.
– Attachment method: use bead backing glue or tiny headpins to secure beads.
– Design direction: a single line of beads for subtlety or a bold beaded motif across the clip.
Why it shines: hair accessories feel like tiny wearable art. They’re also a great way to use up scrap bead bits.
4. Beads on Fabric: Easy Embellishments for Clothes and Bags

Beads aren’t just for jewelry. They’re fabric-friendly when you pick the right technique.
– Choose the right needle: sharp needle with a small eye helps pass through fabric smoothly.
– Thread choices: use sturdy, strong thread to handle movement.
– Stitch style: couching or simple bead embroidery can change a tee or tote from plain to wow.
Tips to avoid drama: test on a scrap fabric first, and keep your tension even so beads don’t look wonky. FYI, felts or stabilizers can save a lot of headaches on slippery fabrics.
Subsection: Quick starter stitches
– Backstitch for basic outlines.
– Running stitch for simple dotted lines.
– Couching with a thread wrap to hold a bead cluster in place.
5. Bead-Textured Keychains: Durable and Fun to Make
Keychains are the “I made this” gift with zero pressure. Beads let you build texture fast.
– Material mix: combine beads with small charms or leather fringe.
– Pattern approach: a zig-zag bead pattern or a straight bead weave creates different vibes.
– Finishing touch: add a sturdy keyring and a protective coating if you’re using delicate beads.
Why they rock: they’re sturdy, portable, and you can customize endlessly. Also, they make carabiner-friendly pockets of color for your keys.
6. Beaded Bookmarks: Practical With a Sparkle
For readers who want something pretty that doesn’t waste ink, bookmarks with beads hit the sweet spot.
– Base: use a sturdy ribbon or cord as the spine.
– Bead layout: stack small beads at the tip to keep it weighted and from flopping.
– Finishing: seal with a dab of clear nail polish or a tiny drop of fabric glue to secure bead ends.
Pro tip: choose water-resistant beads if you’ll be hauling books around in damp places. Yes, this is the moment you realize you can nerd out about bookmarks with a bead obsession.
7. Beaded Zipper Puller: Small Accessory, Big Flair
Zipper pulls are tiny, but they’re excellent for practicing beading technique and upgrading jackets, bags, or pouches.
– Ring method: loop a small beaded cap to a jump ring and attach to the zipper slider.
– Bead choices: tiny glass beads or mixed shapes add personality.
– Variations: create gradient shades down the pull or a tiny pattern like a stripe.
Why it’s worth it: a small upgrade that makes a big visual impact. It’s a fast win when you want visible results in one sitting.
8. Beaded Wall Art: A Personal Chunk of Color on Your Wall
If you’re up for a bigger project, turning beads into a tiny piece of art can be incredibly satisfying.
– Base idea: use a sturdy canvas, wood panel, or fabric stretched on a frame.
– Beading technique: a simple bead weaving grid or a line-work design can look stunning.
– Color story: limit yourself to 3–4 colors for cohesion or go wild with a full rainbow.
This one won’t be a quickie, but the payoff is striking. It’s the kind of project you can’t stop showing off to friends.
Deeper Dives: Practical Tips to Master 8 Craft Ideas Beads
Subsection: Budget-friendly bead hacks
– Mix bead types: combine seed beads with cheaper plastic beads for a lush look without a high price tag.
– Reuse leftovers: save extra beads from previous projects for accents in new ones.
– Thrift finds: look for occasional bead lots at thrift stores or online marketplaces.
Subsection: Tools that actually help
– Basic tools: scissors, beading needle, beading thread, round-nose pliers.
– Optional but nice-to-have: crimping tool, bead mat, storage tray, and a bead organizer to avoid the bead chaos.
Conclusion
Beads aren’t just tiny decorations; they’re tiny doors to big creativity. With these 8 craft ideas, you can spin up stylish accessories, practical everyday items, and even wall art without turning your craft space into a storm cloud. Start with something you already own and a handful of beads, and you’ll surprise yourself with what you can finish in a weekend. IMO, the best part is that you can mix and match ideas to fit your vibe—no pressure, just color and texture having a party on your project.
FAQ
What beads work best for beginners?
For beginners, seed beads (size 6/0 or 8/0) are forgiving and easy to handle. Glass beads and cheap jewelry beads are great for practice. Start simple and level up as you gain confidence.
Do I need fancy equipment to start beading?
Not at all. A basic starter kit with a needle, thread, scissors, and a few beads will do. You can add tools as you go, but you’ll be surprised how far you can go with the basics.
How long does it take to finish a project?
Short projects like beaded earrings or keychains can take under an hour. More intricate wall art or embroidered fabric pieces might take a weekend. Plan in chunks, and celebrate the small wins.
Can I wash beaded items?
Care depends on the materials. Simple beaded jewelry usually needs gentle handling; fabric or embroidery-based pieces may need a spot-clean approach. Check your bead and thread types for specific care notes.
How can I come up with my own bead design?
Start with a color palette you love, then sketch a simple pattern or use a bead weaving grid. Mix textures and try a gradient or stripe pattern. Don’t overthink it—sometimes the best ideas start with a happy accident.