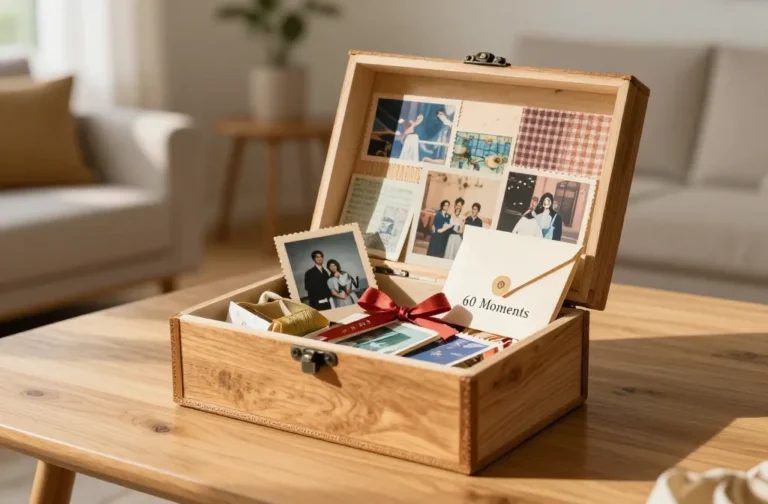
9 Fun Christmas Countdown Activities for Kids (Holiday Magic!)
Kick off the most wonderful countdown ever with playful, kid-tested crafts that spark imagination and glimmer with holiday charm. You’ll love how quick, inexpensive, and totally doable each project is—no stress, all sparkle. Trust me, these ideas turn December days into a merry, crafty adventure.
1. Advent Puzzle Garland: Every Window a New Clue
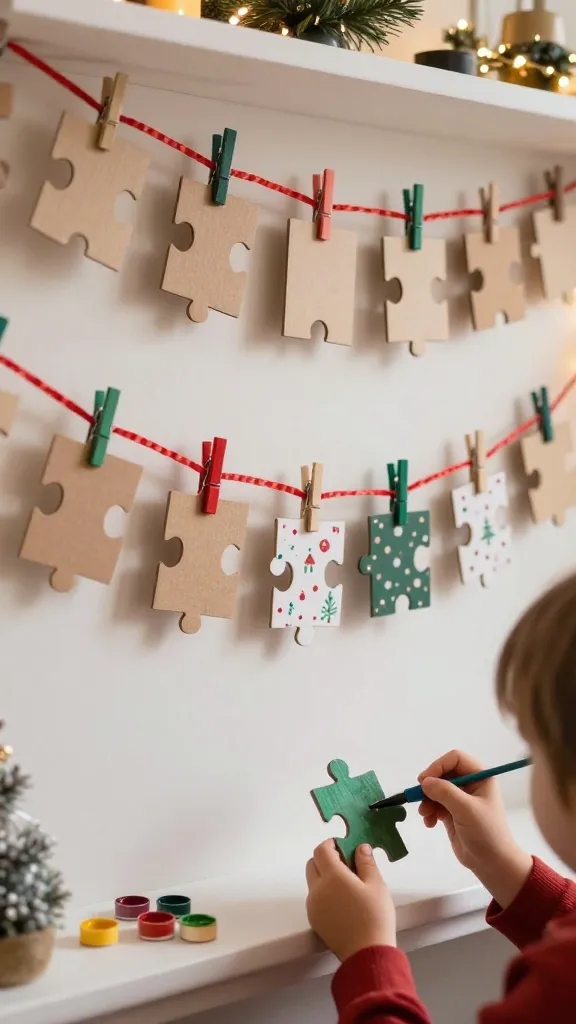
Imagine a garland that reveals a new puzzle piece each day. When the countdown ends, the pieces form a festive scene that kids can admire all season long. This one is equal parts anticipation and artful display.
- Materials:
- 12–24 blank wooden or cardboard puzzle pieces
- Non-toxic paints or markers in Christmas hues
- String or ribbon, hot glue or double-stick tape
- Small magnets (optional) or clothespins
- How to Make It:
- Assign each day a puzzle piece piece. Paint a simple section of a larger holiday scene on each piece—think Santa, stockings, candy canes, snowy houses.
- As the days pass, have kids color or decorate a new piece. Once all pieces are ready, assemble them to reveal the full scene.
- Attach magnets or clothespins to the back so it can hang on a metal surface or be clipped along a string.
- Pro Tips / Styling Ideas:
- Mix glossy and matte paints for texture.
- Hang along a mantle, doorway, or window for a daily reveal.
- Laminate pieces for durability if you plan to reuse next year.
- Use & Who’ll Love It:
- Perfect for families who love a collaborative art project and a surprising daily reveal.
- The finished garland doubles as a keepsake memory wall.
2. Mini Santa Hat Bookmarks: Reading Pep in Red and White
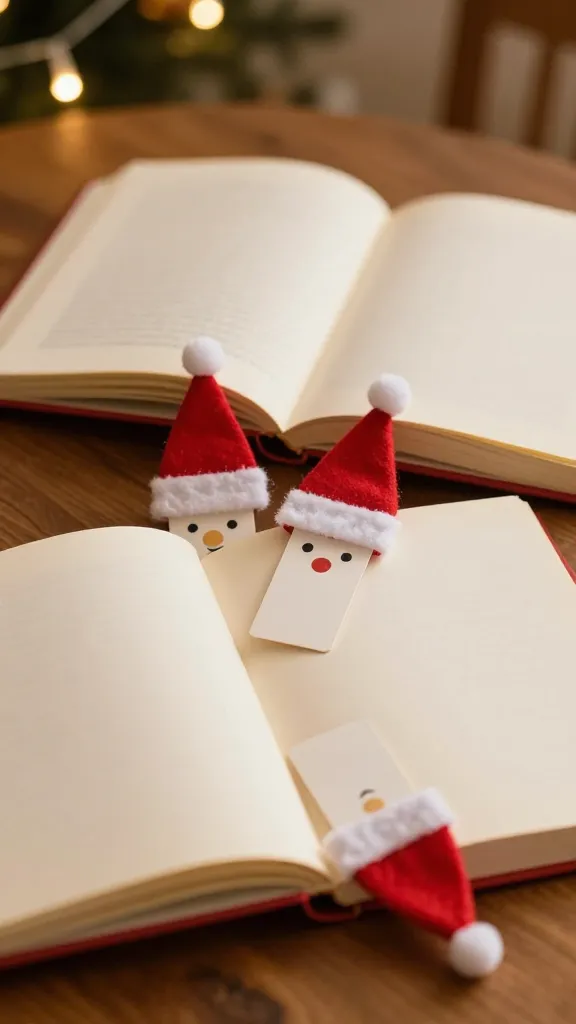
Turn ordinary reading time into a holiday ritual with these adorable mini Santa hat bookmarks. They’re cute, functional, and a sweet way to encourage nightly stories. Seriously, who wouldn’t smile at a tiny hat peeking from a page?
- Materials:
- White cardstock or thick scrap paper
- Red paper or fabric scraps
- Black marker, tiny pom-poms or white fuzz for the hat fuzz
- Scissors, glue, tape, and a little ribbon
- How to Make It:
- Cut a 1.5″ by 6″ strip of white cardstock for the bookmark base.
- Create a tiny Santa hat by shaping red paper into a cone and adding a white fuzzy brim and pom-pom.
- Attach the hat to the top corner of the bookmark with glue. Add a dab of ribbon or a small tag for personalization.
- Pro Tips / Styling Ideas:
- Decorate with a silver or gold border to make the bookmark feel festive.
- Create a set with different hat colors for variety.
- Use & Who’ll Love It:
- Readers of all ages will appreciate a tiny, joyful accessory in their books.
- Gift a set to classmates or cousins for a personal, cozy touch.
3. Snow Globe Ornaments: Shake Up a Tiny Winter Scene
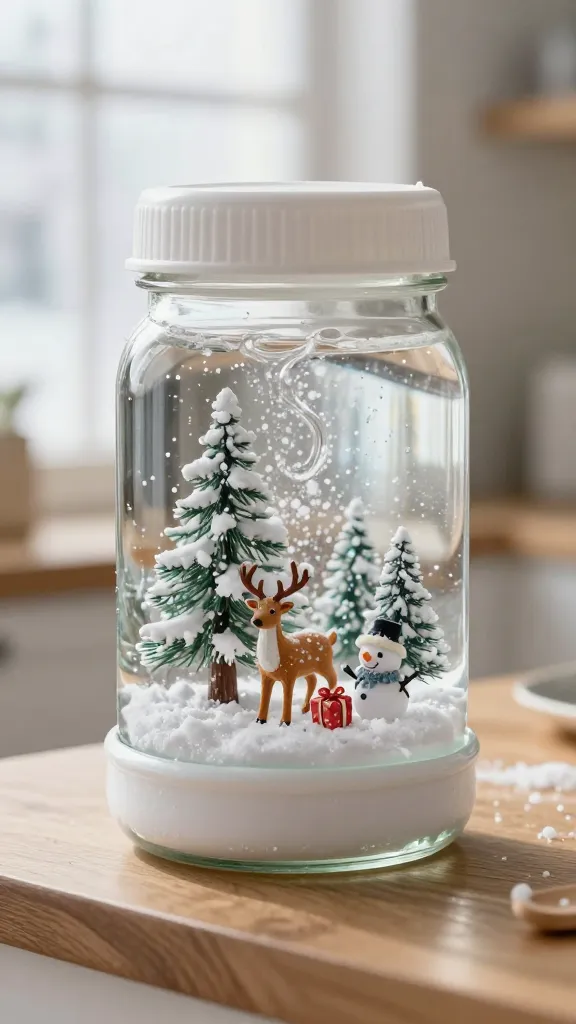
Delightfully instant holiday magic, these mini snow globe ornaments capture a winter wonderland in a jar. Shake, watch the glitter swirl, and count the days until Santa arrives. It’s a tiny, collectible joy you’ll want to make again next year.
- Materials:
- Small clear jars with lids (baby food jars work well)
- Water, clear glue, glitter in white and blue hues
- Miniature trees, animals, or other festive figurines
- Waterproof sealant or hot glue
- How to Make It:
- Glue a tiny scene inside the lid or base: a tree, a snowy hill, and a little figure.
- Fill the jar with a mix of water, a few drops of glue, and glitter. Seal tightly to avoid leaks.
- Invert and shake to see the snow swirl. Attach a ribbon for hanging.
- Pro Tips / Styling Ideas:
- Use color scheme that matches your tree or room decor.
- Label each jar with the day number for countdown use.
- Use & Who’ll Love It:
- Kids love watching the glitter drift around. A perfect ornament tradition for the tree or a windowsill display.
- Great as a gift exchange item with a personal note.
4. DIY Gingerbread Cookie Ornaments: Sweet Smell, Sweet Decor
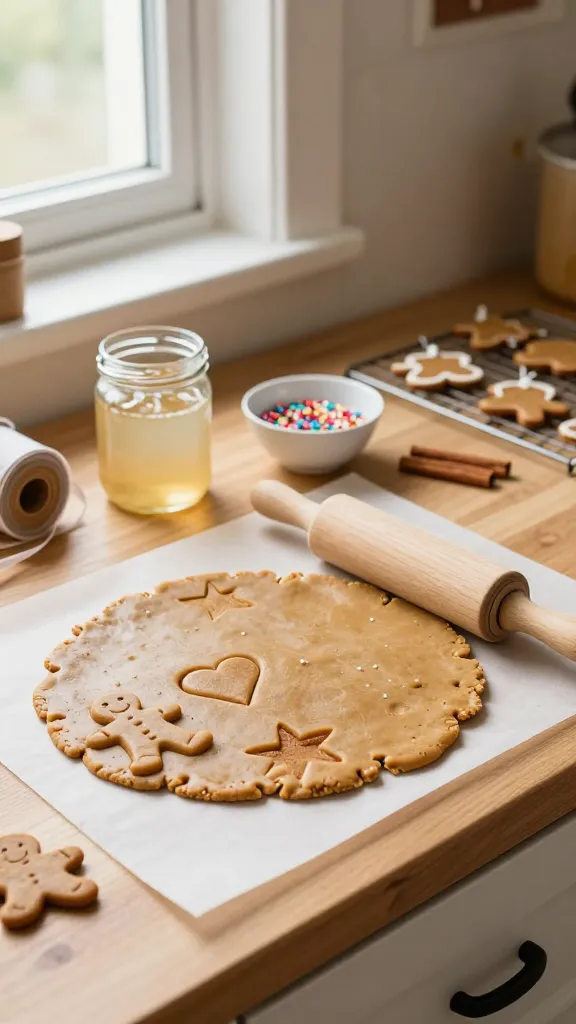
Bake dough, sculpt little gingerbread friends, and bake again to create edible-turned-decor ornaments. The scent of cinnamon and nutmeg will fill your kitchen and the ornaments will bring smiles all season.
- Materials:
- Gingerbread dough (store-bought or homemade)
- Roller, cookie cutters (gingerbread man, heart, star)
- Clear drying glaze or icing for decorations
- Ribbon for hanging, oven-safe paint pencils
- How to Make It:
- Roll out dough and cut shapes. Bake until firm but not hard, then cool fully.
- Decorate with icing. Add a small hole at the top for the ribbon before baking if you want the decorations to hang.
- Thread ribbon through and hang on the tree or a string across a wall for a garland.
- Pro Tips / Styling Ideas:
- Choose a neutral base glaze that will let the icing colors pop.
- Store extras in an airtight container; they can double as edible treats or keepsakes.
- Use & Who’ll Love It:
- Cousins, siblings, and friends who love baking and cute ornaments.
- A sweet, tasty keepsake to mail to far-away relatives.
5. Countdown Calendar Cupcake Flags: Tiny Treats, Big Excitement
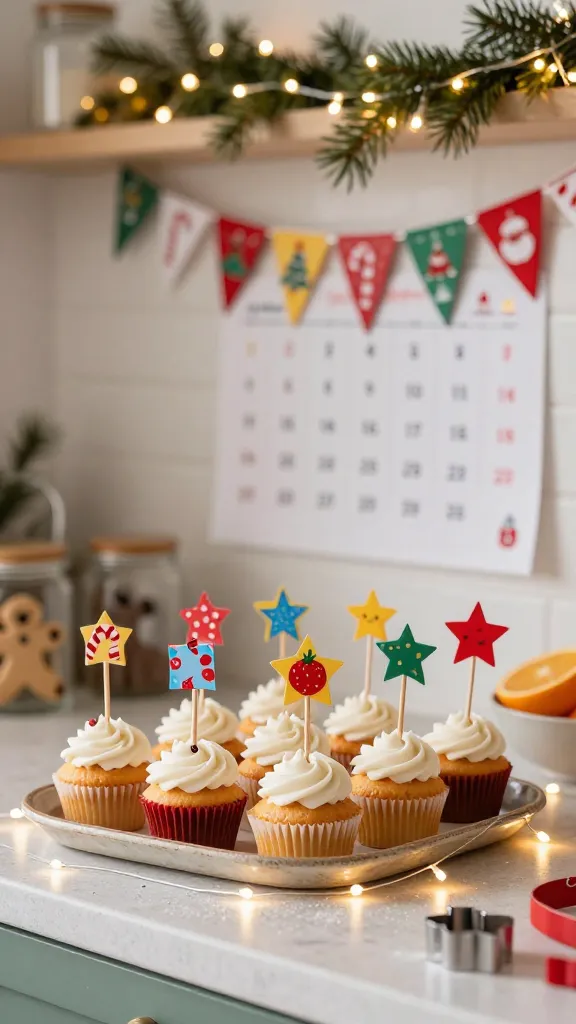
Turn daily treats into a sweet countdown with a cupcake flag calendar. Each day reveals a new flag with a mini challenge, a joke, or a tiny drawing. It tastes like holiday magic in frosting form.
- Materials:
- Cake popsicle sticks or toothpicks
- Colorful cardstock, markers, washi tape
- Mini flags or printed numbers 1–25
- Pre-baked mini cupcakes or sugar cookies
- How to Make It:
- Decorate each flag with a number or tiny scene. Attach to the cupcake with a stick.
- Stand the flags in a row on a tray; each day, remove the top flag and enjoy the treat.
- Optional: write a daily mini challenge on the back of each flag for extra fun.
- Pro Tips / Styling Ideas:
- Use a neutral, festive color palette to keep things cohesive.
- Pair with a small glass of milk and a napkin ring for a café-like display.
- Use & Who’ll Love It:
- Families with big sweet tooths or kids who love daily surprises.
- Good for Christmas Eve celebrations as a grand finale treat!
6. DIY North Pole Mailbox: Letters to Santa, Countdown-Style
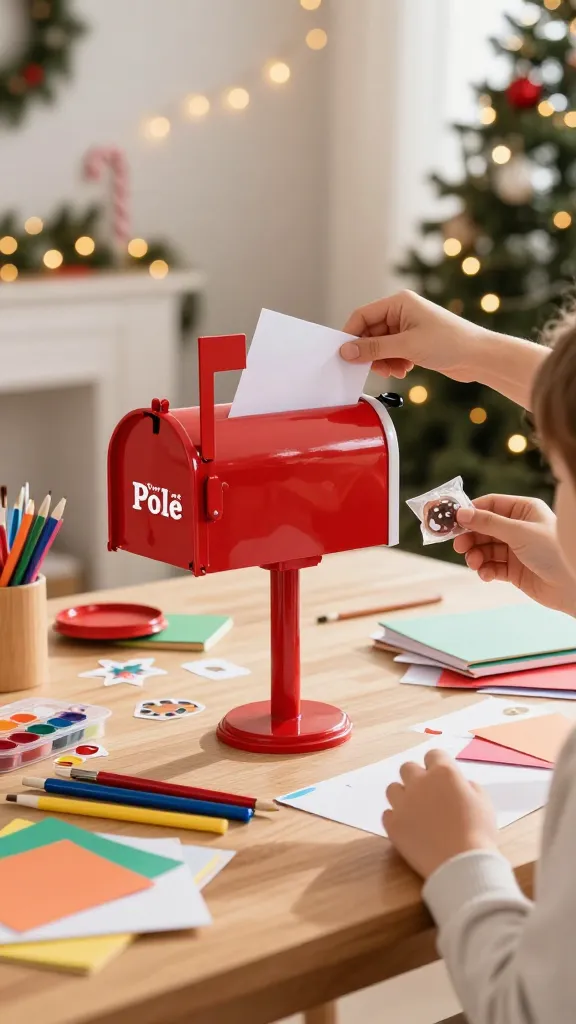
A tiny mailbox stuffed with daily letters or requests creates a tangible countdown ritual. Kids write a wish or joke and slip it into the mailbox; you respond with a small treat or a fun reply.
- Materials:
- A small cardboard or wooden box (re-purpose a lunch box or tissue box)
- Bright paint, markers, stickers for the North Pole vibe
- Mini notepads or scraps of paper, a tiny mailbox flag
- How to Make It:
- Paint the box in festive colors and add a sign that reads North Pole Mailbox.
- Each day, kids write a short letter or a joke and drop it in. You respond with a tiny treat or an encouraging note.
- Decorate the outside with snow, reindeer, and peppermint swirls.
- Pro Tips / Styling Ideas:
- Attach a small chalkboard label to write the day’s message.
- Place near the entryway as a daily reminder to write and drop a letter.
- Use & Who’ll Love It:
- Kids who adore mail, storytelling, and interactive play.
- Great for parents who want a playful afternoon activity and a bit of daily joy.
7. Peppermint Sock Snowmen: Cozy Ornaments with a Playful Wiggle
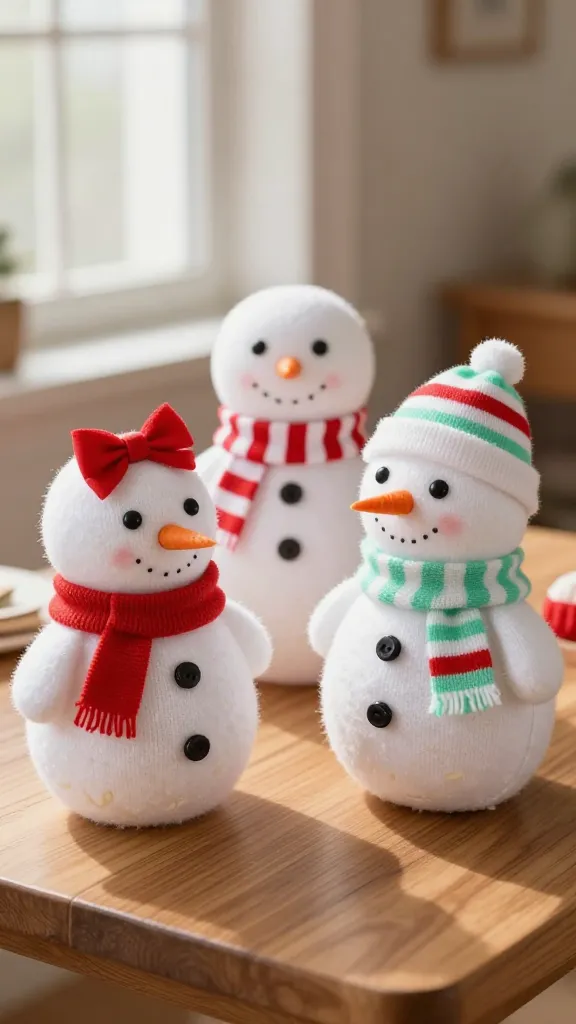
Whip up a trio of peppermint-striped sock snowmen that double as desk decor or tree ornaments. They’re soft, snuggly, and the textures are irresistible for little hands.
- Materials:
- White socks, rice or beans for filling
- Black buttons for eyes, orange felt for the carrot nose
- Red ribbon, small scarves, and peppermint stripe fabric or paint
- Glue, needle and thread
- How to Make It:
- Fill the sock to form a plump snowman. Tie off the end for the body.
- Decorate with eyes, nose, and scarf. Use ribbon or fabric to create a hat or a topper.
- Optional: stuff a bit of stuffing inside for extra fluff and shape.
- Pro Tips / Styling Ideas:
- Display on a mantle with a tray of faux snow for a wintry vignette.
- Make a set of three in varying sizes for a cute trio display.
- Use & Who’ll Love It:
- Crafters who love sewing or upcycling fabric scraps.
- A cozy, tactile addition to kid-friendly decor shelves.
8. Nutcracker Crest Coasters: Festive Decor You Can Use
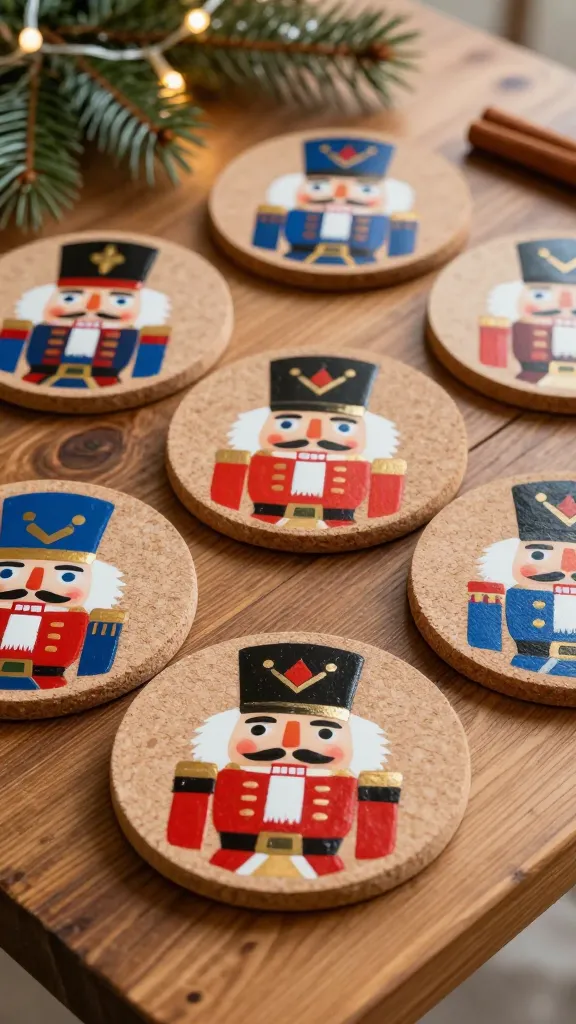
Turn wooden discs or cork into nutcracker-style coasters that add a playful touch to your coffee table. They’re practical, cute, and sure to spark conversations during holiday gatherings.
- Materials:
- Wooden discs or thick cork coasters
- Acrylic paints in red, blue, black, gold
- Fine brush, sealant spray
- Foam sticker shapes for details
- How to Make It:
- Paint each coaster with a nutcracker face or pattern, focusing on bold accents like mustaches, hats, and collars.
- Add fine details with a thin brush. Seal when dry.
- Optionally, attach cork feet or a felt bottom to prevent scratches on furniture.
- Pro Tips / Styling Ideas:
- Match the color palette to your tree decor for a cohesive look.
- Bundle a set of four with a ribbon for a quick gift.
- Use & Who’ll Love It:
- Hosts and new homeowners who love charming, functional decor.
- Perfect as a small, personal gift for teachers or neighbors.
9. Pinecone Lanterns: Rustic Glow for Evenings of Wonder
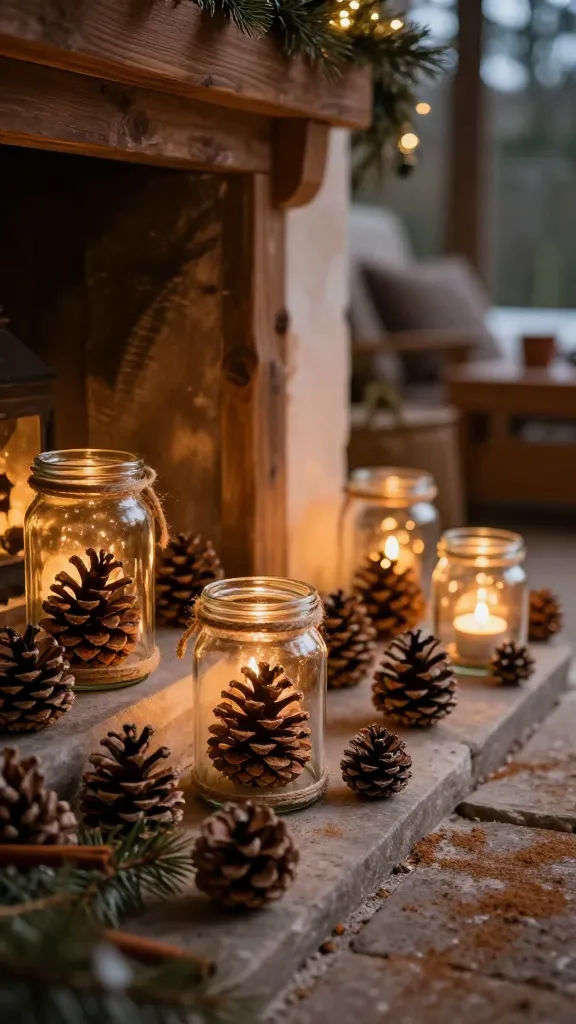
Convert pinecones into luminous lanterns that glow softly along the mantle or patio. A simple tea light and some natural textures make this a warm, nature-meets-holiday craft.
- Materials:
- Pinecones, glass jars (mini or small mason jars)
- Vinegar and water or spray paint to freshen pinecones
- Battery-operated tea lights, twine or ribbon
- Optional: small sprigs of evergreen, cinnamon sticks
- How to Make It:
- Clean the pinecones and let dry. If desired, lightly spray or dust with natural scent for an extra holiday aroma.
- Place a jar inside the pinecone cluster or wrap pinecones around a jar. Secure with twine.
- Place a tea light inside the jar and anchor with a ribbon for hanging or table display.
- Pro Tips / Styling Ideas:
- Pair with evergreen sprigs and cinnamon sticks for a rustic, fragrant vibe.
- Line a windowsill for a soft, ambient glow at dusk.
- Use & Who’ll Love It:
- Nature lovers and kids who enjoy outdoor-inspired decor.
- A perfect accent for a winter porch or living room corner.
Conclusion
These nine fun Christmas countdown activities for kids prove that the most magical days of December can be handmade, heartwarming, and wildly enjoyable. Pick one (or all) and start a festive crafting streak that your family will remember long after the holidays. Happy crafting and holiday magic to you and yours!