6 whimsical crafts for teens aesthetic
Ready to upgrade your space and your Instagram feed with zero-fuss flair? These six crafts are designed for teens who crave playful, aesthetic vibes without the overwhelm. Trust me, you’ll have a blast, and your room (and feed) will thank you.
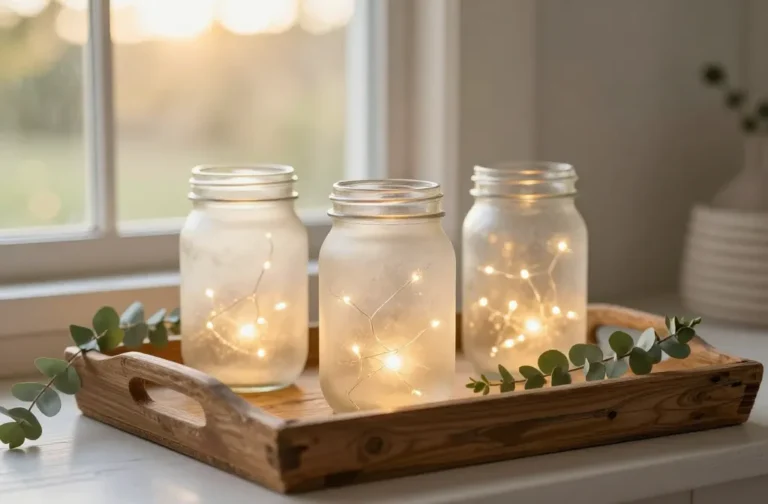
1. Dreamy Luna Jar Terrarium
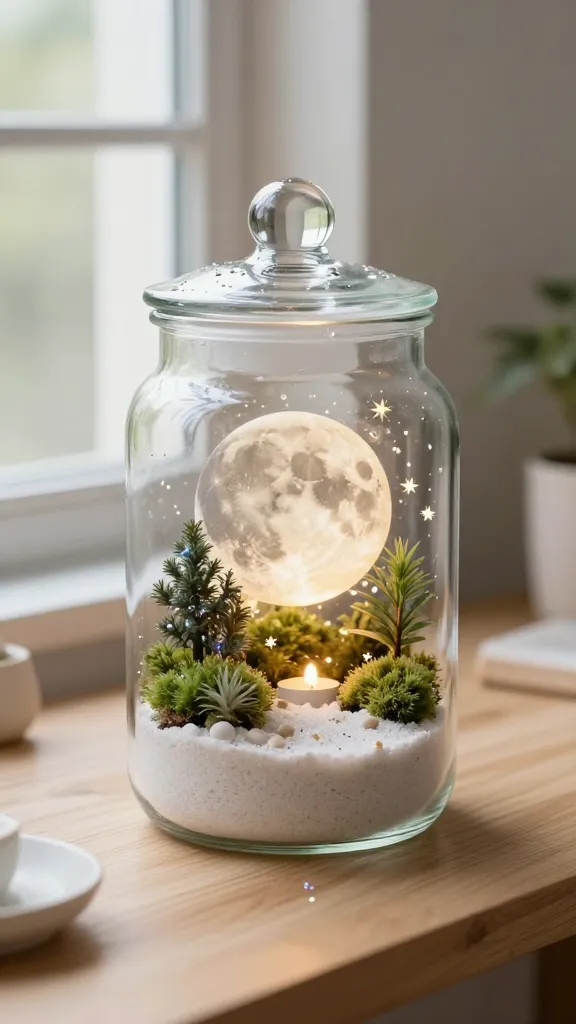
Imagine a tiny, glass-and-glow oasis perched on your desk or window sill. This Luna Jar Terrarium feels magical — like you bottled a moonlit moment. It’s easy, instagrammable, and endlessly customizable.
Materials Needed
- Clear glass jar with lid
- Small faux plants or moss
- Biodegradable glitter or tiny star confetti
- Fine white sand or decorative pebbles
- Water bead crystals (optional for a dewy look)
- LED tea light or fairy lights
How to Make It
- Layer sand or pebbles in the bottom for a grounded base.
- Arrange moss and tiny plants to create a mini landscape.
- Add glitter or star confetti for that celestial sparkle.
- Pop in water beads for a soft, dewy texture if you like—just be mindful of the jar’s height.
- Screw on the lid with a small hole (or add a battery-operated light inside) and tuck in fairy lights for a subtle glow.
Pro Tips / Styling Ideas
- Place next to a mirror or on a stack of art books for depth.
- Change out colors with the seasons — pinks and purples in spring, golds and blues in winter.
- Switch to a small succulent for a low-water, long-lasting option.
Who’ll love it: The dreamy, low-maintenance décor lover who wants a touch of magic on their desk. Serious vibes, lightly sparkly, totally you.
2. Beaded Boho Earrings With A Twist
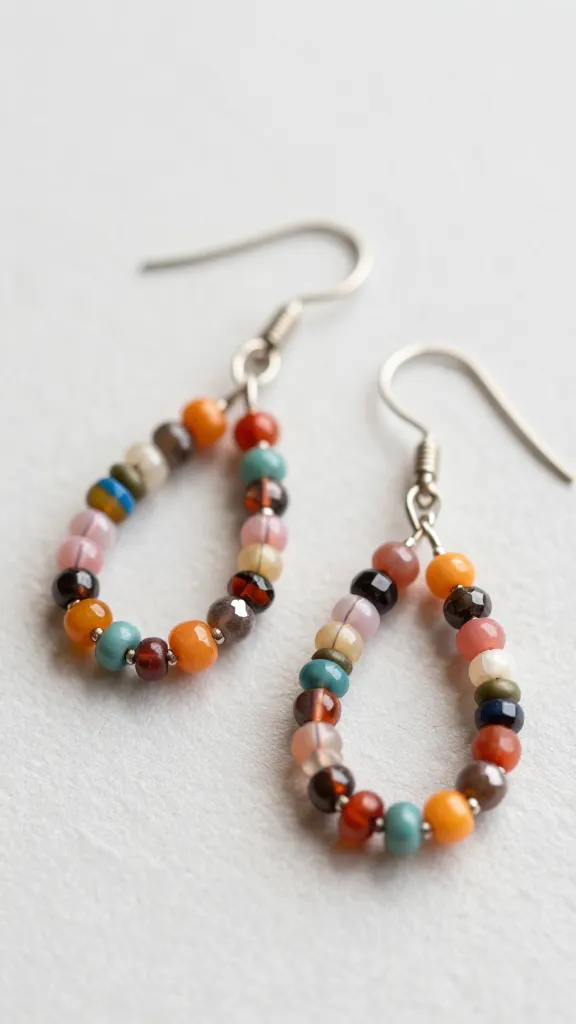
Elevate your jewelry game with earrings that scream “you.” These beaded beauties mix textures and colors for a DIY-accessory that’s totally unique. They’re lightweight, bright, and perfect for outfits that feel carefree and creative.
Materials Needed
- Beads in two or three coordinating colors
- Fire-polish or seed beads
- Thin jewelry wire or stretchy cord
- Ear hooks or hoops
- Jump rings and small pliers
How to Make It
- String beads onto your wire in a pattern you love — think gradient or chunky color blocks.
- Attach beads to a jump ring, then hook onto an ear hook.
- Seal with a dab of clear nail polish on the knot if you used string, to prevent unraveling.
Pro Tips / Styling Ideas
- Coordinate with a simple outfit and a bold lip for a pop of color.
- Mix matte and shiny beads for textural intrigue.
- Make a shorter pair for daytime wear and a longer pair for evenings.
Who’ll love it: The fashion-forward teen who loves to layer textures and color. These are giftable, too—perfect for a stylish friend or sophomore-year swap.
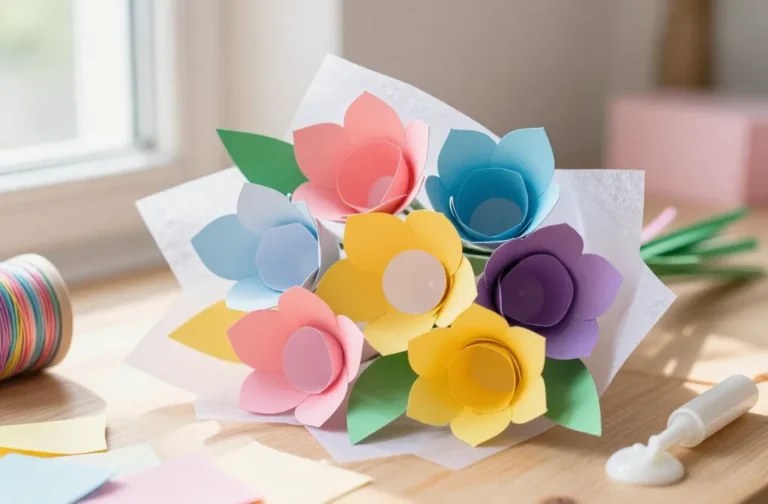
3. Paper-Pulled Flower Wall Panels
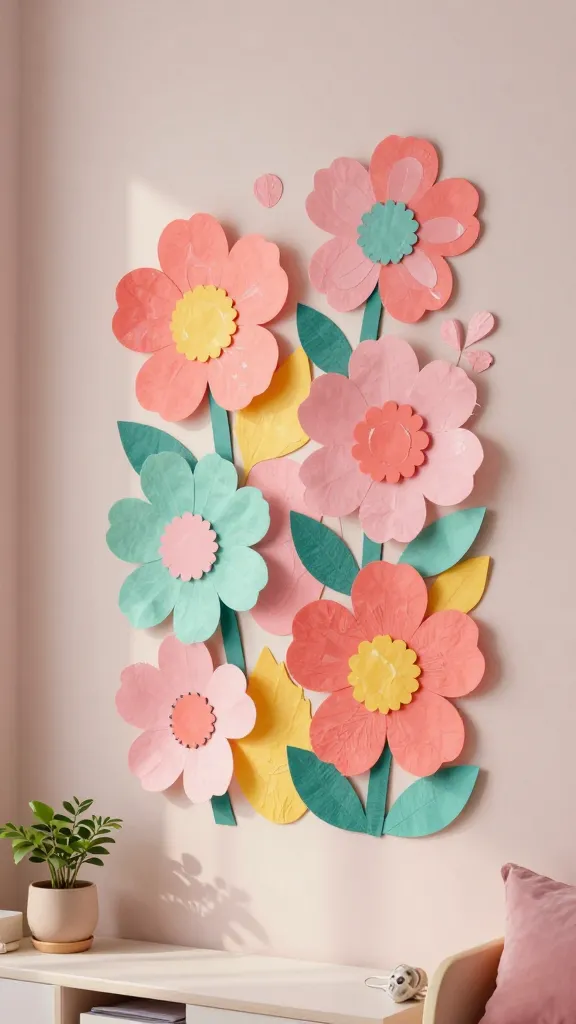
Turn your wall into a blooming gallery with panels made from layers of vibrant paper petals. It’s artsy, affordable, and surprisingly calming to assemble. The finished piece feels airy and whimsical, like a secret garden in your room.
Materials Needed
- Colorful scrapbook paper or crepe paper
- Scissors or a craft knife
- Cardboard or foam board for backing
- Glue or double-sided tape
- Punch to cut petals (optional)
How to Make It
- Cut multiple petal shapes in varying sizes from your colored paper.
- Layer petals onto the backing, overlapping slightly to mimic a full bloom.
- Secure with glue and create an organic, cascading arrangement.
- Arrange panels in a grid or freeform cluster on the wall.
Pro Tips / Styling Ideas
- Use a color gradient for a bold statement wall, or choose a monochrome palette for a chic look.
- Mix glossy and matte papers for subtle texture.
- Pair with a few hanging string lights for a dreamy glow.
Who’ll love it: The wall-artist in your life who loves big, joyful color and a splash of whimsy. It’s bold but totally doable in a weekend.
4. Capsule-Scented Candles In Mini Jars
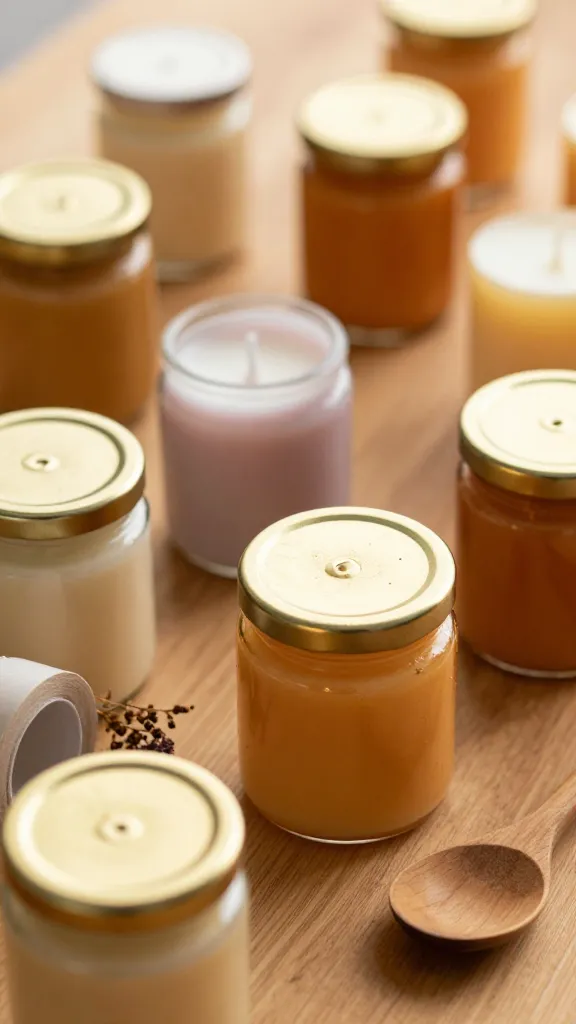
Aromas are mood magnets, and tiny candle jars give your space a cozy, collectible vibe. This project blends scent, color, and a touch of vintage charm. It’s relaxing to make, delightful to display, and a subtle homage to hygge.
Materials Needed
- Small glass jars with lids
- Mini soy wax flakes or beeswax
- Scented oil or essential oil (your choose)
- Wick, glue dot, or wick sticker
- Color dye or mica powder (optional)
- Decorative labels or washi tape
How to Make It
- Melt wax in a double boiler, stir in scent and color.
- Fix the wick to the bottom center of the jar, then pour in the wax.
- Let it cool completely, trim wick, and dress with a label or tape.
Pro Tips / Styling Ideas
- Group a collection of different scents on a shelf for a mini perfume bar vibe.
- Use pastel dyes for a soft, aesthetic look or metallic mica for glam.
- Keep lids on when not in use to preserve scent longer.
Who’ll love it: The scent-curator who wants a tiny, collectable flame-free vibe (or a cute gift with a personal scent story).
5. Geometric Macramé Wall Hanging
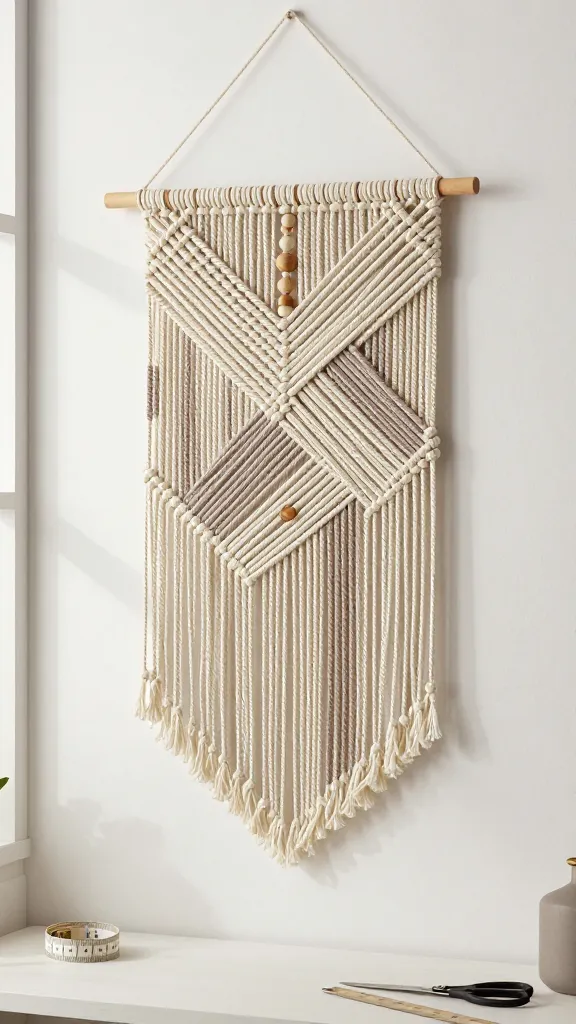
Macramé meets modern minimalism in a geometric wall hanging that instantly upgrades any blank wall. This project is satisfying to weave, looks high-end, and is surprisingly forgiving for beginners with a dash of patience.
Materials Needed
- Macramé cord (cotton or jute)
- Wood dowel or metal ring for hanging
- Measuring tape, scissors, and a ruler
- Beads (optional for extra texture)
How to Make It
- Cut cords into long strands; attach to the dowel in a simple lark’s head knot pattern.
- Weave crisscross and diagonal knots to form a geometric shape, adding beads as you go if desired.
- Trim evenly and knot secure ends to prevent fraying.
- Hang on a wall in a cozy corner or above a bed for a bold focal point.
Pro Tips / Styling Ideas
- Use natural-toned cords for a boho vibe, or black for a modern, graphic look.
- Pair with a small plant or photo prints to complete the gallery wall.
- Experiment with asymmetry by varying knot density on each side.
Who’ll love it: The zen crafter who enjoys hands-on projects and a touch of artisan texture. It’s the perfect statement piece for tiny rooms or shared spaces.
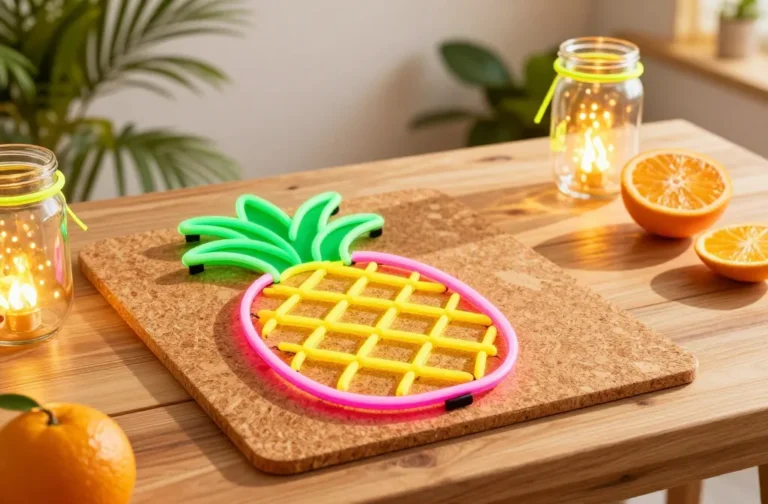
6. Neon Shadow Box Portraits
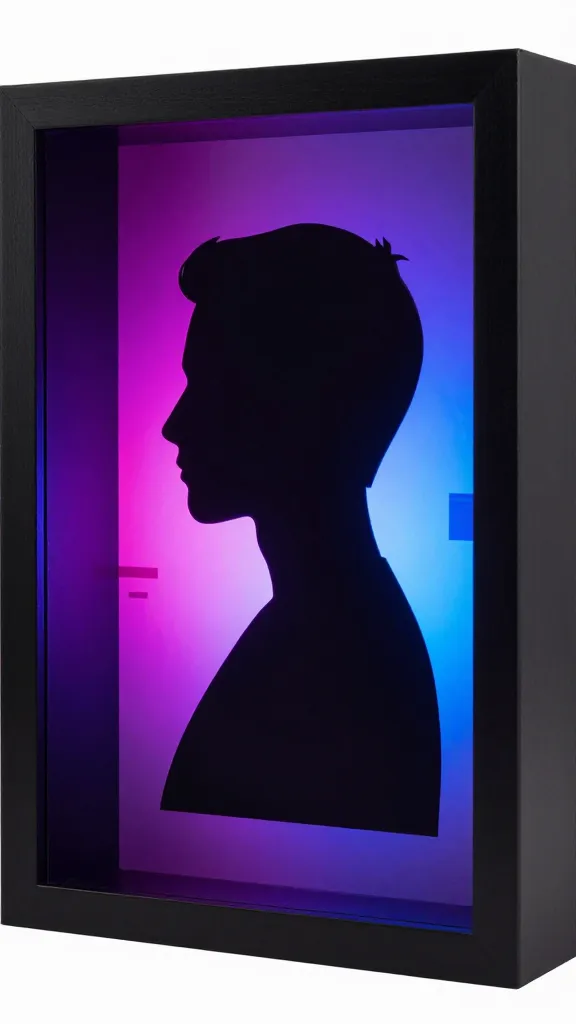
Turn a simple silhouette into a neon-night, gallery-worthy piece. This shadow box crafts a luminous, retro-modern vibe that’s instantly shareable. It’s bold, graphic, and surprisingly quick to assemble.
Materials Needed
- Shadow box frame
- Colored cardstock or foam board
- Neon or glow-in-the-dark paint or markers
- LED tape light (optional for extra glow)
- Double-sided tape or glue
How to Make It
- Cut a profile silhouette from dark cardstock and place it inside the shadow box.
- Decorate the background with neon accents, outlines, or abstract shapes.
- Line the inside back with glow tape or paint to make the silhouette pop when lights are low.
Pro Tips / Styling Ideas
- Use mismatched frames for an eclectic wall collage, or keep it uniform for a clean look.
- Pair with a dim lamp to amplify the glow when you’re gaming or streaming.
- Swap in new silhouettes for seasonal changes or mood shifts.
Who’ll love it: The retro-futurist who loves bold visuals and a little nightlife glow in their room. It’s a conversation starter that totally nails the aesthetic.
Conclusion
These six whimsical crafts for teens aesthetic are playful, approachable, and highly Pinterest-ready. Grab a handful of supplies, pick your favorite two or three, and start a little creative streak this weekend. You’ll be surprised how quickly your space, style, and mood transform when you invest a bit of your time in DIY magic.
So, which one will you try first? Or, if you’re feeling truly ambitious, dive into all six and create your own mini-art universe. Have fun, stay curious, and happy crafting!