9 whimsical crafts to make and sell
Ready to turn everyday materials into charming, shop-worthy treasures? These nine crafts are fun, doable, and totally giftable, so you can sew, glue, paint, and flourish your way to a plant-loving, cozy-home lineup. trust me, your future best-sellers are closer than you think.
1. Milk-Paint Polaroid Planter Orbs
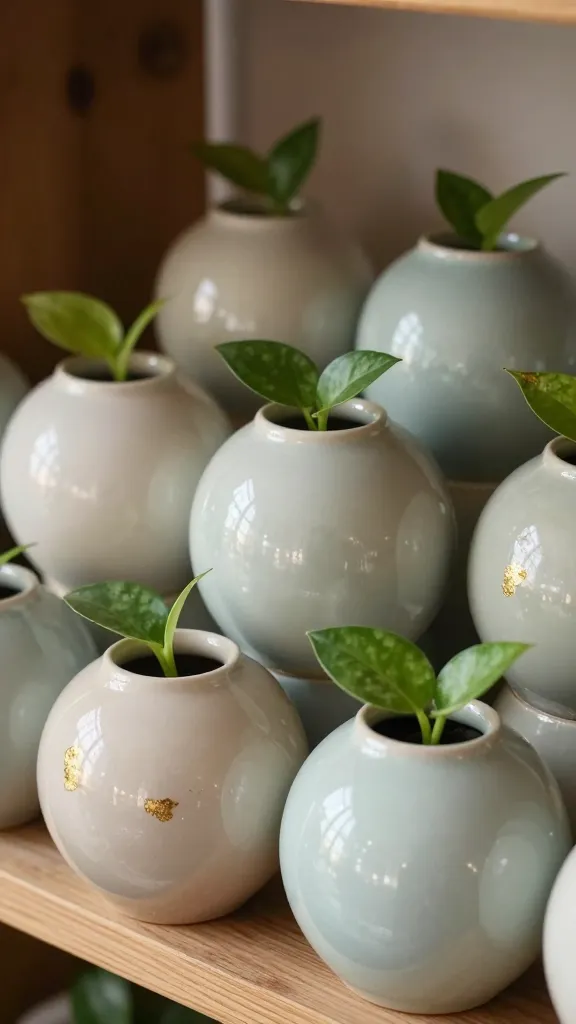
Picture this: glossy ceramic-like orbs perched on a shelf, each holding a tiny pothos halo. These Milk-Paint Planter Orbs feel vintage yet fresh, with a soft matte finish that’s incredibly forgiving to imperfect surfaces. They’re cute, compact, and whisper “homey wow.”
Materials
- Plastic or ceramic hollow orbs (two-part): about 3–4 inches diameter
- Milk paint in pastel tones (or chalk paint with water to thin)
- Gold or copper foil accents (optional)
- Mini succulents or air plants
- Foam paintbrushes, drop cloth, sealant
How to Make It
- Warm up the paint, then apply a thin, even coat for a vintage ceramic look. Layer for depth, letting each coat dry fully.
- Add a second color on the bottom half for a sunset split. Dry, then lightly sand the edge for a soft burnished line.
- Seal lightly to protect indoors. Attach a small drainage hole or use self-watering moss as a decorative base.
- Fill with tiny plants and place where natural light hits—bathroom shelves or desks love these.
Pro Tips / Styling Ideas
- Pair with dried grasses or seashells for a coastal vibe.
- Personalize with initials or tiny vinyl stickers for gift sets.
Who would love it? Plant enthusiasts, minimalist decorators, and anyone who needs a pocket-sized eye-catcher. FYI, these are perfect for weekend markets or a little online bundle with a plant starter kit.
2. Velvet-Cinish Dried-Flower Jars
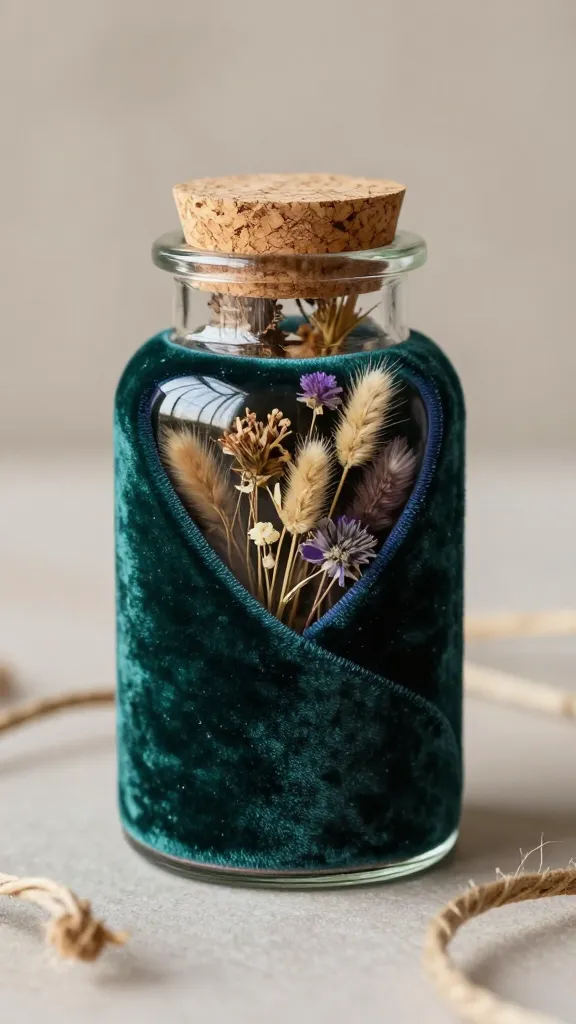
These jars feel luxe and moody, like a boutique perfume bottle meets blooming bouquet. The velvet shine comes from a simple finish that catches light in the most flattering way, and the dried flowers keep forever—seriously satisfying for shoppers who want longevity.
Materials
- Small glass apothecary jars with cork lids
- Assorted dried flowers and grasses
- Matte velvet spray paint in jewel tones
- Clear sealant, twine or ribbon
How to Make It
- Spray velvet on the outside of the jar in light, even coats. Let dry completely.
- Fill with dried stems, then seal the top with glue to keep stems in place.
- Decorate the cork lid with a ribbon bow for a finished look.
Pro Tips / Styling Ideas
- Line a row of jars on a windowsill or coffee-table tray for a luxe vignette.
- Offer sets in color families (pinks, greens, blues) to boost gifting appeal.
Who would love it? Boho botanists and anyone who loves a soft, rich accent piece. It’s a crowd-pleaser at craft fairs and a simple, high-value online listing.
3. Fold-Over Leather Gift Tags With Dainty Glass Beads
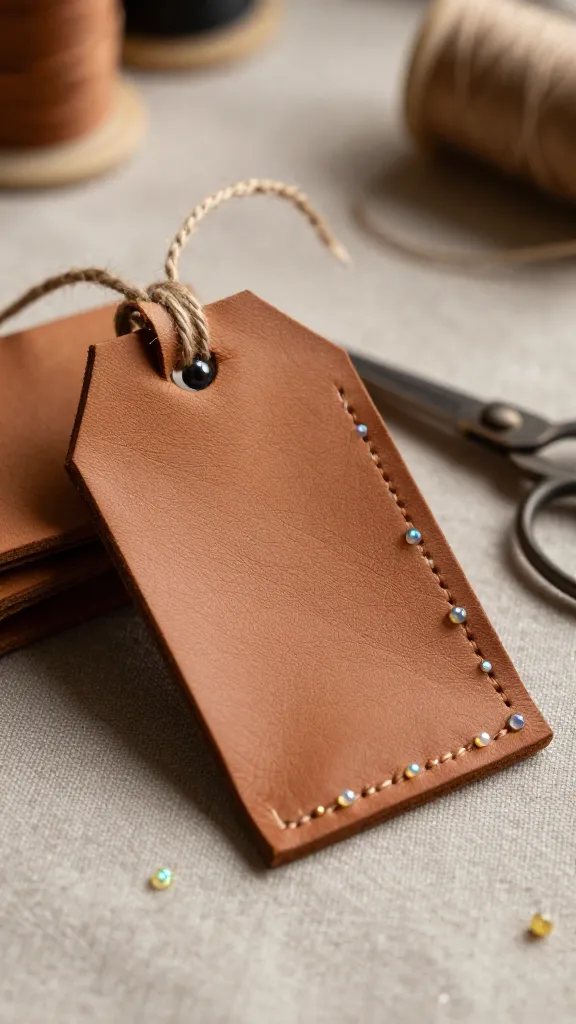
Gift-ready and endlessly charming, these Fold-Over Leather Gift Tags add a tactile luxury to presents. Tiny glass beads catch the light and elevate simple wrapping into a little ceremony—trust me, people keep these on their cards for ages.
Materials
- Thin vegan leather or real leather scraps
- Strong craft thread or twine
- Assorted tiny glass beads
- Hole punch or nail and hammer
- Scissors, ruler, binder clips
How to Make It
- Cut leather into 3×2 inch rectangles. Fold over to create a pocket tag.
- Punch two holes along the fold, then thread in beads along the edge as a delicate trim.
- Attach with a loop of twine to a gift or hang on a wreath for décor.
Pro Tips / Styling Ideas
- Use metallic beads for a glam look or pastel beads for soft charm.
- Pair with handwritten guest-name tags for weddings or showers.
Who would love it? Gift-wrap lovers, wedding planners, and shop owners stocking seasonal décor. It’s compact, lightweight, and easy to customize with initials or holiday motifs.
4. Felted Cloud Lamp Shade Garlands

Soft, whimsical, and instantly cozy, these Felted Cloud Lamp Shades transform a plain lamp into a dreamscape. When the light hits the felted puffs, the room glows with a playful, cloud-watching vibe.
Materials
- White wool felt sheets and roving
- Ring lamp shade base or burlap drum shade
- Needle felting kit or hot glue
- Optional: pastel thread for stitched outlines
How to Make It
- Cut cloud shapes in varying sizes. Felt or glue edges to avoid rough seams.
- Attach to the shade in a staggered pattern, leaving some space between to keep the glow dreamy.
- Use a warm white bulb to keep the cloud aura soft and magical.
Pro Tips / Styling Ideas
- Group several shades over a reading nook for instant whimsy.
- Change up with light gray or blush for seasonal shifts.
Who would love it? Teen rooms, cozy corners, and gift-giving friends who crave a whimsical upgrade. It’s a conversation piece that doubles as a nightlight—double win!
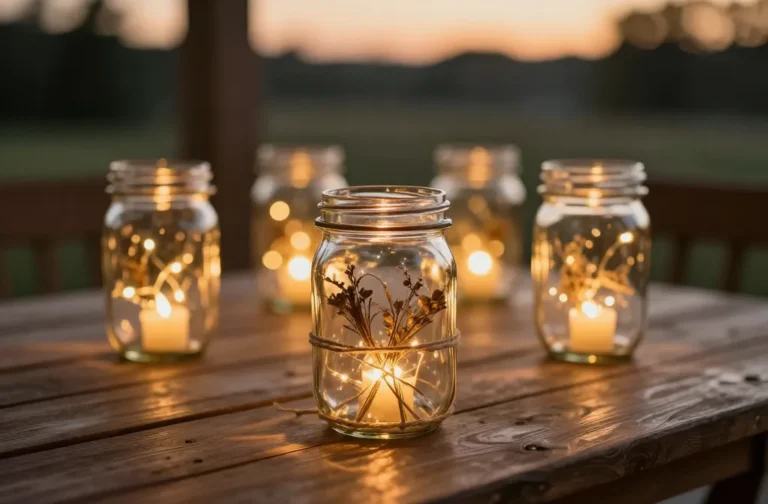
5. Upcycled Tin-Can Lanterns With Seed-Stamped Glow
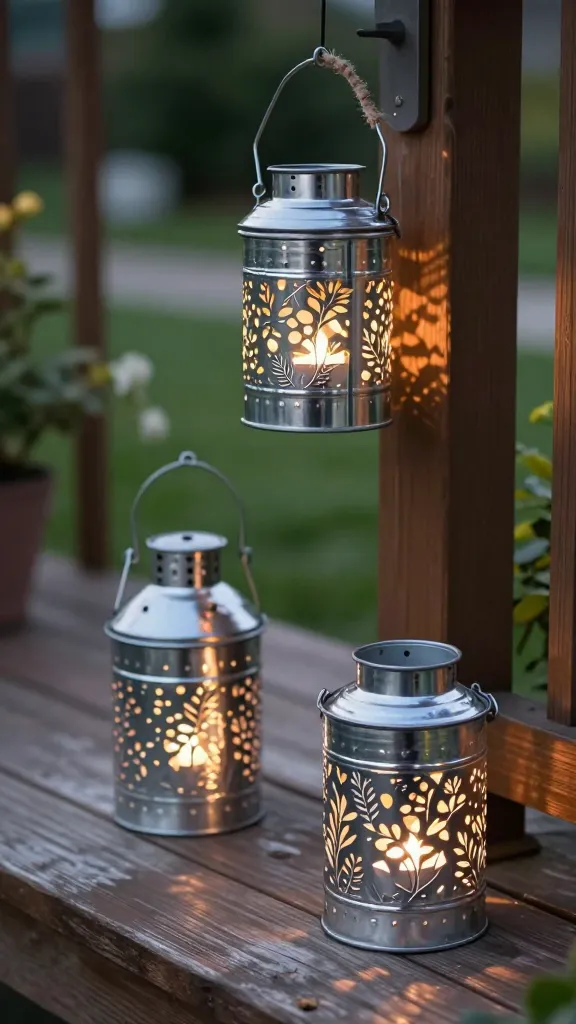
Waste-not-what-you-started-with meets outdoor chic in these Upcycled Tin-Can Lanterns. The seed-stamped patterns create a delicate lantern glow perfect for patios, balconies, or indoor fairy lights—seriously, strolls to the porch nightcap look.
Materials
- Empty tin cans, cleaned
- Hammer and nail or a metal punch
- Seed-stamp or punch pattern
- Tea lights or small LED candles
- Vine twine for handles
How to Make It
- Punch holes in patterns around the can. Create a light-catching silhouette when lit.
- Rinse and dry, then wrap with twine or paint for a rustic finish.
- Place a tea light inside and set on a balcony or table for warm glows at dusk.
Pro Tips / Styling Ideas
- Group in odd numbers along a table or step outside for a candlelit dinner vibe.
- Pair with potted herbs to make a mini garden lantern trio.
Who would love it? Outdoor enthusiasts, apartment dwellers, and anyone itching for a sustainable project. It’s sturdy, reusable decor that also makes a thoughtful, eco-friendly gift.
6. Mini Magnetic Chalkboard Wall Tiles
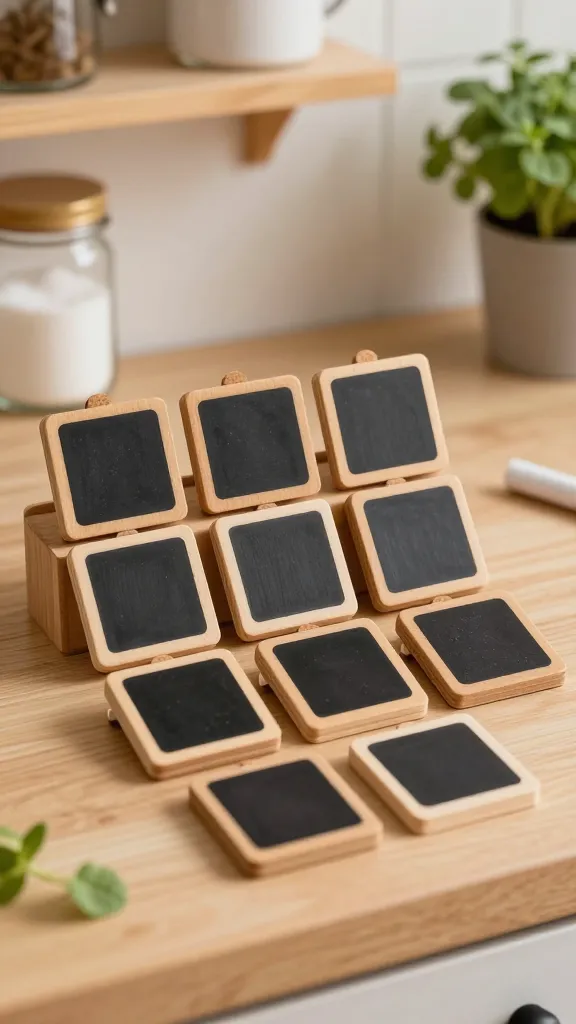
These tiny boards are bound to spark creativity in kitchens, offices, or kids’ spaces. Chalkboard tiles offer a practical canvas for grocery lists, inspirational quotes, or doodle sessions—compact, reusable, and endlessly handy.
Materials
- Small wooden or cork tiles
- Chalkboard paint or adhesive chalkboard vinyl
- Magnetic strips or tiny magnets
- Fine-tip chalk markers
How to Make It
- Coat tiles with chalkboard paint or apply vinyl, then let dry thoroughly.
- Attach magnets to the back; add a tiny decorative trim if desired.
- Mount on a fridge, magnetic board, or metal wall for easy access and writing.
Pro Tips / Styling Ideas
- Set up a seasonal quote wall with a “this week’s goals” section.
- Bundle in sets of three with a chalk marker and a dab of white chalk for a gift-ready package.
Who would love it? Families, editors, and students who crave a tidy, charming way to jot down notes. It’s practical, adorable, and highly bookable for online shops.
7. Polymer-Clay Mini Plaque Animals
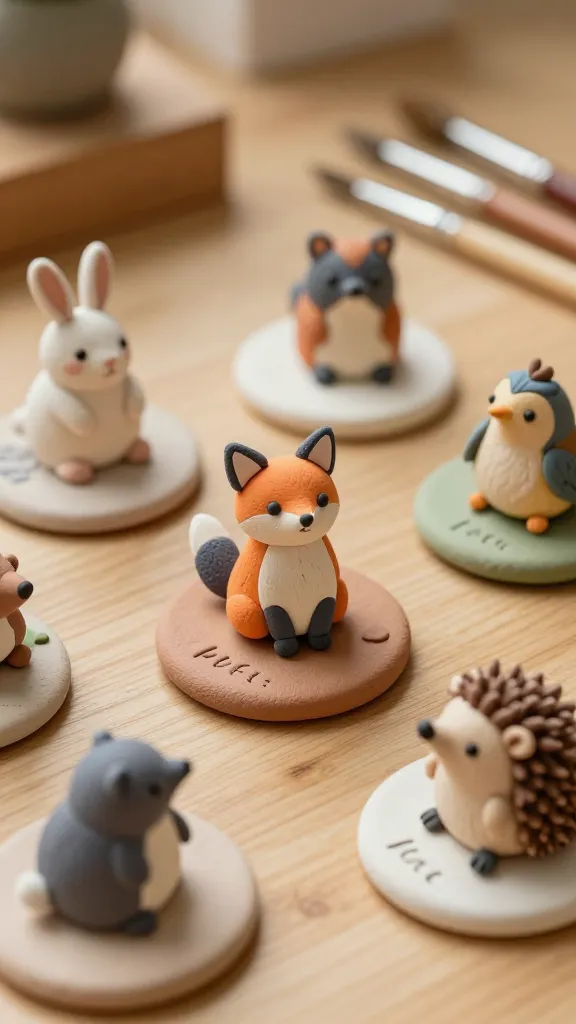
Whimsy meets whimsy here: tiny polymer-clay animals perched on little plaques that tell a story. These mini sculptures are perfect for shelves or desks, with personality that’s both cute and collectible.
Materials
- Polymer clay in assorted colors
- Flat ceramic or wooden plaques
- Small paint brushes, tool set, sealer
- Jump rings and tiny stands (optional)
How to Make It
- Shape animals in small counts, bake per clay instructions, and let cool.
- Paint little details, seal, then attach to plaques with a dab of glue or a small stand.
Pro Tips / Styling Ideas
- Create themed sets: woodland creatures, sea life, or farm friends.
- Offer as a gift bundle with a mini easel display and a handwritten note card.
Who would love it? Collectors, kids’ rooms, and anyone who enjoys tiny, charming creatures perched on a shelf. It’s a playful lineup for holidays or birthday markets.
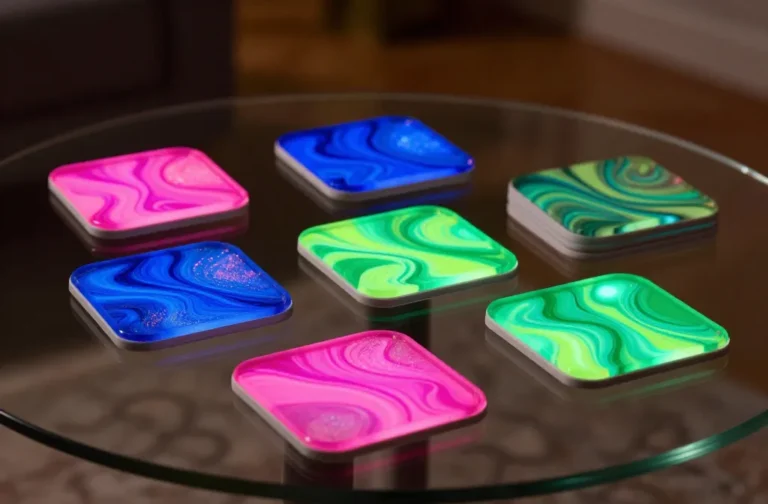
8. Infra-Red Ceramic Coaster Towers

Coasters that feel like tiny architectural sculptures? Yes, please. These Infra-Red Ceramic Coaster Towers stack in a rainbow of soft hues and bring a touch of gallery style to every coffee table. Practical and pretty—two birds, one craft.
Materials
- Pre-made ceramic tiles or air-dry clay
- Acrylic paints in pastel tones
- Matte sealant
- Felt pads to protect surfaces
How to Make It
- Color each tile and seal, letting edges softly blend into the next tile’s color.
- Stack in a small tower or create a single layered mat with a puzzle-like interlock.
Pro Tips / Styling Ideas
- Use as a set of five in a gift box with a mug and a sachet of coffee.
- Offer custom color sets to match home decor trends.
Who would love it? Home decor lovers and coffee aficionados who appreciate a touch of modern art on their tables. It’s sturdy, giftable, and visually striking on social feeds.
9. Dreamy Resin Inlay Coasters With Dading Glitter
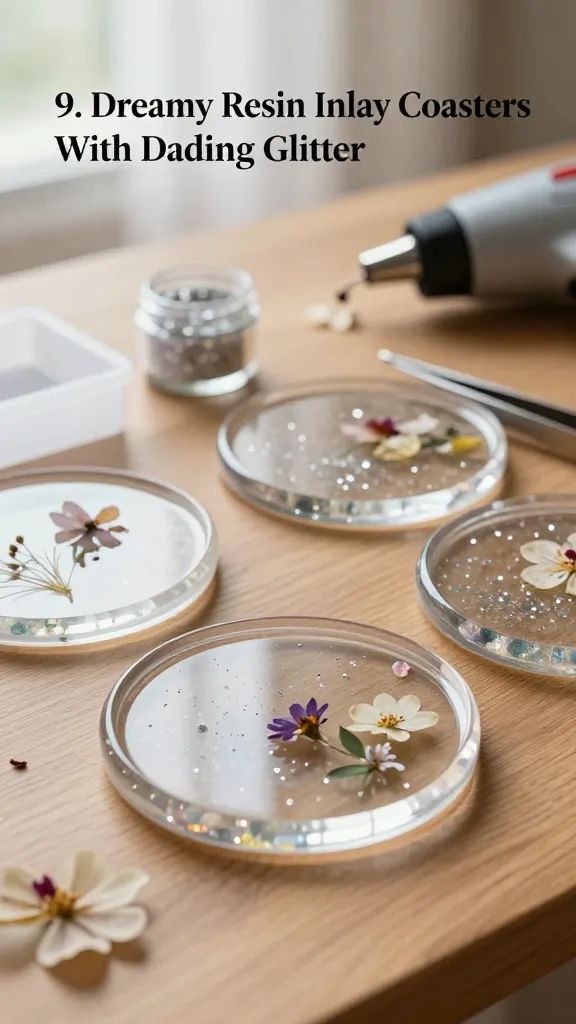
This final act blends resin art with a dash of whimsy. The Dreamy Resin Inlay Coasters shimmer with tiny glitter flecks or pressed flowers suspended in clear, glossy resin. They’re practical, pretty, and boldly photogenic for selling online or at markets.
Materials
- Round silicone coaster molds
- Clear epoxy resin, hardener
- Fine glitter, dried petals, or tiny shells
- Mixing cups, popsicle sticks, heat gun or torch
- Non-stick spray
How to Make It
- Spray molds with non-stick spray. Pour a thin clear layer and let cure.
- Place glitter or dried petals, then fill with resin to top. Move gently to remove bubbles.
- Top with a clear layer and cure fully. Sand edges smoothly for a flawless finish.
Pro Tips / Styling Ideas
- Pair with matching drinkware for a chic gift set.
- Offer seasonal motifs—snowflakes for winter, sunbursts for summer.
Who would love it? Resin enthusiasts, gift-curators, and shoppers who adore glossy, modern home accents. It’s a showpiece that still plays well on a coffee table or bar cart.
Conclusion
These nine whimsical crafts prove you don’t need a huge studio to build a bright, sellable lineup. Each project is distinct, bite-sized to finish, and crafted to shoot straight into both shelves and social feeds. Pick one (or all) and start turning your creative energy into charming items people can’t resist buying.
So, which idea will you try first? Grab your scissors, paintbrush, and a pocket full of confidence—you’ve got this. The world’s ready for your next best-seller, and trust me, the feeling of seeing your own handmade goods loved by others is seriously priceless.