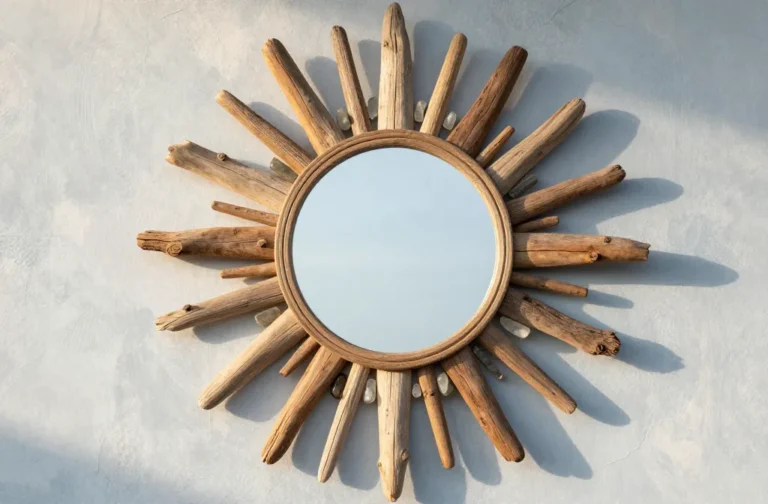
7 whimsical crafts for beginners
Ready to unleash your inner maker without the overwhelm? These 7 whimsical crafts for beginners prove that you don’t need a million tools or a perfectionist eye to create something delightful. Trust me, they’re simple, stylish, and seriously satisfying.
Let’s dive into crafts that spark joy, look Instagram-ready, and actually fit into a busy life. FYI, you’ll finish feeling accomplished and maybe a little bit addicted to the glue gun.
1. Fairy-Tale Tea Light Jars: Glow Up Your Windowsill
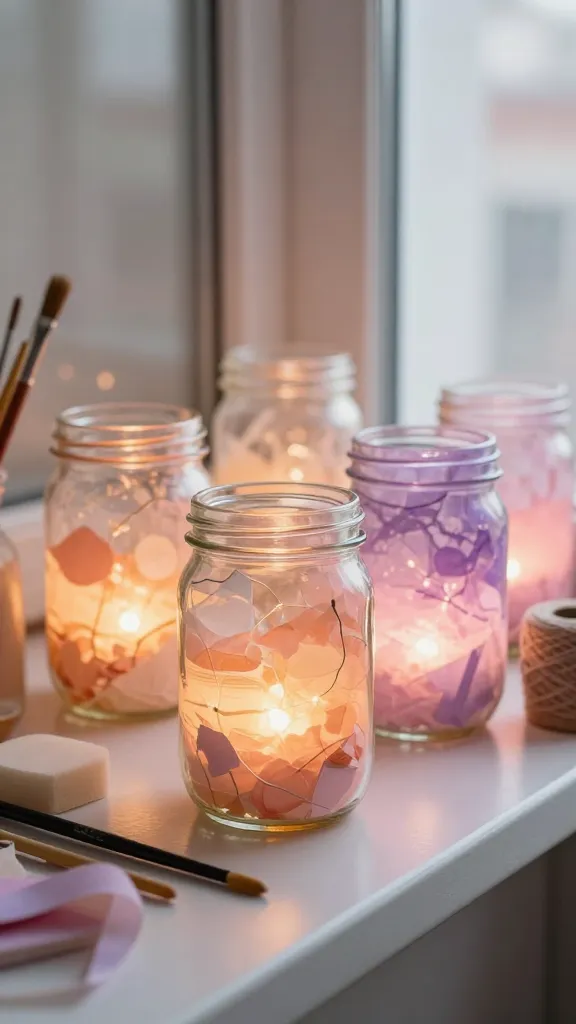
Imagine a row of glass jars glowing softly with colors that look like a sunset melted into a dream. This craft is charming, inexpensive, and endlessly customizable for seasons or moods. It’s the perfect starter project to get comfy with decoupage and color layering.
Materials Needed
- Glass jars (any size)
- Mod podge or craft glue
- Assorted tissue paper, napkins with patterns, or scrapbook paper
- Battery-operated fairy lights
- Brushes or sponges
- Ribbon or twine for finishing touches
How to Make It
- Cut or tear your paper pieces into shapes you love—flowers, stars, or whimsical washi motifs.
- Brush a thin layer of Mod Podge on the jar, press the paper pieces onto the surface, and seal with another coat of glue. Let dry between layers.
- Wrap the top rim with ribbon or twine for a finished look, then tuck in the fairy lights.
Pro Tips / Styling Ideas
- Use different paper textures for depth—vellum for glow, foil for sparkle.
- Group jars in a staggered line on a tray for a moodier glow.
- Switch out the paper seasonally: florals for spring, metallics for holidays.
Who will love it or when to use it: Perfect as a living room or bedroom accent, party decor, or a cozy gift for a friend who loves twinkle lights. You’ll love this because it’s forgiving and endlessly adaptable.
2. Minimalist Felt Plant Cushions: Tiny Greenery, Big Charm
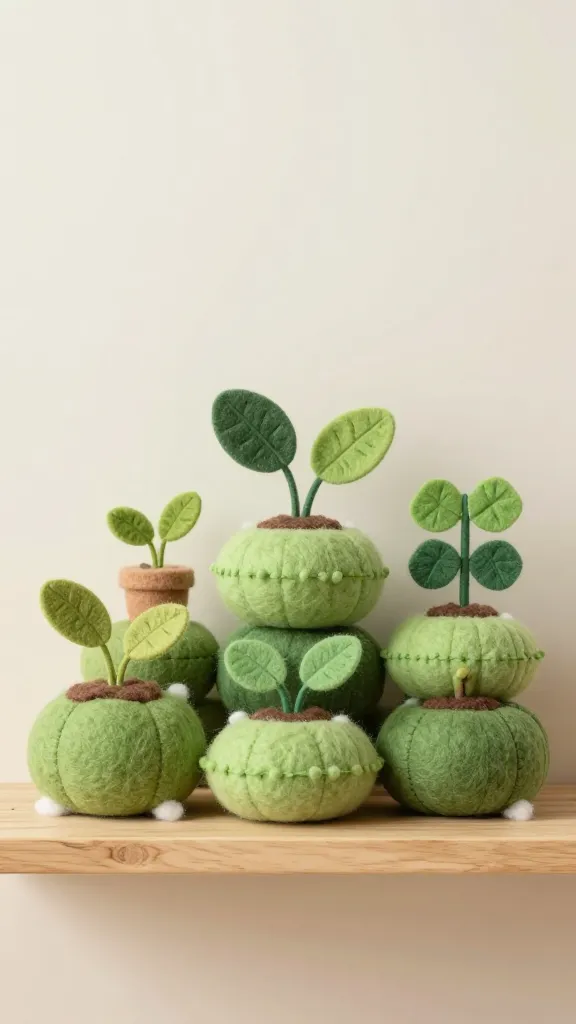
Bring a touch of whimsy to a shelf with these tiny felt plant cushions. They’re surprisingly realistic and so soft to the touch, with a playful cartoonish vibe. No real soil, no watering—just pure cuteness.
Materials Needed
- Green felt sheets in a few shades
- Wadding or cotton stuffing
- White embroidery thread and needle
- Felt leaves and stem shapes for variety
- Small buttons or beads for tiny pots (optional)
How to Make It
- Cut two rounded cushion shapes from felt in your chosen green hues. Stack with a bit of stuffing between.
- Stitch around the edge, leaving a small opening to add extra stuffing, then close up.
- Top with a separate leaf shape stitched on, and add a tiny “pot” base with a contrasting color if you’d like.
Pro Tips / Styling Ideas
- Create a tiny arrangement on a shallow tray with faux pebbles for a grown-up display.
- Mix sizes for a forest-floor vibe on a windowsill.
- Use as charming desk accents or as a playful gift tag topper.
Who will love it or when to use it: Great for dorm rooms, desks, or anyone who loves a touch of whimsy without the upkeep. You’ll adore how quickly these come together and how cute they look.
3. String Art Postcards: Hopeful Messages That Hang
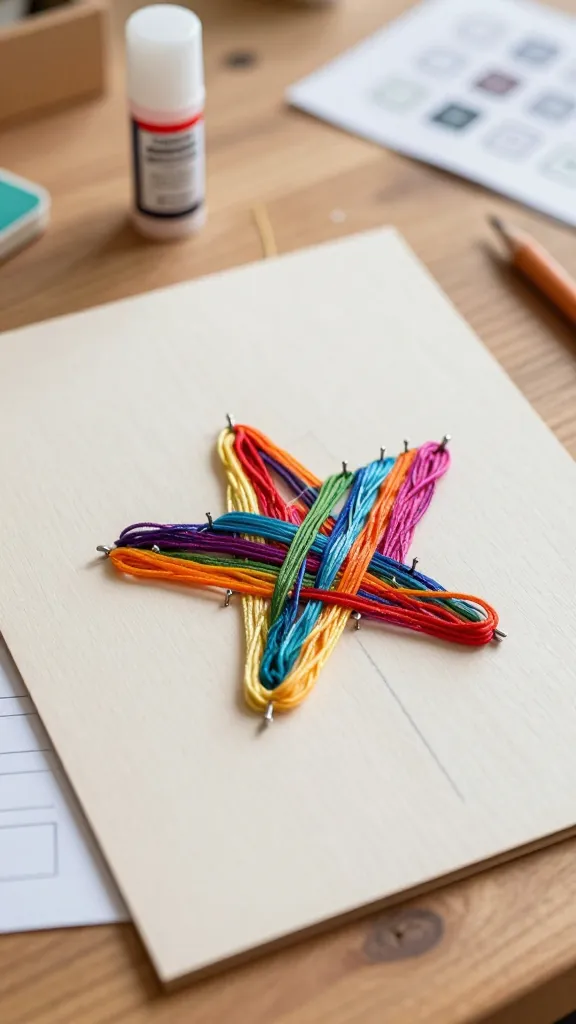
Who says art has to be big to be bold? These string-art postcards are a delightful way to flex a tiny canvas, finish quickly, and mail a smile. It’s art you can mail, which is basically craft magic.
Materials Needed
- Blank wooden or thick cardboard postcard base
- Colorful embroidery floss
- Small nails or push pins (optional, depending on base)
- Pattern stencil or your own doodle
- Glue stick or Mod Podge to seal
How to Make It
- Lightly trace your chosen pattern onto the postcard.
- If using nails, hammer tiny nails along the pattern; if not, simply stitch through the paper surface.
- Loop the floss between points to create a geometric outline, then fill in with decorative stitching.
Pro Tips / Styling Ideas
- Keep the color palette cohesive—soft pinks, creams, and sage greens for a chic look.
- Seal with a light coat of Mod Podge to prevent fraying if stitching through paper.
- Gift as a mini set—three postcards with coordinating patterns.
Who will love it or when to use it: Ideal for sending a handwritten note with a twist or decorating a wall gallery with tiny, meaningful shapes. Seriously, it’s a tiny project with a big impact.
4. Wax-Sealed Cork Coasters: Cozy, Rustic, Customizable

Coasters are the unsung heroes of tabletops, and these wax-sealed cork beauties add a warm, artisanal vibe. They’re practical, charming, and easy to customize with color and wax accents.
Materials Needed
- Cork coaster blanks
- Colored beeswax pellets or crayons
- Citronella or essential oil (optional, for scent)
- Heat-safe spoon and small heat source
- Metal foil or parchment for workspace
How to Make It
- Melt a small amount of wax, then tint with color. Pour a thin layer onto each coaster and let set.
- Drip a contrasting color in a simple pattern or wax seal style for a unique mark.
- Optional: imprint a stamp before the wax fully hardens for an added flourish.
Pro Tips / Styling Ideas
- Pair with a matching wax-sealed gift tag for a cohesive hostess set.
- Use neutral tones for a timeless look, or go bold with teal and gold.
- Store in a decorative tray on a coffee table for instant cozy vibes.
Who will love it or when to use it: Great as a housewarming gift, a small hostess present, or a weekend DIY session with a friend. You’ll love how useful and tactile they feel.
5. Painted Stone Garden Markers: Welcome a Little Flora Personality
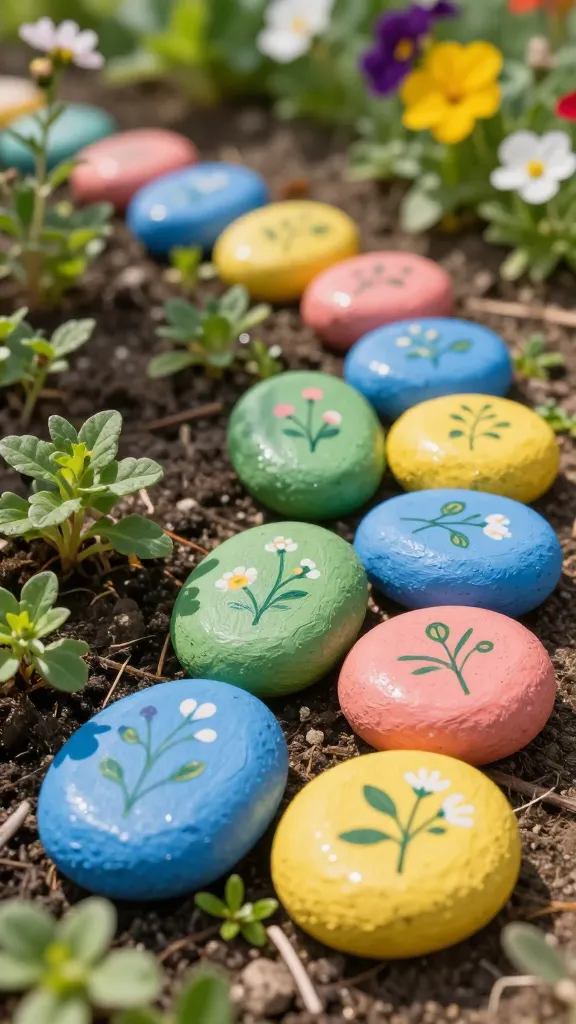
Turn plain stones into cheerful markers for herbs, flowers, or a tiny bloom garden. This project is fast, forgiving, and oddly satisfying—yes, even for beginners with a shaky hand at paint.
Materials Needed
- Smooth flat stones
- Acrylic paints in bright colors
- Fine-tipped paint pens for details
- Clear sealant spray
- White chalk or pencil for labeling
How to Make It
- Paint each stone with a solid base color and let dry.
- Use paint pens to write plant names or doodle tiny icons like leaves or petals.
- Seal with a spray to protect from weather if used outdoors.
Pro Tips / Styling Ideas
- Coordinate colors with your garden theme or container color palette.
- Add little patterns on the back for a surprise when flipped over.
- Line them up in a decorative row by the herbs for a cute kitchen garden vibe.
Who will love it or when to use it: Perfect for backyard or balcony gardens, kitchen herb pots, or as a bright, nature-inspired gift. You’ll appreciate how personal and practical they are.
6. Paper-Flower Curtain Ties: Spring Indoors, All Year Round
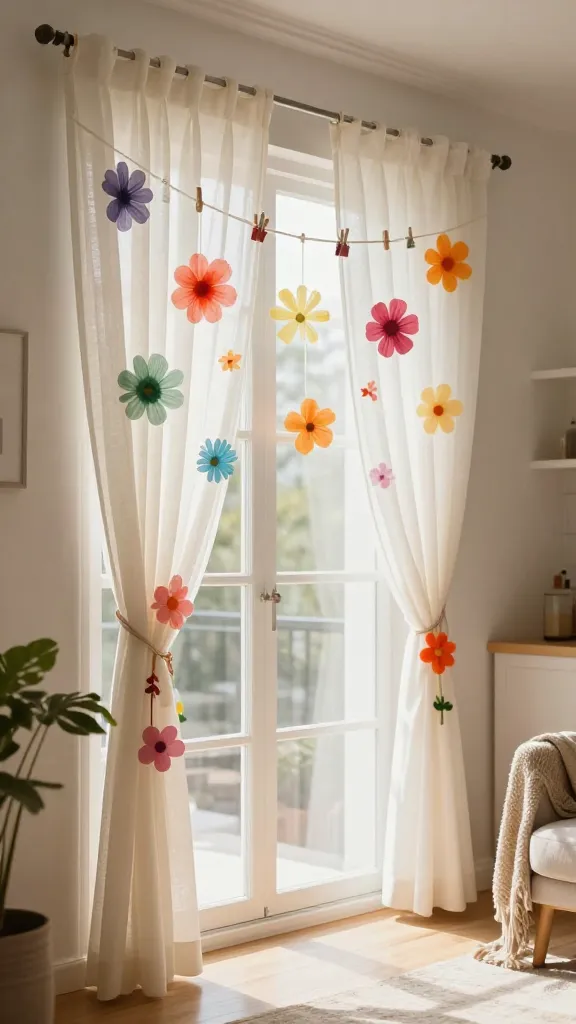
Looking for a playful way to inject color into a plain window? These paper-flower curtain ties are lightweight, reusable, and add a whimsical touch to any room. They feel like a little party every time you pull the curtains.
Materials Needed
- Colored craft paper or tissue paper
- Tiny clothespins or mini binder clips
- Ribbon or string to tie
- Glue or tape
How to Make It
- Cut paper into flower shapes of varying sizes.
- Layer petals and secure with a dab of glue to create dimensional blooms.
- Attach flowers to the ribbon with clothespins or clips, spacing evenly.
Pro Tips / Styling Ideas
- Use complementary colors to your curtain fabric for maximum pop.
- Seasonally swap in different color palettes—pastels for spring, bolds for autumn.
- Let the bow of the ribbon be a contrasting accent for a playful finish.
Who will love it or when to use it: Great for renters who want a quick decor refresh or for brightening a kitchen nook. You’ll love the instant sunshine these bring to any room.
7. Tiny Felted Needle Pompoms: Soft, Squishy Decor Delights
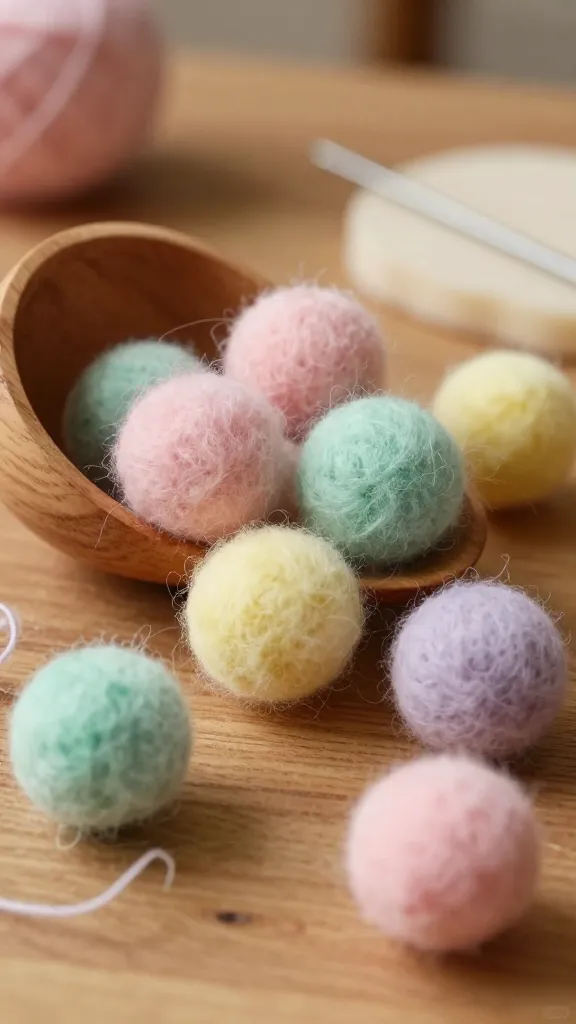
Soft, lovable, and incredibly cute, these tiny felted pompoms add texture to garlands, wreaths, or a decorative bowl. No heavy machinery required—just a little fiber friend energy and a splash of color.
Materials Needed
- Carded wool roving in chosen colors
- Felting needle and foam pad
- Optional beads or tiny rings for embellishment
How to Make It
- Roll a small ball of wool and repeatedly poke with the felting needle to shape and firm the core.
- Shape into tiny pompoms by felting more evenly, then add a subtle dot of contrasting color for personality.
- Thread onto a string to create a garland, or cluster in a decorative bowl.
Pro Tips / Styling Ideas
- Mix matte and metallic fibers for a bit of glam.
- Create a mini tassel by leaving a short thread tail for hanging accents.
- Hang on a lightweight branch to craft a mobile-like centerpiece.
Who will love it or when to use it: Perfect for sprucing up a kid’s room, creating a cozy mantel, or gifting as a whimsical party favor. You’ll be surprised how therapeutic needle felting can be—trust me, it’s oddly soothing.
Conclusion
These 7 whimsical crafts for beginners prove that you don’t need to be an expert to make something delightful. Pick one (or all seven) and start a cozy weekend of creativity. You’ll finish with handmade pieces you’re proud to display, gift, or repurpose into fresh decor. Happy crafting—your future self will thank you for the fun, the color, and the little daily wins.