5 Simple Origami Craft Ideas for Beginners
Ready to fold your world into something delightful? If you’re new to origami, these five ideas are crafted to be friendly, fun, and totally Instagram-worthy. Trust me, you’ll fall into a satisfying flow with every crease.
Origami isn’t just folding paper; it’s a tiny win with every square. These projects keep things light, colorful, and practical—perfect for beginners who want quick rewards and a dash of whimsy. FYI, you’ll love how each piece doubles as decor or a thoughtful handmade gift.
1. Simple Crane mobile: airy decor you can actually hang

Imagine a delicate flock of cranes gently hovering over your reading nook or sunny desk space. The Simple Crane mobile gives you that dreamlike vibe with minimal fuss. It’s light, graceful, and incredibly satisfying to customize with your favorite colors.
Materials Needed
- Assorted origami square paper (5–8 sheets, 6×6 inches works great)
- Clear fishing line or thread
- Cardboard diffuser or a small hoop (optional for hanging)
- Scissors
How to Make It
- Fold a traditional crane from one sheet of paper. Keep folds crisp for a clean silhouette.
- Repeat with the remaining sheets to create 5–8 cranes.
- Thread each crane, spacing them evenly, and knot at the top to form a hanging line. Adjust lengths for a cascading effect.
- Attach to a hoop or a small piece of cardboard so you can hang it as a focal mobile.
Pro Tips / Styling Ideas
- Mix matte and metallic papers for a playful shimmer.
- Use cotton thread for a ghost-light, almost ethereal feel.
- Hang near a window so the breeze adds subtle motion—seriously magical.
Who would love it or when to use it
Perfect for living rooms, nurseries, or a dreamy desk corner. This is a calm, classy project you’ll want to show off to guests. You’ll adore the zen of watching the cranes drift with the air.
2. Origami sachets: cute little gift tags that double as storage
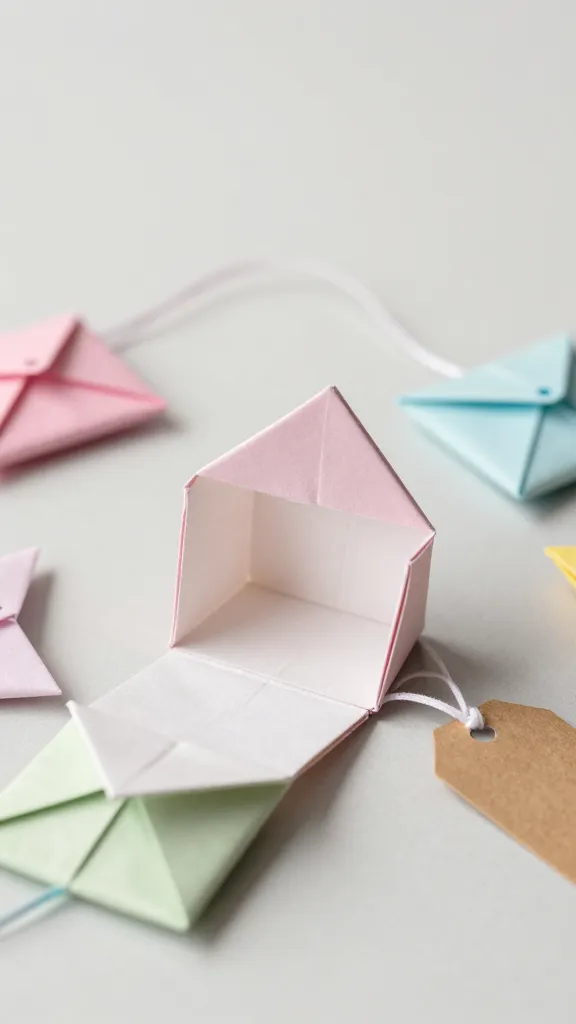
Picture tiny, pocket-sized pouches that flip open to reveal a sweet note or a small trinket. These Origami Sachets are adorable, practical, and surprisingly straightforward—great for gifting or organizing tucked-away treasures.
Materials Needed
- Colored origami paper (6×6 inches, at least 6 sheets)
- Thin ribbon or string (optional)
- Mini tags or stickers for labeling (optional)
How to Make It
- Fold a basic origami pouch: a simple corner-folded base that becomes a tiny envelope.
- Seal with a small tuck or a dab of glue at the edge for staying power (optional).
- Decorate the outside with a contrasting color or a tiny sticker for personality.
Pro Tips / Styling Ideas
- Fill with a note, a coin, or a scented bath salt for a charming gift trio.
- Line a tray or mini shelf with a row of sachets for a boutique display.
- Use metallic or patterned papers to elevate the vibe.
Who would love it or when to use it
Gifting season, wedding favors, or a cute desk organization hack. These sachets add a touch of handmade warmth to any small gift or decor setup.
3. Origami flower bouquet: paper petals that last forever
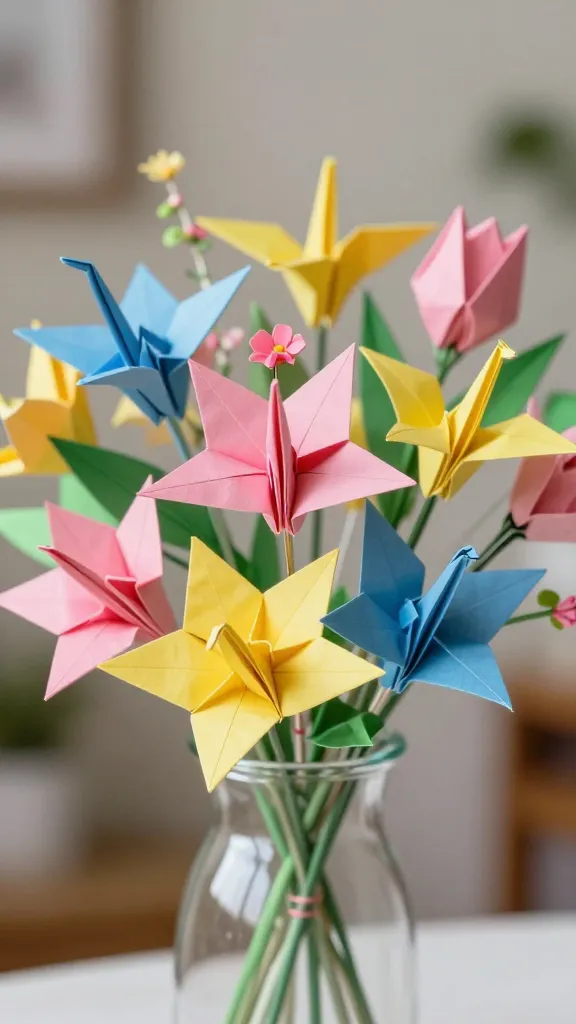
A blooming bouquet that never wilts—yes, please. The Origami Flower Bouquet turns simple square papers into a cheerful array of blossoms. It’s bright, flexible, and a playful way to bring a garden-ready vibe indoors.
Materials Needed
- Bright origami paper in multiple colors
- Wire stems or floral wire (optional for structure)
- Floral tape (optional)
- Scissors
How to Make It
- Fold a classic crane-style flower or a tulip-inspired blossom from each sheet. The trick is to choose variations that echo a real bouquet (pink, yellow, coral, and lime are gorgeous together).
- Attach to wires for stems, or glue a small stick to the back of the blossom for a ready-to-display stem.
- Arrange in a jar or vase, mixing heights for a natural look.
Pro Tips / Styling Ideas
- Wrap stems with green floral tape for a seamless, natural finish.
- Group different flower shapes for a garden-fresh feel.
- Place in a glass vase with water beads to anchor the look.
Who would love it or when to use it
A thoughtful centerpiece for kitchen counters, dining tables, or a whimsical wedding décor element. It’s a long-lasting bouquet that makes people smile—trust me.
4. Folded creature garland: playful critters for a cozy corner
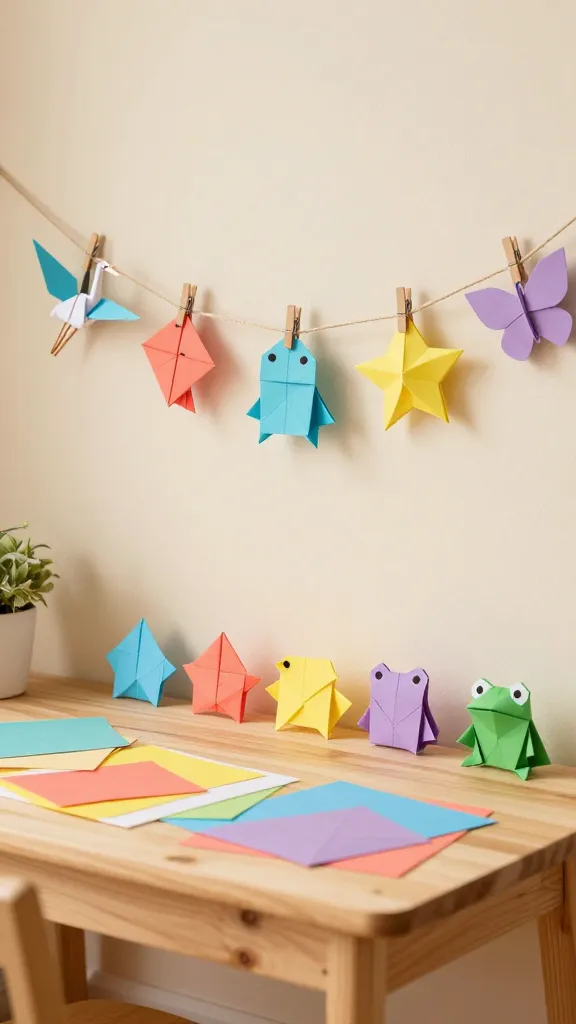
Bring a little whimsy to a kid’s room or your creative corner with a folded creature garland. These tiny origami critters are easy to make, endlessly printable with color choices, and super fun to string together into a playful parade.
Materials Needed
- Origami paper in assorted colors
- String, twine, or ribbon
- Mini clothespins or glue (optional)
How to Make It
- Choose five to eight creatures to fold (crane, fish, frog, star, butterfly – the sky’s the limit).
- Fold each one with clean, precise lines so they sit nicely along the string.
- Space them evenly along the garland and hang at eye level for best effect.
Pro Tips / Styling Ideas
- Alternate colors for a vibrant rhythm.
- Attach to a short dowel or a strip of wood for a clean base you can mount on a wall.
- Switch out the creatures seasonally for a fresh display.
Who would love it or when to use it
Nursery walls, playrooms, or a fun photo backdrop for birthday parties. It’s a charming, kinetic piece that invites a smile every time you walk by.
5. Origami bookmark set: tiny folds, big reading joy
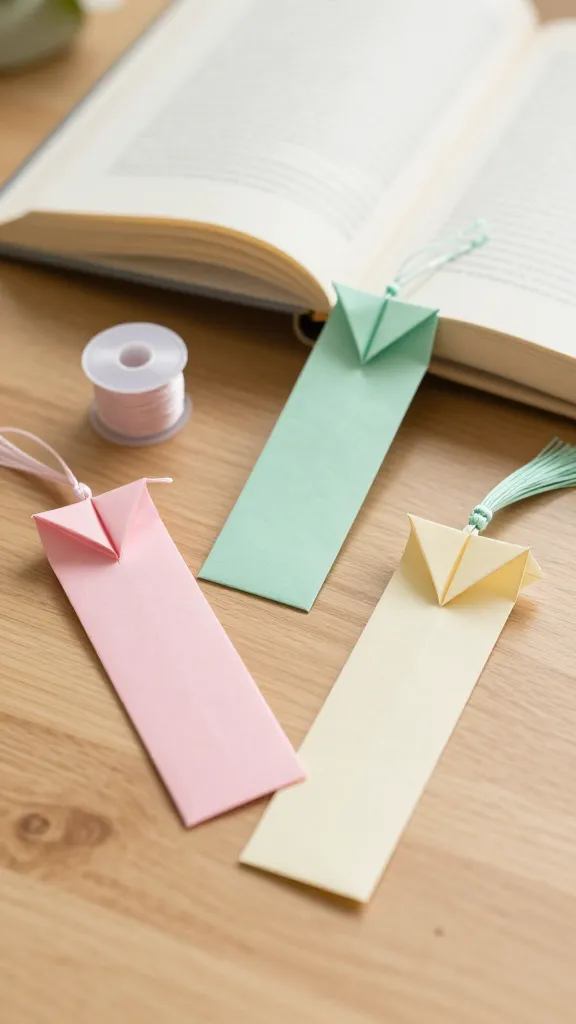
Calling all book lovers: a set of Origami Bookmarks is a practical keepsake that bookmarks chapters with personality. These are quick to fold, easy to customize, and a tiny luxury you’ll love slipping into your favorite novels or gifting to readers in your life.
Materials Needed
- Thin origami paper or sturdy decorative cards
- Double-sided tape or a dab of glue (optional)
- Ribbon or tassels (optional)
How to Make It
- Fold a corner and flat-fold a simple triangle bookmark with a small pocket to tuck the page corner in.
- Decorate the front with a contrasting color or a tiny sticker for flair.
- Attach a tiny ribbon tassel if you want a little drama when you flip the page.
Pro Tips / Styling Ideas
- Pack a few in a gift bag with a mini bookplate for a thoughtful gift set.
- Coordinate colors with the recipient’s favorite book or vibe (cozy neutrals, playful brights, etc.).
- Laminate or seal if you want them to last through heavy reading sessions.
Who would love it or when to use it
Ideal for teachers, students, or anyone who loves a little literary charm on their pages. These bookmarks blend usefulness with a dash of craftiness that you’ll reach for again and again.
Conclusion
Five completely unique origami crafts, each designed to be beginner-friendly, visually striking, and endlessly adaptable. Which one will you try first—crane mobile, sachet keepsakes, flower bouquet, creature garland, or bookmark set? Start with one, or dive into all five and build a tiny origami gallery in your home. The joy is in the folds, and you’ll feel that boost of proud creator energy with every finished piece. Happy folding, friend—you’ve got this, and trust me, the results are absolutely worth it.