6 Genius Road Trip Activities for Kids to Keep Them Quiet
Road trips don’t have to be silent, tedious marathons. They can be sparkling with color, creativity, and a little chaos in the best way. Trust me, these six completely unique crafts will transform backseat time into studio time—without the mess you dread.
Let’s roll through six distinct, easy-to-macgy crafts that are fun, travel-friendly, and seriously Pinterest-worthy. You’ll love how quick they come together and how even the pickiest kiddo can tastefully destroy a project in the most adorable way. FYI, these are designed to be mess-light and map-friendly, so your car stays semi-clean and everyone stays semi-happy.
1. Road-Trip Color-Changing Crayon Scraper Art Kit
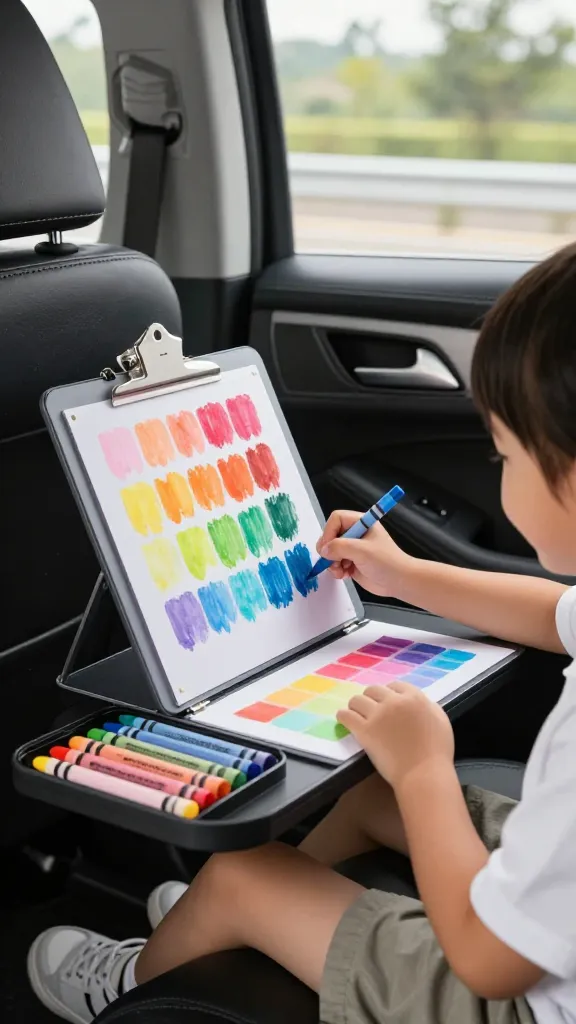
Imagine a tiny, portable studio where crayons become shimmering, color-changing sketches. This project yields compact panels kids can color, clear for a dramatic reveal, and then clip on a travel clipboard for instant art anywhere. It’s bold, it’s practical, and it turns dull highway scenery into a kaleidoscope of possibilities.
Materials Needed
- Magnetic or clip-on travel boards (thin metal or plastic, clipboard-style)
- Colored wax crayons (near full range)
- Clear dry-erase markers (different colors)
- Water spray bottle (tiny)
- Fine glitter or iridescent paper scraps (optional)
- Double-sided tape or small magnets
How to Make It
- Young artists color full scenes with crayons on the travel board.
- They trace over with clear dry-erase markers to create bold lines and patterns.
- Spritz a little water and watch the colors blend and shift as the markers react—trust me, it’s magical.
- Add glitter or iridescent scraps for extra pizzazz, then seal with tape or magnets on the back to keep pieces in place.
Pro Tips / Styling Ideas
- Heat-safe, wipe-clean surfaces help when the magic fades—just erase and start again.
- Attach a small pocket for extra marker refills and tiny accessories so nothing goes missing mid-trip.
End Note
This craft is perfect for curious minds and little color enthusiasts who love a little science-y shimmer. It’s ideal for road trips, car rides, or any time a kid wants a mini studio session on the go.
2. Mini Travel Terrariums in a Box
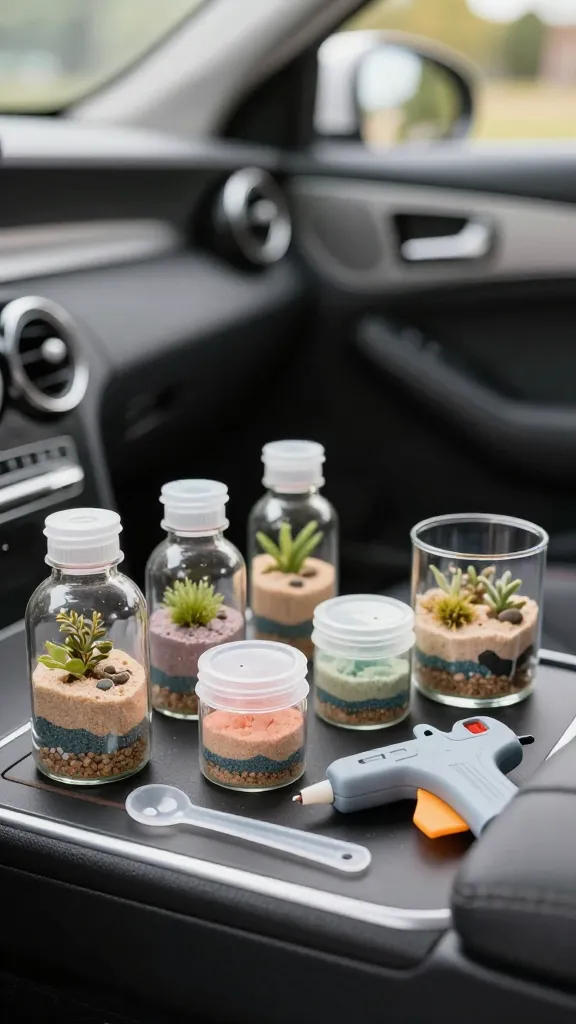
Tiny glass bottles, tiny landscapes, tiny dreams. This project is all about crafting a miniature landscape inside a compact box that fits neatly on a car seat. It’s oddly soothing to assemble, and the finished terrariums feel like a cozy little world—perfect for quiet moments of imagination while the miles roll by.
Materials Needed
- Small glass bottles or plastic mini terrariums
- Colored sand, tiny pebbles, and tiny faux plants or moss
- Mini scoop or teaspoon
- Glue dots or a low-temp glue gun
- Label stickers or mini signs for customization
How to Make It
- Pour a little sand into the bottom to anchor the scene.
- Layer in pebbles for texture, then press in a few faux plants or moss with glue dots.
- Seal with a cork lid or cap; if using glass, keep it short and calm around sharp edges—super important in a moving vehicle.
Pro Tips / Styling Ideas
- Coordinate colors with the season—sunset tones in summer, forest greens in fall.
- Add a tiny printed sign like “Calm Zone” or “Dream City” to personalize.
End Note
Loveable, calming, and endlessly customizable, these terrariums become keepsakes whether you’re on a long road trip or just a quick family outing. They’re best for kids who love tiny details and quiet, focused play.
3. Sticker-Sling Shadow Box Craft
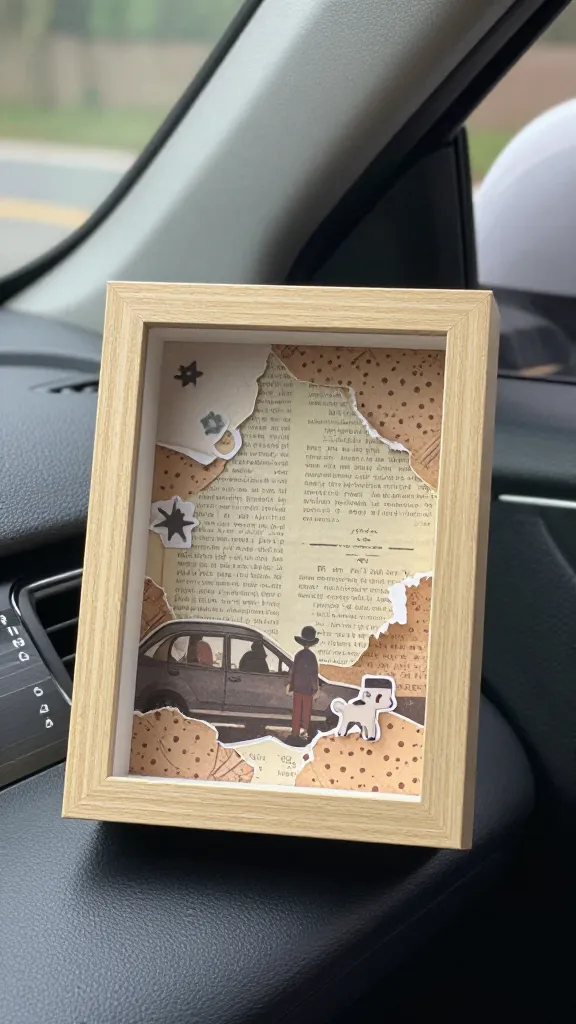
Shadow boxes are adorable on a dashboard shelf, but with a travel twist, they become a storytelling stage in one frame. This version uses chipboard, pages from old books for a vintage vibe, and a handful of stickers to narrate a tiny scene. It’s portable, lightweight, and a total mood booster when the road gets loud.
Materials Needed
- Hollow or flat shadow box (small, 4×6 inches works well)
- Patterned scrapbook paper or a tiny book page background
- Sticker sheets (various shapes: animals, stars, hearts, arrows)
- Scissors, craft knife, glue stick
- Optional mini clothespins and thread to hang tiny items
How to Make It
- Cut background paper to fit the shadow box and secure it with glue.
- Arrange a mini scene using stickers—try a forest floor with critters, or a city skyline with tiny moons above.
- Add a few moving parts with clothespins and thread for a playful, interactive element (like a little banner that swings).
Pro Tips / Styling Ideas
- Use a matte frame to reduce glare from car windows for easier viewing.
- Switch out the background when you stop for lunch—instant mini gallery changes.
End Note
Shadow boxes are conversation starters and collectible keepsakes. They’re a hit for kids who love storytelling and a little drama in their displays.
4. Magnetic Crown Jewel Jewelry for the Car
Yes, you can accessorize the backseat. This project turns low-cost trinkets into a magnetic, interchangeable crown-like set of car-approved baubles. It’s decorative, playful, and surprisingly satisfying to build, especially for kids who adore treasure and tiny keepsakes.
Materials Needed
- Flat-backed magnets (strong-safe for kids’ use)
- Assorted faux gems, beads, and bottle-cap charms
- Thin magnetic tape or glue for magnets
- Small clear baggies or zip pouches for organization
- Optional mini sparkly sticker sheet for extra shine
How to Make It
- Arrange a collection of gems and charms on magnetic tape to create sets—think “royal”, “sea” or “space” themes.
- Stick the magnets to the back of each piece and label with a tiny sticker for easy sorting in the car.
- Clip onto a metal travel tray or a magnetic strip on the seat pocket for instant decoration.
Pro Tips / Styling Ideas
- Create daily “theme sets” to rotate through, so there’s always something new to discover.
- Add a small velvet bag for storage on longer trips—luxury, but compact.
End Note
This is a total crowd-pleaser for kids who love jewelry-like play and a touch of glam. It also makes a super cute gift for later trips or birthday road trips!
5. DIY Puzzle Stone Seekers
Turn common roadside stones into a scavenger-hunt puzzle that kids can assemble and then hide for next leg of the journey. Think of it as a tiny treasure map meets mosaic craft. The finished stones are artful enough to display at home too, so the fun doesn’t ending in the car.
Materials Needed
- Smooth, flat stones (washed and dry)
- Acrylic paints or paint markers
- Fine brushes or chisel-tip markers
- Clear sealant spray (adult use only) or Mod Podge
- Pencil for sketching patterns
How to Make It
- Sketch simple puzzle pieces or pixel patterns on each stone.
- Paint sections in bold colors; let dry, then seal for durability.
- Preserve with a clear coat and pair each piece with a tiny clue card for the scavenger hunt at the next stop.
Pro Tips / Styling Ideas
- Coordinate color palettes with season or destination for cohesive sets.
- Create a “master map” page in a notebook with clue locations to guide the hunt.
End Note
Puzzle Stones give kids a tactile, interactive project that rewards focus and creativity. They also offer a tiny scavenger adventure that can continue long after the road trip ends.
6. Travel-Ready Felt Story Stones
Soft, plush, and endlessly imaginative, felt story stones invite kids to craft mini tales on the move. Each stone holds a character, setting, or prop, and kids combine them to spin quick stories while the car hums forward. It’s a cozy, quiet, and endlessly entertaining storytelling tool.
Materials Needed
- Assorted felt squares in different colors
- Felt sheets cut into small shapes: animals, people, trees, houses
- Light-weight stuffing for a 3D feel
- Needle and thread or fabric glue
- Small fabric bags to keep stones organized
How to Make It
- Stitch or glue felt shapes into little “story stones” with a tiny face or feature on each.
- Stuff lightly to give a slight dimensional feel, then pair shapes into story sets (the hero, the sidekick, the setting).
- Store in color-coded fabric bags to keep sets separated and easy to grab.
Pro Tips / Styling Ideas
- Leave a few stones plain so kids can add their own features with a felt-tip marker later.
- Keep a small felt carry bag in the seat pocket for quick access.
End Note
Felt Story Stones are soft, snuggly, and perfect for kids who love theatre and tales. They’re gentle on car interiors and delightfully portable for any adventure.
Conclusion
These six completely unique crafts prove road trips can be creative, not chaotic. Each project is designed to be quick to assemble, travel-friendly, and visually irresistible for Pinterest-worthy memories. Pick one (or all six) and turn your next car ride into a crafty, quiet, and delightfully memorable experience. You’ll love how easy, engaging, and rewarding they are—seriously, the car trips might finally start to feel like a fun studio on wheels.