11 vintage whimsical crafts
Ready for a stroll down memory lane with a playful twist? These 11 vintage whimsy crafts are fun, easy, and totally Pinterest-worthy. Trust me, you’ll fall in love with the charm of yesteryear reimagined for modern homes.
Each idea is a fully formed project you can tackle in an afternoon or a lazy weekend. No overlaps, no recycled variations—just distinct, delightful crafts that spark joy. Let’s dive in and get crafty!
1. Upcycled Teacup Bird Bath Garden Ornament
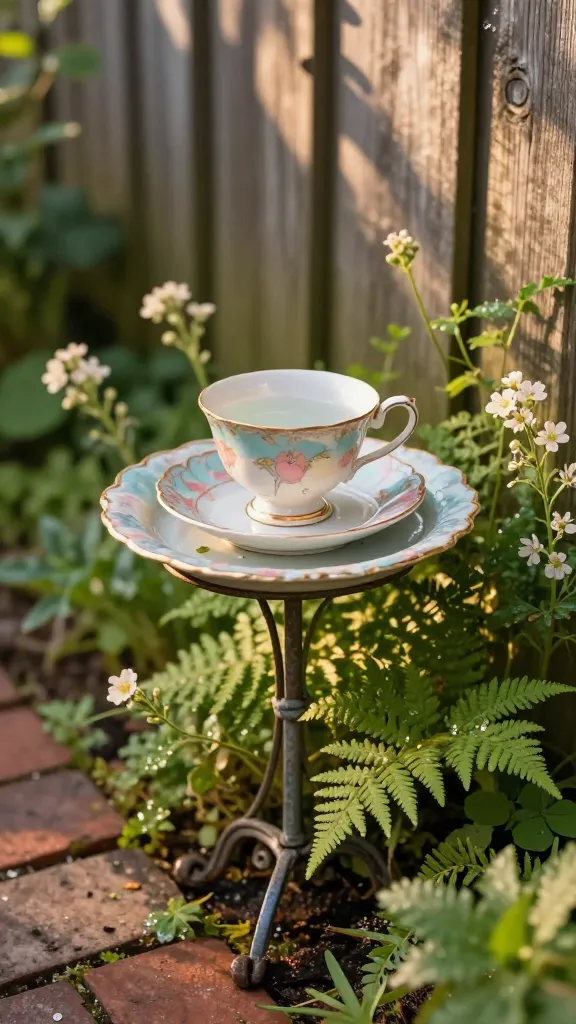
Imagine a sweet, sun-soaked corner outside your door, with a tiny teacup perched atop a repurposed plate as a charming bird bath. It’s quirky, it’s nostalgic, and it doubles as a garden darling. You’ll love the delicate vintage vibe without a lot of fuss.
Materials Needed
- Old teacups and saucers (varied patterns work best)
- Decorative metal plant stake or thick dowel
- Epoxy or strong outdoor adhesive
- Low-speed drill with a small bit (optional for drainage holes)
- Clear outdoor sealant
How to Make It
- Glue a saucer to a teacup’s rim, creating a shallow dish. Let it dry fully.
- Attach the cup-saucer combo to the stake or dowel with extra epoxy for stability.
- Optionally drill a tiny drainage hole in the bottom of the saucer before sealing.
- Seal all exterior surfaces with outdoor sealant and place in a sunny spot.
Pro Tips / Styling Ideas
- Stack a few teacups of different heights for a tiered effect.
- Paint the stake with soft pastel hues for a cottage-core vibe.
Who would love it / When to use
Perfect for garden lovers, bird watchers, and anyone who adores vintage tea sets. It’s a whimsical addition to entryways, patios, or a sunny window ledge.
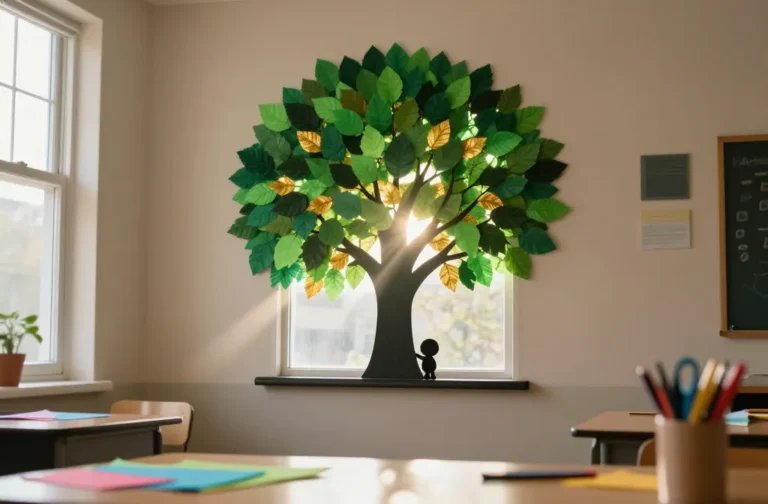
2. Velvet Ribbon Button Tree Wall Art
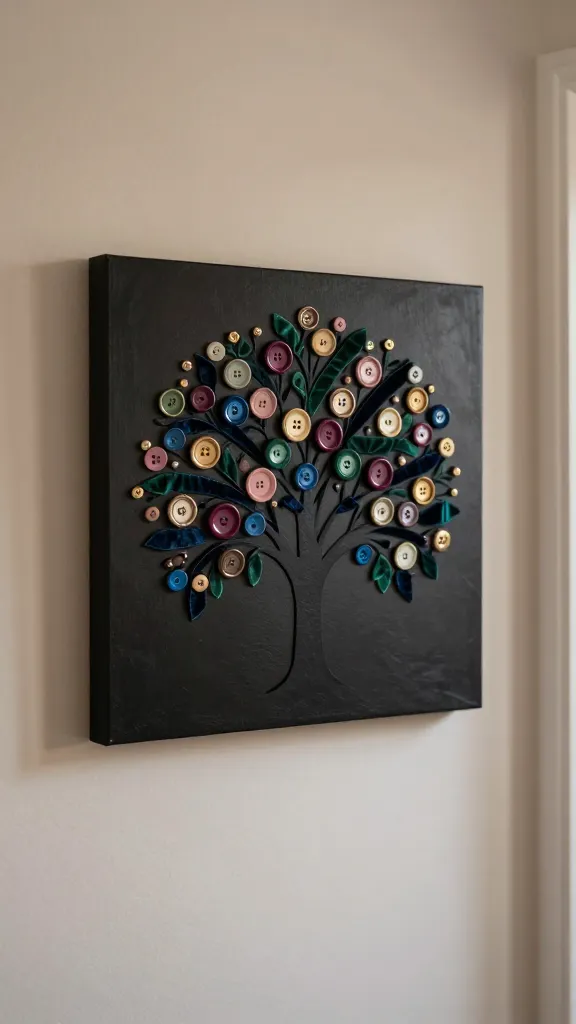
Picture a small, framed tree silhouette bursting with tiny velvet ribbon “leaves” and vintage buttons. It’s tactile, textural, and absolutely charming in a hallway gallery or nursery corner. Easy to customize with your color story.
Materials Needed
- Canvas or wood-framed board
- Black craft paint or black fabric for the silhouette
- Assorted vintage buttons and small velvet ribbons
- Hot glue gun and glue sticks
- Optional: gold or bronze acrylic paint for accents
How to Make It
- Paint or stencil a tree silhouette onto the board. Let it dry.
- Arrange buttons along the branches, then glue in place.
- Tie tiny velvet ribbons around the buttons for “leaves” and texture.
- Add a subtle paint splash or frame trim if you like.
Pro Tips / Styling Ideas
- Create seasons by swapping in ribbon colors—creamy whites for winter, warm amber for autumn.
- Pair with a vintage frame and a soft matte to mirror a postcard aesthetic.
Who would love it / When to use
Great for craft rooms, entryways, or a child’s room. It’s a tactile nod to retro craft fairs and a conversation starter.
3. Milk Bottle Snow Globes with Studio-Fed Figurines
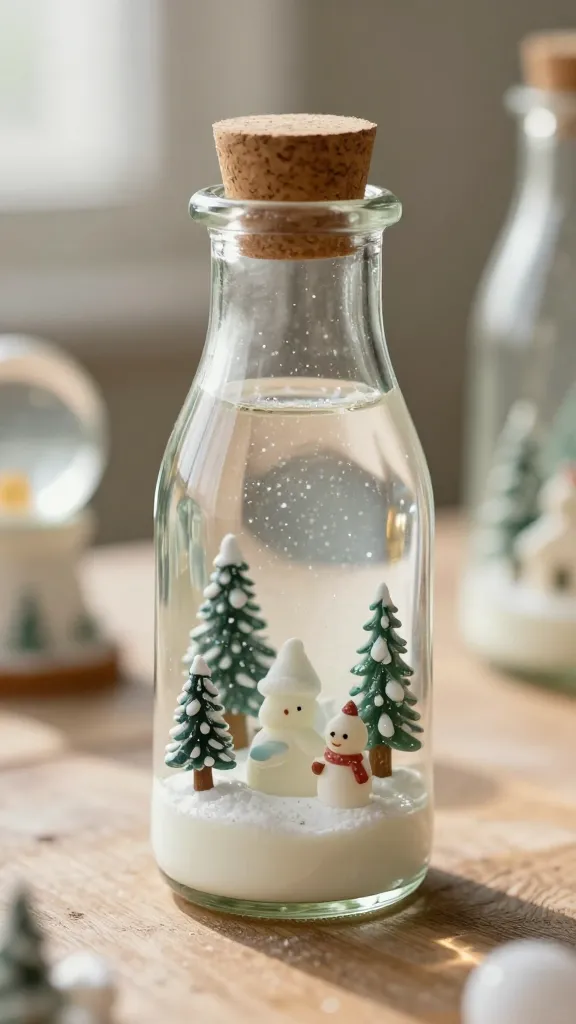
Snow globes aren’t just holiday decor; they’re miniature dreamscapes. This version uses vintage milk bottles and tiny figurines for a sweet, nostalgic charm. Shake to hear a little winter whisper—seriously, it’s just adorable.
Materials Needed
- Clean glass milk bottles with lids
- Miniature figurines or trees (tiny ceramic or plastic)
- Distilled water, glycerin, and a pinch of glitter
- Hot glue or silicone sealant
- Decorative corks or lids
How to Make It
- Seal a figurine into the bottle with a dab of glue, leaving space for water.
- Fill with a mix of water, glycerin, and glitter. Seal tightly.
- Add a cork lid and a dotted line of waterproof sealant around the edge for extra security.
Pro Tips / Styling Ideas
- Label with a tiny vintage tag for a “handcrafted in the 1950s” look.
- Group several bottles on a tiered stand for a winter vignette.
Who would love it / When to use
Ideal for mantels, curio shelves, or as a quirky wedding favor with a retro twist.
4. Patchwork Doily Table Runner with Pocket Pages
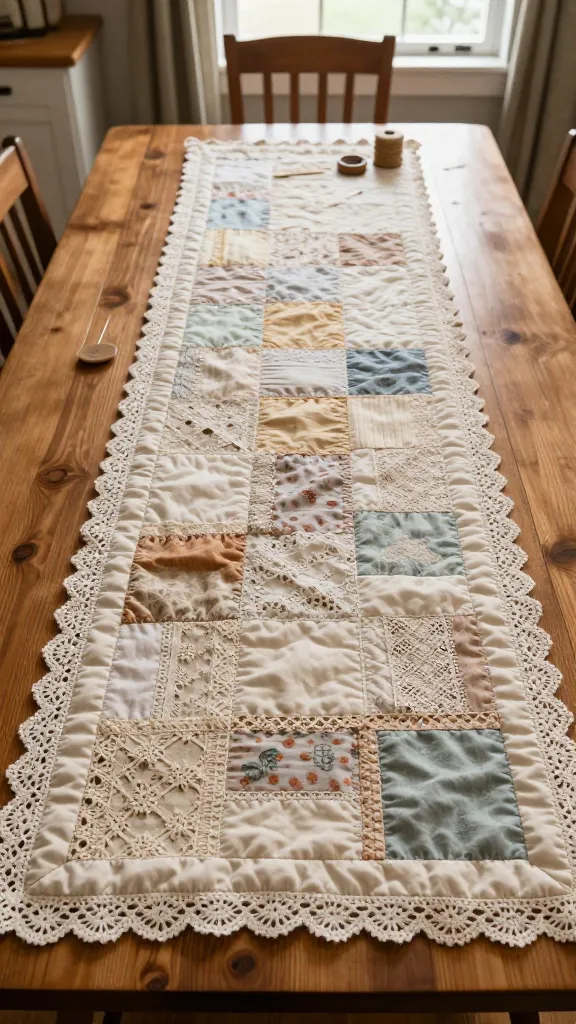
This table runner is like a memory quilt you can walk on. Mix vintage doilies, lace, and tiny fabric pockets to stash keepsakes or recipes. It’s cozy, tactile, and endlessly customizable.
Materials Needed
- Assorted vintage doilies and lace
- On-hand fabric scraps for backing
- Fabric fusible interfacing or light batting
- Thread in coordinating colors
- Sewing machine or needle and thread
How to Make It
- Layer doilies in a pleasing arrangement on backing fabric; fuse lightly if needed.
- Topstitch edges to secure, then add small fabric pockets along the center or sides.
- Finish with a clean binding around the edge.
Pro Tips / Styling Ideas
- Stiffen doilies with a light mist of fabric starch for a crisper edge.
- Use pockets to hold napkin rings, flatware tips, or tiny utensils for gatherings.
Who would love it / When to use
Perfect for dining nooks, tea-on-the-porch setups, or Sunday brunch charm.
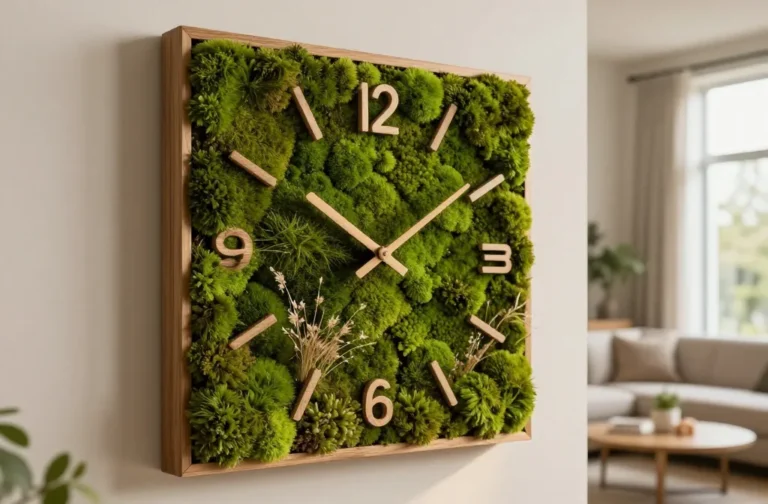
5. Vintage Button Clock Kit
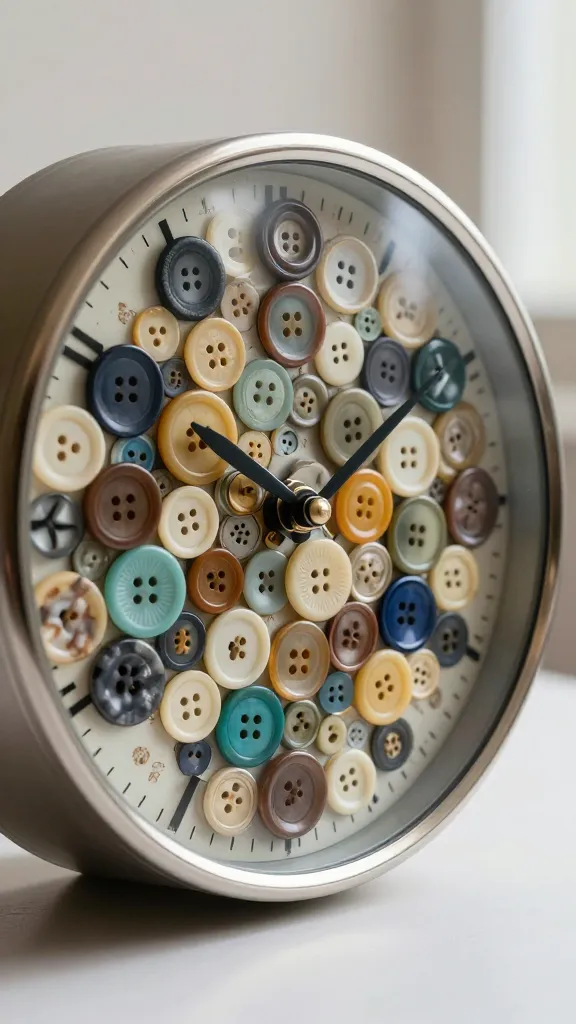
Turn a plain wall clock into a whimsical button mosaic that threads your past into every tick. It’s a conversation piece that still tells time—handy and collectible all at once.
Materials Needed
- Plain round clock mechanism with frame
- Assorted vintage buttons (varied sizes and colors)
- Strong adhesive suitable for metal and plastic
- Fine-tip marker or paint for numbers
How to Make It
- Remove the clock face and begin arranging buttons in a pattern or random mosaic.
- Glue buttons in place, then reassemble the clock mechanism.
- Customize with painted numerals or vintage-style markers behind the button work.
Pro Tips / Styling Ideas
- Create a gradient of colors radiating from the center for a bold look.
- Use metallic buttons for a luxe retro vibe.
Who would love it / When to use
Great for a craft room, kitchen wall, or hallway gallery—anywhere you want a playful, tactile focal point.
6. Crayon-Wax Sunset Wall Hanging
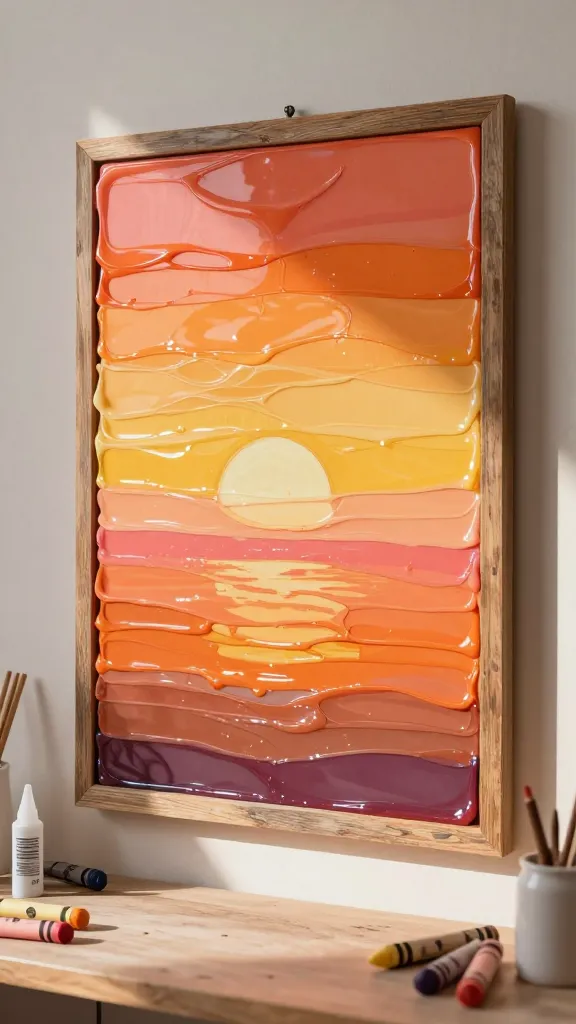
A melt-and-glow project that captures vintage sunset palettes. Layer crayons and wax to create a soft, sun-kissed piece of wall art that glows when the light hits it just right.
Materials Needed
- Wood board or reclaimed frame
- Crayons in sunset hues
- Wax sticks or paraffin (older wax in vintage shades works well)
- Glue gun and clear sealant
How to Make It
- Glue crayons to the board in horizontal slices, then melt using a heat tool to blend colors.
- Overlay with a clear wax layer for a glossy finish.
- Seal edges and mount as wall art.
Pro Tips / Styling Ideas
- Keep the color blocks imperfect for a nostalgic, handmade feel.
- Pair with vintage mid-century frames to amplify the retro vibe.
Who would love it / When to use
Ideal for kids’ rooms, craft nooks, or any space needing a warm, retro glow.
7. Satin Ribbon Seed Pack Banner
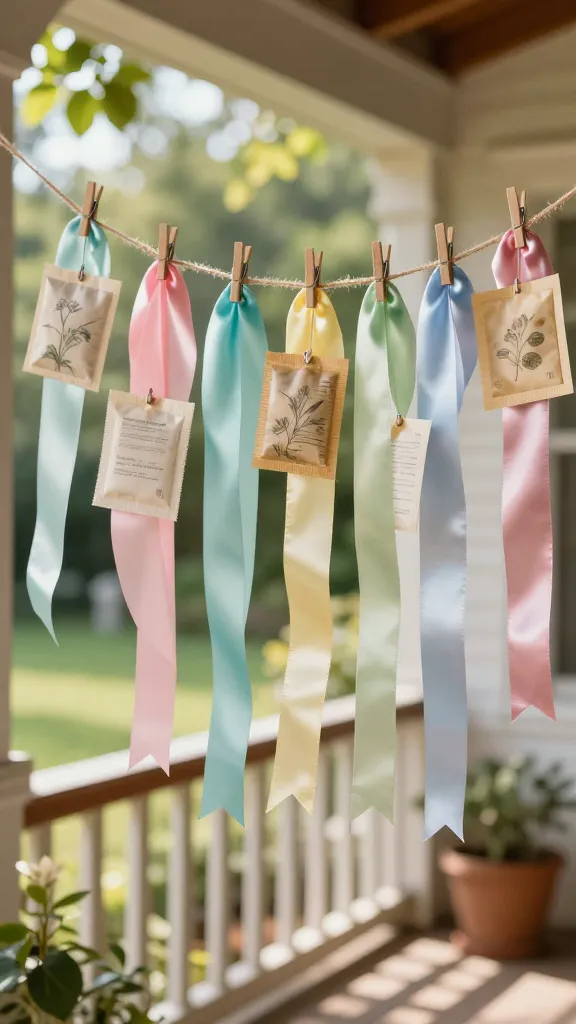
Garden whimsy meets couture in a banner made from satin ribbons and seed packets. It’s perfect for a porch, balcony, or a sunlit kitchen wall that loves a little botanical flair.
Materials Needed
- Assorted seed packets (vintage designs if you can find them)
- Satin ribbon in coordinating colors
- Hot glue gun or fabric glue
- Jute twine or string for hanging
How to Make It
- Seal seed packets and sandwich between ribbon segments as decorative flags.
- Attach to twine with small clothespins or glue to the ribbon ends.
- Hang in a sunny corner where the seed packets can catch the light.
Pro Tips / Styling Ideas
- Mix in a few dried flowers or pressed leaves between packets for texture.
- Use metallic ribbon accents for a vintage glam touch.
Who would love it / When to use
Great for gardeners, sunrooms, or weddings with a rustic vintage vibe.
8. Ceramic Teapot Lanterns
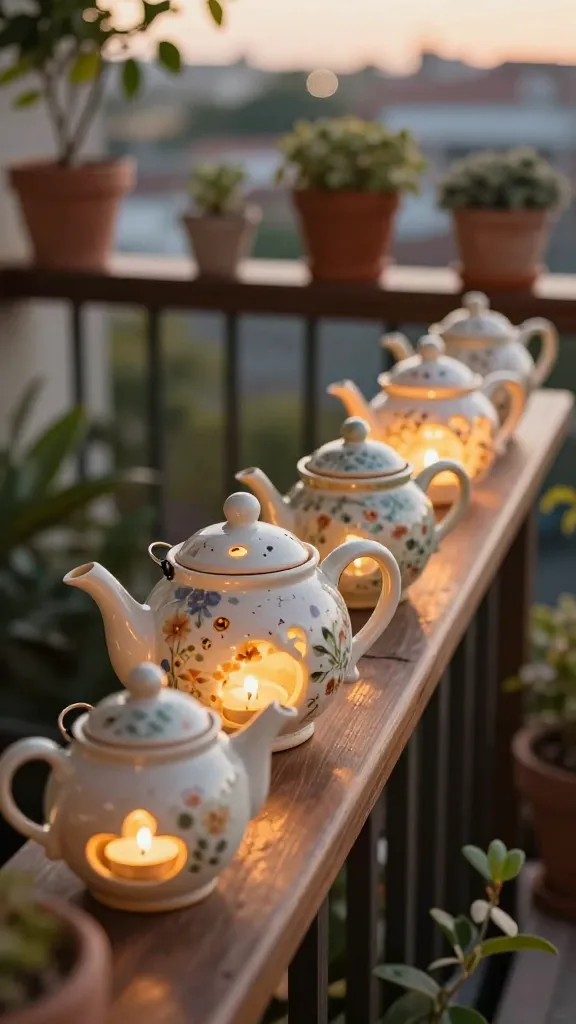
Repurpose old ceramic teapots into softly glowing lanterns. It’s an easy upcycle with a cozy, whimsical aura that looks magical along a balcony railing or patio steps.
Materials Needed
- Old ceramic teapots without cracks
- Battery-operated votive candles or LED tea lights
- Small drill bit and waxing or sealing material
- Tea light-safe lantern lids or metal handles
How to Make It
- Place a votive candle inside each teapot and secure the lid. If using tea lights, ensure venting.
- Drill a small hole near the spout for light escape or attach a handle for hanging.
- Seal exterior for weather resistance and safety.
Pro Tips / Styling Ideas
- Group several teapot lanterns at varying heights for drama.
- Paint with soft chalky tones for a vintage Parisian patina.
Who would love it / When to use
Perfect for outdoor gatherings, porches, or romantic evening settings.
9. Linen Fragrance Sachets with Button Accents
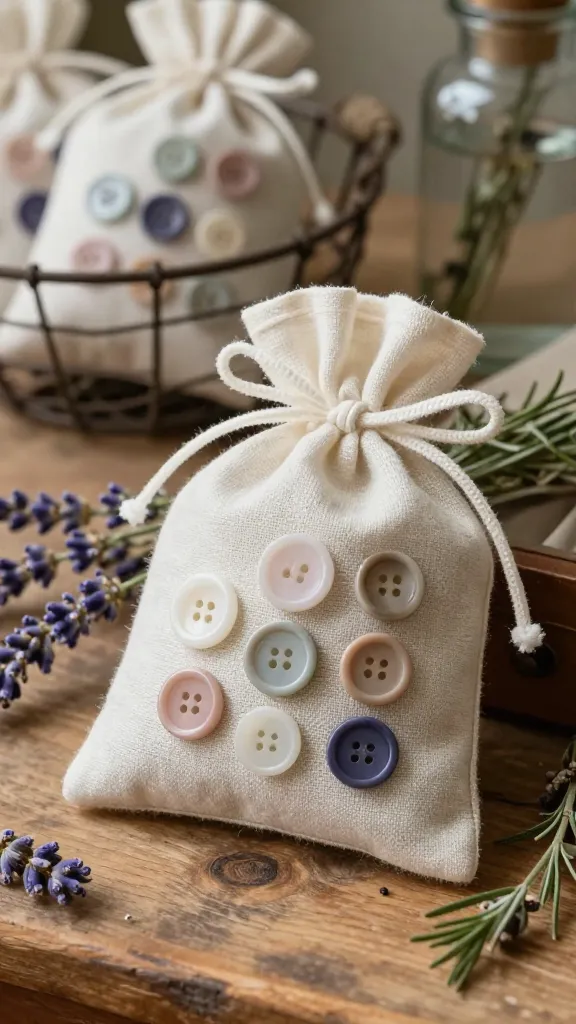
Soft, scented, and irresistibly vintage, these linen sachets carry a gentle fragrance and a pop of color from vintage buttons. They’re perfect tucked into drawers, closets, or a linen closet that needs a touch of whimsy.
Materials Needed
- Small muslin or linen sachets
- Lavender or dried rosemary
- Assorted vintage buttons for decoration
- Ribbon or twine for ties
How to Make It
- Fill sachets with dried lavender or herbs.
- Seal and decorate the front with buttons sewn or glued in a simple pattern.
- Finish with a ribbon tie for hanging or storage.
Pro Tips / Styling Ideas
- Pair with a matching scented sachet placed in a decorative bowl for a room diffuser effect.
- Use in guest rooms for a welcoming, vintage scent profile.
Who would love it / When to use
Ideal for brides-to-be, vintage lovers, and anyone who adores gentle, neutral scent decor.
10. Polaroid Photo Shard Mosaic Coasters
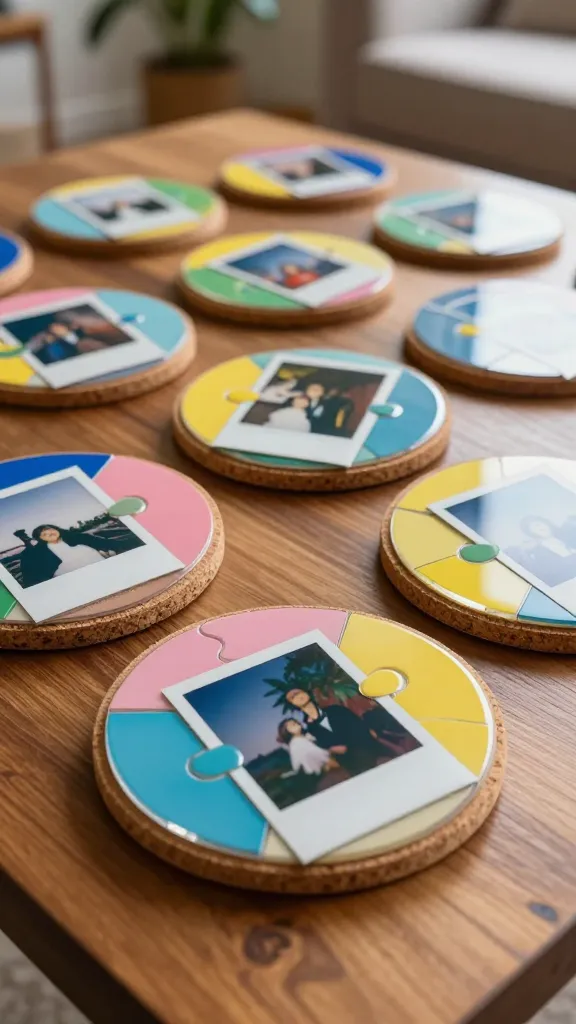
Turn memory-laden Polaroids into a bright, mosaic-inspired coaster set. It’s a tactile homage to old-school photography and crafts that look incredibly chic on a coffee table or office desk.
Materials Needed
- Plain cork coasters
- Polaroid photos (included or scanned to print on sticker paper)
- Clear epoxy resin or adhesive
- Fine sandpaper
How to Make It
- Cut photos into shapes that fit together like a puzzle on each coaster.
- Adhere pieces to the cork and seal with epoxy for a glossy finish.
- Sand edges lightly for a smooth, finished look.
Pro Tips / Styling Ideas
- Use a mix of black-and-white and color photos for a retro collage style.
- Assign each coaster a theme: travel, family, or fashion eras.
Who would love it / When to use
Excellent for living rooms, home offices, or as a thoughtful handmade gift set.
11. Miniature Tin Can Wind Chimes
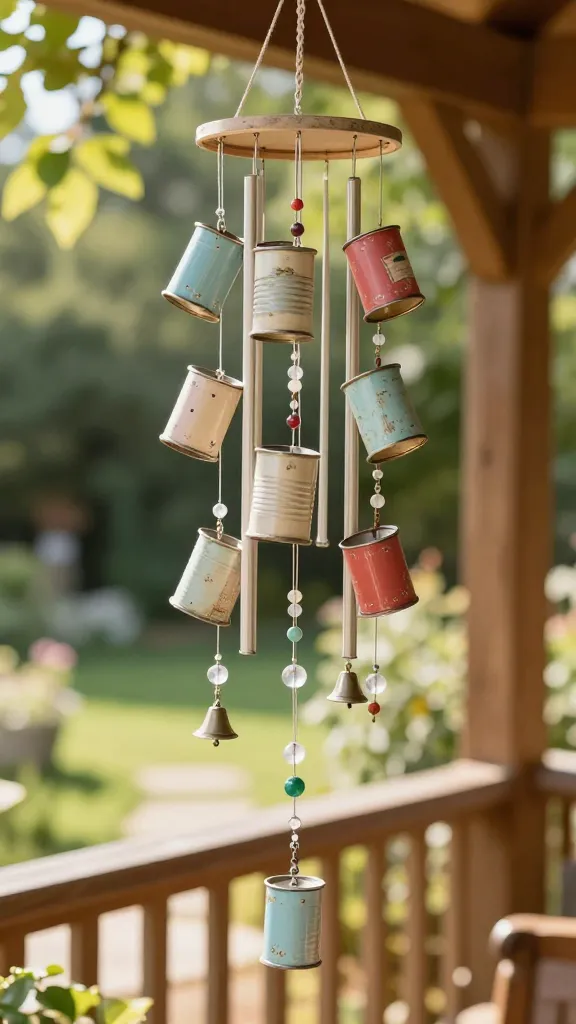
Charming, melodic, and wonderfully tinny, these wind chimes are crafted from old tin cans and delicate beads. They sway with the breeze and bring a soft, nostalgic melody to any outdoor nook.
Materials Needed
- Old tin cans of various sizes
- Paint, brushes, and light sanding tools
- Fishing line or sturdy thread
- Beads, charms, and small bells (optional)
How to Make It
- Decorate cans with paint and vintage-style decals; let dry thoroughly.
- Punch small holes around the rim and tie together with fishing line in descending lengths.
- Attach beads and charms between cans for added sparkle and sound.
Pro Tips / Styling Ideas
- Vary can sizes to create a fuller, richer chime.
- Hang from a weatherproof hook on a breezy porch or garden arch.
Who would love it / When to use
Great for outdoor spaces, porches, and garden corners that crave a touch of musical whimsy.
Conclusion
These 11 vintage whimsical crafts prove that nostalgia can be both easy and stylish. Grab a few vintage bits, a splash of creativity, and you’re set to create home accents that feel timeless and personal. Pick one, or go wild and try them all—your space will thank you, and your inner crafter will, too.