5 Fun DIY Musical Instrument Crafts for Kids
Ready to jam with your little artists? These five DIY musical instrument crafts are playful, easy, and totally kid-friendly. You’ll love how quick they come together and how proudly your mini-musicians show off their own creations. Trust me, these ideas spark imagination as loudly as a tambourine!
1. Cardboard Drum Set: Build a Mini Percussion Studio
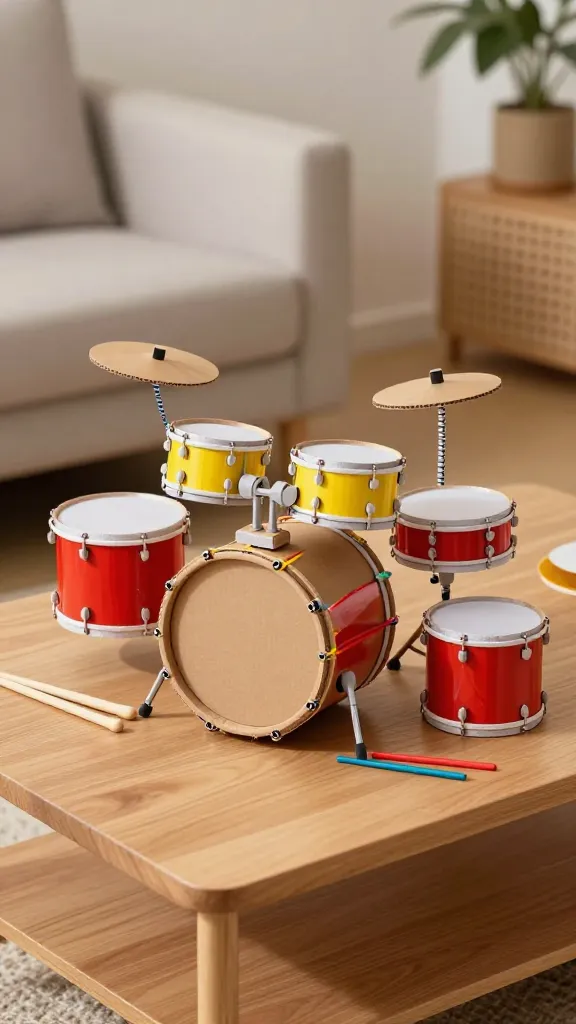
Picture a tiny drum kit that fits on a coffee table, ready for a thunderous creative session. This cardboard drum set looks bold, sounds surprisingly musical, and doubles as a great decor piece when the performance is over.
Materials
- Cardboard boxes (small cylinders or round tubs work great)
- Colored paper or acrylic paints
- Rubber bands or tape
- Beads or bottle caps for jingles
- Plastic spoons or wooden sticks
How to Make It
- Turn boxes into drums by stretching rubber bands over the top for a snappy drum head.
- Paint each “drum” with bright colors and kid-friendly designs—think stripes, polka dots, or a faux wood grain.
- Attach small jingles like beads or bottle caps to the rims with tape for extra shimmer and sound.
- Stir up a seat of plastic or wooden sticks as drumsticks; add grips with colorful tape.
- Create a simple bass by using a larger container with a balloon stretched over the opening as a drum skin.
Pro Tips / Styling Ideas
- Group the drums into a cohesive “stage” with a small rug, pretend spotlight, and a custom band name banner.
- Encourage your kid to tap out a beat and then clap along to record a short “song.”
Who will love it? Kids who crave a bold, tactile instrument and parents who want quick, mess-free crafting sessions. This set is a joyful centerpiece for playrooms or classroom corners.
2. Upcycled Tin Pan Shaker Orchestra
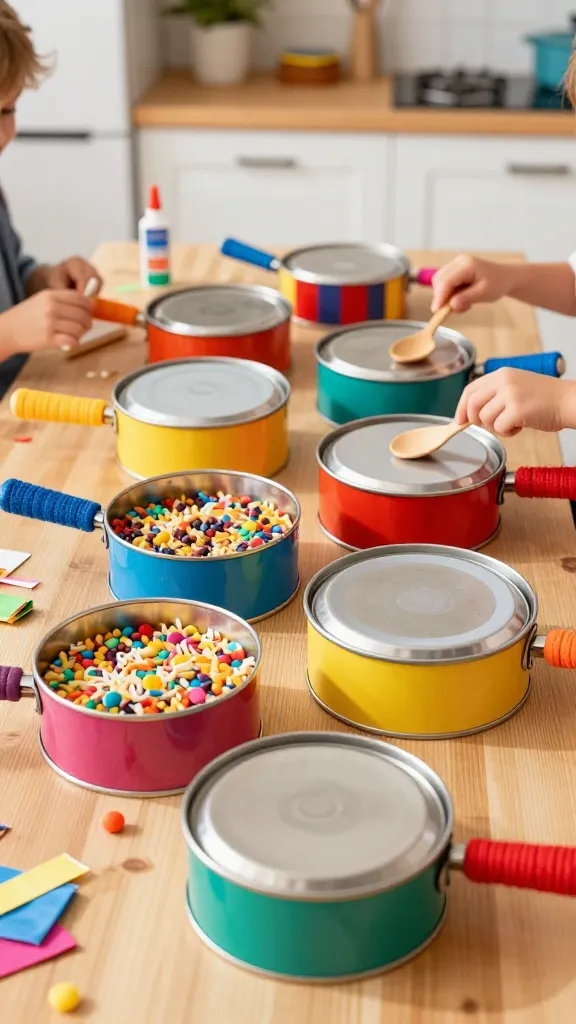
Turn everyday kitchenware into a chorus of sound. The upcycled tin pan shaker is bright, noisy in all the right ways, and uses minimal supplies. Plus, it teaches a tiny lesson in repurposing with flair.
Materials
- Metal tin pans or pans with lids
- Rice, beans, or small pasta shapes for filling
- Colored tape or fabric scraps
- Non-toxic glue
- Ribbons or yarn for handles
How to Make It
- Fill the pan with a small amount of rice or beans—don’t overfill.
- Seal with another pan or secure the lid with glue and tape for a snug seal.
- Decorate the outside with colorful tape, fabric patches, or drawings.
- Attach a ribbon handle so little ones can swing and shake with pizzazz.
Pro Tips / Styling Ideas
- Label each shaker with a color-coded dot to cue different sounds (soft, loud, rattle).
- Pair with a wooden spoon xylophone for a mini family concert—bonus points for belly-dattle applause!
Who would love this? Kids who adore sensory play and making noise with a purpose. It’s a terrific warm-up act for a birthday party or a kitchen-table music session.
3. Toilet Paper Roll Wind Chimes: Echoes of Color
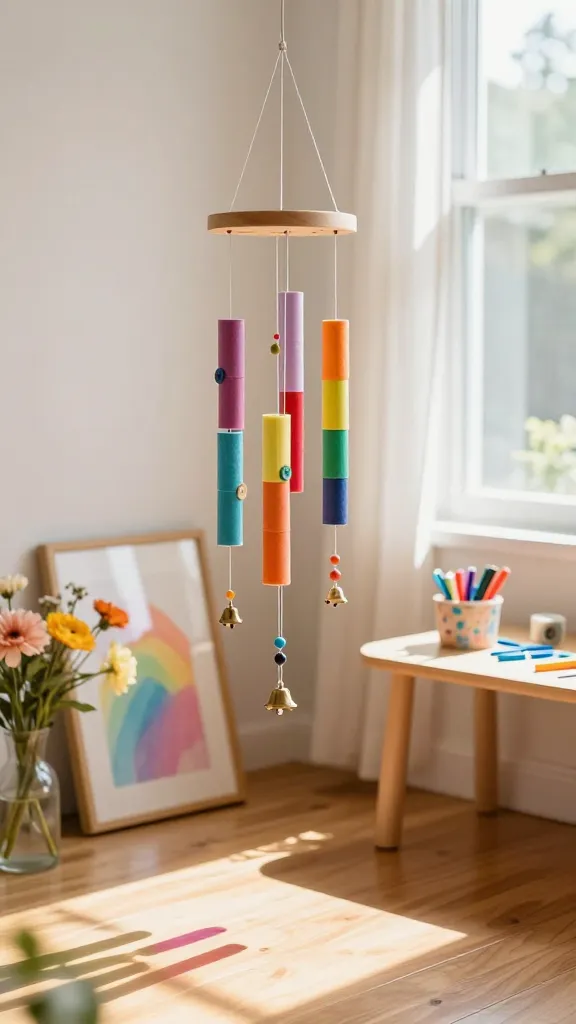
Turn humble toilet paper rolls into a cheerful wind chime that tinkles on a breezy day. It’s a kid-friendly craft that feels magical once strung up by a window for a gentle evening soundtrack.
Materials
- Empty toilet paper rolls
- Acrylic paints or colored markers
- String or yarn
- Beads, buttons, small bells
- Scissors and double-sided tape
How to Make It
- Paint the rolls in a rainbow of colors and let dry.
- Cut the rolls into 1-inch rings to create multiple “pipes” for each roll (optional but fun).
- Thread beads and bells onto short lengths of string, then attach to the ends of the rolls.
- Tie all strands to a wooden stick or embroidery hoop to form the wind chime frame.
Pro Tips / Styling Ideas
- Hang by a sunny window to catch light and sound—watch the beads glint as they sway.
- Use color gradients (cool blues to warm pinks) for a calming or energizing mood.
Who will love this? Kids who enjoy gentle sounds and tactile crafting. It’s a perfect project for spring windows, a light birthday gift, or a school art project centerpiece.
4. Cardboard Guitar Mini-Whiz: Strum and Sing
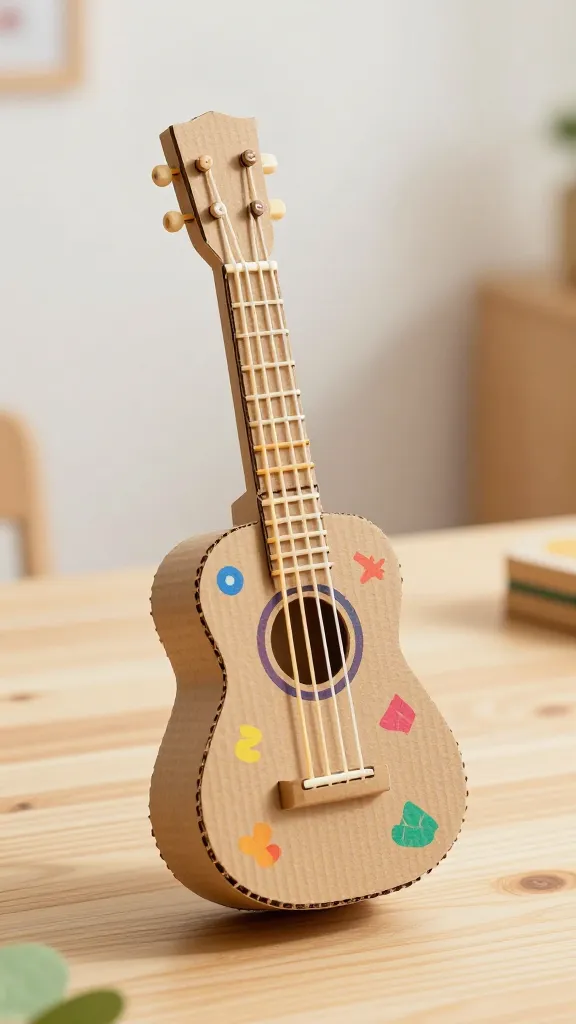
Imagine a tiny cardboard guitar that actually plays a few chords when strummed. This project blends art with music for a kid-friendly instrument that doubles as a pretend stage prop—plus it’s seriously adorable for photos.
Materials
- Corrugated cardboard board
- Rubber bands of various thickness
- Markers, stickers, and paint for decorating
- String for the neck and a small stick for the neck reinforcement
- Glue and tape
How to Make It
- Cut a guitar-shaped silhouette from cardboard and reinforce with a second piece of cardboard.
- Attach several rubber bands across the top to act as strings.
- Decorate the body with bold colors and playful patterns.
- Attach a wooden dowel or wrapped stick as the neck, tying strings to it with small knots for tuning-like control.
Pro Tips / Styling Ideas
- Experiment with different string tensions to produce varied tones—fun for a mini “studio” session.
- Pair with a pretend microphone and let your kid belt out their own tunes.
Who would love this? Budding guitar heroes or kids who enjoy dress-up performance moments. It makes a charming shelf sculpture when not in use and a lively stage prop during playtime.
5. Handprinted Rainbow Xylophone: Colorful Keys to Play
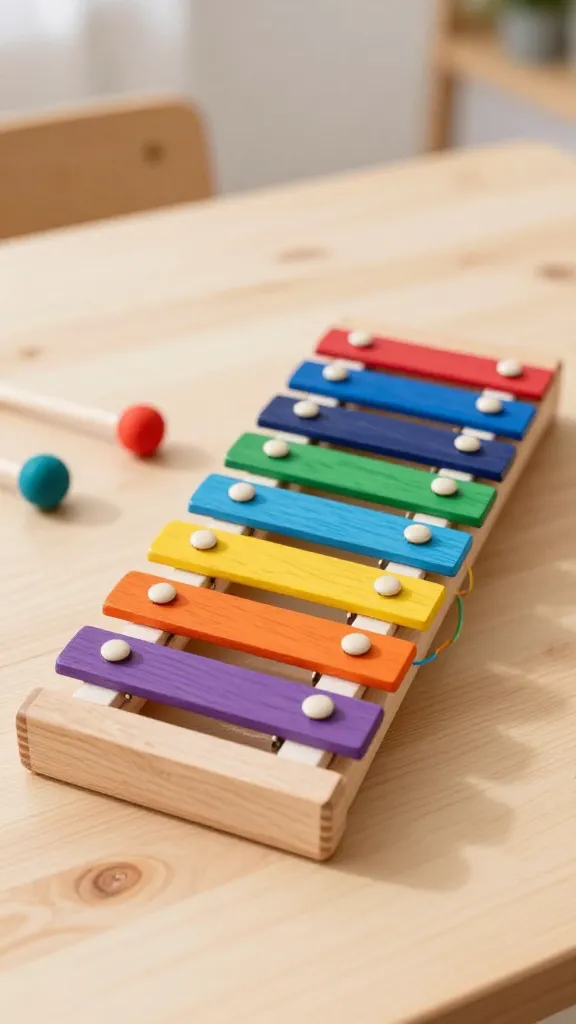
Turn wooden craft sticks or painted skewers into a tiny, color-blocked xylophone. With a few nails or glue, you create bright “keys” that produce cheerful, approachable tones when tapped. It’s a musical table-top marvel you’ll want to display as art too.
Materials
- Wooden craft sticks or popsicle sticks
- Non-toxic paints in a rainbow palette
- Small wooden dowel or a sturdy cardboard base
- Rubber bands or yarn for stringing
- Small mallets or improvised drumsticks
How to Make It
- Paint each stick a different color and seal with a quick coat of varnish or glue.
- Line up the sticks in a row and secure them to the base with glue or small nails (supervised if using nails).
- Attach a string or rubber band across the back to keep them aligned and add a gentle chord as you tap.
- Provide a pair of small mallets for tapping and listen to the rainbow chorus.
Pro Tips / Styling Ideas
- Arrange the sticks in a gradient from red to purple for a striking visual impact.
- Use as a desk toy that doubles as a classroom teaching aid for colors and rhythm.
Who would love this? Kids who adore color coordination and rhythm play. It’s a fantastic gift for a music-loving youngster or a delightful addition to a classroom sensory corner.
Conclusion: Ready to bring the beats home? Each of these five DIY musical instrument crafts for kids is designed to be quick, colorful, and incredibly satisfying. Pick one (or try all five) and invite a playful jam session, celebrate tiny victories, and create keepsake moments your family will treasure. You’ll love how easy it is to spark imagination with everyday materials—and seriously, your kid’s creativity will thank you.