5 Viral YouTube Craft Ideas You Have to Try
Ready to level up your weekend with projects that look stunning and are actually doable? You’ll love these five viral-worthy crafts that feel bespoke but are totally beginner-friendly. I’m talking wow-factor decors, giftable goodies, and vibe-rich ideas you’ll want to pin ASAP.
Trust me, these crafts are as fun to make as they are to show off. FYI: once you start, you’ll want to try them all. Seriously worth it for the smiles and the “where did you learn that?” questions.
1. Rustic Mason Jar Lanterns With Fairy Lights
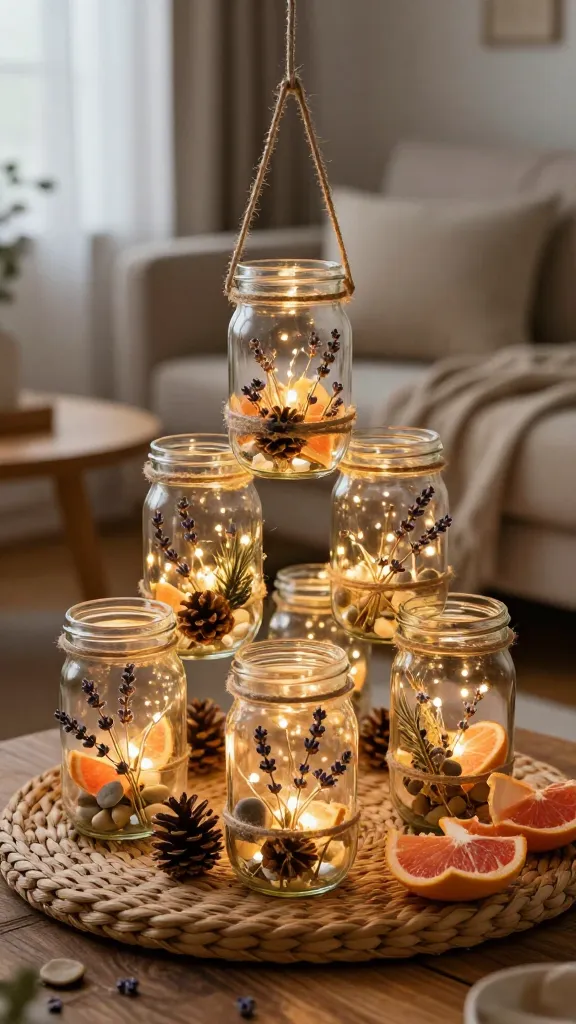
Imagine a cozy glow turning a dull corner into a warm nook that begs to be photographed. These rustic mason jar lanterns combine soft fairy lights with natural textures for an outdoorsy, hygge-friendly vibe. They’re the kind of decor that makes a living room feel instantly inviting.
Materials
- Clear mason jars (5–8 oz works great)
- Battery-operated string lights
- Jute twine or hemp rope
- Natural fillers: dried lavender, pine cones, or small pebbles
- Grapefruit rind peels or citrus slices (optional, for fragrance)
- Hot glue gun and glue sticks
How to Make It
- Wrap the jar neck with jute twine, securing with a dab of hot glue for that vintage-lantern feel.
- Stuff fairy lights into the jar, leaving enough cord to reach a switch or battery pack outside.
- Add natural fillers inside for texture. If you’re going for fragrance, tuck in dried citrus slices or herb sprigs.
- Hang them from a tree branch, place on a shelf, or cluster them on a coffee table for a twinkly glow.
Pro Tips / Styling Ideas
- Use jars of varying heights for an eye-catching centerpiece.
- Coat the outside with a light frost spray to create a frosted, magical look in winter evenings.
- Pair with warm-toned bulbs for a sunset-glow vibe.
End note: This craft is perfect for patios, bedrooms, or as a charming housewarming gift. You’ll love how easy it is to customize with colors and fillers to suit any season.
2. Marble-Effect Concrete Coasters With Gold Rim

Concrete can feel rugged, but these coasters bring in a chic marble vibe with a metallic edge. It’s a practical, stylish project that looks luxe on a coffee table and makes tea-time feel like a mini-spa moment. The best part? They’re surprisingly simple to pull off.
Materials
- Fast-setting concrete mix
- Water, mixing cup, and spoon
- Circle silicone molds or thick cardboard cutouts
- White paint or marbleizing powder
- Gold acrylic paint or metallic leaf
- Sealant spray
How to Make It
- Prepare the concrete according to package directions and pour into molds to set.
- Float streaks of white paint through the wet mix to create a marble pattern. Use a skewer to swirl gently.
- Once dry, add a thin gold rim with a steady hand or apply gold leaf for a luxe edge.
- Seal the surface to resist moisture and stains.
Pro Tips / Styling Ideas
- Pair with a matching tray or a small plant for cohesive coffee-table styling.
- Create a set in three sizes for visual rhythm.
- Experiment with different marble swirls—no two coasters are exactly the same.
End note: These are giftable, desk-friendly, and sturdy enough for daily use. They strike that perfect balance between rugged and refined—trust me, guests will compliment them.
3. Delicate Paper-Quilt Wall Art
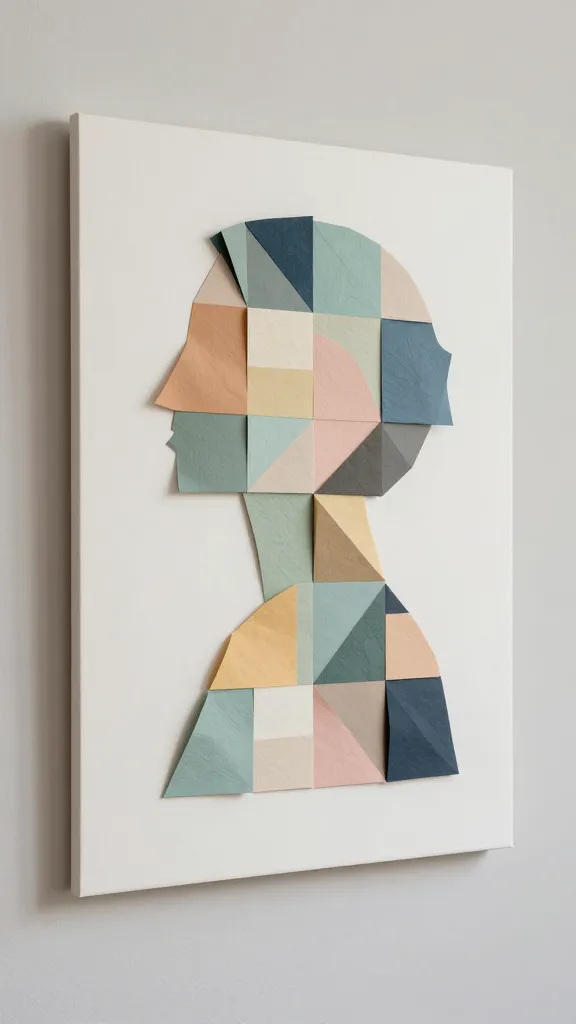
Turn simple paper into a gallery-worthy piece that looks artsy and thoughtful. This paper-quilt wall art blends color blocks, texture, and a modern silhouette, making your wall pop with personality. It’s delicate in look, tough in execution—yet you’ll breeze through it.
Materials
- Colored craft papers or scrapbooking paper
- Thick poster board or a canvas panel
- Scissors or craft knife
- Ruler and pencil
- Glue stick or spray adhesive
- Optional: a thin frame to finish the edge
How to Make It
- Draft a simple geometric layout on the poster board (think stacked rectangles, diamonds, or a gentle chevron).
- Cut shapes in a cohesive color palette, then glue them in layers to create depth.
- Press flat and let dry before framing or mounting on the wall.
Pro Tips / Styling Ideas
- Choose a color story that matches your living room—soft neutrals for calm or bold hues for a statement wall.
- Vary the paper textures (matte, glossy, or metallic) for extra visual interest.
- Hang opposite a light source to highlight the layered edges.
End note: A little art that you can customize endlessly, this piece is a conversation starter and a personal touch for any space. You’ll adore how fast it comes together and how big the impact feels.
4. Functional Sock-Puppet Planters
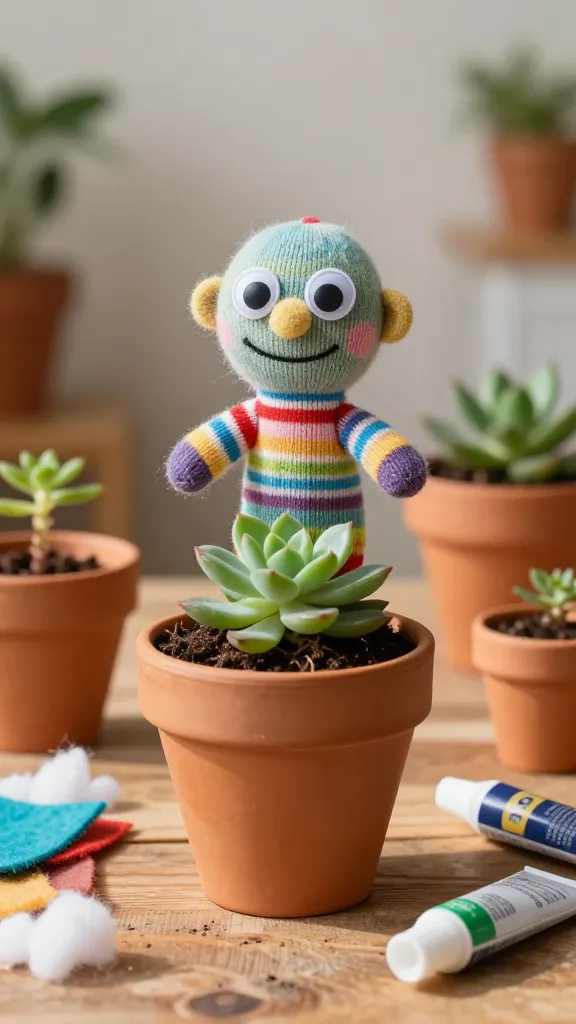
Yes, planters can be playful—and these sock-puppet planters prove it. A dash of whimsy with handmade creatures perched on small pots instantly turns plain greens into focal points. They’re goofy, charming, and surprisingly easy to create with materials you already have lying around.
Materials
- Small terracotta pots (3–4 inches)
- Colored socks (fun patterns work best)
- Polyfill stuffing or cotton batting
- Craft googly eyes, felt scraps, and fabric glue
- Potting soil and a tiny plant or succulent
- Optional: yarn for hair; buttons for noses
How to Make It
- Fill the pot with soil and plant your greenery.
- Swaddle the top of the pot with a sock, folding excess fabric under the rim for a snug fit.
- Stuff the sock to create the head, add eyes, a mouth, and any fun features using felt and glue.
- Use yarn or fabric scraps for hair, and glue a small mouth or nose for extra character.
Pro Tips / Styling Ideas
- Group several planters on a windowsill for a mini menagerie of greenery.
- Mix plant types—succulents, ferns, and small flowering plants—to vary texture.
- Make a set in different colors to create a playful rainbow display.
End note: These little plush-planters are a gift-ready combination of cute and useful. They’re perfect for desks, kitchen counters, or “just because” gifts, and you’ll be amazed how quickly they come together.
5. Upcycled Drawer-Shelf Jewelry Organizer
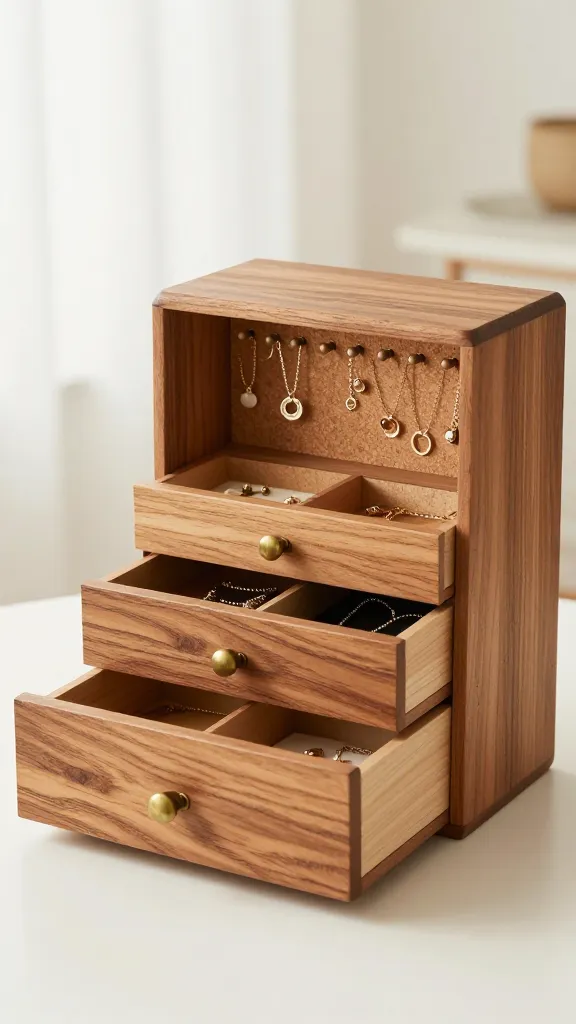
Turn an old drawer into a chic jewelry organizer that looks like a tiny boutique display. This upcycled project is part storage, part art, and totally Instagrammable. It’s a clever reuse that declutters without sacrificing style, and you’ll be amazed at how practical it feels.
Materials
- An old wooden drawer with a handle
- Sandpaper and wood stain or paint
- Foam sheets or cork for inlays
- Thin brass rod or decorative knobs
- Glue and small hooks or tacks
- Clear sealant (optional)
How to Make It
- Sand and refinish the drawer exterior to your preferred color or stain.
- Line the interior with foam sheets or cork to create soft, grippy sections for rings, bracelets, and earrings.
- Install hooks or small knobs along the back or sides for hanging necklaces and bracelets.
- Seal if you want a glossy, durable finish, then mount or place on a dresser or vanity.
Pro Tips / Styling Ideas
- Keep a metallic or pastel color scheme to match your dresser decor.
- Add a small glass knob to the edge for an extra vintage touch.
- Use different material textures to create a tactile, boutique vibe.
End note: This organizer is a clever revival of something old into something treasured. It’s a perfect gift for jewelry lovers or a personal treat you’ll actually use daily.
Conclusion
Give one (or all five) of these crafts a try, and you’ll see why they went viral: they’re approachable, customizable, and visually striking. Save, pin, and start creating—these projects are built for sharing, admiring, and gifting. Have fun, get a little messy, and watch your space transform with handmade charm.