6 Smart Cardboard Craft Ideas to Upcycle & Reuse
Ready to turn simple cardboard into conversation-worthy decor and gifts? These six smart ideas prove that you don’t need fancy supplies to create something wow-worthy. Trust me, your recycling bin is about to get a lot more stylish.
1. Sculpted Cardboard Planter Troughs for Petite Greenery
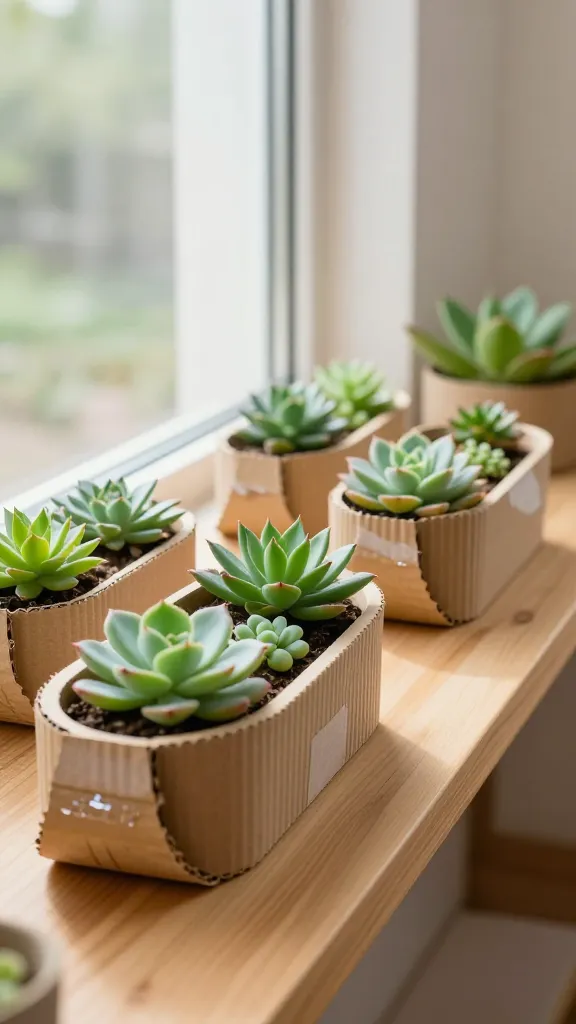
Imagine a row of chic, sculptural planters that look expensive but are totally DIY-friendly. These cardboard troughs cradle tiny succulents or herbs and add a sculptural, modern vibe to any shelf or windowsill.
Materials: corrugated cardboard, acrylic paint, craft knife, hot glue gun, decorative paper or washi tape, optional sealant
How to Make It:
- Cut the cardboard into long, shallow trough shapes. Score gentle curves to create a soft, organic look.
- Fold and glue the sides to form a sturdy box. Strengthen with internal supports if you’re worried about wobble.
- Paint with a matte or metallic finish. Add texture by brushing a dry layer of lighter paint on raised edges.
- Line the inside with decorative paper or seal with clear sealant to protect from moisture. Place a thin plastic liner if you’re watering.
Why it’s special: The minimalist form feels contemporary and lightweight while staying budget-friendly. It’s easy to customize with colors to suit your space.
Pro tip: Create a mini “garden row” by aligning several troughs of varying heights for a gallery-like display. This is a perfect gift for plant lovers or a bright kitchen windowsill accent.
Who will love it: Style-savvy apartment dwellers, dorm life heroes, anyone who wants a touch of greenery without heavy pots. FYI, it’s a weekend project you’ll proudly show off.
2. Cardboard Textile Wall Tableaux
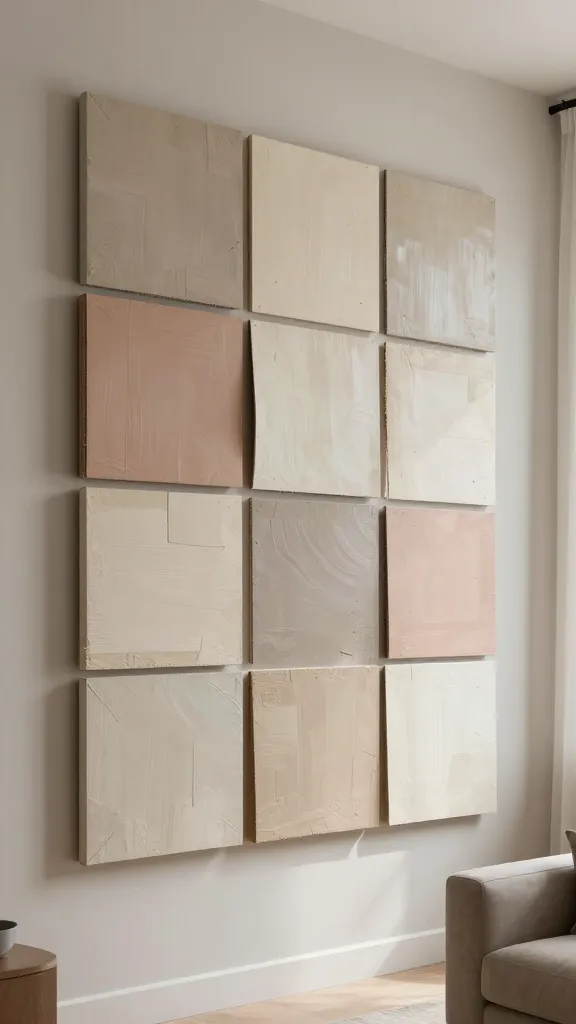
Turn sturdy cardboard into a statement wall piece that looks like it came from a boutique gallery. Layered textures and soft tones create a tactile, cozy focal point for living rooms or bedrooms.
Materials: flat cardboard sheets, glue, scissors, craft knife, fabric scraps or old textiles, acrylic paint or rattle can spray, clear sealant
How to Make It:
- Cut multiple cardboard panels in varying sizes with clean, crisp edges.
- Roughly paint or spray them in complementary colors. Let colors partially bleed for a soft, painterly effect.
- Stack and offset the panels like a mini gallery. Attach with hot glue or a lightweight frame backing.
- Cushion the back with fabric scraps for a tactile finish and to dampen sound a bit.
Why it’s special: It’s a low-cost way to achieve a high-end, textile-heavy look without actual fabric walls. The mix of textures reads as luxe on a budget.
Pro tip: Use neutral tones with a pop of color in one panel to create a focal point. You’ll love how it elevates a plain wall into a design moment.
Who will love it: Eco-conscious décor lovers, renters decorating on a dime, anyone craving a gallery vibe without expensive art. Seriously, it’s a snap to assemble.
3. Cardboard Marble Lampshade—Glow-Up Edition
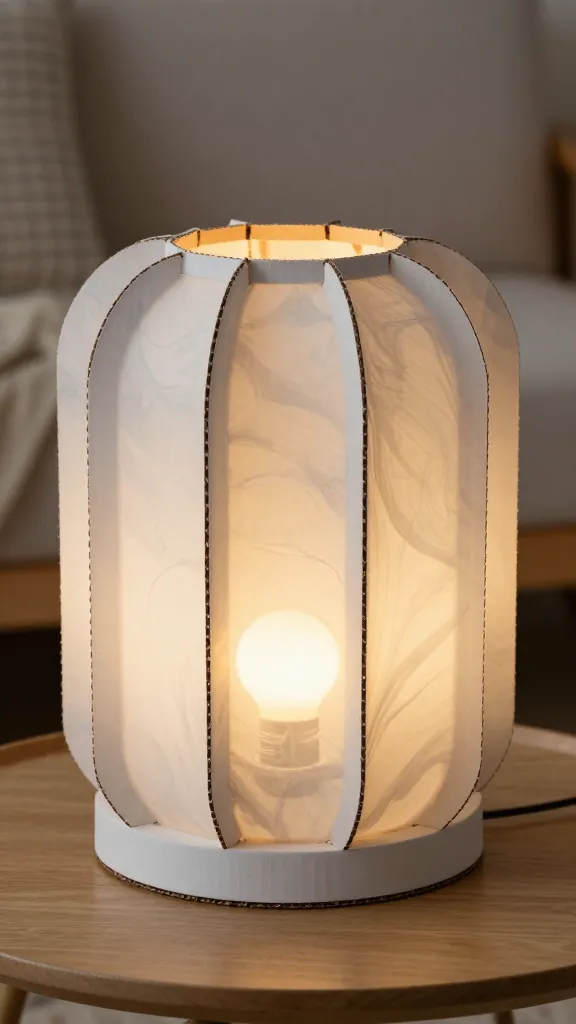
Brighten your space with a handmade lampshade that feels chic and artisanal. This cardboard marble lampshade refracts light in a soft, diffused glow, turning ordinary evenings into cozy, stylish moments.
Materials: sturdy cardboard, craft knife, hot glue, white/gray acrylic paints, round lamp frame or existing shade base, LED bulb, optional gold or copper foil
How to Make It:
- Cut cardboard into interlocking panels with curved edges to form a dome or drum shape (leave a vent hole near the bottom).
- Paint in marbled whites and grays. Add metallic speckles or foil accents for a luxe touch.
- Assemble around a lamp frame, securing with glue. Ensure the shade isn’t blocking the vent hole or causing overheating.
Why it’s special: The matte marble look pairs surprisingly well with warm bulbs, giving off a soft, contemporary glow. It’s a bright, functional art piece you’ll brag about.
Pro tip: Keep the interior panels light in color to maximize light diffusion. This shade works beautifully in bedrooms and living rooms alike.
Who will love it: Night owls, designers seeking statement lighting, anyone who wants an easy DIY that dramatically changes a room’s ambiance. FYI, you’ll love the warm evenings it creates.
4. Cardboard Kaleidoscope Lanterns
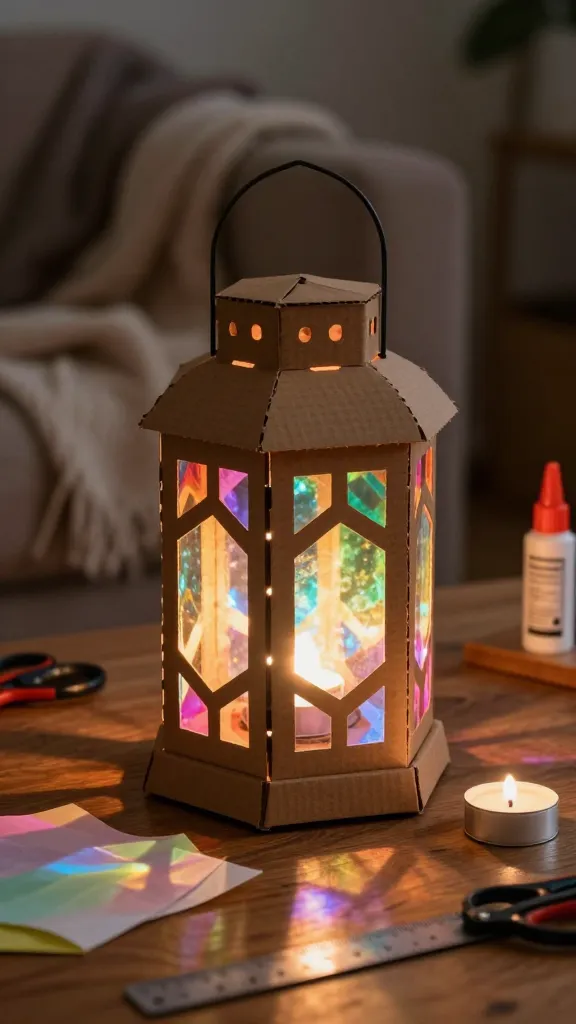
Let’s light up your evenings with geometric, cut-out lanterns that shimmer as the light dances through them. Cardboard Kaleidoscope Lanterns create playful shadows and color palettes, perfect for gatherings or a cozy night in.
Materials: cardboard sheets, craft knife, box cutter, scissors, tissue paper or colorful translucent paper, LED tea lights, glue, ruler, pencil
How to Make It:
- Cut intricate geometric patterns into the sides of the lantern panels. Leave a sturdy back panel for stability.
- Assemble into a cube or hexagonal lantern shape, leaving space for a light source.
- Decorate with tissue paper or translucent paper behind the cutouts to catch the light in color.
- Insert LED tea lights and place on a safe, flat surface.
Why it’s special: The interplay of light and shadow creates a magical, party-ready glow. It’s modern, festive, and completely DIY.
Pro tip: Build a cluster of three in varying sizes for a dramatic centerpiece or patio ambiance. You’ll get that Pinterest-perfect glow without breaking the bank.
Who will love it: Hosts who love mood lighting, teen room decor fans, anyone planning a party or outdoor get-together. Seriously, it’s a mood-maker.
5. Upcycled Cardboard Puzzle Shelf Display
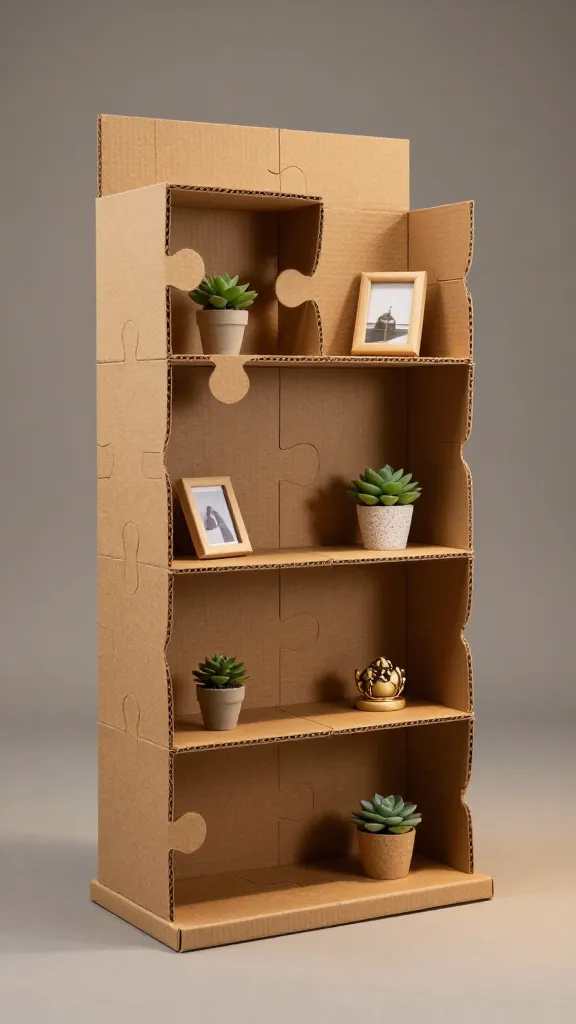
Turn flat cardboard into a sculptural shelf that doubles as art. This puzzle-piece display is perfect for small keepsakes, succulents, or picture frames and doubles as a conversation starter.
Materials: cardboard, hot glue gun, craft knife, ruler, leftover packaging foam or cushioning material, paint or wallpaper sample, small display items
How to Make It:
- Cut cardboard into interlocking puzzle-like pieces. Ensure edges fit snugly for a stable display.
- Glue the pieces together in a stepped, cascading pattern to form a staggered shelf.
- Paint or cover with wallpaper samples to match your decor. Line the inner surfaces with foil or fabric for a refined finish.
Why it’s special: It’s modular and customizable. You can rearrange the “puzzle” shelves as your space evolves, making it a long-term décor solution.
Pro tip: Use the lower compartments for heavier items and the upper for lighter trinkets. A little balance goes a long way in a compact display.
Who will love it: Organizers who crave visual interest, small-space dwellers, crafters who want a functional sculpture. You’ll smile every time you glance at it.
6. Cardboard Framed Mirrors With Echoing Cross-Lattice
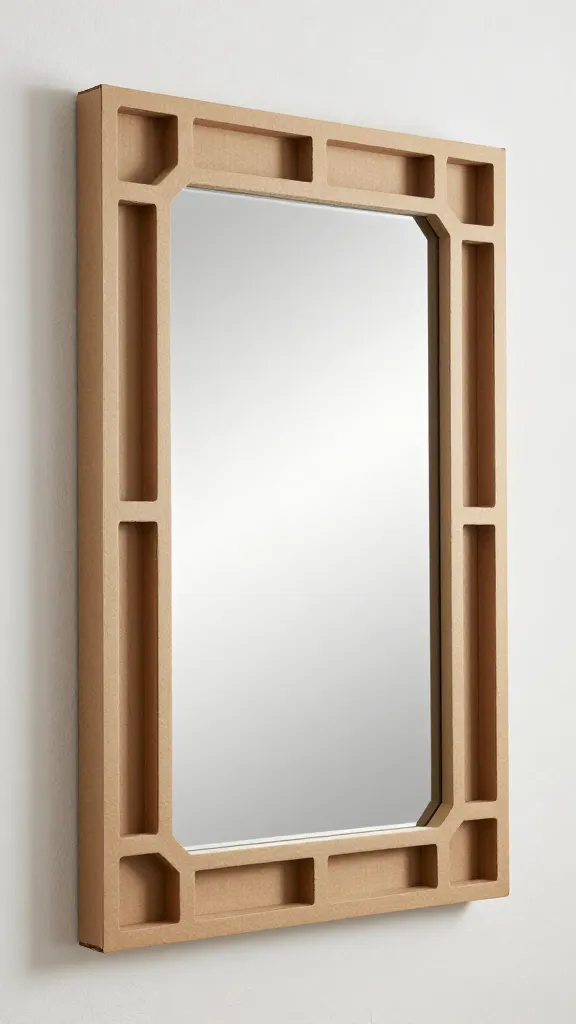
Dial up charm with a lightweight, sculptural frame that frames a mirror in airy cross-lattice cuts. It echoes mid-century vibes with a playful, crafty twist.
Materials: thin cardboard or boekboard, mirror sheet or reflective acrylic, hot glue, X-acto knife, ruler, decorative paper or paint, hanging hardware
How to Make It:
- Cut a rectangular frame from cardboard, then carve a lattice pattern along the inner edge with careful notches and spaces.
- Attach a small mirror sheet or reflective acrylic behind the lattice, securing with glue and a backing.
- Finish with paint or decorative paper for a pop of color and installed hanging hardware for wall mounting.
Why it’s special: It blends function with art, and the light, airy frame keeps it from feeling heavy. It’s a quick upgrade that instantly elevates a wall.
Pro tip: Choose metallic paints or pearlescent papers to catch light in interesting ways. This piece looks especially striking in hallways or bedrooms.
Who will love it: DIY decorators who adore unique wall art, renters needing portable yet stylish pieces, anyone who appreciates clever use of shadows and light. Seriously, it’s a win for small spaces.
Conclusion
These six upcycled cardboard crafts prove that style doesn’t require expensive materials. Each project is designed to be fun, quick, and uniquely yours—perfect for saving, pinning, and actually making. Grab a chunk of cardboard, unleash your creativity, and watch your space transform—you’ll be amazed at what a little imagination can do. Try one tonight, or dive into all six and turn your home into a playful, eco-friendly gallery. The enjoyment is in the making, and trust me, you’ll love this DIY journey.