7 Fun Paper Plate Craft Ideas for Kids
Ready for a burst of kid-friendly creativity that actually sticks? These 7 fun paper plate craft ideas prove you don’t need fancy supplies to make something unforgettable. Trust me, they’re fast, cute, and totally pull-your-own-kid-friendly-spark energy.
1. Whimsical Paper Plate Fairy Garden — Tiny World, Big Wow
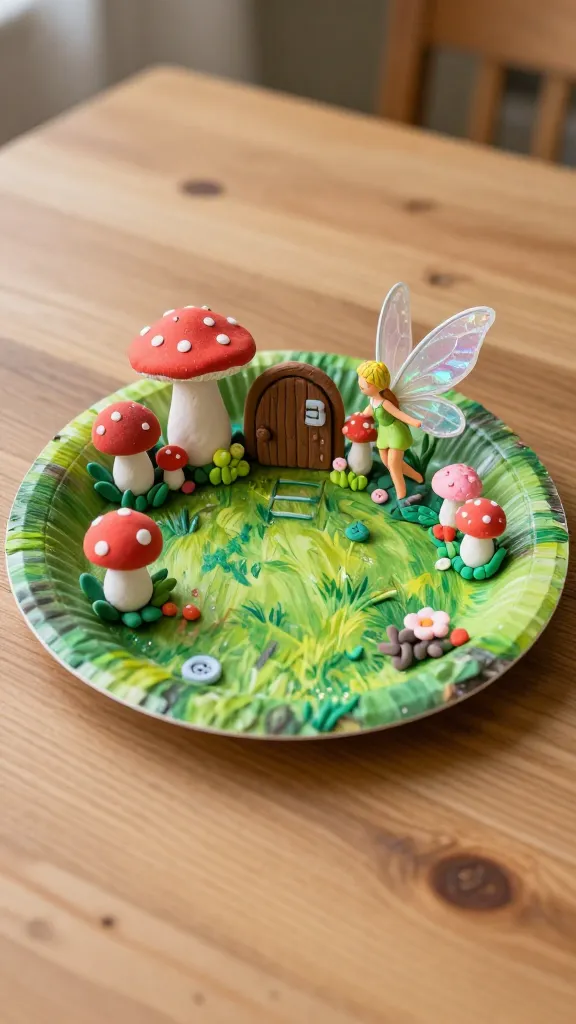
Imagine a super cute little fairy garden perched on a plate, complete with mushrooms, a tiny door, and shimmering wings. This project turns an everyday plate into a magical miniature scene that kids will want to play with all day.
Materials
- Plain paper plates
- Acrylic paints (green, brown, red, pink, white)
- Pipe cleaners, colored paper, and glue
- Miniature trinkets or buttons for doors and windows
- Glitter (optional, sparingly)
How to Make It
- Paint the plate’s base as a grassy meadow or woodland floor.
- Cut a small door and windows from colored paper, attach to the plate edge, and embellish with tiny details.
- Create mushrooms from painted cotton swabs or clay, and add a tiny path using pebbles or painted rocks.
- Attach a few pipe-cleaner fairies or wings, and place mini plants around the scene.
Pro Tips / Styling Ideas
- Seal with a light spray of clear acrylic to keep colors vibrant during play.
- Use as a table centerpiece for a woodland-themed party or as a shelf-y micro-scene.
Who would love it: Little dreamers who adore magical creatures and secret gardens—this is a perfect, delightful play moment.
2. Happy Face Plaque Portraits — Expressive Smiles in a Plate
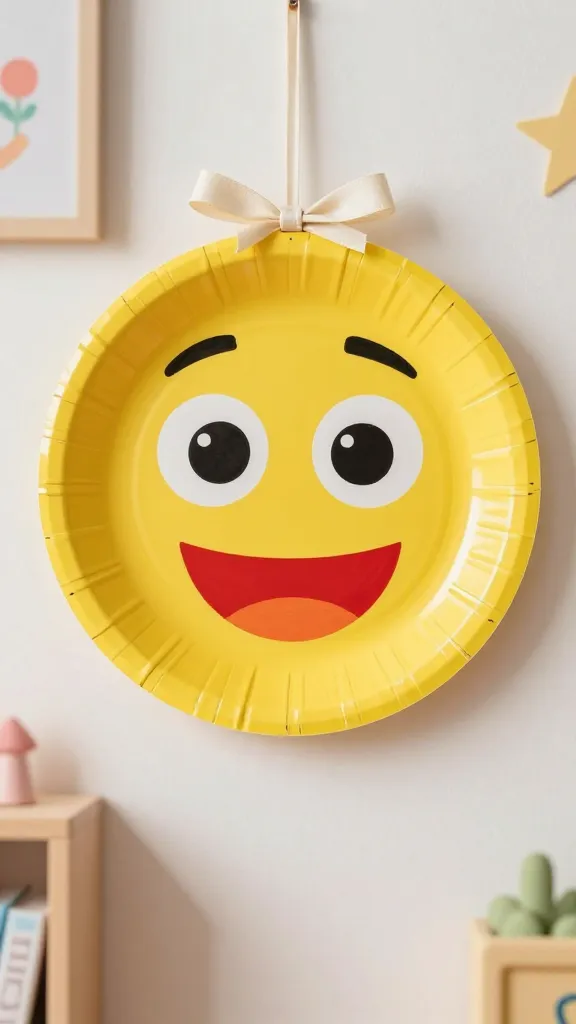
Turn a simple plate into a gallery-worthy emoji-like portrait that kids can customize with their favorite expressions. It’s instant mood-boosting decor for bedrooms or playrooms.
Materials
- Paper plates
- Kid-safe acrylic paints or markers
- Googly eyes (optional)
- Ribbon or string for hanging
How to Make It
- Paint the plate in a bold base color (yellow is classic).
- Add a big facial feature set—eyes, nose, and a mouth—using contrasting colors.
- Glue on googly eyes for extra whimsy if you like.
- Attach a ribbon to the back for easy wall-hanging.
Pro Tips / Styling Ideas
- Let kids experiment with different emotions: goofy grin, surprised, sleepy, silly face.
- Group 3–5 portraits in a frame or line them along a hallway for a “mood gallery.”
Who would love it: Kids who love doodling, characters, and turning their feelings into art you can display.
3. Ocean Friends Paper Plate Mobile — Splashy Silly Sea Parade
Dive into the deep with a bright ocean-themed mobile that sways with every breeze. Fish, crabs, and seaweed all float from a plate house—perfect for a kid’s room or classroom corner.
Materials
- Assorted paper plates in ocean colors
- Blue crepe paper streamers or tissue paper
- Cut-outs of fish, starfish, crabs from colored paper
- String or fishing line
- Glue, scissors, hole punch
How to Make It
- Decorate each plate as an ocean creature scene—fish with scales, starfish with dots, crabs with claws.
- Punch a hole at the top of each plate and thread with string to hang in a cluster or cascading line.
- Attach blue streamers behind the plates to resemble water currents.
Pro Tips / Styling Ideas
- Vary the lengths of strings for a dynamic mobile that catches light nicely.
- For a coastal vibe, add tiny shells using glue or tiny painted stones.
Who would love it: Littles who adore the ocean, marine life, and kinetic home decor.
4. Floral Wreath Ornaments — Springy Circles to Decorate With
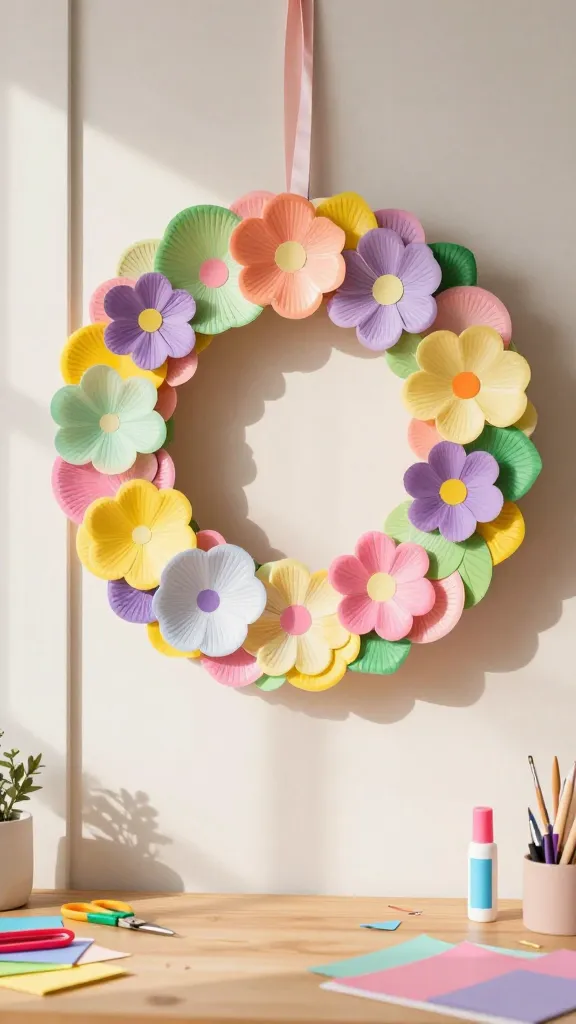
A cheerful wreath you can hang on a door or wall, made entirely from paper plates and bright florals. It’s a joyful, springy touch that’s easy to customize for seasons or holidays.
Materials
- Two or more paper plates per wreath
- Acrylic paints or colored paper for petals
- Scissors, glue, and tape
- Ribbon for hanging
How to Make It
- Cut the center from one plate to form a ring; use the second plate as a base.
- Paint or decorate petal shapes and glue them around the ring in layers, building a blooming effect.
- Add a few leaf cutouts and a ribbon loop at the top for hanging.
Pro Tips / Styling Ideas
- Mix paper textures—glitter, tissue, and solid color—to create depth.
- Use as a year-round wreath with seasonal color palettes.
Who would love it: Seasonal decorators, classroom display makers, and anyone who loves fresh floral vibes.
5. Monster Mask Parade — Silly, Spooky, or Sweetly Scary
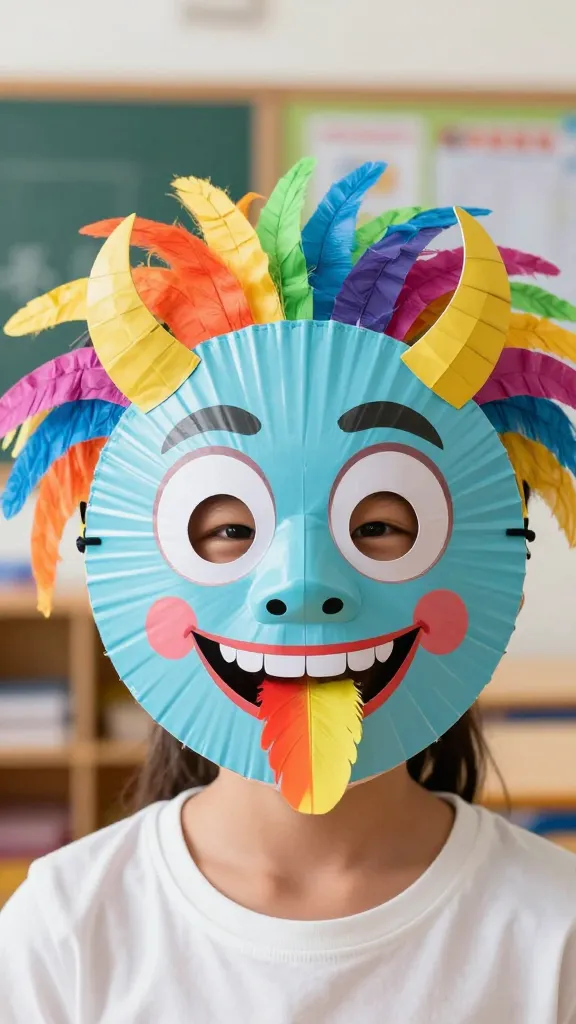
Turn a simple plate into a friendly monster mask that kids will adore wearing or hanging as wall art. Bow your head to cute teeth, goofy eyes, and wild hair that kids can customize with bold colors.
Materials
- Paper plates
- Colored construction paper, markers, and crayons
- Elastic string or headband
- Glue, scissors
How to Make It
- Cut eye holes in the plate and decorate with vibrant features—horns, antennae, wild hair made from paper strips.
- Create teeth, tongues, or patterns with colored paper and glue them on.
- Attach elastic or a headband so the mask fits comfortably.
Pro Tips / Styling Ideas
- Encourage kids to invent a backstory for their monster—great for storytelling time.
- Make a mini theater by pairing masks with a simple “show” on a living room stage.
Who would love it: Kids who love pretend play, silly creatures, and character-driven crafts.
6. Mini Photo Frames — Personalize with Plate-astic Charm
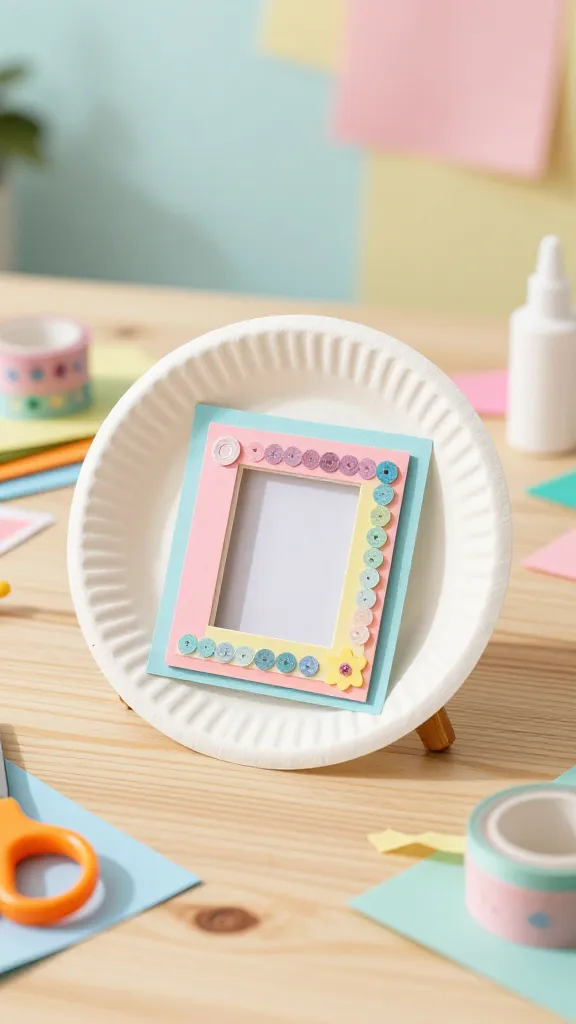
Score big when you give kids a canvas to frame their favorite tiny photos or drawings. These mini frames are charming, nostalgic, and perfect for a pinch-me gift idea.
Materials
- Paper plates
- Colorful paper, washi tape, small photos or drawings
- Glue, scissors, craft knife (adult supervision)
- Ribbon for hanging or easel backs
How to Make It
- Cut the inner circle to create a frame around a mini photo or drawing.
- Decorate the outer edge with layers of paper, tape, or sequins for sparkle.
- Attach a stand or a ribbon hanger to display on a desk or wall.
Pro Tips / Styling Ideas
- Coordinate frame colors with room decor or a themed party color palette.
- Swap photos seasonally to keep the frames fresh and fun.
Who would love it: Kids who adore memory projects and personalizing spaces with their art.
7. Rainbow confetti Wind Chimes — Symphony of Color
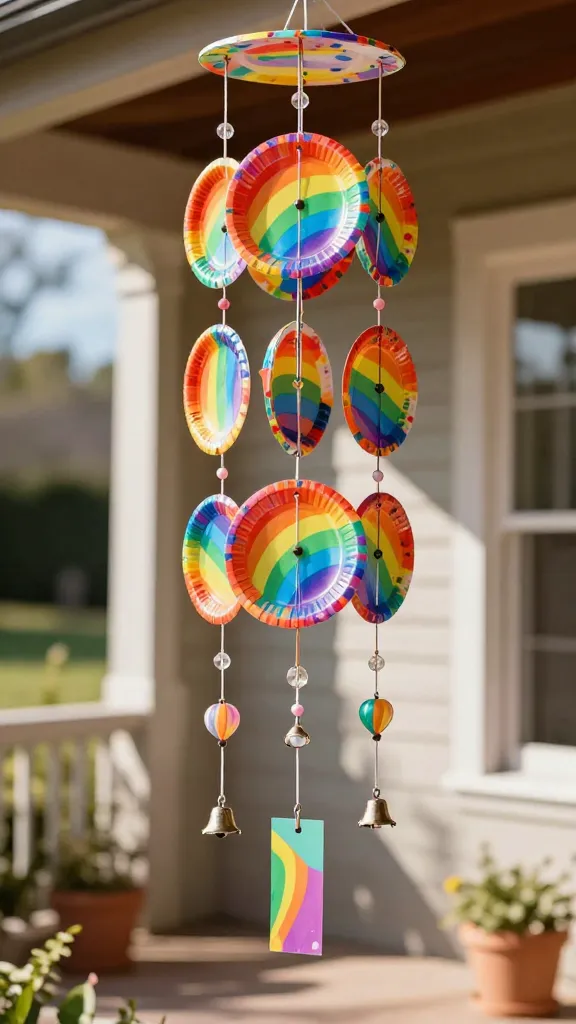
Finish with a sound and color celebration. Paper plate wind chimes bring motion, color, and soft tinkling sounds—beautiful on a porch, balcony, or sunny window.
Materials
- Multiple paper plates in rainbow hues
- String, beads, small bells, or metal washers
- Hole punch, scissors, glue
- Markers or paint for extra pop
How to Make It
- Decorate the plates with bright paints or markers; punch holes along the rims.
- Thread strings with beads or small bells and tie them to the holes to create a wind-catching cascade.
- Hang as a cheerful outdoor or sunny-window decoration that jingles softly when the breeze hits.
Pro Tips / Styling Ideas
- Choose lightweight beading to keep the wind chime easy to move and fun to sway.
- Group a trio of wind chimes near a seating area to enjoy the little sounds of summer.
Who would love it: Kids who crave music, motion, and color—plus any backyard “amuse-breeze” moment.
Conclusion
These 7 fun paper plate craft ideas are designed to be quick, creative, and irresistibly kid-friendly. Pick one to start, or go on a mini-crafting marathon and try them all. You’ll end up with playful decor, handmade gifts, and memories of giggles, glue, and glorious color. Ready to dive in? Grab a plate, a splash of color, and your favorite mini crafts buddy—you’ll love this DIY adventure.