8 Engaging Craft Activities for 6-Year-Olds to Fight Boredom
Ready for a burst of color, curiosity, and giggles? If you’re chasing crafts that a bright 6-year-old will actually love (and you won’t want to throw out after week two), you’re in the right place. These eight unique ideas are easy, playful, and totally Pinterest-worthy. Trust me, you’ll be bookmarking them for Saturdays and rainy afternoons alike.
1. Paper Plate Parade Masks: Colorful Creatures in Minutes
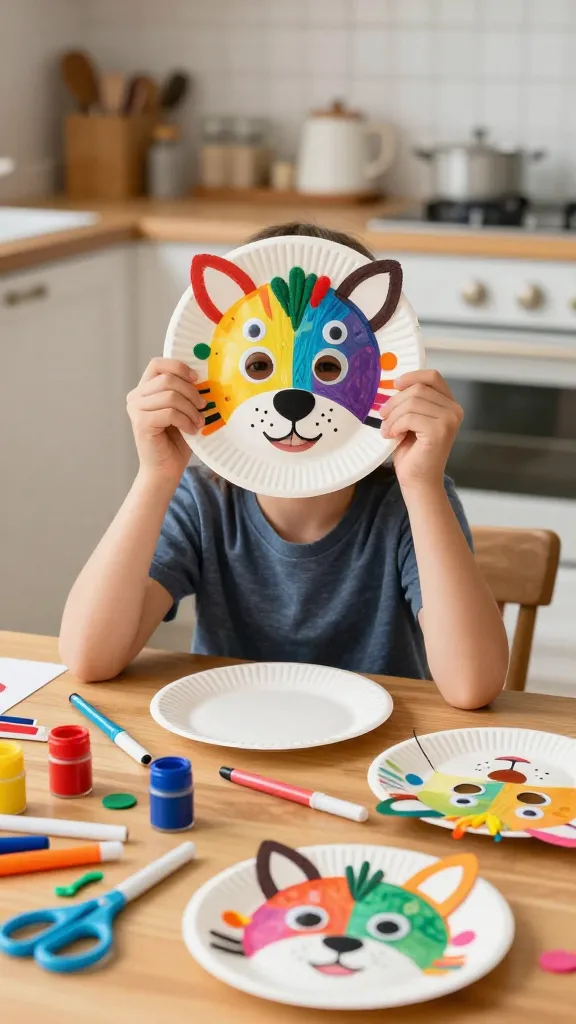
Imagine a parade of goofy animal faces coming to life on your dining table. These paper plate masks are simple, silly, and seriously adorable. Your kiddo will love picking a creature and adding their own magical touches.
Materials Needed
- Paper plates (one per mask)
- Acrylic paints or markers
- Elastic string or ribbon
- Scissors, hole punch
- Googly eyes, craft foam, yarn, and stickers for embellishments
How to Make It
- Cut holes for eyes in the plate, then paint the base color of your creature.
- Add facial features, ears, noses, and any fantastical details with paint or foam.
- Attach a piece of elastic through the holes for a comfy fit.
- Decorate with googly eyes, glitter, and stickers to give each mask its personality.
Pro Tips / Styling Ideas
- Match masks to a simple “mask parade” show—kids can perform a tiny skit for family.
- Hang a string of masks as a cute wall garland when not in use.
End Note
This is perfect for imaginative play or a quick photo booth moment. Any kid who loves animals or superheroes will adore it.
2. DIY Sensory Bottle Mix-Up: Glitter, Color, Calm
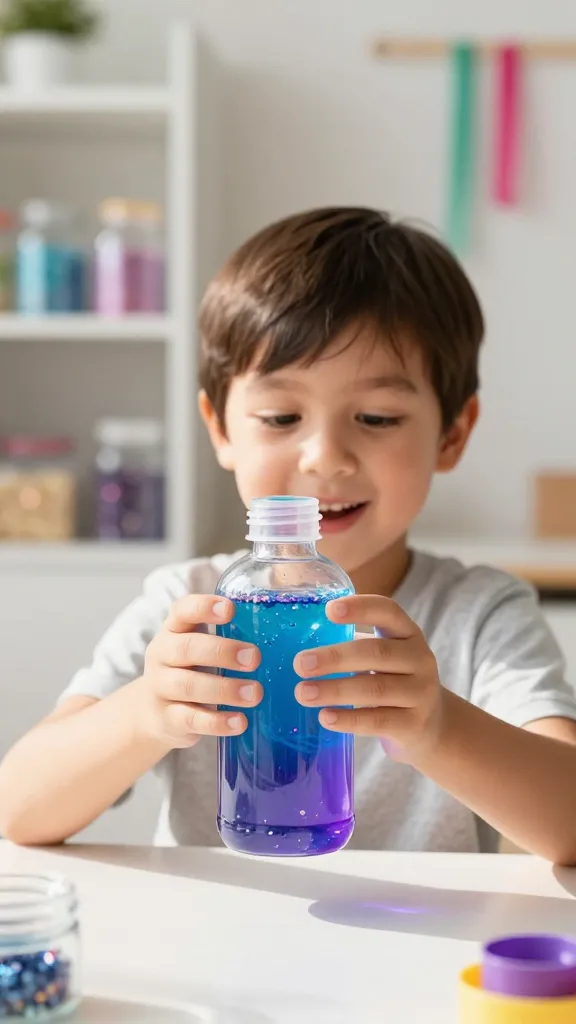
Sensory bottles are a soothing, science-meets-art project that doubles as a mesmerizing décor piece. Your 6-year-old can customize textures, colors, and sparkles while learning about density and flow.
Materials Needed
- Clear plastic bottle with cap
- Water, clear glue or glycerin
- Sequins, glitter, small beads
- Food coloring or liquid watercolors
- Hot glue (adult use) or strong tape to seal
How to Make It
- Fill bottle with warm water and add a few drops of color.
- Pour in glue or glycerin to slow the flow and create interesting movement.
- Toss in a handful of glitter, beads, and sequins.
- Seal tightly and shake to watch the sparkle dance.
Pro Tips / Styling Ideas
- Label bottles with fun names like “Ocean Whisper” or “Jelly Cloud.”
- Use as a calming tool during quiet time or as a desk toy for focus.
End Note
Kids will love the sparkle party in a bottle, and you’ll love the low-mass mess and big sensory payoff.
3. Cardboard City: Street Map and Mini Buildings
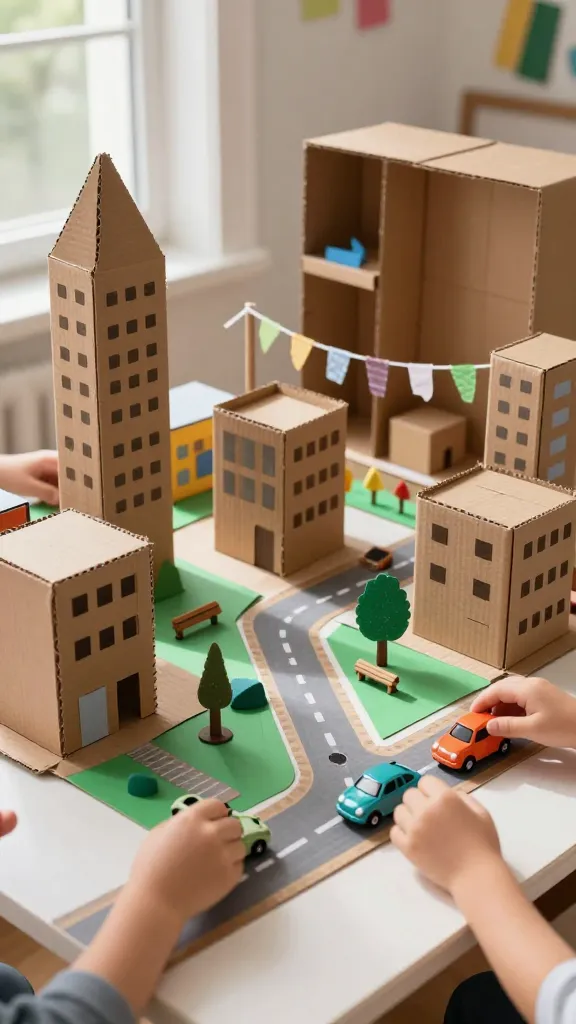
Turn a cardboard box into a bustling little metropolis with tiny buildings, streets, and friendly sidewalks. It’s creativity meets engineering as kids plan a neighborhood they can park cars in or role-play as city planners.
Materials Needed
- Large cardboard box or several small boxes
- Acrylic paints, markers, and washi tape
- Scissors and craft knife (adult supervision)
- Glue or tape, string for laundry-line garland if desired
- Foam shapes or paper scraps for mini details
How to Make It
- Open the box to create a flat “city map” surface, or cut out windows and doors for buildings.
- Paint streets, sidewalks, and blocks with bright colors; add crosswalks with tape.
- Build small skyscrapers or houses by stacking and gluing cardboard pieces, then decorate.
Pro Tips / Styling Ideas
- Place toy cars on the map and stage tiny scenarios—parades, deliveries, park picnics.
- Use a roll of craft paper as a removable city rug for easy playtime cleanup.
End Note
Imagination runs wild here—great for collaborative play, and the finished city makes a charming shelf display.
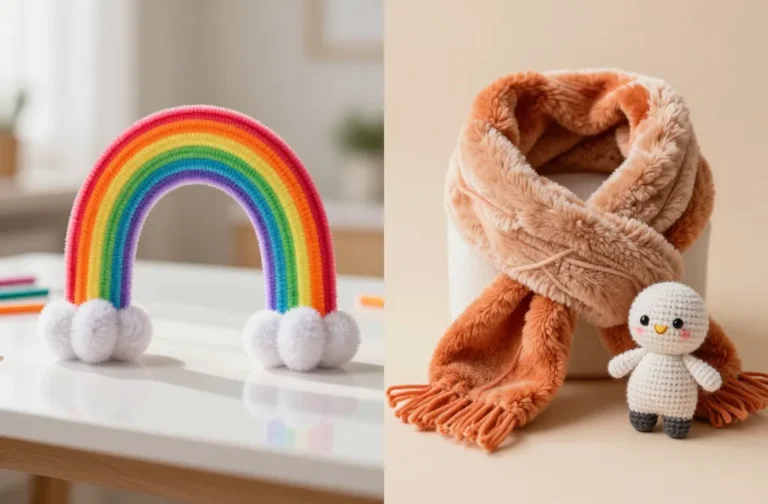
4. Felt Animal Puppets: Quick, Cuddly Charms
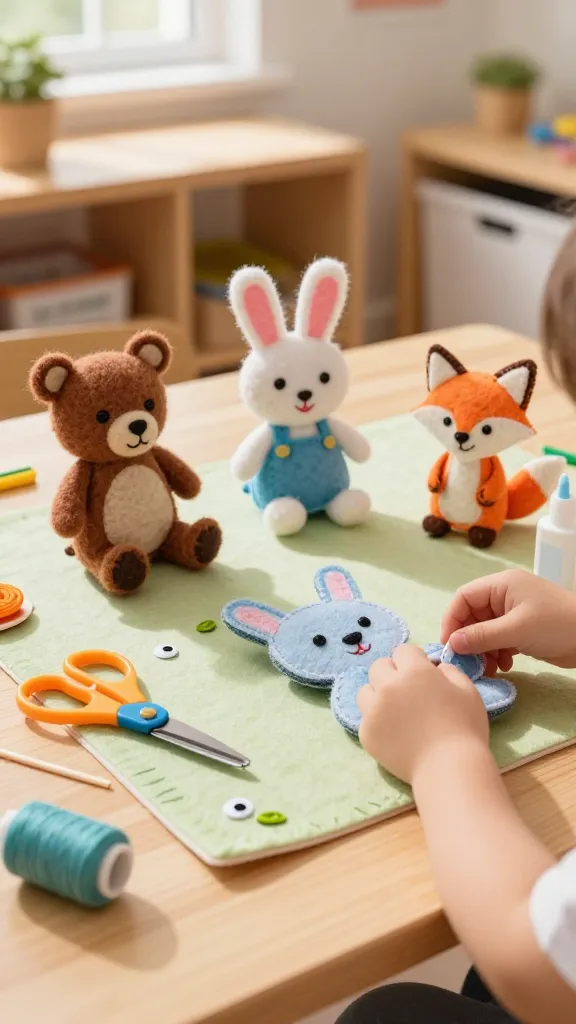
Soft, snap-free, and super cuddly, felt animal puppets are perfect for storytime and dramatic play. Your kiddo can design a cast of characters and put on a show with squeaky personality.
Materials Needed
- Felt sheets in assorted colors
- Googly eyes, embroidery thread, fabric glue
- Kid-safe scissors
- Popsicle sticks or small craft sticks for puppets
How to Make It
- Cut simple animal shapes from felt (bear, bunny, fox, etc.).
- Glue on eyes and accents; stitch a small mouth using embroidery thread.
- Attach a stick to the back for a quick-hand puppet.
Pro Tips / Styling Ideas
- Create a mini puppetry stage with a DIY felt backdrop and a strip of fabric as a stage.
- Mix-and-match accessories for new characters—child-friendly, no-sew options are best.
End Note
These puppets spark storytelling and fine motor fun, and they’re perfect for giftable keepsakes or classroom decorations.
5. Marble-Dyed Tote Bags: Colorful Carry-Ons
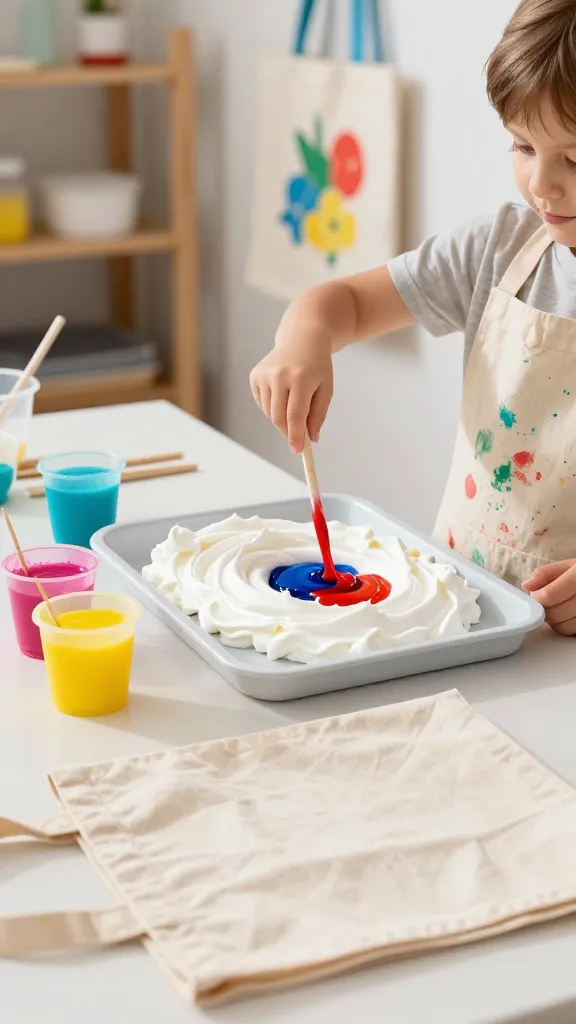
Marble dyeing is here to wow with swirl-on-swirls and bold, wearable art. A tote bag makes a practical, reusable canvas that your kid can proudly show off at market days, library visits, or sleepovers.
Materials Needed
- Plain cotton tote bags
- Shaving cream or baking soda and water for base layer
- Food coloring or fabric dyes
- Plastic tray and toothpicks for swirls
- Gloves and paper towels for cleanup
How to Make It
- Spread a thick layer of shaving cream on the tray and drop in colored dye.
- Swirl with a toothpick to create marbled patterns; roll the tote bag through the design.
- Let set, rinse, and lay flat to dry (adult supervision for the rinsing step).
Pro Tips / Styling Ideas
- Encourage unique signatures—two or three colors per bag keep it cohesive but lively.
- Gift them as party favors with a mini drawstring pouch containing a note about their design.
End Note
Functional art that travels well and sparks compliments—your kiddo will love carrying their own masterpiece.
6. Nature Rubbings Wall Gallery: Leafy Textures, Big Smiles
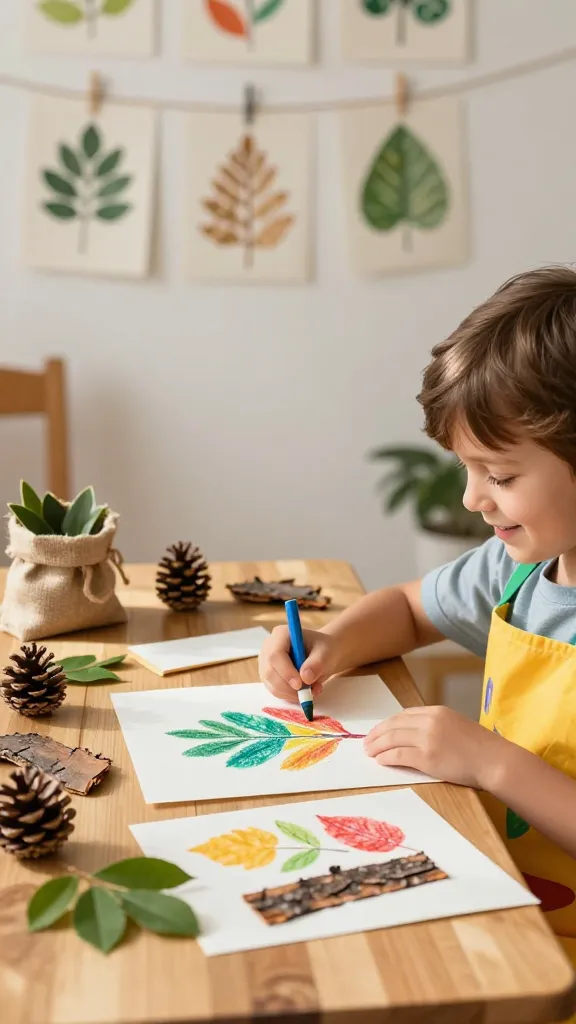
Nature rubbings are a sensory treasure—texture, color, and a dose of science all in one. Let your child explore the outdoors and transform textures into a wall-worthy gallery.
Materials Needed
- Leaves, pinecones, bark, or interesting plant textures
- Paper or sketchbooks
- Crayons or soft pastels
- Optional: twine for hanging
How to Make It
- Place objects under a sheet of paper and rub with a crayon to capture the texture.
- Experiment with color combinations—try layering different rubbings for depth.
- Mount or string rubbings into a mini gallery on a wall or bulletin board.
Pro Tips / Styling Ideas
- Group rubbings by season or color palette for a cohesive look.
- Add tiny captions with kids’ observations about textures.
End Note
A scavenger-hunt print-and-display project that’s both educational and pretty enough to frame.
7. Mini Felt Succulent Garden Pins: Evergreen Smiles
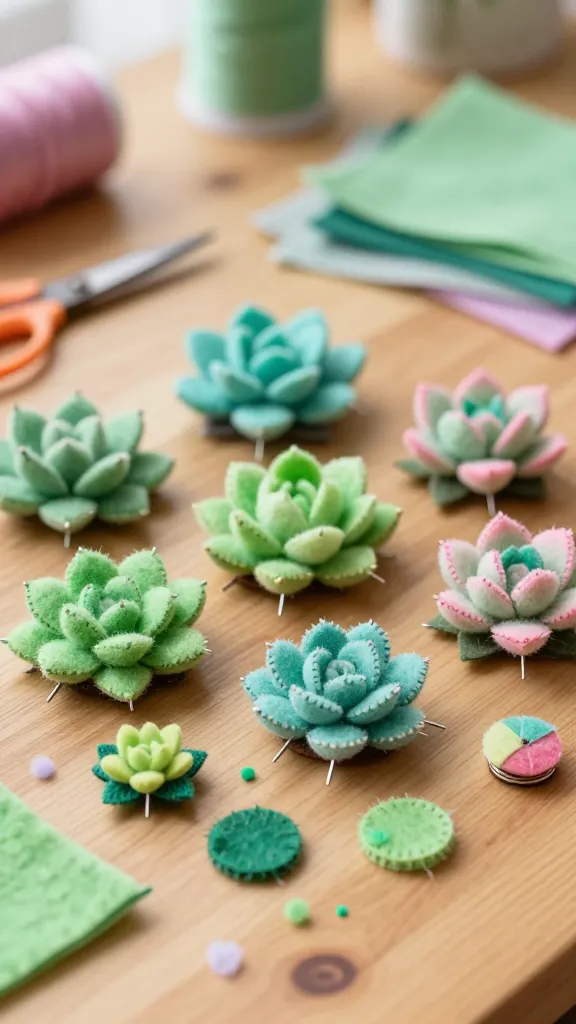
Soft, squishy, and endlessly cute, felt succulents become wearable pins that brighten jackets, backpacks, and tote bags. Easy enough for a quick Saturday project with big, adorable results.
Materials Needed
- Assorted felt in greens and vibrant tones
- Needle and thread or fabric glue
- Pin backs or brooch pins
- Scissors, small stuffing for dimension (optional)
How to Make It
- Cut leaf shapes and small plant pieces; stitch or glue layers together for dimension.
- Attach pin backs to the back side for easy wearing.
- Arrange into mini clusters or a single potted arrangement on a felt “pot.”
Pro Tips / Styling Ideas
- Package as a gift set with a tiny envelope card about plant care (even though it’s pretend!).
- Create a small display board to showcase a garden of pins.
End Note
Green-thumb vibes without watering—these pins are a sweet, durable craft that kids can proudly wear.
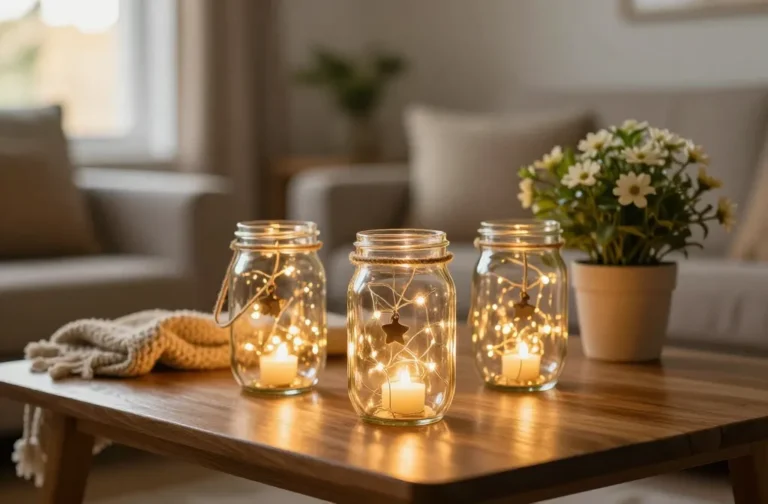
8. Glow-in-the-Doodie Night Light Jars: Sparkle to Sleep By
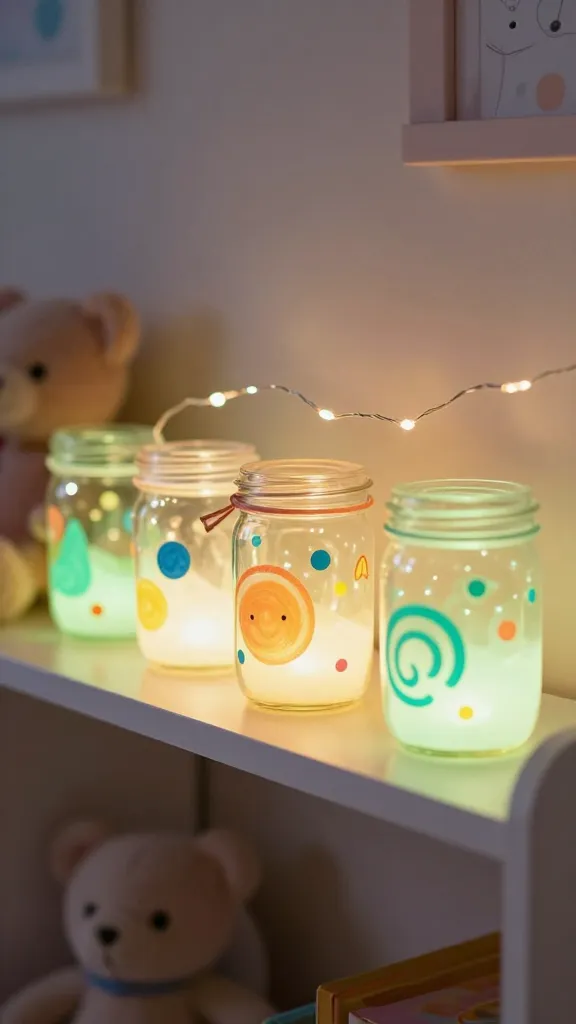
A little magic for bedtime routines—glow-in-the-dark doodle jars that cast soft, friendly light. Customize with paints, stickers, and a dash of imagination, then place on a shelf for a calming glow.
Materials Needed
- Small glass jars with lids (or plastic, for safety)
- Glow-in-the-dark paint or stickers
- Water, glycerin (optional for smooth glow)
- Ribbon or twine for hanging, if desired
- Battery-operated tea lights or fairy lights
How to Make It
- Decorate jars with glow paint or stickers in daytime; add doodles or simple patterns.
- Fill with a small amount of water and drop in a light to cast a gentle glow when turned on.
- Close the lid and place on a shelf where they’ll catch the eye at night.
Pro Tips / Styling Ideas
- Turn jars into a little “glow garden” by grouping them on a tray with fairy lights.
- Add a fabric “lid” for a cozy look and a quieter finish.
End Note
Bedtime becomes a little easier when magic helps eyes settle. These jars are not only cute but functional for a soft night light.
Conclusion
These eight completely unique and distinct craft ideas are designed to capture a 6-year-old’s imagination while keeping mess manageable for grown-ups. Whether you’re chasing an afternoon project or a gift-worthy keepsake, you’ll find something here that sparks smiles, creates memories, and looks absolutely adorable on display. Pick one (or all eight) and dive into a colorful, cozy crafting adventure today.