10 Cheap 3d Craft Ideas for Thrift Store Hauls You Can Diy Now
Welcome, thrifters and DIY dreamers! You’re about to turn those quirky thrift-store finds into stunning 3D crafts that pop with personality. These ideas are fun, super affordable, and totally doable—trust me, your mantle and your feed will thank you.
Grab your toolbox of paints, hot glue, and a fearless sense of whimsy. Each project is a fresh, unique twist you can tailor to your own style. FYI, you’ll probably end up surprising yourself with how easy and satisfying these are.
1. Upcycled Geometric Planters From Picture Frames
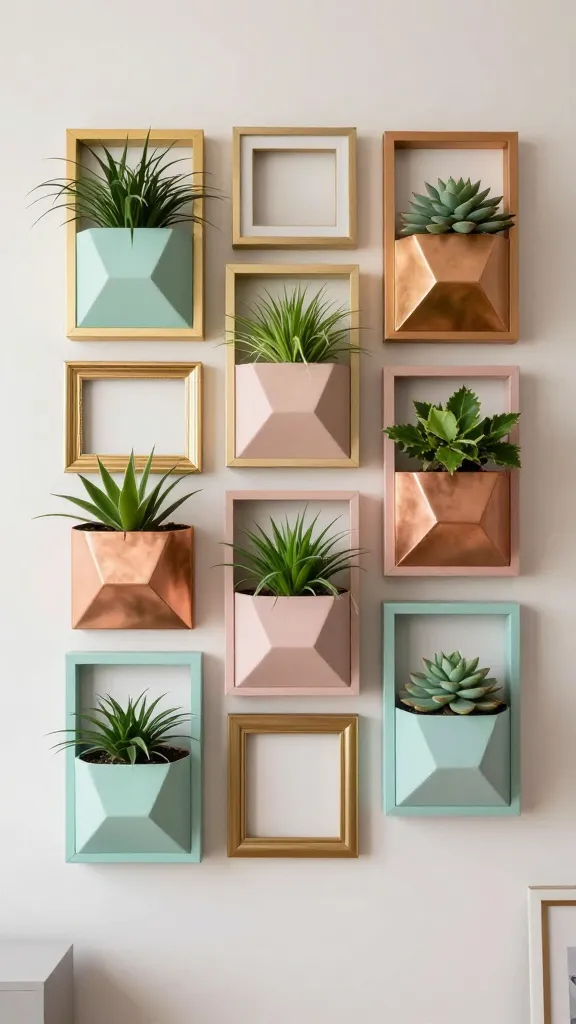
Picture frames aren’t just for photos anymore. Imagine bold three-dimensional planters built from thrifted frames, finished in metallics or matte pastels. The result: architectural, gallery-worthy plant displays that bring life to any room.
The finished piece feels modern and playful, with plant life peeking through framed cutouts. It’s a conversation starter and a cheeky nod to interior fashion all in one.
Materials Needed
- Assorted thrifted picture frames (various sizes)
- Painter’s tape, acrylic paints
- Foam board or cardboard for backing
- Hot glue gun and glue sticks
- Small planters or pots that fit behind the frame panels
How to Make It
- Disassemble frames and cut foam board to fit behind each frame piece. Create a staggered, three-dimensional arrangement by layering pieces with hot glue.
- Paint the frames in a cohesive color palette, then reassemble around the backing. Leave some raised panels for depth.
- Attach small pots or seedling trays behind the frame gaps. You’ll see greenery peeking through the openings for a playful 3D effect.
Pro Tips / Styling Ideas
- Mix metallics with soft pastels for a chic, contemporary vibe.
- Group several sizes together on a sunny shelf for a mini gallery garden.
Who will love it? Plant lovers, modern decor fans, and anyone who loves a clever, statement piece.
2. 3D Letter Wall Art Made From Jar Lids
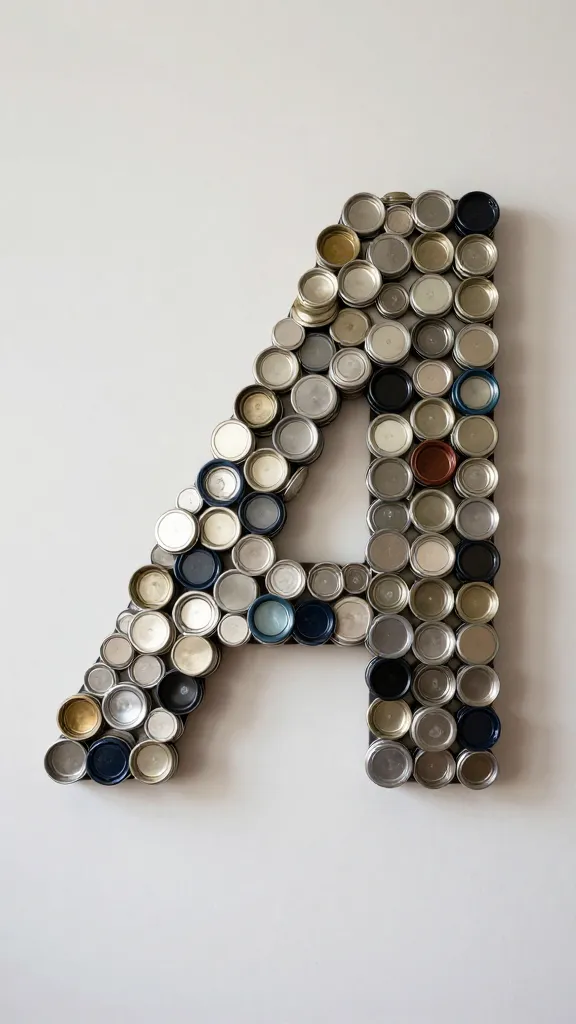
Picture this: a bold initial or word, built from a sea of thrifted jar lids, stacked into a tactile, rhythmic piece of wall art. It’s quirky, textural, and unexpectedly chic.
Finish with a high-contrast color scheme or a soft, dusty palette to fit your space. It’s a great gift option for a friend who loves personalized decor.
Materials Needed
- Assorted metal or plastic jar lids
- Cardboard or thin wood board for backing
- Hot glue, strong adhesive
- Acrylic paint, primer
How to Make It
- Arrange lids into the shape of a letter or word on backing. Glue lids in place, building height with layering or stacking.
- Prime and paint for a clean, bold finish. Add a gloss topcoat if you want a standout shine.
Pro Tips / Styling Ideas
- Choose a palette that contrasts with your wall color for maximum impact.
- Hang with a thin ledge shelf beneath so it feels like a built-in typography sculpture.
Who will love it? Typography fans, audio-obsessed friends who want sound-absorbing wall art, and lovers of tactile crafts.
3. Coastal Pebble Lamp Base From Vintage Glass Bottles
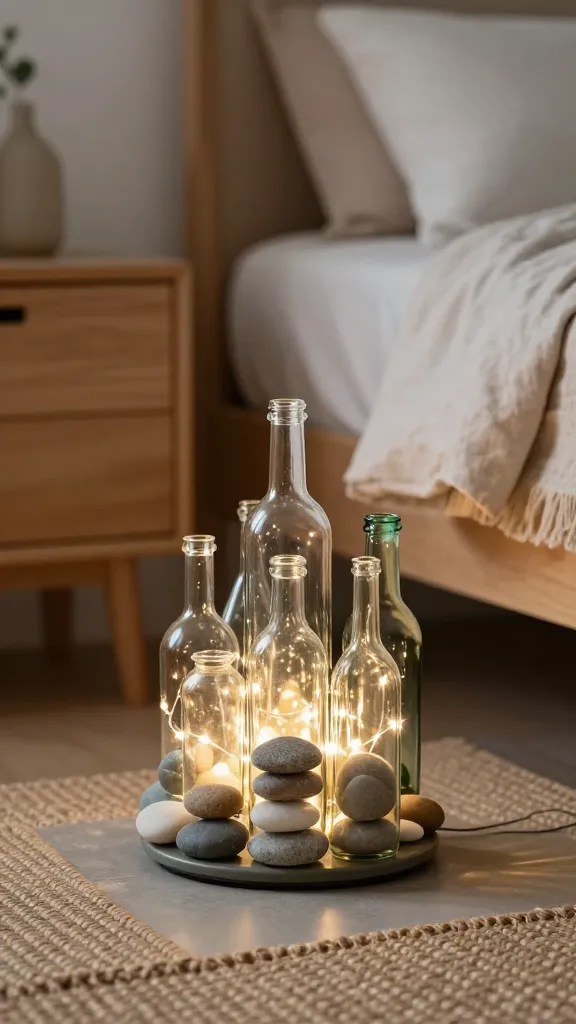
Channel beachy vibes with a 3D pebble base built from thrifted glass bottles. When lit, the pebbles cast a warm, rippling glow—serene and subtly luxe.
The glow is cozy, the texture is organic, and it makes for a perfect bedside lamp or living room accent. It screams “effortless chic” without saying a word.
Materials Needed
- Assorted glass bottles (clear or tinted)
- Small smooth pebbles or glass beads
- Strong epoxy or hot glue
- LED fairy lights or a low-watt bulb socket
How to Make It
- Fill bottles with pebbles up to about two-thirds height, then nest a string of lights inside. Add more pebbles on top to stabilize.
- If wiring a bulb, secure a socket at the base and thread the cord out neatly. Close with a bottle cap or a cork as a decorative cap.
Pro Tips / Styling Ideas
- Group several bottles on a tray for a coastal tablescape.
- Use mismatched shapes for a natural, sea-glass feel.
Who will love it? Anyone chasing a summer home vibe, or a soft, ambient glow in cozy corners.
4. 3D Faceted Wall Mirror From Cardboard and Mirror Tiles
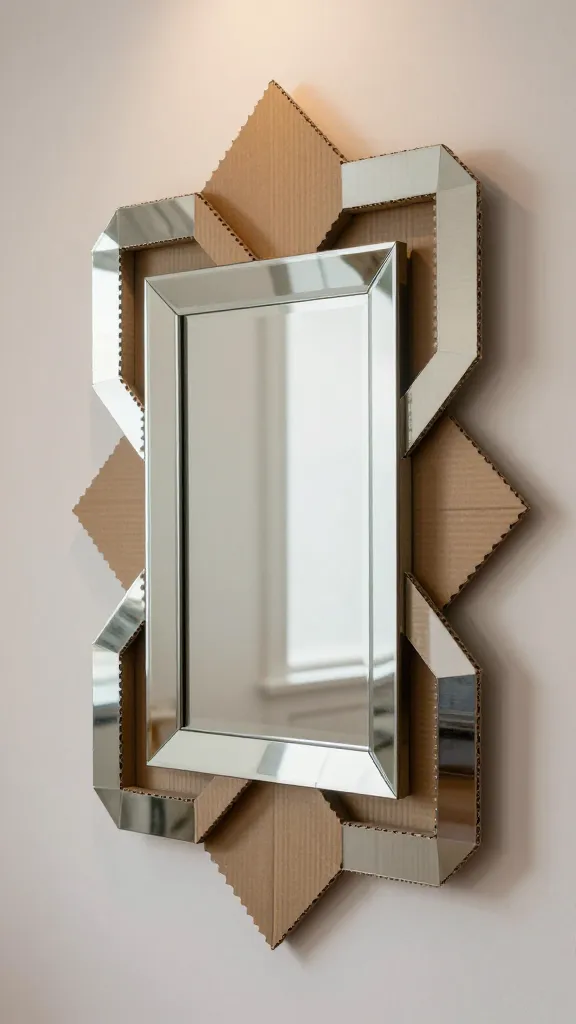
Turn a thrift-store mirror into a shimmering 3D art piece. Layer faceted cardboard shapes behind a vintage mirror for a gallery-grade effect that bounces light like a dream.
The result: a bold, dimensional surface that instantly updates tired walls with architectural intrigue.
Materials Needed
- Old wall mirror or compact mirror
- Cardboard or foam board
- Mirror tiles or reflective stickers
- Hot glue, craft knife, ruler
How to Make It
- Cut zig-zag or geometric shapes from cardboard to create a 3D backdrop. Glue to the back of the mirror edge, layering for depth.
- Add mirror tiles or reflective stickers to the front surface for extra sparkle.
Pro Tips / Styling Ideas
- Paint the cardboard shapes in a metallic tone for an extra pop.
- Hang opposite a light source to maximize shine and depth.
Who will love it? Glam lovers, apartment dwellers needing a statement piece, and anyone who adores reflective texture.
5. Faux 3D Succulent Garden From Teacups
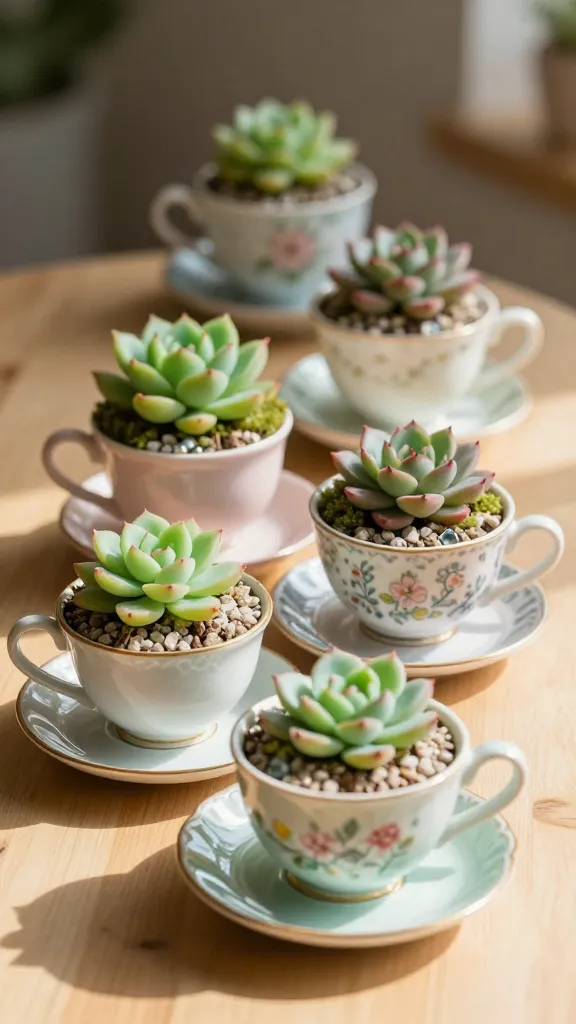
Transform mismatched teacups into a tiny, adorable three-dimensional succulent garden. They’re whimsical, unexpected, and perfect for a desk or windowsill vignette.
It’s like a miniature landscape that fits in the palm of your hand—soft, charming, and utterly collectible.
Materials Needed
- Assorted thrifted teacups and saucers
- Miniature fake succulents or wooden moss
- Hot glue, small gravel for soil texture
- Glass marbles or beads for drainage
How to Make It
- Fill cups with a layer of gravel, then add moss and miniature plants. Secure with a dab of glue to hold the “soil” in place.
- Nest cups on a tray or stack them on a small rack for a tiered garden display.
Pro Tips / Styling Ideas
- Use a few bold colors on the teacups themselves for a bright, cohesive set.
- Create a rainbow of tiny pots for a playful centerpiece.
Who will love it? Tea lovers, desk gardeners, and anyone craving tiny, tactile decor.
6. 3D Cozy Quilt Block Wall Hanger From Fabric Scraps
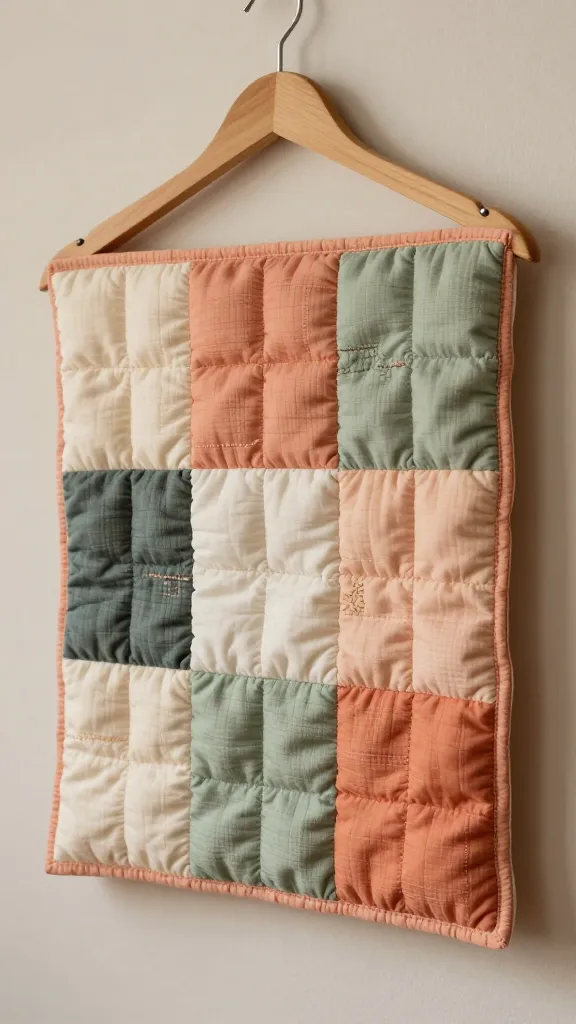
A patchwork-inspired wall hanger stitched from fabric scraps and a thrifted wooden hanger creates a warm, cozy three-dimensional texture. It’s like hanging a soft, tactile painting.
The result is inviting, with a handmade vibe that invites a closer look and bigger smiles.
Materials Needed
- Wooden hanger or frame
- Assorted fabric scraps, foam padding
- Hot glue, sewing needle and thread
- Fabric paint or embroidery floss for accents
How to Make It
- Layer foam padding behind fabric scraps, then glue the layers to the hanger in a pleasing, quilt-like pattern.
- Stitch or glue small pieces to create a tactile, 3D block texture. Finish with decorative stitching or painted accents.
Pro Tips / Styling Ideas
- Choose a color story that matches your sofa or bedding for a coordinated look.
- Hang in a hallway or reading nook to invite cozy vibes.
Who will love it? Blanket-lovers, textile crafters, and anyone craving warmth in their walls.
7. Ship-Wainting Sailor Rope Pendant From Doorknobs
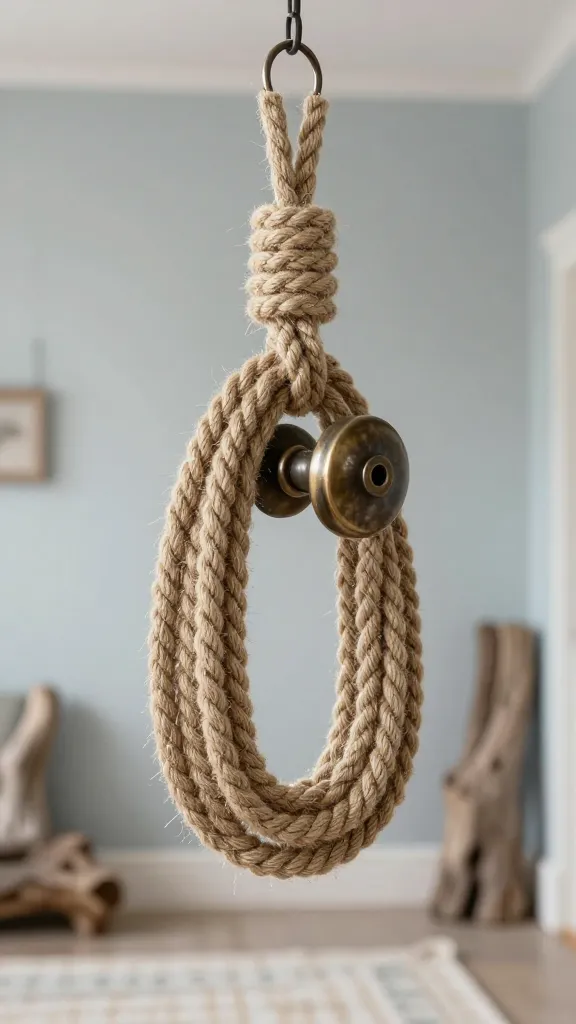
Take a nautical turn with a 3D rope pendant crafted from thrifted doorknobs and jute. It’s sculptural, tactile, and endlessly versatile as a statement lighting piece or wall adornment.
The pendant’s texture and curl add depth, while a simple color palette keeps it elegantly maritime.
Materials Needed
- Doorknobs (antique or modern)
- Jute twine or thick rope
- Metal ring or ceiling hook for hanging
- Hot glue or epoxy
How to Make It
- Wrap rope around the doorknob in a coiled, layered pattern, securing with glue as you go. Create a few inches of tail to finish with a tidy knot.
- Hang from a decorative ring or hook to display as a wall sculpture or lightweight pendant.
Pro Tips / Styling Ideas
- Finish with a coastal-blue or sandy beige palette for a sea-inspired vibe.
- Group with other rope-based pieces for a cohesive, textural wall cluster.
Who will love it? Nautical lovers, DIY pendant fans, and anyone who craves tactile, sculptural wall decor.
8. 3D Stackable Book Spine Wall Display From Paperback Bundles

Imagine a living bookshelf on the wall—literally. Stack up paperback spines and secure them into a three-dimensional, sculptural display that doubles as art and a quiet ode to reading.
The finish is cozy, literary, and surprisingly modern when painted in bold or muted tones.
Materials Needed
- Used paperback books
- Matchbox-sized wooden blocks or cardboard spacers
- Strong adhesive, acrylic paint
- Wall mounting hardware
How to Make It
- Cut spacers to create clear separations between book spines. Glue the spines to the backing in a staggered, geometric arrangement.
- Paint the face of the spines for a cohesive color story and mount to the wall in a dynamic grid or diagonal line.
Pro Tips / Styling Ideas
- Use a color gradient across the spines for a striking visual effect.
- Pair with a small reading nook lampshade and a plant for a library corner vibe.
Who will love it? Bookworms, design nerds, and anyone who wants a literary twist on 3D art.
9. Whimsical 3D Origami Flower Wall Panel From Scrap Paper
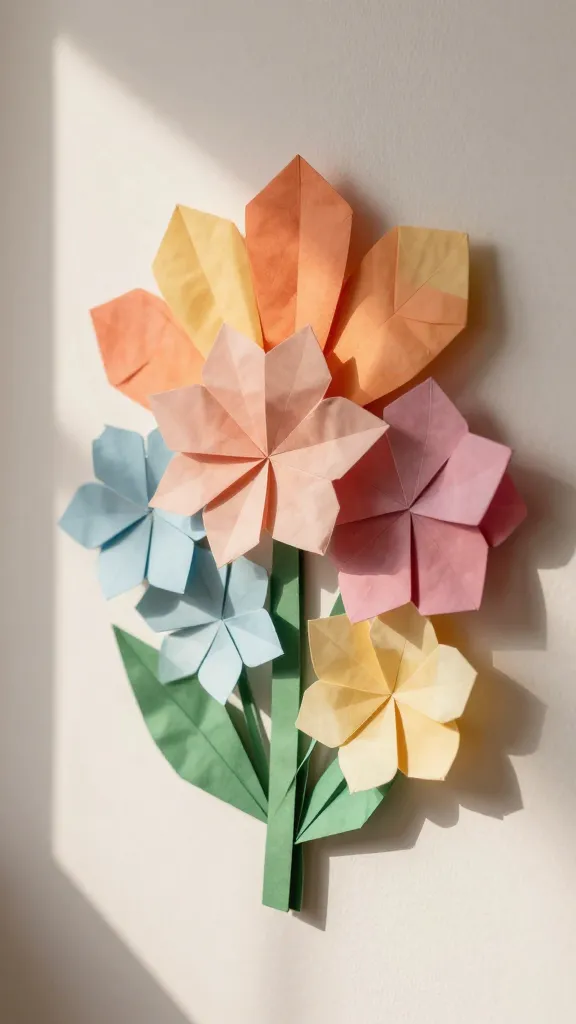
Turn scrap paper into a blooming, three-dimensional wall panel that brings sunshine indoors. Layered petals and soft shadows create a playful yet sophisticated floral scene.
The result feels handcrafted and cheerful, a delightful way to brighten dull walls without floral maintenance.
Materials Needed
- Assorted cardstock or scrap paper
- Cardboard or backing board
- Glue, scissors, craft knife
- Optional: colored washi tape, glitter glue for accents
How to Make It
- Cut petal shapes in varying sizes, then fold and glue them into layered flowers. Attach to backing in an organic, garden-like arrangement.
- Finish with a painted or colored frame to emphasize the 3D effect.
Pro Tips / Styling Ideas
- Use warm pastel tones for a soft, inviting look, or go bold with saturated hues for a modern punch.
- Create a seasonal wave by arranging flowers in a color progression from winter to spring hues.
Who will love it? Crafters who adore paper artistry, kids’ rooms, and anyone wanting a cheery focal point.
10. 3D Bottle-Cap Mosaic Clock From Thrifted Jars
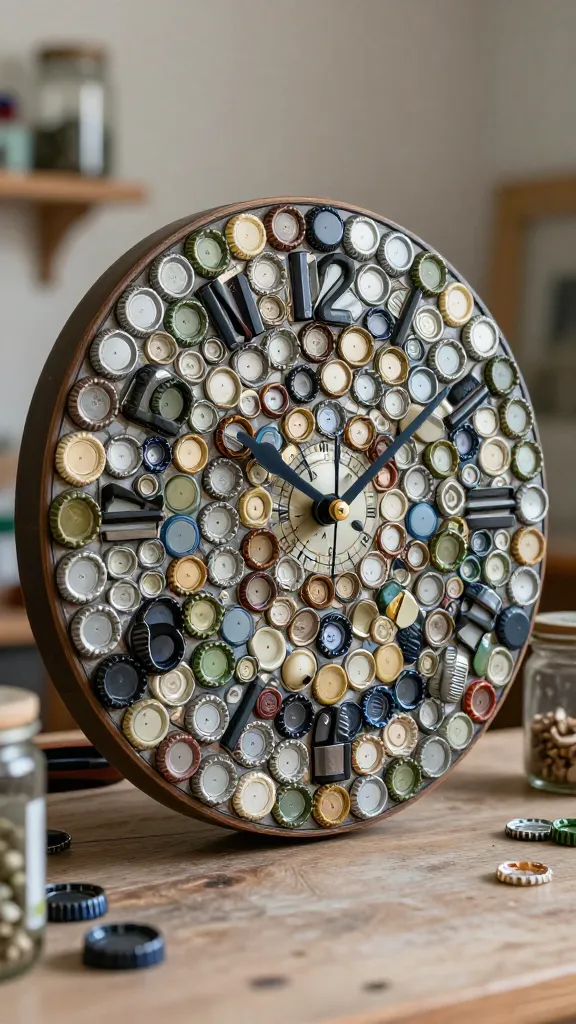
End your list with a bang: a functional, 3D mosaic clock crafted from bottle caps and thrifted jars. It’s a functional piece of art that ticks with personality.
The mosaic shimmer, the tactile surface, and the satisfying snap of each cap make this a centerpiece you’ll want to show off.
Materials Needed
- Assorted bottle caps (metal or plastic)
- Clock mechanism kit or a pre-made clock face
- Wooden or plexiglass backing
- Strong adhesive, spray paint if desired
How to Make It
- Arrange bottle caps in a striking pattern on backing, then glue in place. Create a circular layout for a classic clock look.
- Attach clock mechanism behind the backing, ensuring the hour and minute hands are visible and functional.
Pro Tips / Styling Ideas
- Paint caps in a cohesive color palette to unify the mosaic.
- Mount on a bold wall color to make the mosaic pop, or keep it monochrome for a sleek, modern edge.
Who will love it? Upcyclers, clock collectors, and anyone who wants a conversation-worthy timepiece.
Conclusion
Ready to dive into your thrift-store haul with a 3D makeover mindset? These 10 completely unique, fully original ideas prove that you can turn the humdrum into the jaw-dropping with a little imagination and elbow grease. Pick one (or all) and start crafting today—your space will thank you, and so will your creative spirit.
Want to share your creations or ask for tips? I’m here for it—drop a comment with which idea you’re trying first and any twists you’re dreaming up. Happy crafting, friends, and may your shelves be as stylish as your imagination!