10 No Tools 3d Craft Ideas Anyone Can Make You’Ll Want to Try
Ready to level up your DIY game without hunting for obnoxious tools or fancy supplies? These 10 no-tools 3d craft ideas are sparkly, satisfying, and totally doable in a single afternoon. Trust me, you’ll want to try every single one.
Short on time? No problem—each idea is designed to wow with minimal setup. Grab a mug, favorite playlist, and dive in. FYI, you’ll love this mix of cozy, whimsical, and gift-gable projects.
1. Paper-Petal Globe: A 3D Floral World You Can Display
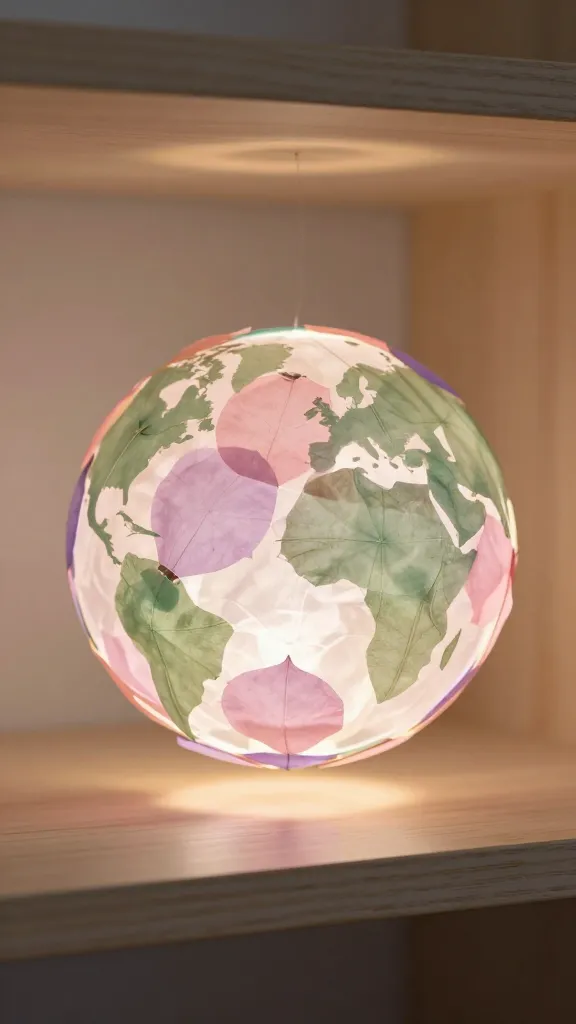
Imagine a delicate, hovering orb made entirely from folded paper petals. The finished piece looks like a tiny, garden-lit planet perched on your shelf. It’s surprisingly sturdy and wonderfully tactile to touch.
Materials Needed
- Colored paper or lightweight cardstock
- Scissors
- Glue or adhesive tape
- Optional: string or fine thread for hanging
How to Make It
- Cut petal shapes from your colored paper—thin at one end, rounded at the other.
- Fold and glue petals in concentric rings, building outward to form a spherical cluster.
- String several clusters together to hint at continents, then tuck them into a loosely spherical structure.
Pro Tips / Styling Ideas
- Use a gradient of tones for depth—peach to coral, teal to seafoam.
- Place on a stand or hang in a corner where light creates gentle shadows.
Who loves it: anyone who adores botanical vibes and a touch of whimsy. This makes a striking centerpiece or a desk sculpture that sparks conversation.
2. Cardboard Cityscape Shadow Box
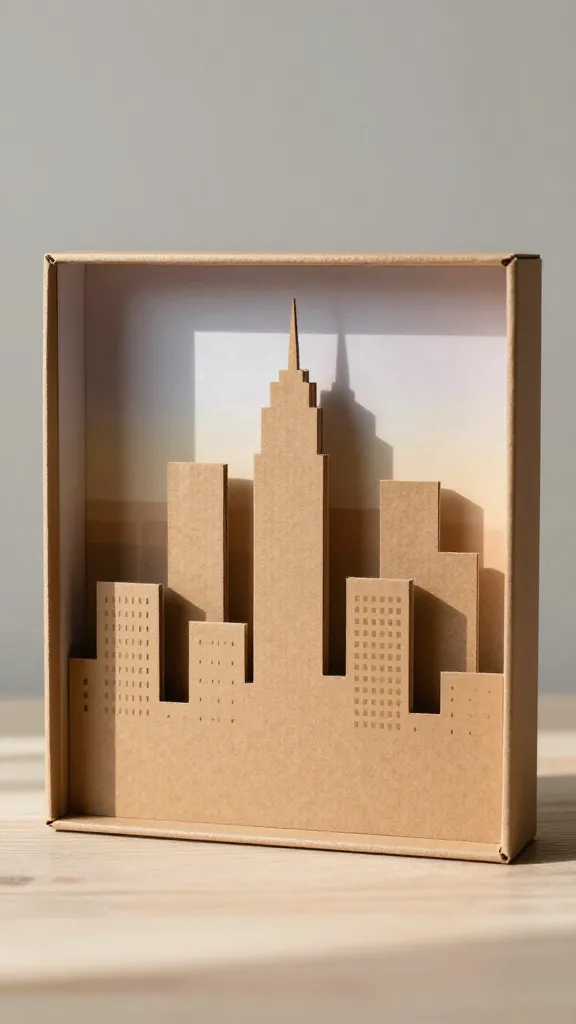
Turn simple cardboard into a tiny, sunlit skyline with this 3D shadow box. It’s modern, graphic, and surprisingly durable when stacked neatly.
Materials Needed
- Cardboard scraps or cereal box cardboard
- Scissors or craft knife (careful with edges)
- Glue or double-sided tape
- Backer paper or decorative paper for the background
How to Make It
- Cut varying rectangular silhouettes to mimic buildings.
- Layer pieces at different depths inside the box to create dimension.
- Line the back with decorative paper and add a tiny “street” at the bottom with washi tape.
Pro Tips / Styling Ideas
- Paint edges lightly for a polished look without needing paint.
- Pair with a small LED light to cast dramatic silhouettes after dark.
Who loves it: minimalists and city-lovers alike. A perfect weekend project that doubles as wall art or a gift for grads and renters.
3. Toothpick Terrarium Tower
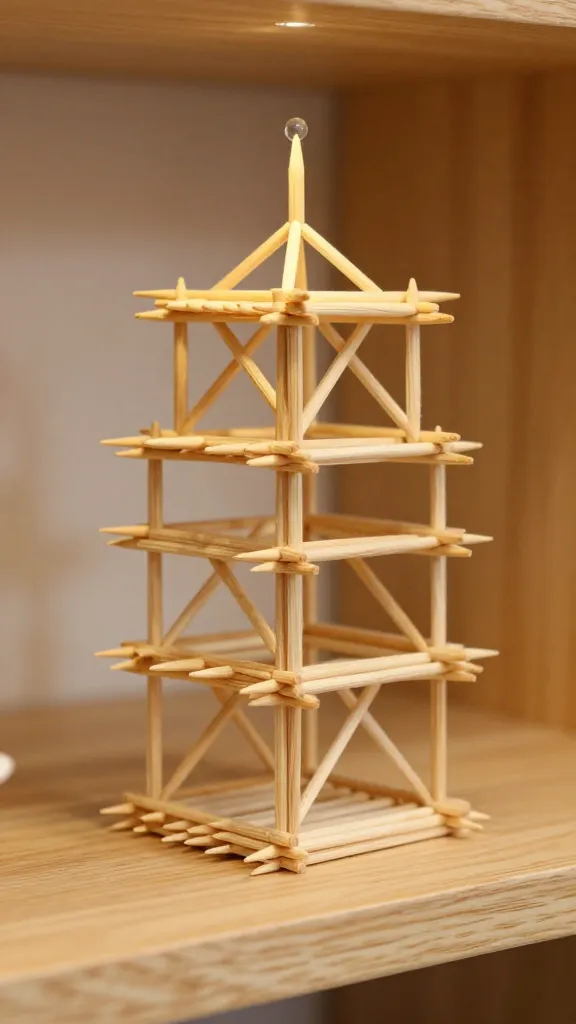
Build a tiny, architectural tower entirely from wooden toothpicks. It’s the kind of quirky decor that earns compliments and looks great on a shelf or coffee table.
Materials Needed
- Toothpicks (tip: choose matching tones)
- Clear glue or craft glue
- Optional: a small bead or marble as a “spire”
How to Make It
- Lay out a square base with four toothpicks and glue at the corners.
- Stack and glue cross-braced layers to form a tower, allowing each level to dry before adding more.
- Finish with a toppy bead or a tiny piece of foil for a spire.
Pro Tips / Styling Ideas
- Spritz with a clear sealant to keep it pristine on display.
- Place inside a glass jar for a contained terrarium effect.
Who loves it: fans of texture and tiny-scale architecture. A playful, conversation-starting piece for desks and shelves.
4. Feathery Wire-Free Mobile Sculptures
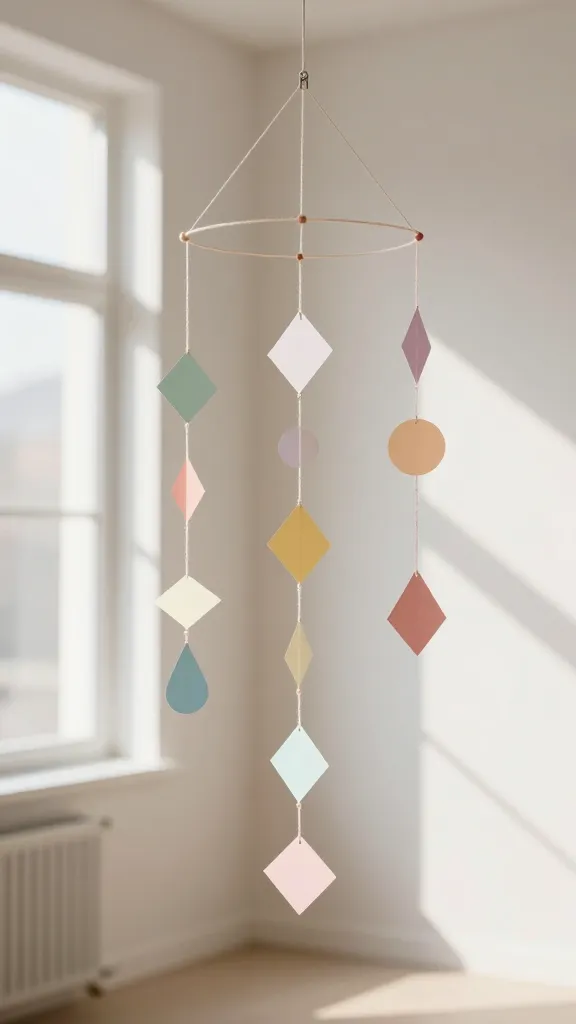
A graceful, no-tools mobile you can make with just paper, yarn, and a pinch of imagination. It sways with breeze and casts soft shadows on walls.
Materials Needed
- Colored paper or cardstock
- Yarn or string
- Scissors
- Clear tape or glue
How to Make It
- Cut lightweight shapes (diamonds, circles, teardrops) from paper.
- Attach shapes at varying intervals along strands of yarn using small wrap-and-tape methods.
- Anchor the top ends to a single point or a paperclip hook so it can hang from a ceiling or door frame.
Pro Tips / Styling Ideas
- Use a monochrome palette for a chic, modern look, or mix metallics for glam.
- Group two or three at different heights for a dynamic installation.
Who loves it: decor lovers who crave motion without noise or clutter. It’s a delightful kinetic piece that adds life to a room.
5. Crochet-Free Crochet Wall Art (Paper Crochet)
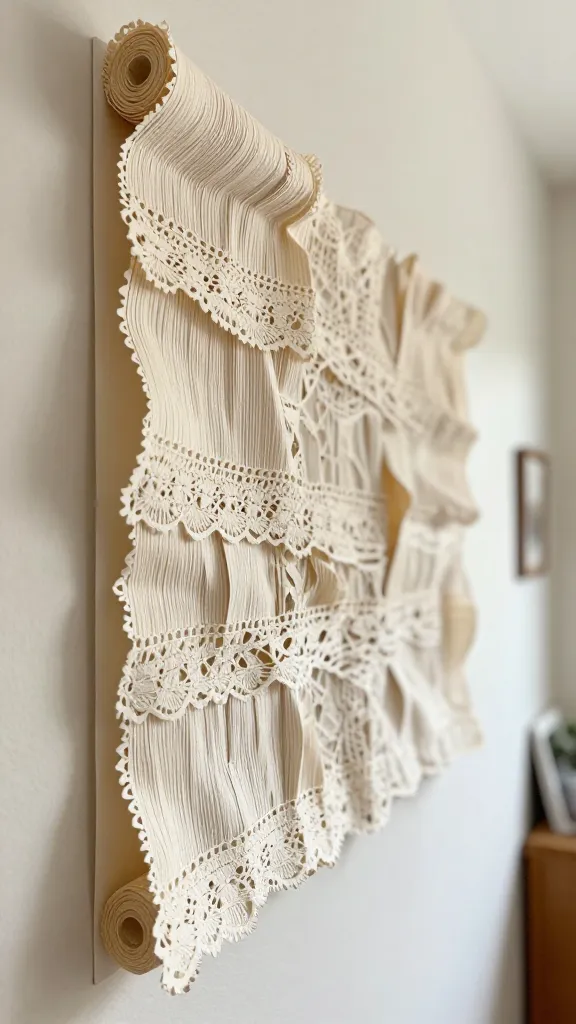
Yes, you can fake the look of crochet without yarn or hooks. Paper crochet brings soft texture and a cozy vibe to walls, doors, or windows.
Materials Needed
- Sheets of thick paper or light cardstock
- Ruler
- Scissors
- Glue stick or glue dots
How to Make It
- Cut a repeating lace-like pattern into the edge of a long strip.
- Roll or pleat sections to create soft, crocheted-looking textures.
- Mount on a backing paper and frame or tape directly to the wall.
Pro Tips / Styling Ideas
- Choose warm neutrals for a cozy vibe, or metallics for a contemporary twist.
- Layer with fabric scraps or felt shapes for depth.
Who loves it: fearless crafters who want tactile art without yarn projects. It’s a surprising conversation starter that looks high-end on a budget.
6. Neon-Light Shadow Stencils (No Electric Required)
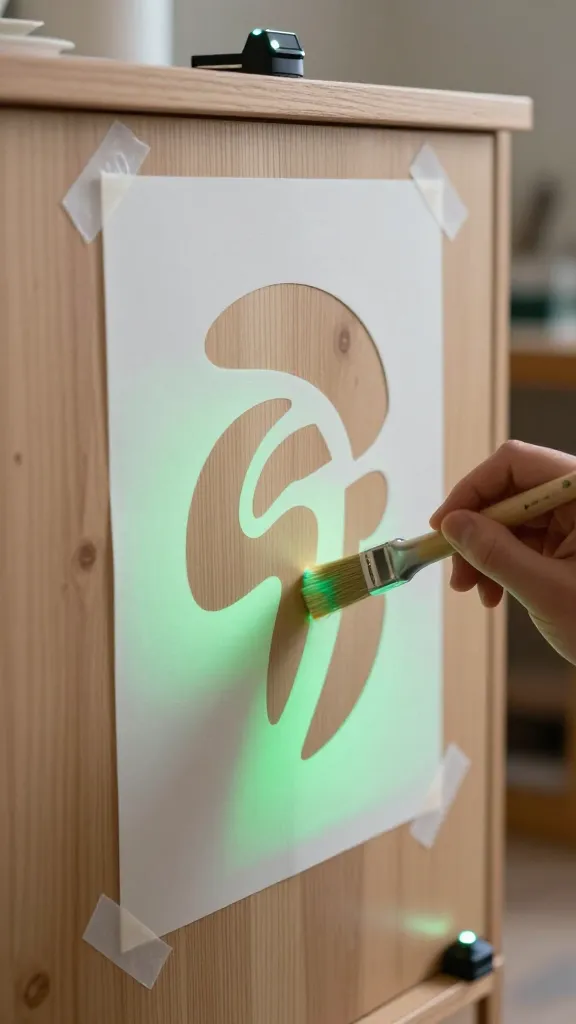
A glow-up for cabinets, frames, or tabletops using simple hand-cut stencils and glow-in-the-dark accents. No tools? No problem—just cut and press.
Materials Needed
- Cardstock or thin plastic sheet (for stencils)
- Glow-in-the-dark paint or markers
- Adhesive putty or double-sided tape
- Small clip-on LED (optional, for extra glow)
How to Make It
- Cut bold shapes or letters from your stencil material.
- Stick the stencil to a surface and fill in with glow paint or markers.
- Let dry and, if you want, clip on a tiny LED for a brighter effect.
Pro Tips / Styling Ideas
- Place on a wall where light naturally hits for enhanced glow after dark.
- Switch out shapes seasonally for a fresh update.
Who loves it: night-owl creatives who want a subtle, neon-like effect without wiring or batteries. It’s playful and seriously eye-catching when the lights go down.
7. Fabric Patch Magnets Without Sewing
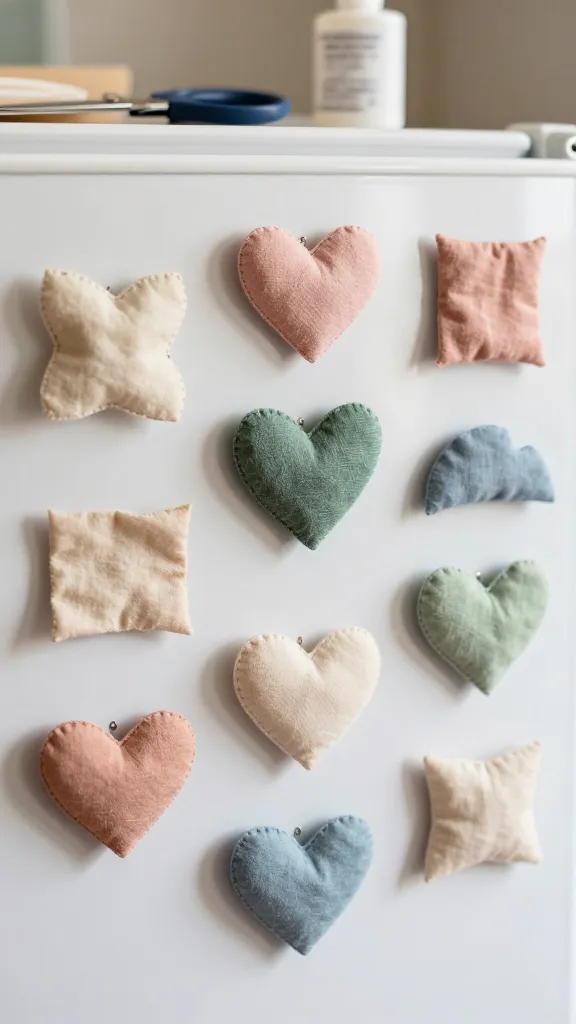
Decorative magnets made from fabric scraps, fastened with simple folds and glue—no sewing, no fuss. They’re soft, tactile, and handy on any fridge or magnetic board.
Materials Needed
- Assorted fabric scraps
- Magnetic sheets or small magnets
- Glue (fabric glue or hot glue if you’re comfortable)
- Scissors
How to Make It
- Cut fabric into small shapes (hearts, circles, or abstract blobs).
- Fold edges under slightly to create a neat edge and glue in place.
- Attach magnets to the back with glue and let dry fully.
Pro Tips / Styling Ideas
- Coordinate colors with your fridge or board decor for cohesive display.
- Group sets of three for visual appeal and easy swapping.
Who loves it: crafters who adore tactile textures and quick, practical gifts. They’re pretty enough to gift and functional enough for daily use.
8. 3D Button Bouquet Keepsake
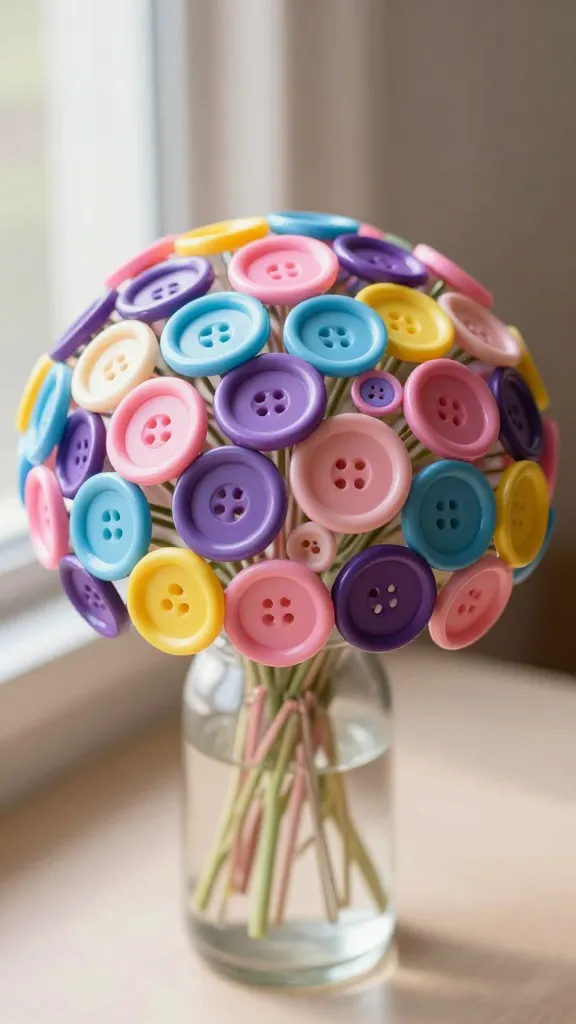
A bouquet that lasts forever, created from colorful buttons layered into a faux flower form. It’s cheerful, nostalgic, and totally giftable.
Materials Needed
- Assorted buttons (glassier or matte, in your chosen color palette)
- Binder clips or floral stems (no tools needed; reuse what you have)
- Heavy cardstock or foam for the “base” / stand
- Glue
How to Make It
- Stack buttons in a circular pattern to form petals, gluing at the center to seal.
- Attach petals around a central button to create a flower shape.
- Mount each flower on a stem and anchor into the base to form a bouquet.
Pro Tips / Styling Ideas
- Diagonal color gradient adds depth and charm.
- Wrap a ribbon around the base for a finished look.
Who loves it: sentimental decorators and handmade gift enthusiasts. A bright, quirky alternative to fresh blooms.
9. Cinnamon-Scented Paper Orbs

Aromatic, airy orbs that fill your space with cozy spice. They’re lightweight, easy to create, and perfect for autumn or gifting to teachers and neighbors.
Materials Needed
- Thin paper or tissue paper
- Ribbon or string
- Ground cinnamon or cinnamon-scented potpourri
- Glue or double-sided tape
How to Make It
- Crush or sprinkle a touch of cinnamon between layers of tissue as you fold into a sphere.
- Seal with glue and thread a ribbon through the top for hanging.
- Dust with extra cinnamon on assembly for a stronger scent.
Pro Tips / Styling Ideas
- Hang in clusters near entryways to greet guests with warmth.
- Use a clear string to give the illusion of floating orbs.
Who loves it: fans of cozy scents and low-fuss decor. They smell amazing and look delightfully whimsical hanging in a corner or window.
10. Foam-Core Mini Bookshelf Display
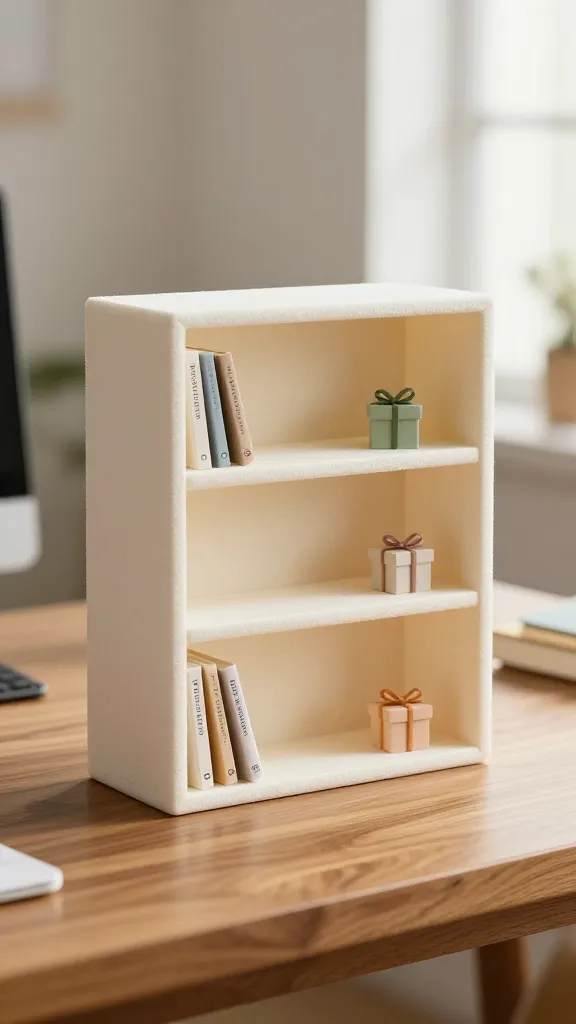
A tiny, gravity-defying bookshelf built entirely from foam core pieces stacked together. It’s a cute desk accent that looks like it popped out of a design magazine.
Materials Needed
- Foam-core sheets
- Glue or double-sided tape
- Markers or paint (optional)
How to Make It
- Cut slim rectangular panels in various sizes to resemble shelves and supports.
- Glue panels perpendicularly to form a freestanding “bookcase.”
- Decorate with tiny book spines or stacked gift boxes to mimic a real shelf.
Pro Tips / Styling Ideas
- Place a few tiny faux books or trinkets on the shelves for character.
- Paint the edges for a polished, magazine-worthy look.
Who loves it: tidy-obsessed DIYers and mini-scene makers. It’s a charming display that doubles as clever decor for desks or shelves.
Conclusion: There you have it—10 completely unique, no-tools 3d craft ideas you can make today. Each project is designed to be approachable, display-worthy, and seriously satisfying to finish. Pick one (or all) and start crafting—your space will thank you, and you’ll have a stack of fresh, handmade treasures to show off.