10 Step by Step Room Decor Craft Ideas Wall Art: Quick Wins
Ready to transform a bland wall into a gallery you’re actually excited to stare at? These 10 Step By Step Room Decor Craft Ideas Wall Art are crafted to be fun, friendly, and totally doable for weekends or late-night creative binges. Each project is unique, easy to customize, and designed to spark serious Pinterest-worthy vibes.
Trust me, you don’t need an art degree to craft stunning walls. Grab a few supplies, pick a color story, and let your space tell your story. FYI, these are all beginner-friendly with playful twists that will have your home feeling polished in no time.
1. Abstract Geometric Canvas Collage
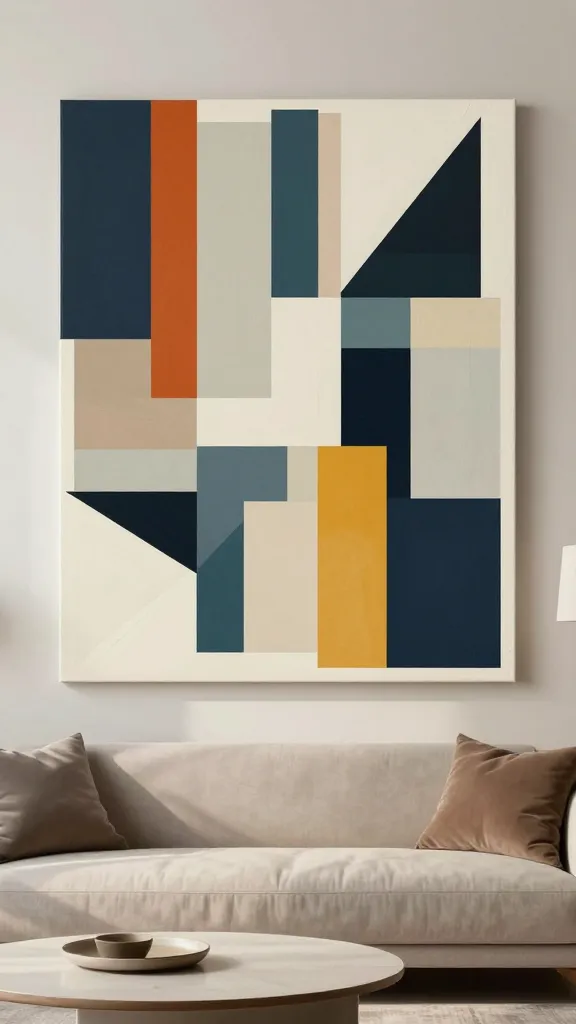
Imagine a bold, modern wall that looks like it belongs in a chic magazine. This Abstract Geometric Canvas Collage brings high-end vibes with simple shapes and color blocks. It’s eye-catching from across the room and perfect for a living room or bedroom feature wall.
Materials Needed
- Blank canvas or canvas panels
- Acrylic paints in 3–5 complementary colors
- Painter’s tape
- Foam brushes, ruler, pencil
- Optional: metallic acrylic for accents
How to Make It
- Sketch a rough grid on the canvas with light pencil lines.
- Use painter’s tape to create bold geometric shapes. Press tape down firmly.
- Paint each shape with a different color. Remove tape while paint is still a touch wet for clean edges.
- Let dry, add metallic accents if you like, and seal with a quick varnish.
Pro Tips / Styling Ideas
- Pair with a minimalist frame gallery for a curated look.
- Hang at eye level in a well-lit spot to maximize impact.
Who would love it? Anyone chasing a modern, chic vibe with a pop of color. You’ll love this if you crave clean lines and bold statements.
2. Botanical Pressed-Leaf Shadow Box
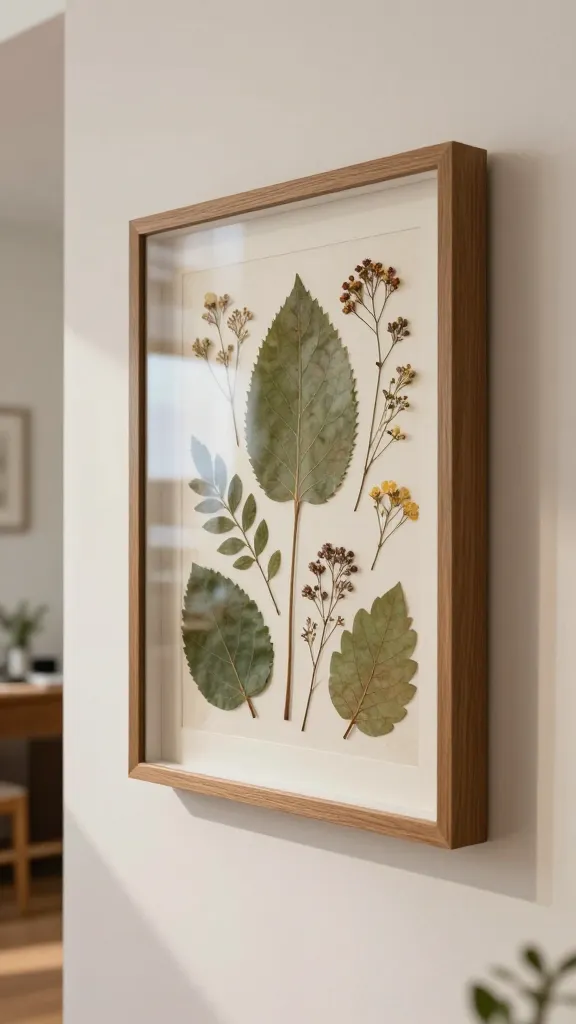
Turn real greenery into a timeless wall treasure. The Botanical Pressed-Leaf Shadow Box captures delicate textures and earthy tones in a single, elegant display. It looks luxe in a hallway or above a workspace, whispering nature into your home.
Materials Needed
- Shadow box frame
- Pressed leaves (or faux leaves)
- Glassine paper or parchment
- Double-sided tape or glue dots
- Optional: tiny dried flowers
How to Make It
- Arrange leaves on a sheet of glassine, trimming as needed.
- Place leaves in a pleasing composition inside the shadow box.
- Seal with the backing and frame it.
Pro Tips / Styling Ideas
- Pair with warm wood tones for an earthy vibe.
- Change out seasonal leaves to refresh the look without a full redo.
Who would love it? Nature lovers and anyone who loves a quiet, timeless look. You’ll love this for a soft, botanical pause in your decor.
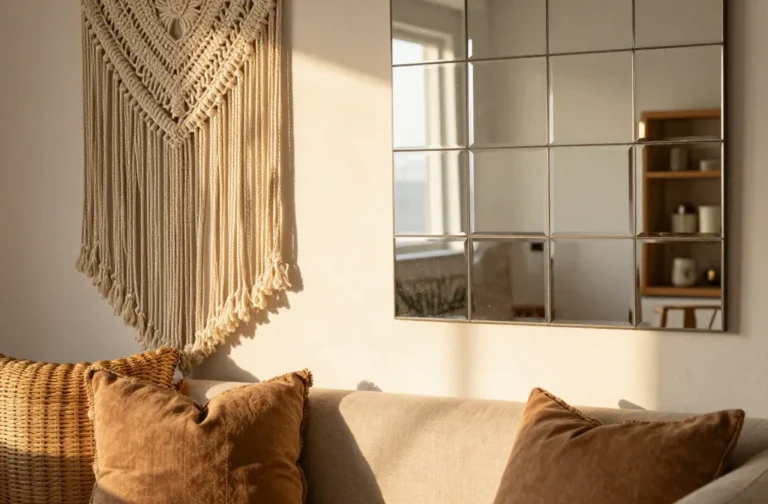
3. Woven Rope Arrow Wall Hanging
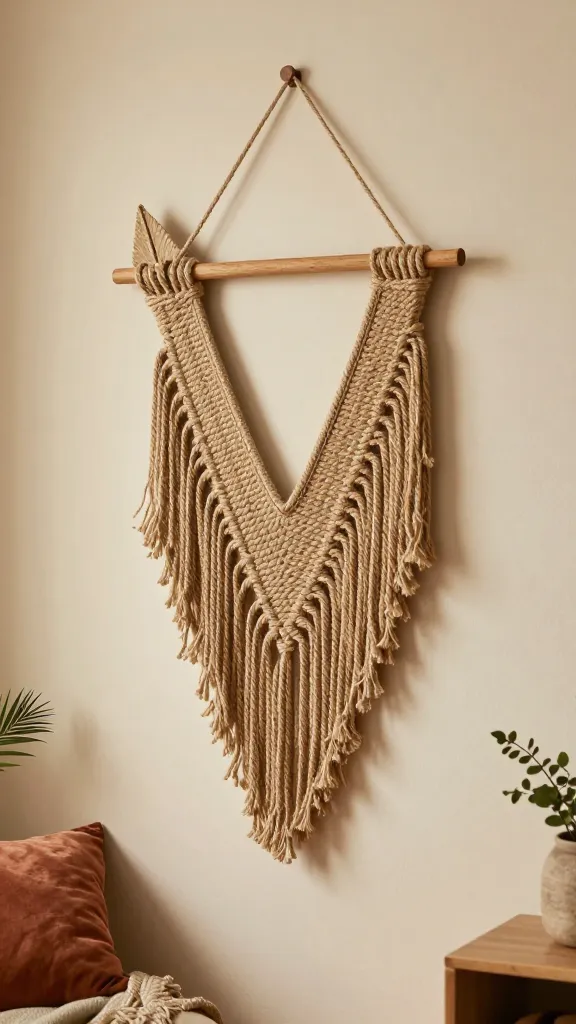
Craft a playful boho accent that feels both cozy and architectural. The Woven Rope Arrow Wall Hanging combines texture and form into one striking piece. It’s a quick statement starter for bedrooms, nurseries, or a living room corner.
Materials Needed
- Jute or cotton rope
- Dowel or wooden rod
- Hot glue gun
- Scissors
- Optional: acrylic paint for the arrow tip
How to Make It
- Cut several lengths of rope for the fringe and a few for the arrow shaft.
- Bundle the fringe and tie to the dowel, creating a V shape for the arrow head.
- Wrap the shaft with rope in tight spirals; glue as you go.
- Finish with a painted arrow tip for a bold focal point.
Pro Tips / Styling Ideas
- Hang over a bed or reading nook for a dreamy, hygge vibe.
- Use in a monochrome palette for a chic, sophisticated look.
Who would love it? Boho lovers and texture enthusiasts. You’ll love the tactile punch this piece brings to a blank wall.
4. DIY Photo Collage Cloud Panel
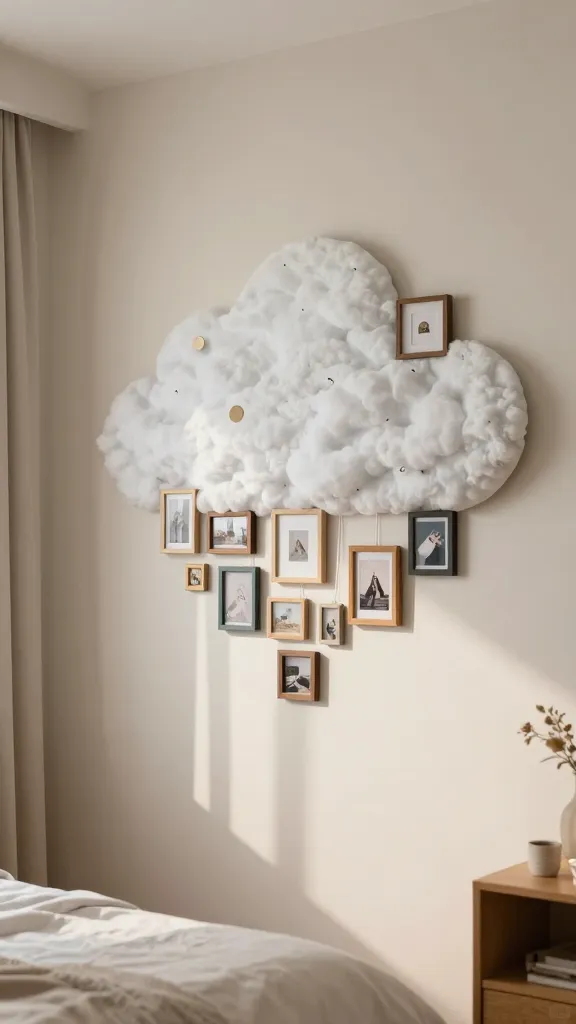
Turn memories into a cloud-like constellation of frames. The DIY Photo Collage Cloud Panel blends photos, art prints, and small souvenirs into a cohesive, airy display. It’s perfect for bedroom crescents, family spaces, or entryways.
Materials Needed
- Several small frames or a single large panel with spots for photos
- String, twine, or thin metal rings
- Photos, postcards, pressed keepsakes
- Command strips or removable adhesive
How to Make It
- Arrange photos and keepsakes in a cloud-like cluster on the floor first.
- Attach frames to the wall using command strips or a base board to hold the cloud shape.
- Add string garlands or mini clip boards for easy swaps.
Pro Tips / Styling Ideas
- Keep a cohesive color palette for a magazine-worthy vibe.
- Rotate in seasonal prints to keep things fresh.
Who would love it? Families and social photographers who want a living, changing gallery. You’ll love how personal it feels without looking cluttered.
5. Metallic Morse Code Wall Art
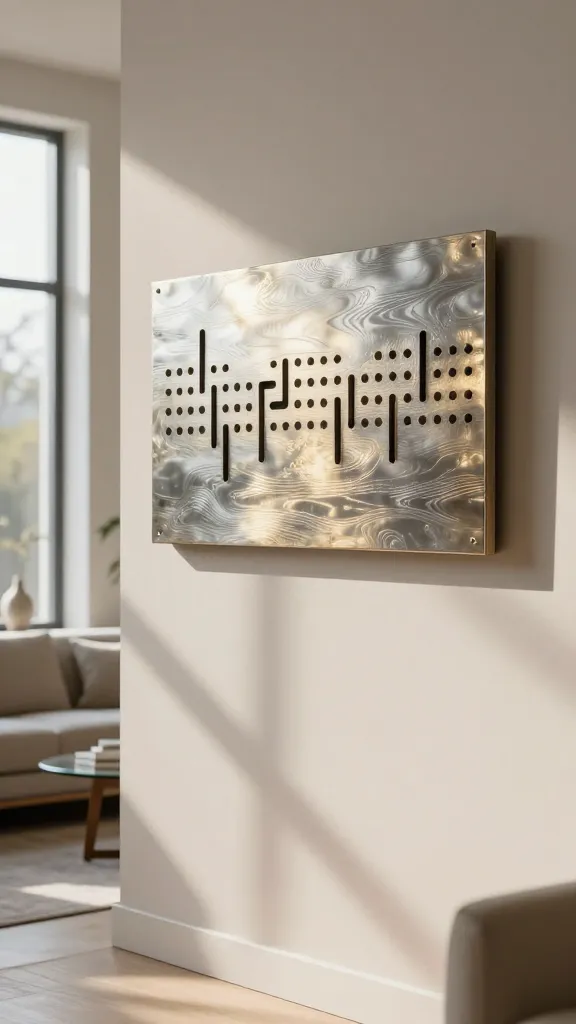
Turn a secret message into shimmering decor. The Metallic Morse Code Wall Art uses dots and dashes to spell something meaningful—without leaving a trace of messy handwriting. It glimmers softly in natural light and adds a touch of glam to any room.
Materials Needed
- Wood board or canvas
- Metallic acrylic paint or foil sheets
- Stencil letters or a printable Morse code message
- Ruler, pencil, fine brush
How to Make It
- Plan your message in Morse code on paper, then transfer the pattern to the board.
- Paint or apply foil dots and dashes with precision.
- Seal with a clear top coat to preserve the shine.
Pro Tips / Styling Ideas
- Pair with industrial hardware for contrast or soft velvet for romance.
- Hang above a desk or reading chair to inject personality.
Who would love it? Fans of typography and subtle sparkle. You’ll love the mystery and shine of a coded message on wall space.
6. Minimalist Monochrome Marble Panels
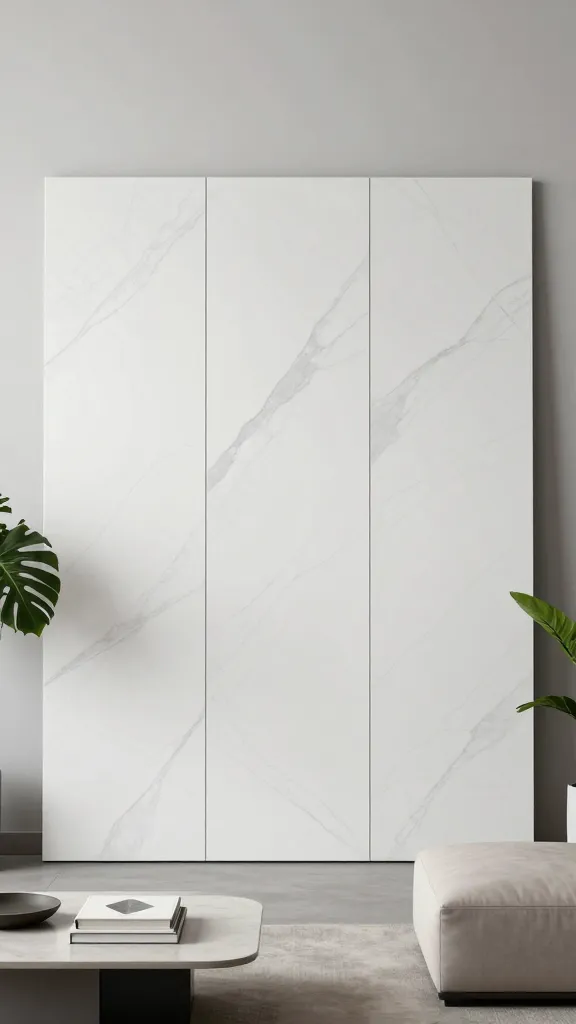
Marble prints without the mess of real stone? Yes, please. The Minimalist Monochrome Marble Panels reproduce the luxe look with acrylics or decoupage on flat panels. It’s a chic backdrop for plant life, books, or a sleek sofa setup.
Materials Needed
- Thin wooden panels or hardboard
- White, gray, and black acrylic paints
- Water or gloss medium for marbling
- Sponge or fine brush
How to Make It
- Lay down a light base coat; let dry.
- Use a damp sponge to dab gray and black to mimic marble veins.
- Finish with a gloss medium to enhance the marble sheen.
Pro Tips / Styling Ideas
- Group 3 panels in a row for a museum-quality effect.
- Add a single greenery plant to break the monochrome.
Who would love it? Clean-liners and art lovers who want timeless elegance. You’ll love the high-end look without the price tag.
7. Globe-Centered String Art
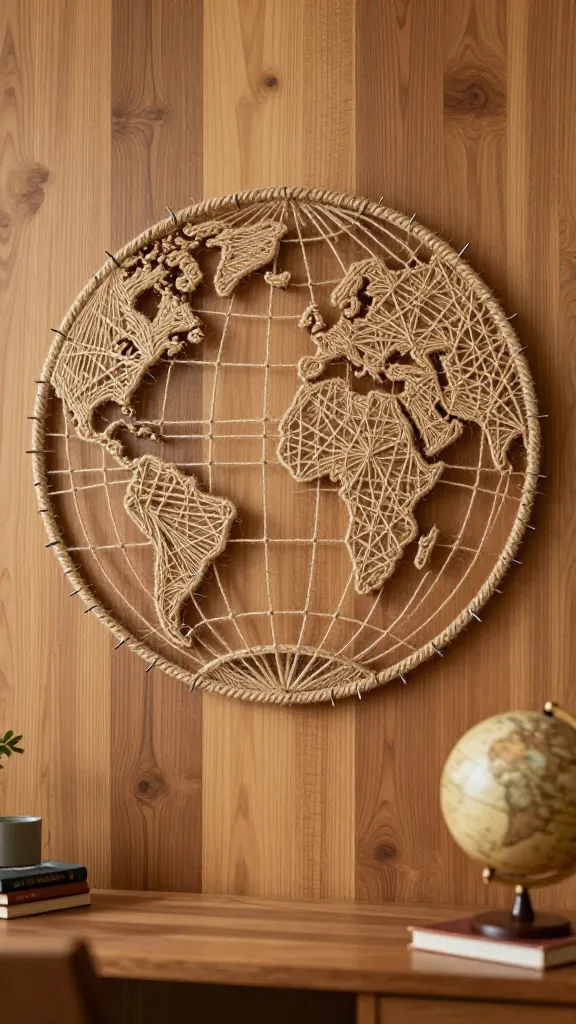
Rediscover your favorite travel obsession with a Globe-Centered String Art piece. This project spins a world map silhouette into a warm, tactile wall ornament. It’s perfect above a workspace, in a study nook, or as a travel-inspired gift.
Materials Needed
- Wooden board or sturdy cork board
- Thin nails or pins
- Hemp or jute string
- Printable globe silhouette or map
How to Make It
- Hammer nails along the outline of the globe on the board.
- Wrap string in a web-like pattern to fill in continents, leaving oceans negative space.
- Secure ends with small knots behind the board.
Pro Tips / Styling Ideas
- Use natural wood tones for a rustic vibe or blackened wood for drama.
- Pair with a travel postcard cluster on a nearby shelf.
Who would love it? Wanderlusters and map lovers. You’ll love how the string art turns a big concept into a tactile, cozy piece.
8. Salted Paper Texture Panels
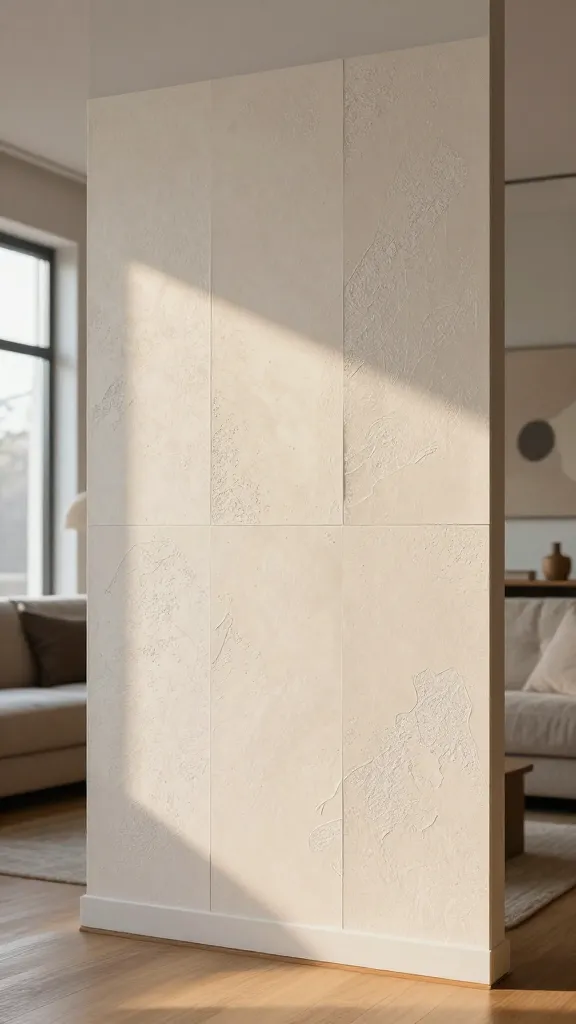
Texture dreams come true with Salted Paper Texture Panels. These create a soft, tactile wall surface that catches light in delicious ways. It’s like walking into a cozy studio every time you enter the room.
Materials Needed
- Heavy watercolor paper or canvas
- Salt, gesso or plaster, and acrylic paints
- Water spray bottle
- Foam brushes
How to Make It
- Paint a base layer in a soft color.
- Spritz water and sprinkle salt to create textured, crystalline patterns as it dries.
- Seal once dry for longevity.
Pro Tips / Styling Ideas
- Display in pairs or triplets for depth.
- Best with soft lighting to emphasize texture.
Who would love it? Texture enthusiasts and soft-color lovers. You’ll adore the cozy, artisanal feel it brings to walls.
9. Glass Jar Wall Mini-Sculptures
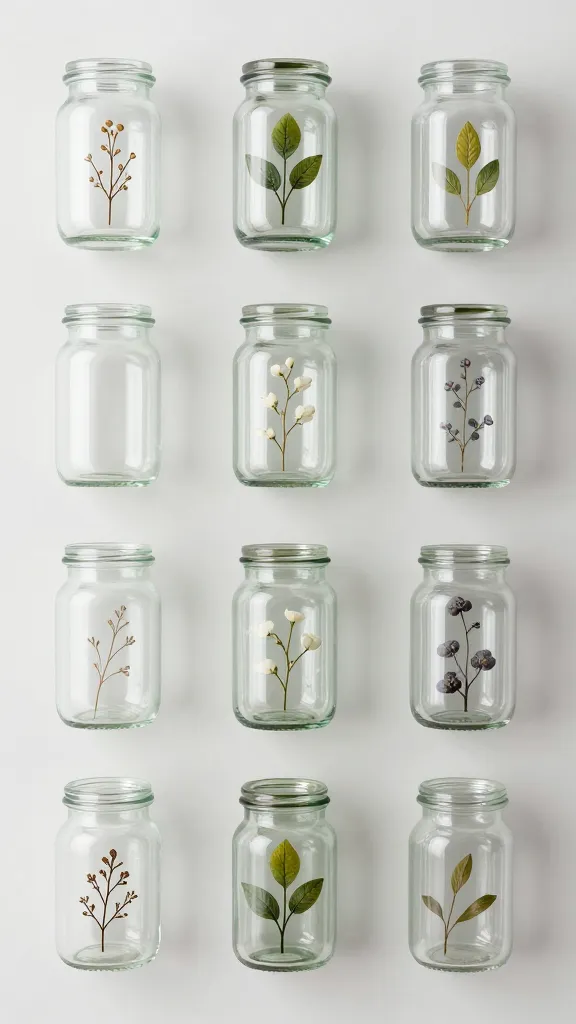
Reimagine tiny glass jars as miniature sculptures mounted on the wall. This Glass Jar Wall Mini-Sculptures project turns everyday jars into quirky, charming art that plays with light and space. Great in a pantry alcove, kitchen backsplash area, or hallway vignette.
Materials Needed
- Small glass jars with lids
- Fine twine, beads, and dried botanicals
- Strong adhesive or mounting putty
- Drill with short screw-in hooks or wall-friendly mounting hardware
How to Make It
- Fill jars with a mini bouquet, beads, or travel sand for texture.
- Mount jars in a staggered grid on a wooden board or directly on the wall.
- Add a subtle label or tiny tag for a playful touch.
Pro Tips / Styling Ideas
- Combine with brass accents for a vintage vibe.
- Use in groups of three or five to create rhythm on the wall.
Who would love it? Craft lovers who enjoy whimsy and tiny details. You’ll love the way light travels through the glass and creates little sparkles.
10. Painted Rope Wall Panels
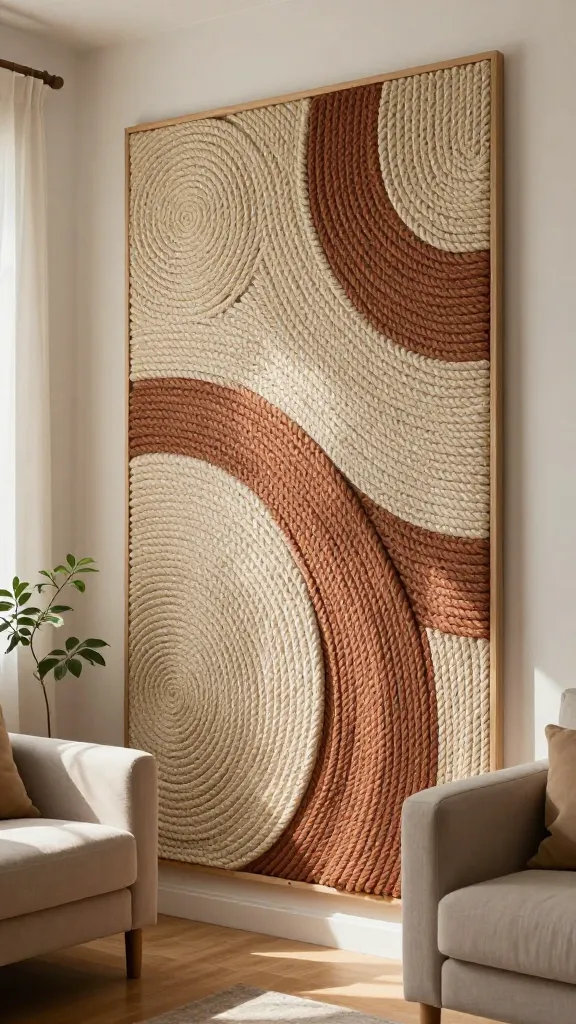
Last but not least, Painted Rope Wall Panels mix fiber and color for a soft, tactile statement piece. Drape panels over a wooden frame to create a gentle, sculptural effect that invites touch and curiosity. Ideal for bedrooms, living rooms, or a creative studio corner.
Materials Needed
- Wood frame or canvas panel
- Coiled rope or thick yarn
- Acrylic paints in your chosen palette
- Glue gun or heavy-duty craft glue
How to Make It
- Glue the rope in concentric circles or wave patterns across the surface.
- Paint the rope sections in complementary colors to create a marbled effect.
- Seal with a matte or satin top coat for durability.
Pro Tips / Styling Ideas
- Hang a single bold panel as a focal point or assemble a small gallery wall with other textures.
- Pair with soft textiles to amplify the cozy, tactile feel.
Who would love it? Texture seekers and color lovers. You’ll adore the soft, sculptural presence this adds to any room.
Conclusion
These 10 Step By Step Room Decor Craft Ideas Wall Art offer a playful, doable path to a more stylish home. Pick one to start, or go ahead and remix all ten for a bold, personalized gallery wall. The fun is in the process, and the payoff is a room that feels totally you. Pin, save, and get crafting—seriously, your walls will thank you.