14 Room Decor Craft Ideas for Craft Room Organization: Stunning Diy Storage Hacks
Ready to transform a cluttered corner into a cozy creative haven? These 14 unique DIY projects tackle organization with style, so your craft room feels inspiring, not intimidating. Each idea is a fresh, easy win you’ll actually enjoy making.
Trust me, a little homemade magic goes a long way. Let’s dive into color, texture, and clever storage that looks good enough to pin immediately.
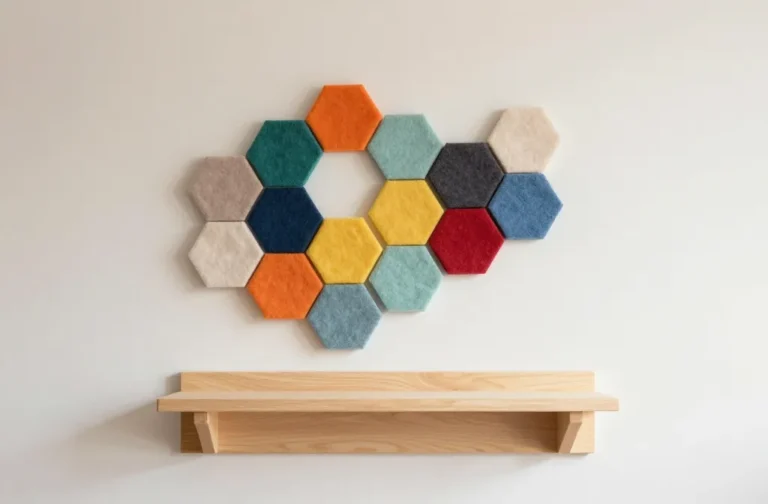
1. Colorful Hexagon Wall Grid Organizer
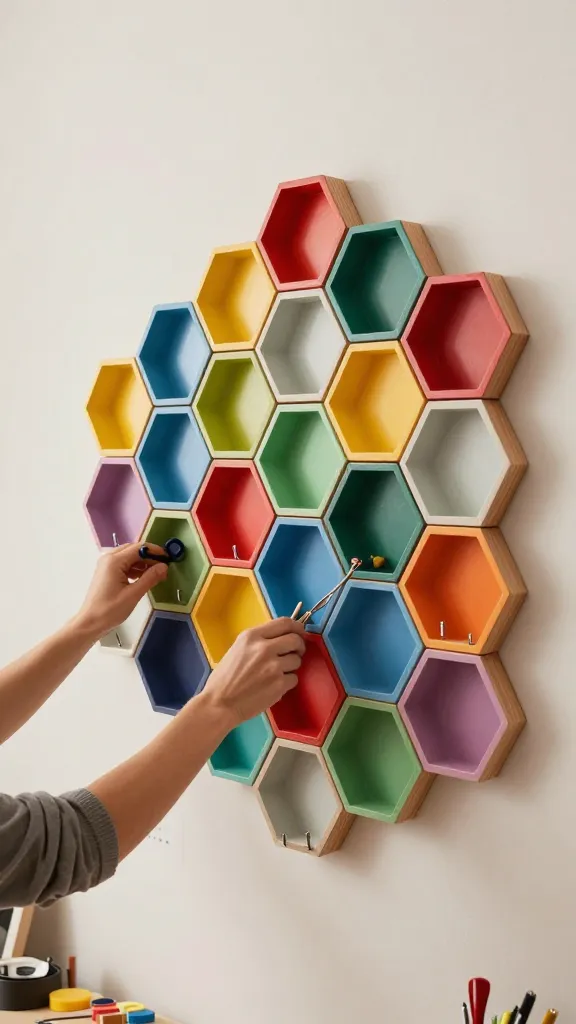
Imagine a striking wall panel that fuses art with practical storage. This geometric grid keeps scissors, brushes, and markers within arm’s reach while adding a bold, modern focal point.
Materials Needed
- Thin wood lattice or wooden skewers
- Paint in 3–4 complementary colors
- Craft nails or wood glue
- Small metal hooks
- Double-sided tape or mounting hardware
How to Make It
- Cut lattice into hexagonal cells and assemble into a honeycomb panel.
- Paint each hex in a different hue for a showroom-worthy look.
- Attach tiny hooks inside some cells for tools and cords.
- Mount on the wall with secure hardware.
Pro Tips / Styling Ideas
- Mix warm and cool tones for balance.
- Use near your cutting station for easy reach.
Who would love this? Any color-loving crafter who wants a bold, organized workspace starter piece.
2. Hanging Felt Pocket Organizer Curtain
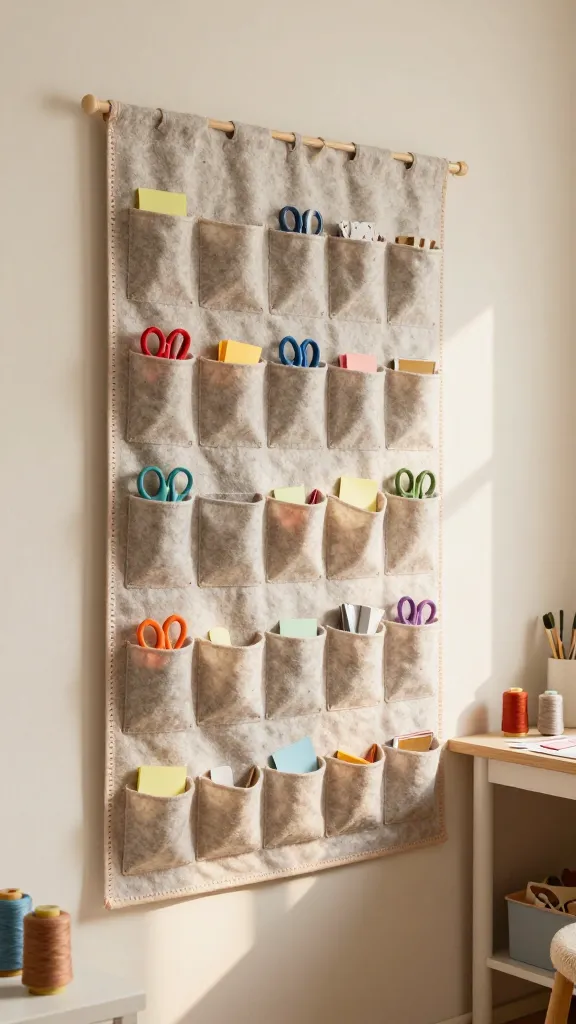
A soft, inexpensive curtain with slim felt pockets transforms plain walls into a playful storage runway. Slip in scissors and mini sticky notes for quick access.
Materials Needed
- Lightweight curtain panel or drop cloth
- Felt sheets in assorted colors
- Fabric glue or hot glue
- Thin ribbon or string for hanging
How to Make It
- Cut felt pockets in varying sizes and stitch or glue them along the curtain edge.
- Attach ribbon along the top to hang like a mini vertical tapestry.
Pro Tips / Styling Ideas
- Coordinate pocket colors with your current color palette.
- Use for thread spools, mini tapes, or scrap paper scraps.
Who would love this? Perfect for a light, whimsical vibe in a craft room with lots of color-blocking.
3. Driftwood Cable-Coord Station
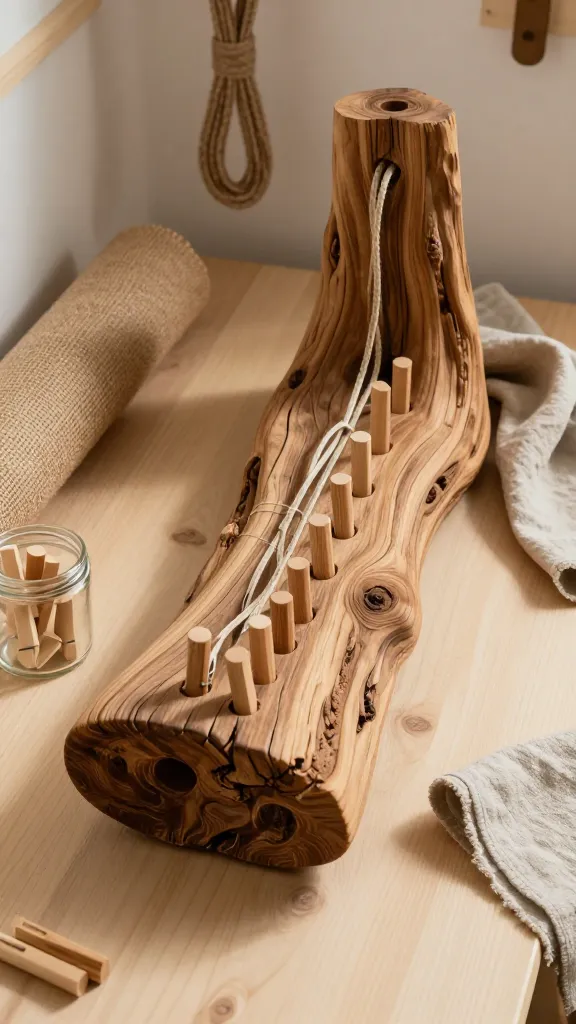
Turn a found driftwood piece into a natural-looking cord management station. It’s rustic, practical, and totally insta-worthy.
Materials Needed
- Sturdy driftwood or reclaimed wood slice
- Hole saw or drill with large bit
- Short dowels or metal pegs
- Jute twine or rope for hanging
How to Make It
- Drill evenly spaced holes along the wood base for cords.
- Attach pegs in front for placement of cords and small tools.
- Hang by twine at a comfortable eye level.
Pro Tips / Styling Ideas
- Stain the wood to match desk legs or wall tone.
- Label pegs with a chalk marker for quick identification.
Who would love this? A nature-loving maker needing tidy, visible cord storage.
4. Magnetic Tin Desktop Caddy

Upcycle small tins into a magnetic, modular desktop caddy. Great for pens, brushes, and tiny hardware—plus it sticks to a metal board for easy rearranging.
Materials Needed
- Small metal tins (mint or candy tins work well)
- Strong magnets or magnetic sheets
- Rattan or fabric wrap (optional)
- Strong double-sided tape
How to Make It
- Line the tins with decorative wrap if you like.
- Attach magnets to the base or back and mount on a magnetic board or fridge panel.
Pro Tips / Styling Ideas
- Color-code by tool type for quick grab-and-go moments.
- Stack two tins for a mini double-decker organizer.
Who would love this? Minimalists who want a sleek, modular solution that expands with needs.
5. Velvet-Cabric Pegboard Cushions
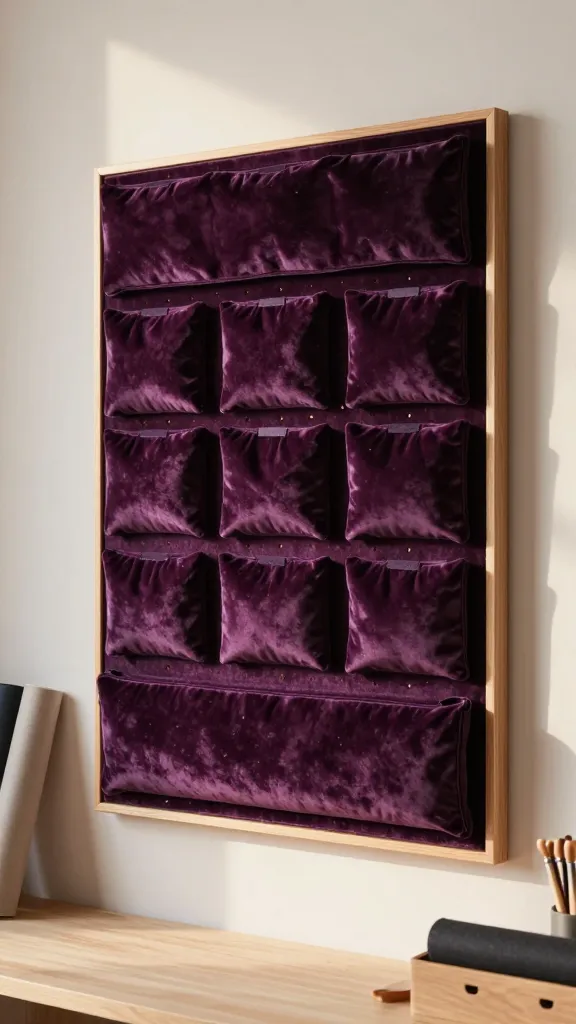
Turn a plain pegboard into a plush, textile-framed art piece with removable, cushy fabric pockets. It’s a soft touch that also hides clutter behind the glamour.
Materials Needed
- Pegboard sheet
- Thin wood frame or decorative frame
- Velvet or heavy-weight fabric
- Elastic or Velcro strips
- Small hooks and pegs
How to Make It
- Wrap fabric over the frame and secure with Velcro along edges.
- Attach pockets behind the fabric using elastic loops.
Pro Tips / Styling Ideas
- Choose luxe textures like velvet or bouclé for a high-end look.
- Use for washi tape, stamps, and small tools that deserve a display moment.
Who would love this? A fashion-forward crafters who wants tactile, pretty organization.
6. Illuminated Scrap Tray Wall Sill
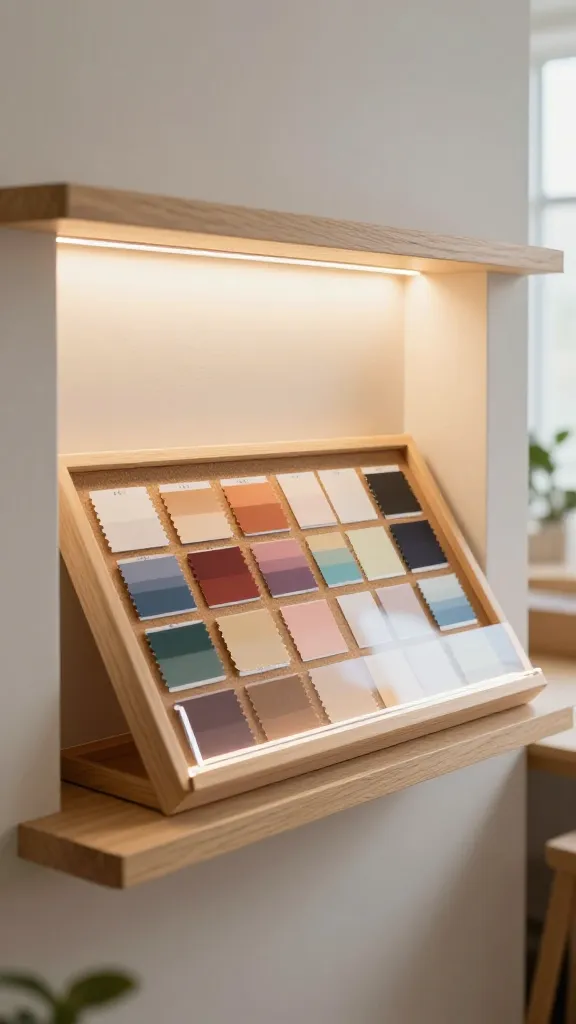
An illuminated, shallow tray holds scraps and swatches with a soft backlight to make color matching a breeze.
Materials Needed
- Shallow wooden tray or picture frame
- LED light strip with controller
- Acrylic sheet (for protection)
- Foam or cork backing
How to Make It
- Line tray with foam or cork and press scraps into place.
- Mount LED strip behind the frame for a gentle glow.
Pro Tips / Styling Ideas
- Sort scraps by color family for quick project pulls.
- Layer thin swatches for a gradient gallery look.
Who would love this? Color nerds who value color-matching accuracy and a bright workspace.
7. Tiered Ribbon and Thread Display Stack
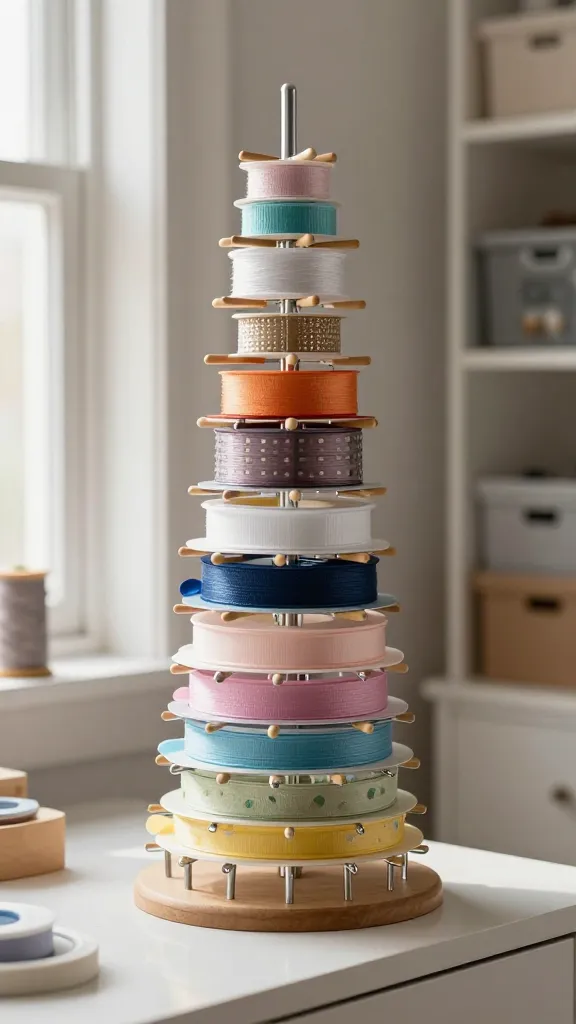
A vertical, tiered stand to showcase ribbons, thread spools, and small embellishments while saving dresser space.
Materials Needed
- Tiered metal or wood stand
- Anchor hooks or mini hangers
- Ribbon dowels or cup hooks
How to Make It
- Install dowels at staggered heights on each tier.
- Hang ribbons and threads neatly, color-coded by family.
Pro Tips / Styling Ideas
- Label each tier with a subtle chalk marker.
- Swap out embellishments with seasons for a fresh look.
Who would love this? A meticulous organizer who loves tactile color pools at a glance.
8. Plant-Stand Tool Teepee
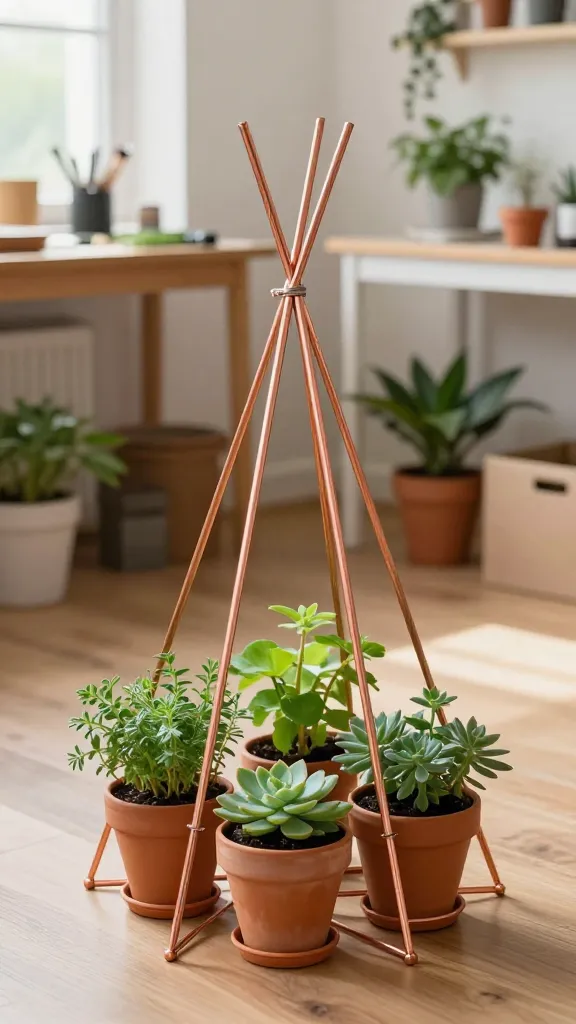
A small, stylish teepee stand that houses a trio of tiny potted plants plus your most-used tools. It’s greenery and practicality in one swoop.
Materials Needed
- Thin copper or metal rods
- Small terracotta pots
- Wire or zip ties
- Spray paint (optional)
How to Make It
- Form a triangle frame with rods and connect at the top.
- Attach pots around the base and plant herbs or small succulents.
Pro Tips / Styling Ideas
- Use the plants for aroma while crafting—mint and rosemary are great.
- Seal metal with paint to prevent rust if you’re in a humid space.
Who would love this? Plants lovers who want a whimsical, compact storage buddy.
9. Mini Chalkboard Drawer Inserts
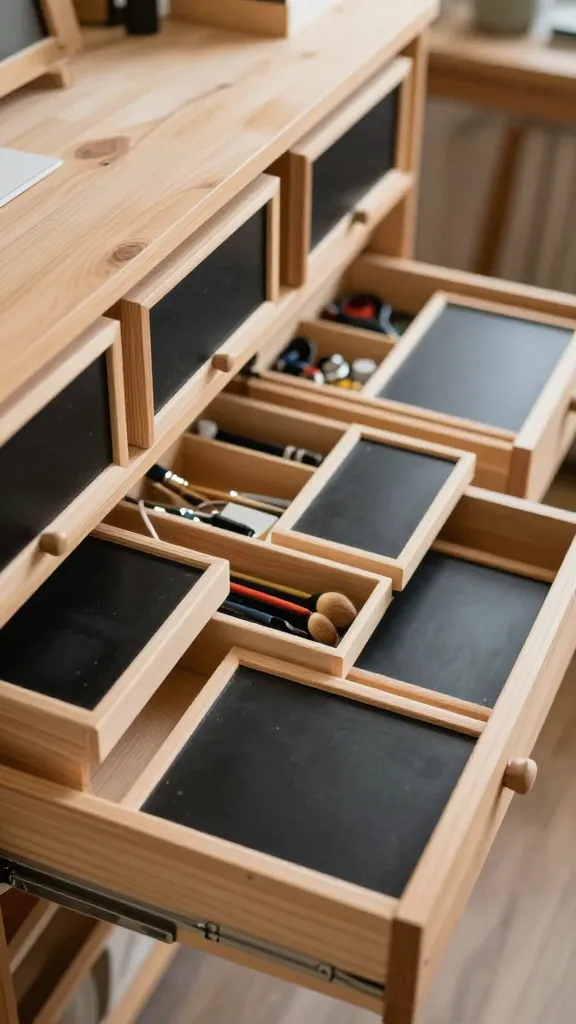
Convert shallow drawers into labeled, reusable spaces with mini chalkboard panels. It’s quick, reusable, and perfect for drawer-by-ddrawer organization.
Materials Needed
- Shallow wooden drawers or repurposed boxes
- Small chalkboard panels or paintable boards
- Adhesive spray or durable double-sided tape
How to Make It
- Cut chalkboard panels to fit the drawer interiors and secure.
- Label each with the tool type or material.
Pro Tips / Styling Ideas
- Wipe clean and rewrite labels as your gear changes.
- Keep color-coordinated tools in corresponding drawers.
Who would love this? People who adore swapping labels as their projects evolve.
10. Marbleized Desk Mat with Built-In Organizer
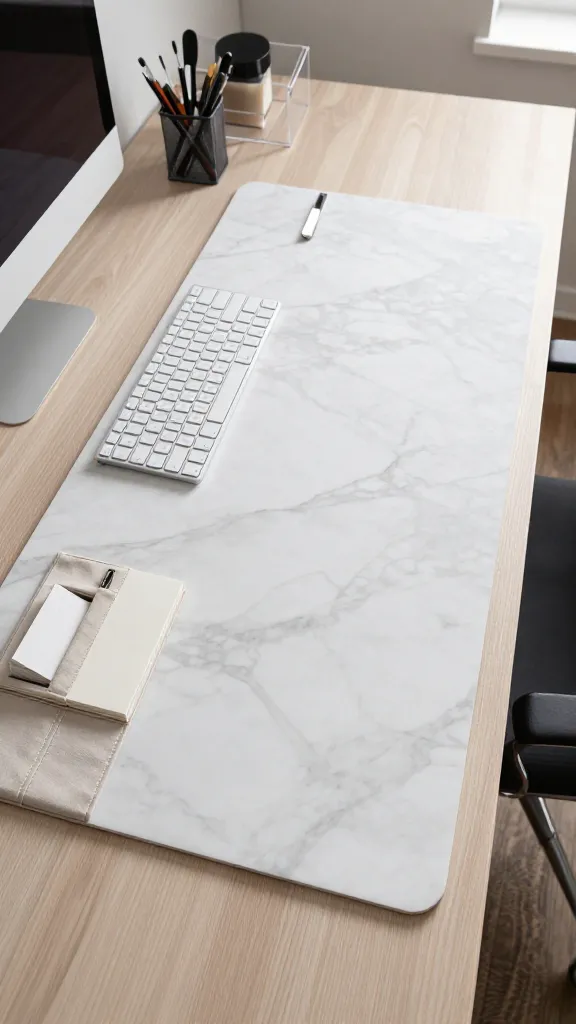
A desk mat with integrated pockets blends practical storage with a chic, marbled aesthetic for a luxe workspace vibe.
Materials Needed
- Faux marble contact paper
- Thin cork board or plywood base
- Elastic bands or fabric pockets
- Strong adhesive
How to Make It
- Cover the base with marble contact paper for a polished surface.
- Attach pockets along one edge to hold small tools and notes.
Pro Tips / Styling Ideas
- Pair with a monochrome palette to keep it classy.
- Use as a writing and trimming zone for easy access to blades and tapes.
Who would love this? A chic crafter who wants function without sacrificing style.
11. Corkboard Washi Tape Gallery Rail
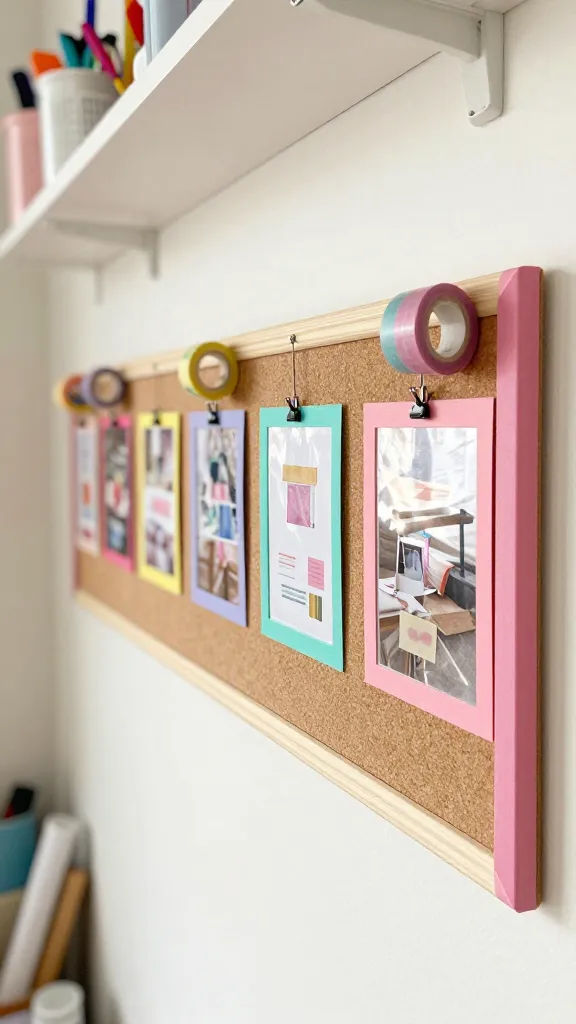
Track pins, clips, and strings on a slim corkboard rail enhanced with colorful washi tape frames. It’s a gallery that keeps mementos and tools in view.
Materials Needed
- Corkboard strip or rail
- Washi tape in assorted colors
- Push pins and mini clips
How to Make It
- Mount rail along a wall.
- Wrap edges with washi tape to create color blocks as frames.
Pro Tips / Styling Ideas
- Label each frame with a tiny tag for tool reminders.
- Use to pin inspiration photos or fabric swatches.
Who would love this? Visual organizers who want a flexible, decorative pin system.
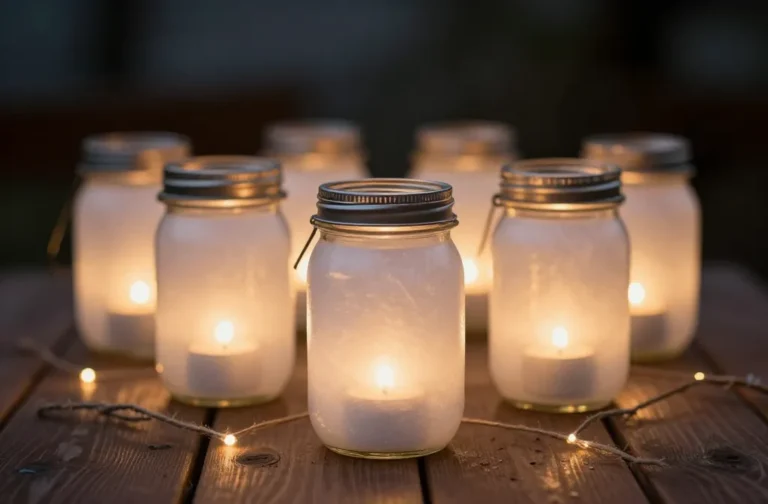
12. Glass Jar Lanterns For Desk Glow
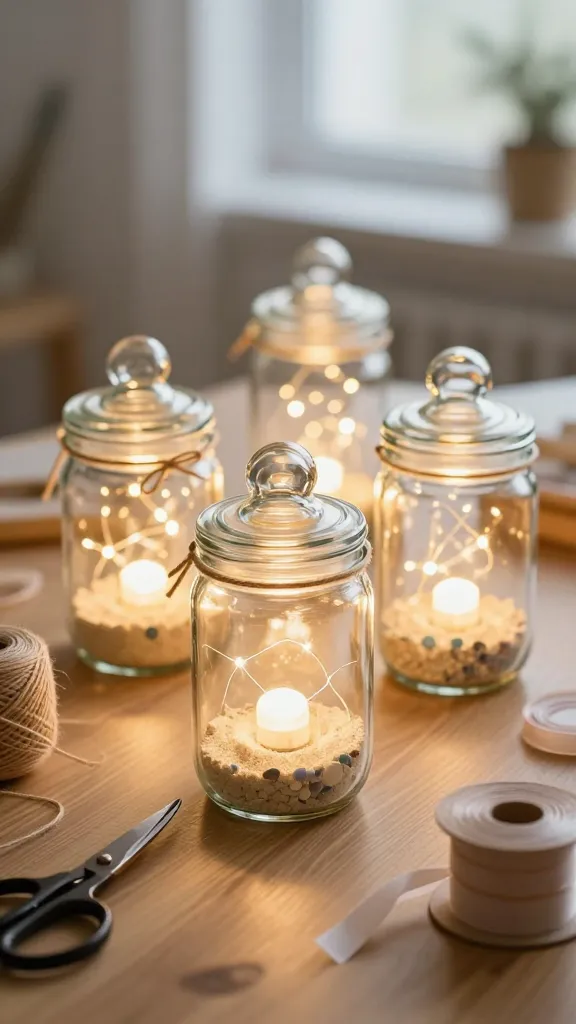
Repurpose glass jars into soft-lit lanterns that double as mood lighting and small storage in one. The ambient glow is seriously calming.
Materials Needed
- Small glass jars with lids
- Fairy lights or battery-operated LEDs
- Decorative twine or ribbons
- Optional: sand or colored beads for inside base
How to Make It
- Fill jars with lights, add a base festive layer if desired.
- Close lids and tie around with twine for a cozy lantern look.
Pro Tips / Styling Ideas
- Group a few sizes together on a windowsill or shelf.
- Use as night lighting for late-night craft sessions.
Who would love this? Night owls who want soft, portable lighting with a hint of charm.
13. Denim Recycler Desk Organizer
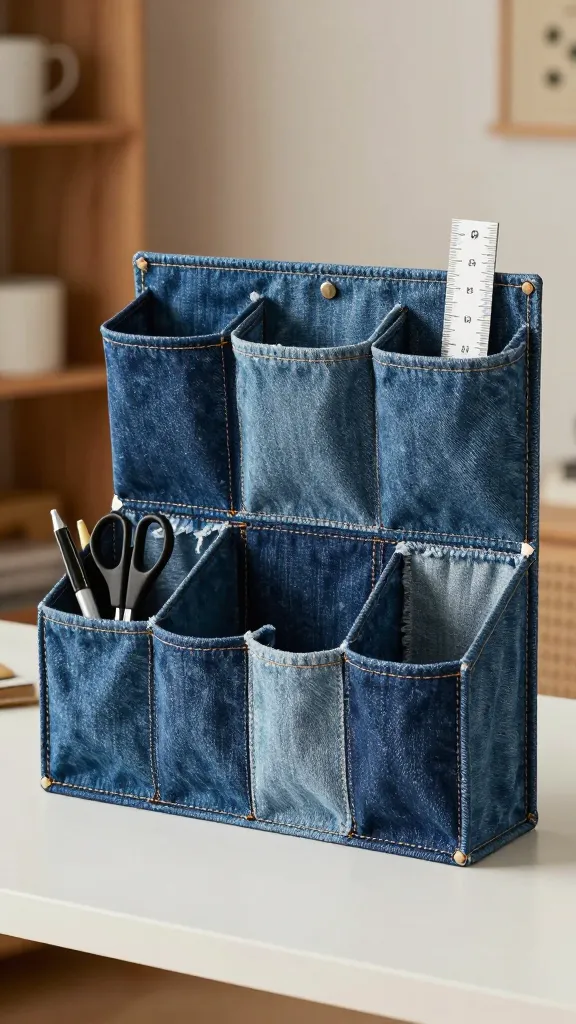
Repurpose old jeans into a sturdy, upcycled desk organizer. It’s rugged, casual, and surprisingly durable for holding scissors, pens, and rulers.
Materials Needed
- Old denim cut into fabric panels
- Thread and needle or fabric glue
- Cardboard or thin plywood for structure
- Velcro or strong fasteners
How to Make It
- Sew denim panels into pockets and glue to a rigid backing.
- Attach to the desk or wall with Velcro for easy removal.
Pro Tips / Styling Ideas
- Stitch on decorative patches for personality.
- Organize by tool type to keep everything within reach.
Who would love this? Denim lovers and upcycling enthusiasts wanting a rugged, practical piece.
14. Floating Shelf Bar With Clip-Liles Grid
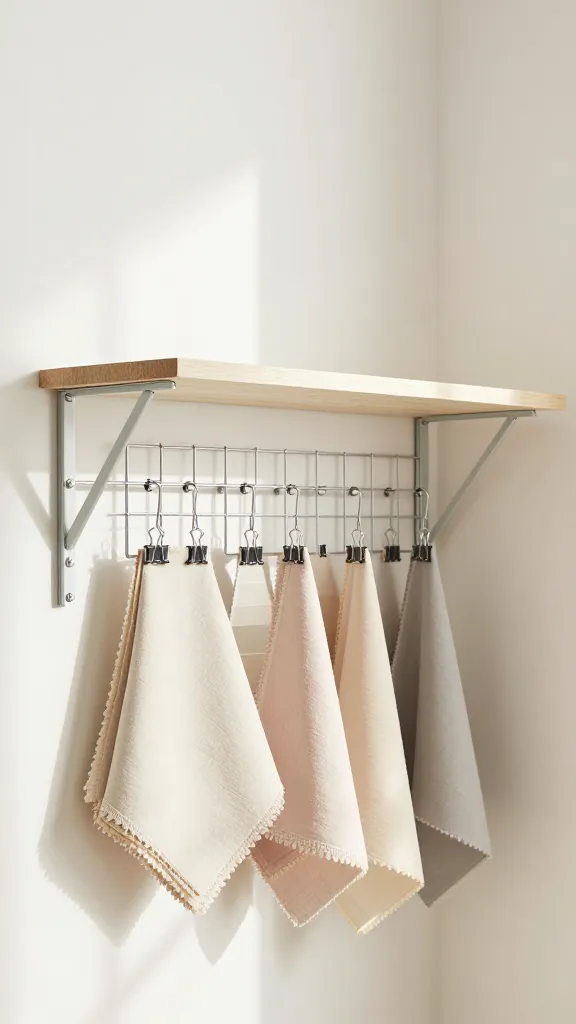
A lightweight floating shelf with built-in clip-lile grid holds swatches, fabrics, and small samples. It’s an airy, minimal option that still packs style.
Materials Needed
- Wood plank for shelf
- Metal brackets
- Clips or tiny binder-clip rails
- Hooks for hanging fabrics
How to Make It
- Mount the shelf with brackets.
- Attach clip rails along the underside for swatches and small items.
Pro Tips / Styling Ideas
- Paint the shelf in a soft matte tone to blend into walls.
- Use the clips to hold color swatches or embroidery floss cards.
Who would love this? Fans of clean lines, light, and practical display in a small footprint.
Conclusion
These 14 room decor craft ideas prove you don’t have to choose between beauty and organization. Each project is crafted to be fun, approachable, and genuinely useful in turning a craft space into your personal creative sanctuary. Pick one to start, or go wild and try them all—your future self will thank you.
Ready to dive in? Grab a few supplies, pick a vibe, and unleash your inner designer. Happy crafting, and may your space be as inspiring as your next project!