15 Beginner Paper Room Decor Craft Ideas You’Ll Love
1. Origami Wall String Art Gallery
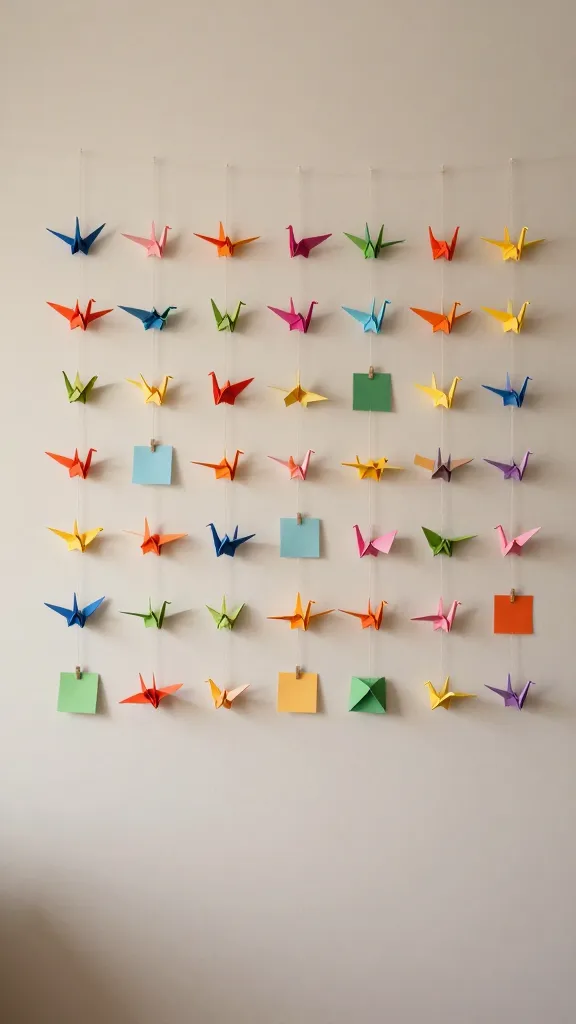
Imagine a wall that looks like a delicate forest of paper birds, suspended in a tidy grid. This project folds simple origami shapes and threads them across string to create a whimsical, airy gallery that breathes personality into any room.
Materials Needed
- Colorful square origami paper (assorted hues)
- Thin cotton string or fishing line
- Printer paper for backing (optional)
- Mini clothespins or clips
How to Make It
- Fold several origami shapes (cranes, boats, or simple squares) with varied sizes.
- Attach each shape to string using clips, spacing them evenly.
- Hang in a grid against a light-colored wall for best contrast.
Pro Tips / Styling Ideas
- Try a gradient from light to dark to add depth.
- Swap shapes seasonally—think heart motifs for Valentine’s Day or leaves for autumn.
Who’ll love it or when to use it
Perfect for a playful lounge or bedroom accent, especially for boho or Scandinavian vibes. You’ll love the airy, handcrafted feel.
2. Colorful Paper Succulent Wall Decals
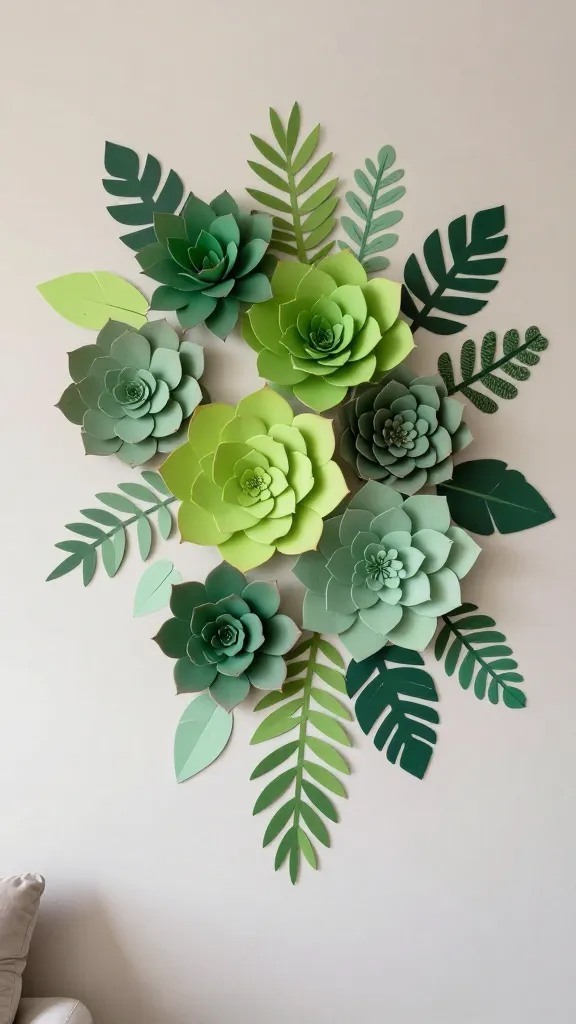
Bright, punchy paper succulents, arranged like a living wall without the watering hassles. These durable, lightweight decals bring greenery into your space all year long.
Materials Needed
- Construction or kraft paper in emerald, sage, lime
- Scissors or a craft knife
- Wall-safe adhesive dots or tape
- Pencil for sketching
How to Make It
- Cut layered leaf shapes in various greens and sizes.
- Arrange on a poster board first, then transfer to the wall using adhesive dots.
Pro Tips / Styling Ideas
- Combine with a chalkboard accent to mimic a potted garden scene.
- Choose a monochrome palette for a chic minimal look.
Who’ll love it or when to use it
Ideal for renters who want greenery without upkeep. It’s a fresh, modern statement piece for living rooms or home offices.
3. Paper Ribbon Mobile in Calming Pastels
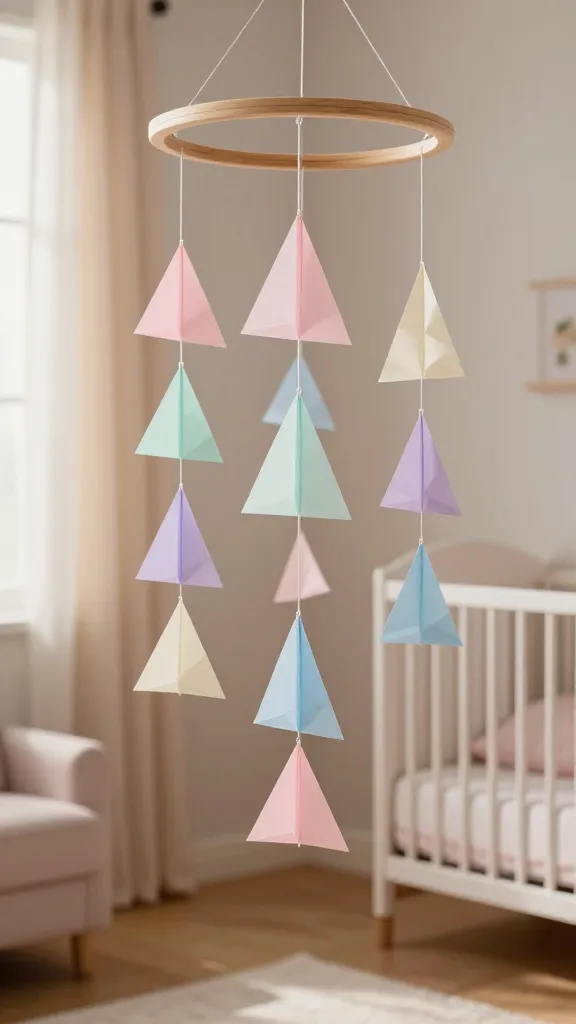
Soft ribbons of folded paper hanging like a gentle breeze. This mobile adds movement and a touch of whimsy to cribs, nurseries, or reading nooks.
Materials Needed
- Pastel tissue paper or thin craft paper
- String or fishing line
- Hoop or wooden dowel
- Glue stick or tape
How to Make It
- Cut folded sails of paper in varying lengths.
- Accumulate on strings and tie to the hoop at different heights.
Pro Tips / Styling Ideas
- Float above a desk or bed for a dreamy focal point.
- Switch colors with seasons for a fresh update.
Who’ll love it or when to use it
Delightful for nurseries or craft rooms—light, delicate, and endlessly customizable.
4. Geometric Paper Lanterns
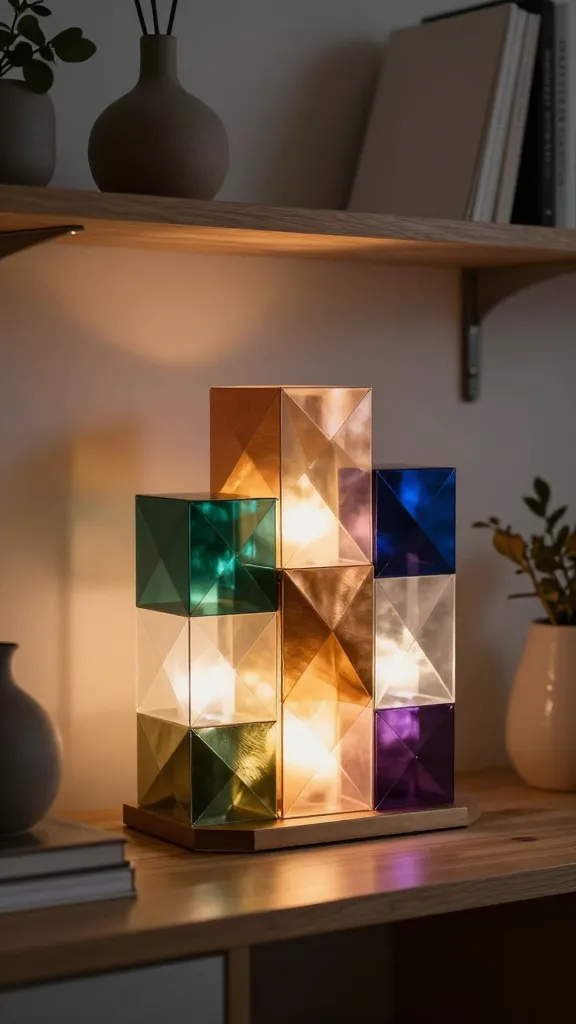
Crafty crystal-lit squares that glow softly when lit from within. These geometric lanterns bring architectural charm to shelves, desks, or tables.
Materials Needed
- Colored or metallic craft paper
- Ruler, pencil, scissors
- Glue or double-sided tape
- LED tea lights
How to Make It
- Cut workspace-friendly triangles and squares; assemble into a 3D lantern by folding and gluing edges.
- Leave an opening for the LED candle inside.
Pro Tips / Styling Ideas
- Group in a cluster for a modern centerpiece.
- Use metallic paper for a touch of glam.
Who’ll love it or when to use it
Great for dinner tables, patios, or living room corners looking for a contemporary vibe.
5. Mini Book-Page Calendars
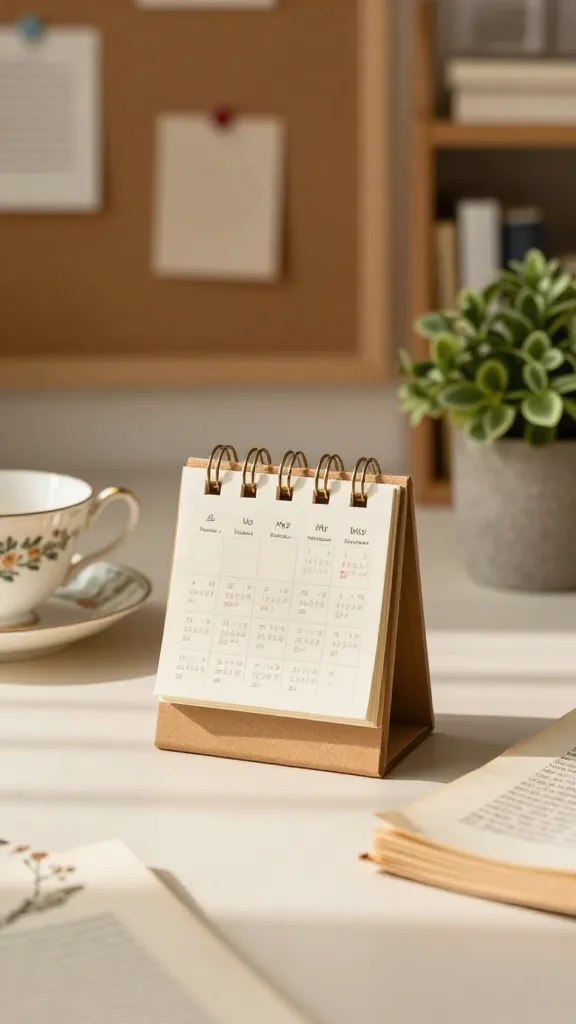
Turn torn-out book pages into tiny calendars you can pin to cork boards or frame as a monthly reminder. It’s a literary wink with functional flair.
Materials Needed
- Old book pages
- Mini months and numbers printed or drawn
- Blank mini frames or a corkboard
How to Make It
- Decorate small squares with numbers and month names.
- Mount on a small frame or pin to a board, flipping to new pages each month.
Pro Tips / Styling Ideas
- Pair with a vintage teacup and a tiny plant for a quaint shelf accent.
- Consider a neutral ink on brown pages for a literary chic look.
Who’ll love it or when to use it
A charming gift for book lovers and a playful organizer for desks or entryways.
6. Paper Clip Photo Garland

Photo garlands are classic, but this version uses decorative paper clips and mini clips to hang black-and-white snapshots or glossy prints. Simple, stylish, and endlessly reusable.
Materials Needed
- Decorative paper clips or mini clothespins
- String, twine, or baker’s twine
- Printed photos or Polaroids
How to Make It
- Attach photos at regular intervals along the string.
- Hang along a wall, bed canopy, or above a desk.
Pro Tips / Styling Ideas
- Rotate photos seasonally—vacations, friends, pets.
- Use contrasting strings to create a color-blocked look.
Who’ll love it or when to use it
Perfect for dorm rooms, studio spaces, or side tables that crave personality.
7. Paper Flower Wall Panel
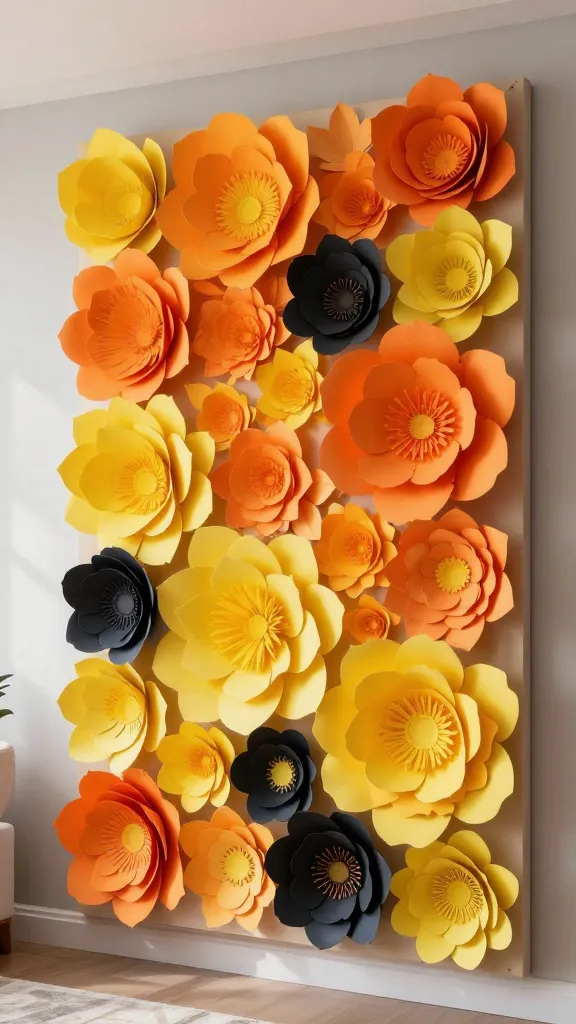
A lush wall of paper blooms that flatters any space with color and texture. This is a showpiece you can tailor to your color story, from sunny citrus to moody jewel tones.
Materials Needed
- Colored tissue paper or crepe paper
- Wire or floral stems (optional)
- Glue or tape
- Cardboard backing or canvas
How to Make It
- Layer petals into sculptural flowers and cluster on the backing.
- Secure with glue, leaving some petals loose for a 3D effect.
Pro Tips / Styling Ideas
- Arrange in a gradient or random cluster for impact.
- Frame the panel with a bold border to mimic a living painting.
Who’ll love it or when to use it
Ideal for guest rooms, living spaces, or as a bold statement above a sofa.
8. Folded Paper Mobile Plants
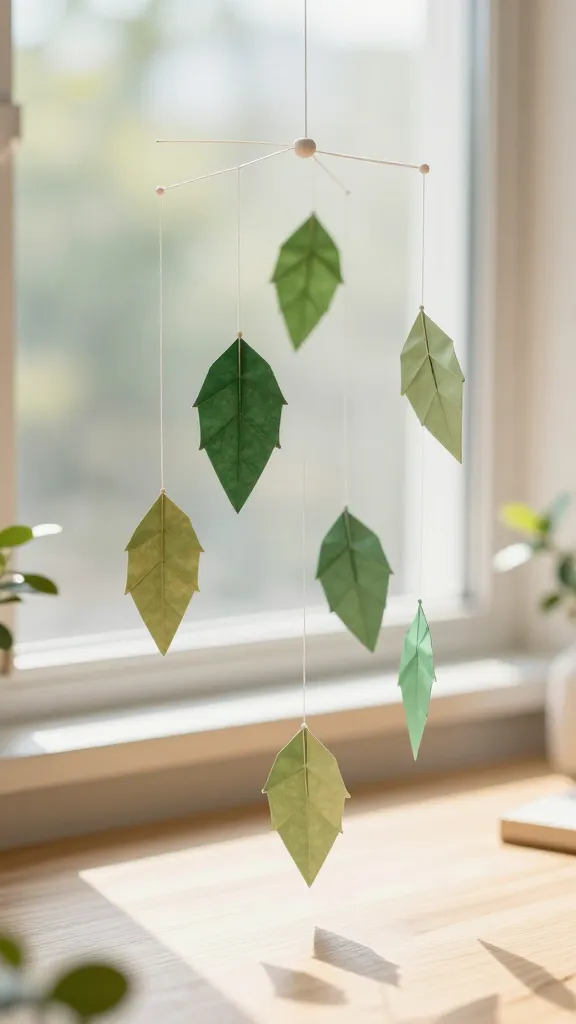
Think folded paper leaves suspended in mid-air—nature-inspired and totally light. This mobile brings a fresh, organic feel to desks or windowsills.
Materials Needed
- Green and earthy-toned craft paper
- Wire or thin dowels
- String or fishing line
How to Make It
- Fold leaves in varied sizes and attach to strings at different lengths.
- Balance the pieces on a central hub to keep the mobile steady.
Pro Tips / Styling Ideas
- Hang near a sunny window to catch light and cast gentle shadows.
- Pair with real plants for a mixed-media vibe.
Who’ll love it or when to use it
A delicate, nature-inspired addition to a reading nook or craft corner.
9. Paper Tile Coasters with Painted Frames
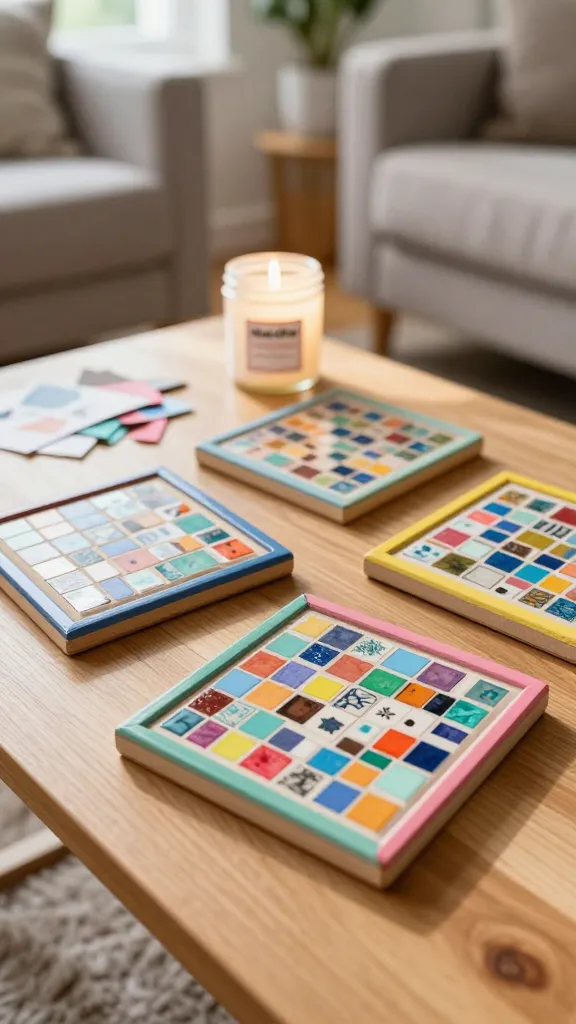
Customize plain coasters with tiny paper tiles and a painted edge for a functional, gift-ready decor piece. It’s colorful, practical, and surprisingly quick.
Materials Needed
- Thick cardboard or cork coasters
- Decorative paper scraps
- Mod Podge or clear-drying glue
- Paint or markers for frame accents
How to Make It
- Cut paper into small squares and glue to coaster tops.
- Seal with Mod Podge and paint framed edges to finish.
Pro Tips / Styling Ideas
- Create a matching set in a color family for a cohesive table vibe.
- Gift as a handmade set for housewarmings.
Who’ll love it or when to use it
Great for coffee tables, side desks, or gifting to newlyweds and roommates.
10. DIY Paper Clip Door Hanger Art
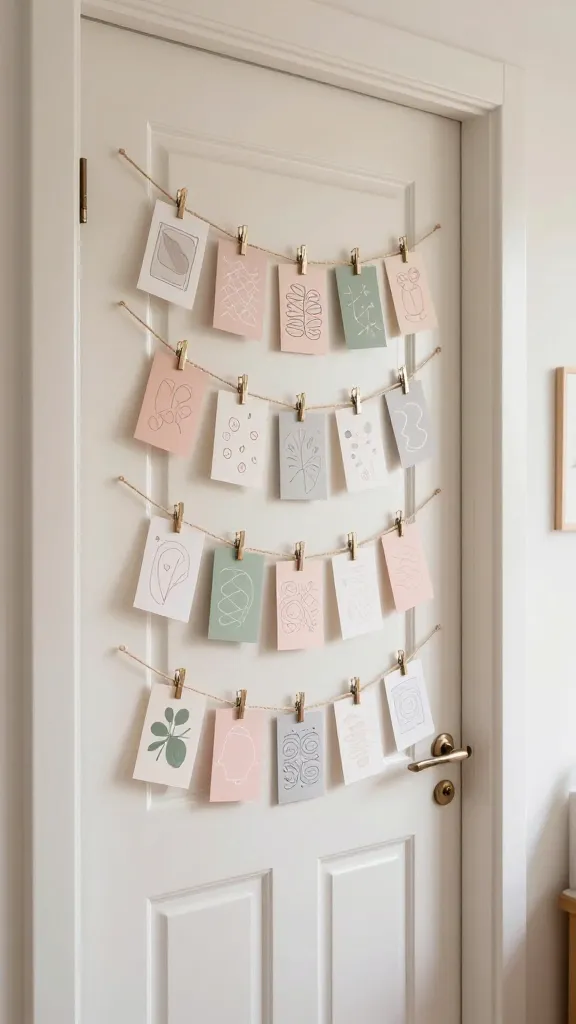
Turn ordinary door space into a tiny gallery with a few decorative paper clips and mini prints. It’s an unexpected, modern touch that shouts personality when guests walk in.
Materials Needed
- Mini clip frames or clips on twine
- Small prints or doodle cards
- Adhesive strips for doors
How to Make It
- Clip mini prints on a cascading string across the door panel.
- Affix discreetly with adhesive strips to avoid damage.
Pro Tips / Styling Ideas
- Use a consistent color palette for a polished look.
- Switch out prints with seasons or moods.
Who’ll love it or when to use it
Perfect for apartment doors, studio spaces, or entryways that welcome guests with personality.
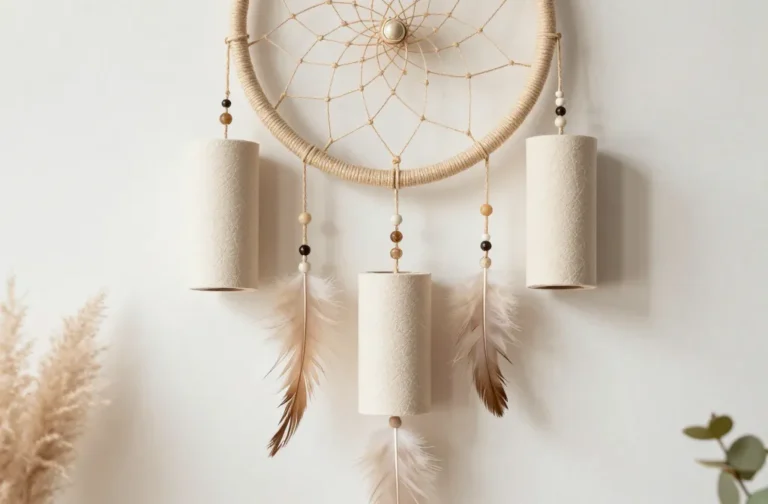
11. Paper-Lace Dream Catcher
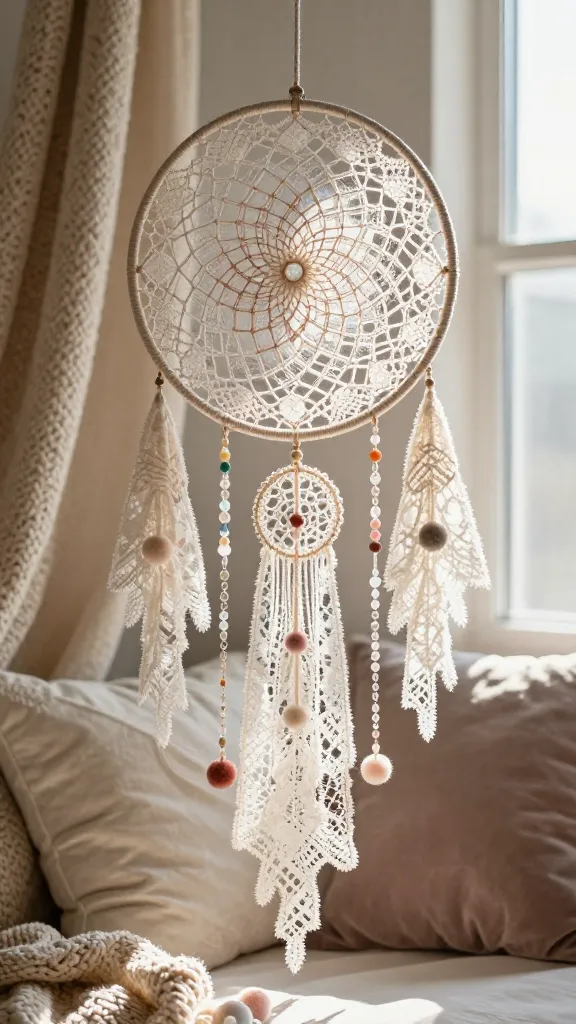
Combine delicate paper lace with a circular frame to craft a modern dream catcher. It’s a boho-chic piece that catches light and compliments soft textiles.
Materials Needed
- Colored lace paper or paper doilies
- Metal hoop or embroidery hoop
- String or yarn
How to Make It
- Layer a lace circle inside the hoop and thread a few strings below to hang beads or tiny pompoms.
Pro Tips / Styling Ideas
- Hang near a window to catch sunbeams that pass through the lace.
- Combine neutral tones with a pop of jewel color.
Who’ll love it or when to use it
Gorgeous in bedrooms, nurseries, or above a reading chair for a dreamy vibe.
12. Monochrome Paper Cut Canvas
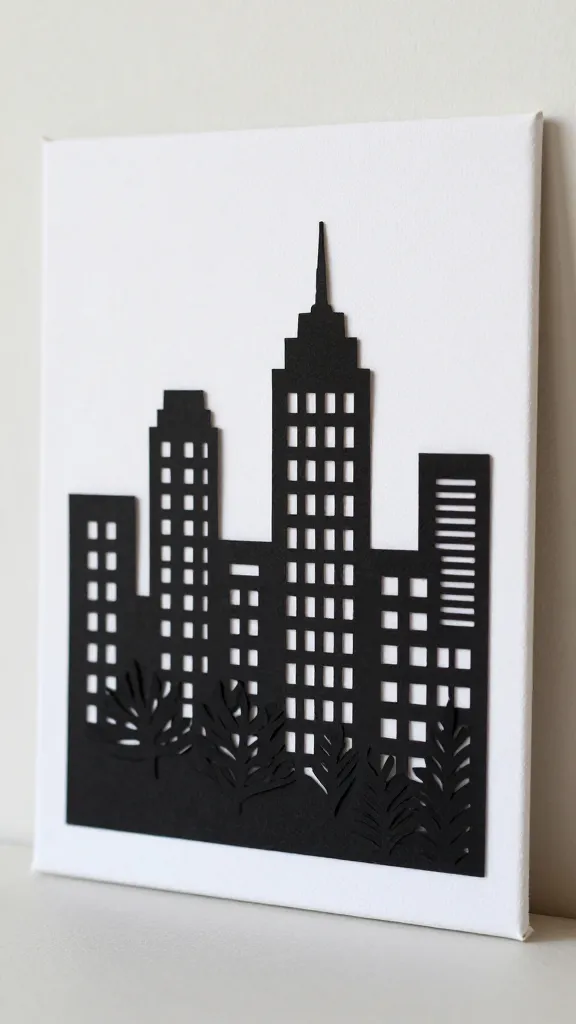
A striking cut-paper cityscape or botanical scene on a small canvas. Clean lines and high-contrast tones create an artful focal point with minimal effort.
Materials Needed
- Black or white construction paper
- Scissors or craft knife
- Canvas or sturdy cardboard
- Glue stick
How to Make It
- Cut silhouettes and layers, then glue onto a canvas to form a scene.
- Seal edges with a light spray of fixative if desired.
Pro Tips / Styling Ideas
- Mount with a bold frame for gallery-style display.
- Keep it strictly black and white for a sharp, modern look.
Who’ll love it or when to use it
Ideal for minimalists or anyone craving a bold, graphic wall piece.
13. Paper Lantern Forest Floor Tray
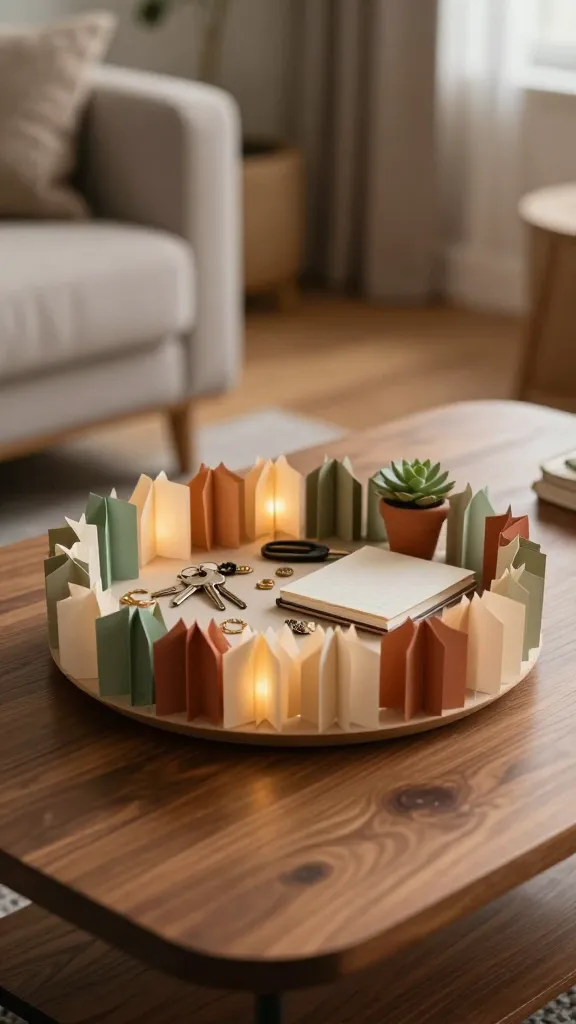
A decorative tray lined with layered paper lanterns to create a whimsical base for jewelry, keys, or desk essentials.
Materials Needed
- Paper lanterns or tissue paper in earthy tones
- Tray or shallow dish
- Glue or double-sided tape
How to Make It
- Line the tray with folded lanterns, trimming to fit the edges.
- Place decorative items on top for a ready-to-scan centerpiece.
Pro Tips / Styling Ideas
- Switch textures with matte vs glossy papers for contrast.
- Place on coffee tables or entryway consoles for a warm welcome.
Who’ll love it or when to use it
A cozy, eclectic addition that works in living rooms, consoles, or craft corners.
14. Paper Air Plant Cloche
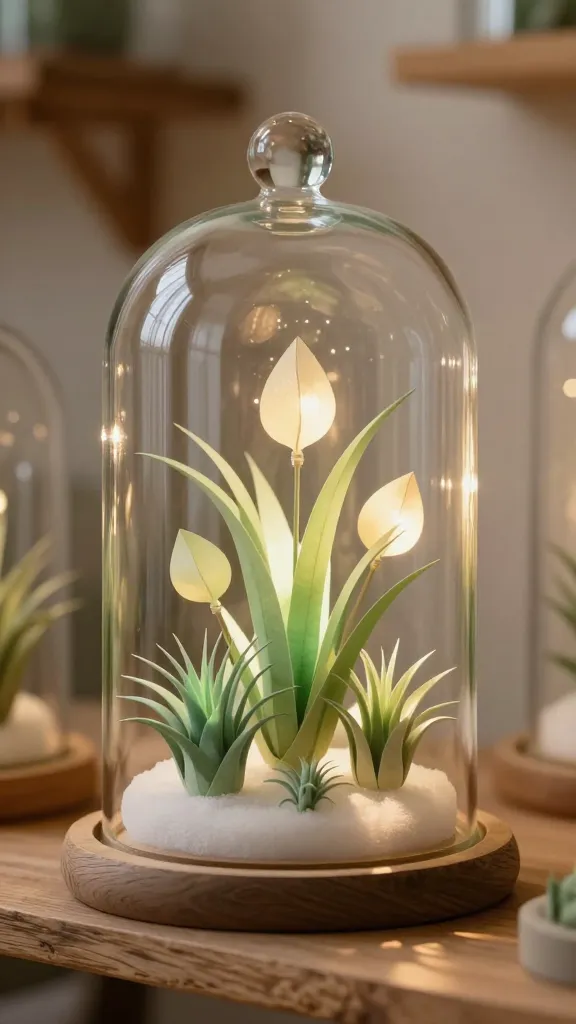
Inside a glass cloche, a cluster of paper “air plants” creates a modern, maintenance-free botanical vibe that lasts forever.
Materials Needed
- Green paper or tissue in soft hues
- Glass cloche or jar
- Foam or tissue filler for texture
How to Make It
- Roll and shape paper into spiky or tear-drop forms to mimic air plants.
- Embed in foam inside the cloche for a floating garden effect.
Pro Tips / Styling Ideas
- Place on a shelf with soft, warm lighting for a magical glow.
- Use two or three cloches of varying heights for visual interest.
Who’ll love it or when to use it
For anyone who loves greenery but lacks a green thumb—this is a chic alternative.
15. Fold-and-Frame Quote Cards

Create a tiny, changing gallery with fold-out quote cards tucked into a lightweight frame. It’s a cozy way to swap in new words of inspiration weekly.
Materials Needed
- Cardstock in a chosen color
- Printable or hand-lettered quotes
- Picture frame with a deep lip
How to Make It
- Cut cardstock into small cards and fold to create a tiny easel.
- Slip the cards into the frame, swapping as you please.
Pro Tips / Styling Ideas
- Coordinate with the room’s color palette for a cohesive look.
- Change quotes with seasons or moods for fresh energy.
Who’ll love it or when to use it
Great as a desk companion, entryway update, or living room accent that keeps you inspired.
Conclusion
See? Paper can transform a room into a playful, stylish space without breaking a budget. Each idea is beginner-friendly, uniquely styled, and easily swapped out as your taste evolves. Pick one (or all) and start a delightful decorating spree—trust me, you’ll love the creative glow these little projects bring.