9 diy garden whimsical crafts
Ready to turn your outdoor space into a playful, photo-perfect paradise? These 9 diy garden whimsy crafts are easy, affordable, and seriously addictive to make. Trust me, you’ll love the squeal of delight when neighbors ask, “Where did you get that?”
1. Whimsical Painted Stone Mushroom Fairy Garden Orbs
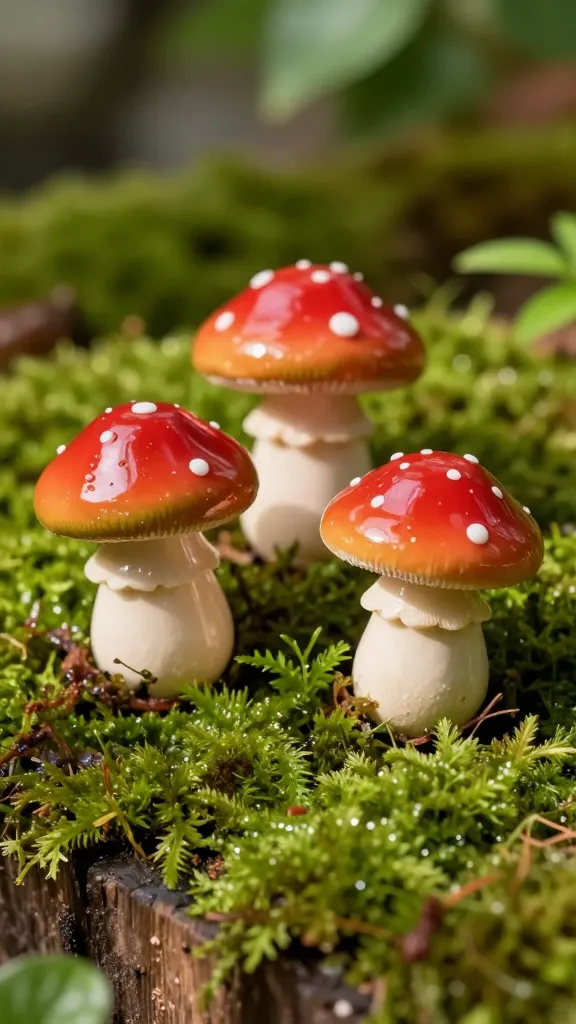
Imagine a trio of glossy, toadstool-styled orbs nestled in mossy greens. These stone mushrooms bring a fairy-tale punch to any corner, balcony, or planter. They’re simple, sparkly, and delightfully enchanting.
Materials Needed
- Smooth river rocks or flat stones
- Acrylic paints (bright red, white, cream, and olive)
- Black Sharpie or fine liner
- Clear sealant spray
- Polymer clay (for stems, optional)
How to Make It
- Wash and dry stones thoroughly. Base coat stones in cream or light tan.
- Paint the tops as mushroom caps: red with white dots or all-white with a red underside motif.
- Add a stem using a small clay plug or paint a thin white line down the side. Seal when dry.
- Arrange in a mossy bed or in a terrarium-style glass bowl.
Pro tips: Keep the dots random for charm; a few tiny painted freckles look adorable. Place near stepping stones or under a shady plant for a cozy peek-a-boo moment.
Who loves it: anyone who adores garden miniatures, fairy vibes, and quick, joyful projects.
2. Upcycled DIY Teacup Bird Bath
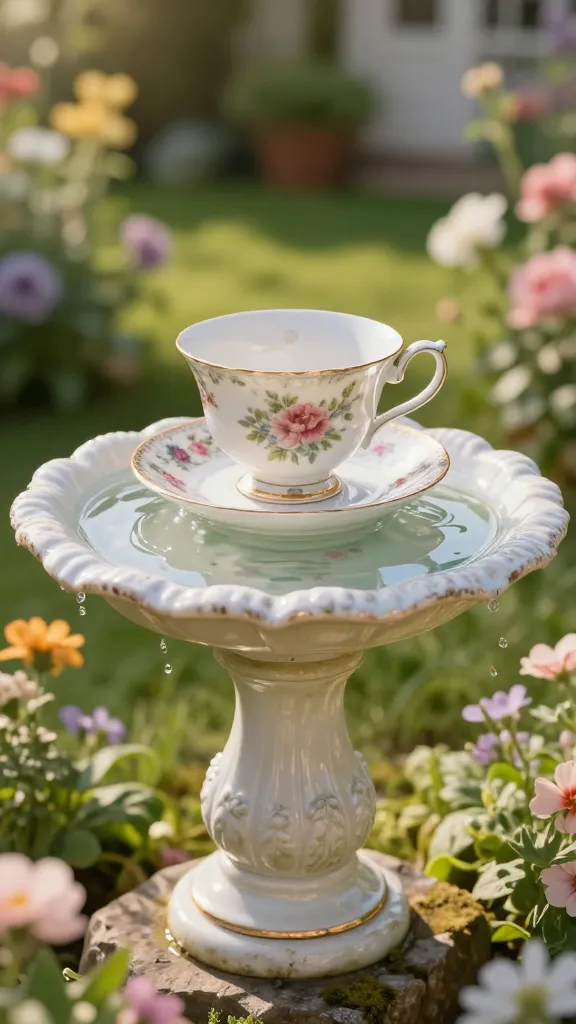
A sweet vintage twist that doubles as a focal point and a water station for your feathered friends. This teacup bird bath is charming, practical, and zero-fuss.
Materials Needed
- Old teacups and matching saucers
- Stable outdoor pedestal or a sturdy stone base
- Crystal-clear outdoor sealant
- Water-resistant epoxy (optional)
How to Make It
- Glue the teacup to the saucer rim to create a shallow bowl. Let dry completely.
- Mount the cup-on-saucer onto the pedestal with epoxy for security.
- Fill with a shallow basin of water and place in a sunny, safe spot.
Styling ideas: decorate the base with mosaic glass pieces or tile shards for a lighthouse-like glow. FYI, a small stone path leading to it invites curious birds to explore.
Who loves it: graceful vintage lovers and anyone who wants a gentle water feature without the fuss of a fountain.
3. Palette-Painted Garden Umbrella Canopy
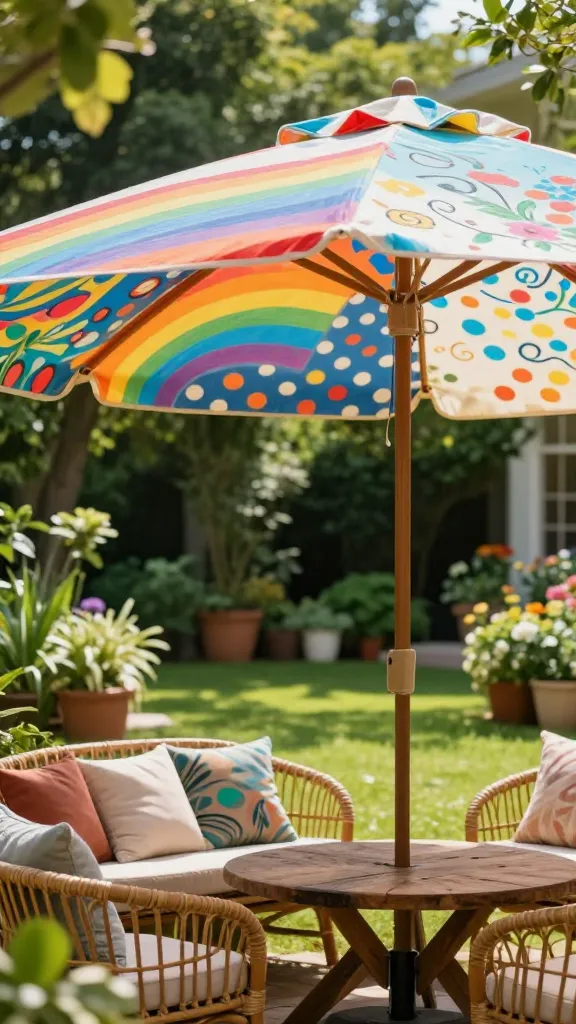
Turn a plain outdoor umbrella into a splashy statement piece. A hand-painted canopy brings color and whimsy to shaded seating, transforming every shade into a color-soaked retreat.
Materials Needed
- Plain outdoor umbrella (frame in good condition)
- Outdoor fabric paints or fabric markers
- Sturdy brush or foam roller
- Painter’s tape for clean lines
How to Make It
- Plan a simple motif per panel (stripes, polka dots, floral swirls).
- Secure painter’s tape for crisp edges, then paint in your chosen design.
- Allow to dry fully, then seal with a UV-protectant spray.
Pro ideas: choose a color palette that matches planters and cushions for a cohesive look. This is perfect for sunny chats and poolside hangs.
Who loves it: color lovers and anyone who loves big, joyful outdoor accents.
4. Garden Plaque Signage With Hand-Lelttered Quotes
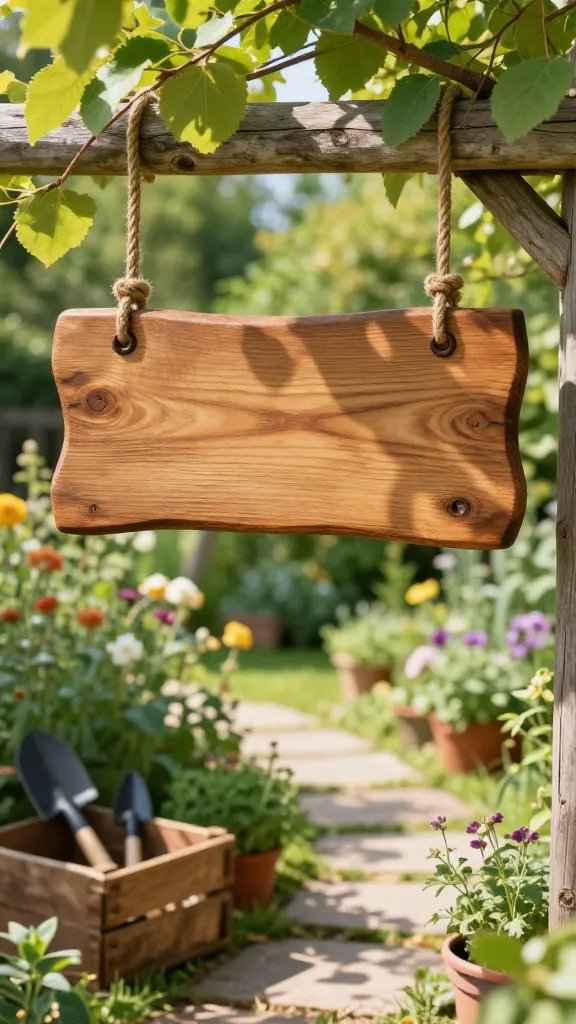
Welcome guests with handmade wood signs that bear cute garden-y quotes. It’s a warm touch that sets a playful mood the moment someone steps outside.
Materials Needed
- Small wooden planks or reclaimed wood
- Non-toxic outdoor paint or wood stain
- Fine-tipped paint pens or brushes
- Rope or rust-proof hardware for wall hanging
How to Make It
- Sand edges smooth, then paint base color in your preferred palette.
- Letter what you love most about your garden in a whimsical font.
- Seal with outdoor varnish and attach hanging hardware.
Styling ideas: pair with a small herb garden or a cluster of potted flowers. A simple, cheerful sign makes a big, welcoming impact.
Who loves it: gifting enthusiasts, plant parents, and anyone who enjoys a touch of rustic charm.
5. Glow-in-the-Darden Night Sky Lanterns
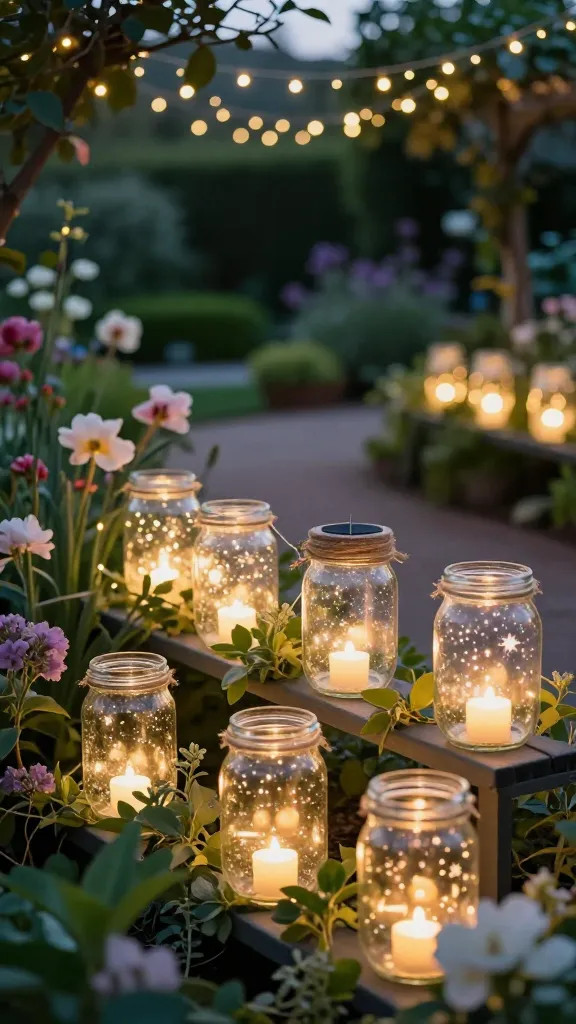
Light up evenings with soft, twinkling lanterns that float above your borders. These glow jars add magical atmosphere without a lot of fuss.
Materials Needed
- Jars with lids or open-top glass jars
- Solar fairy lights or battery-powered LED tea lights
- Natural twine or ribbon
- Optional: small artificial stars or paint for a galaxy vibe
How to Make It
- Fill jars with lights; seal lids or leave open as desired.
- Wrap lids or rims with twine, adding stars or dots if you like.
- Place jars on plant shelves or hang from tree branches using sturdy hooks.
Pro tips: space them at varying heights for a dreamy constellation effect. FYI, wind-safe placement means less drama on breezy nights.
Who loves it: late-evening gardeners, décor explorers, and anyone who wants a soft, starry vibe outdoors.
6. Mini Terracotta Fairy Houses for Plant Pots
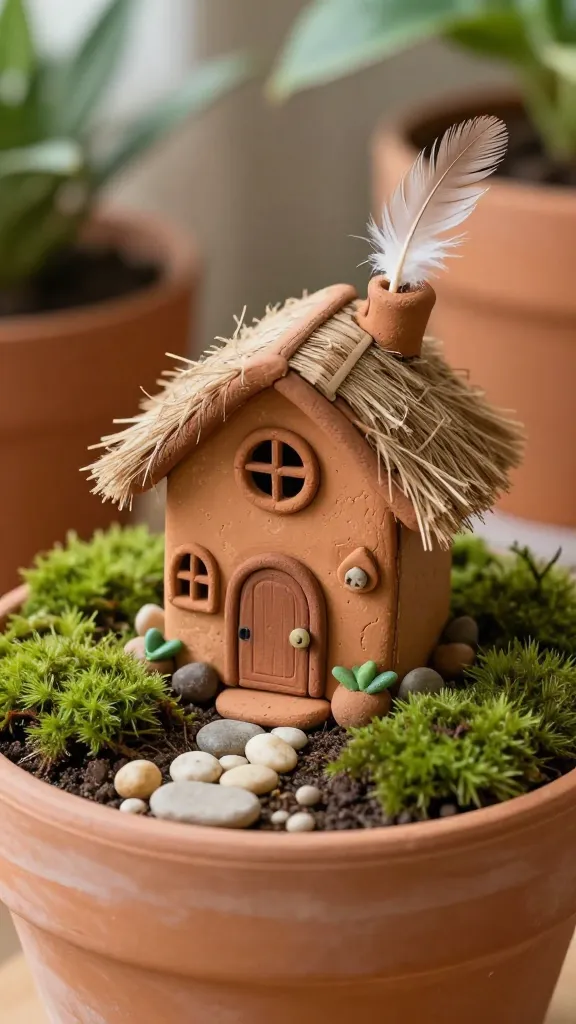
Tiny fairy homes tucked into potted plants spark joy every time you water. They’re charming, easy, and endlessly customizable with textures and colors.
Materials Needed
- Mini terracotta pots or upcycled ceramic pieces
- Acrylic paints in earthy tones
- Small craft bits (gravel, tiny doors, buttons)
- Sealant spray
How to Make It
- Base coat pots in your favorite neutral shade.
- Paint tiny doors, windows, and roofs; glue on mini accents.
- Seal and tuck into the soil or moss inside a larger pot.
Styling ideas: place near a fern or trailing plant for a woodland effect. Perfect for gifting a touch of whimsy to a plant-loving friend.
Who loves it: fans of micro-landscapes, whimsy collectors, and people who love adorning planters with personality.
7. Vintage Echo Tin Wind Chimes
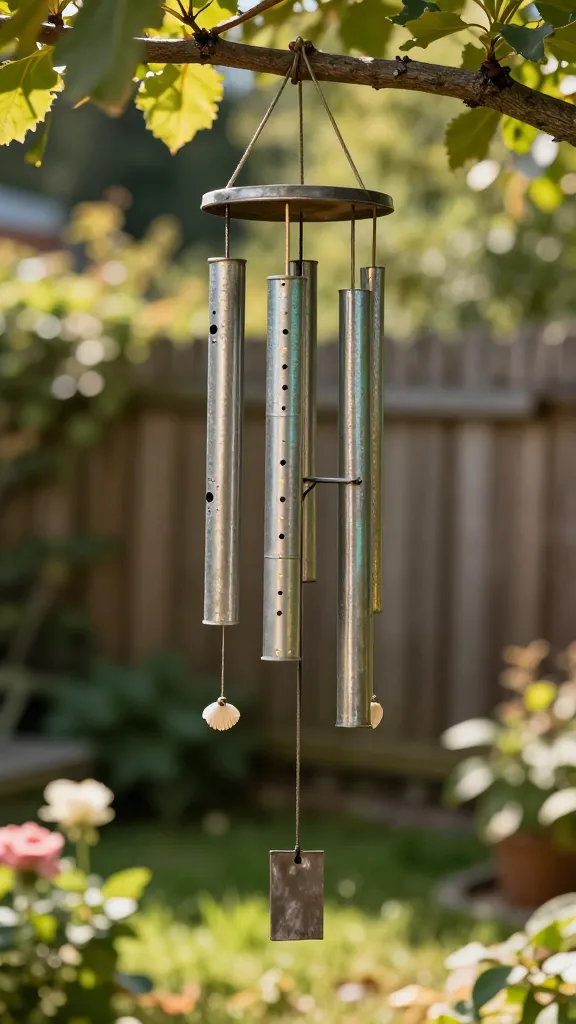
Repurpose vintage metal tins into gentle wind chimes that add soft music to your outdoor moments. They’re nostalgic, eco-friendly, and surprisingly satisfying to assemble.
Materials Needed
- Small metal tins (cookie, mint, or spice tins)
- Fishing line or sturdy craft string
- Small charms or shells
- Drill or nail for holes (adult supervision if needed)
How to Make It
- Drill small holes at the bottom of each tin. Thread strings and add charms at different lengths.
- Group tins together, tie to a branch or freestanding hanger.
- Adjust spacing to create a mellow chime that’s pleasant on a breeze.
Pro idea: mix metals with a splash of color on each tin for a playful rainbow chorus. Seriously, it’s oddly soothing to listen to.
Who loves it: anyone who loves repurposing, gentle soundscapes, and vintage-inspired garden accents.
8. Moss Wall Garden Panels You Can Move
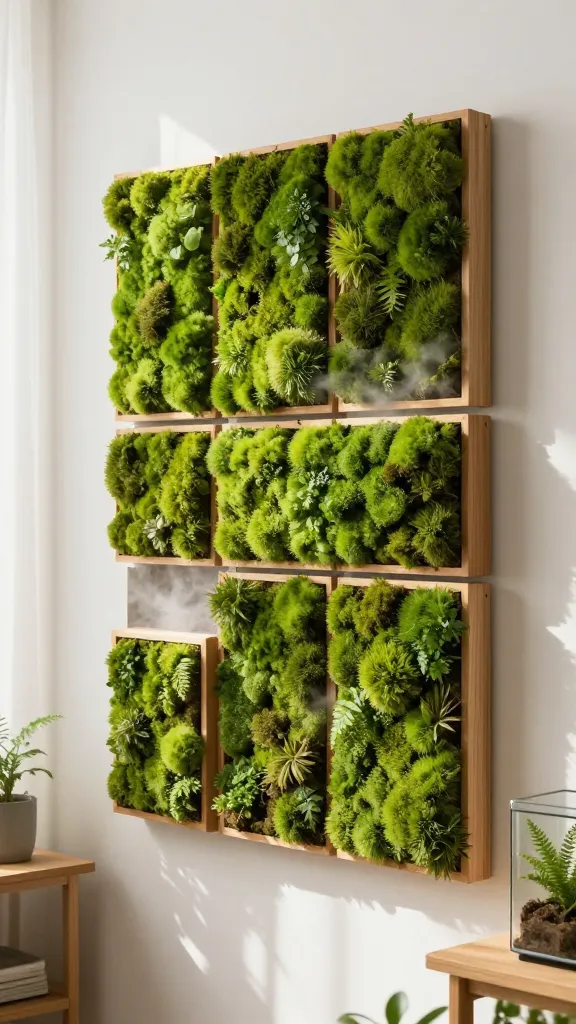
A lush, living canvas that doubles as art. Create portable moss panels that you can rearrange as you decorate, season, or host guests.
Materials Needed
- Pressed moss sheets or moss spray sheets
- Lightweight wood frames or canvas boards
- Non-toxic glue or double-sided tape
- Water mist spray bottle
How to Make It
- Cut moss panels to fit frames; secure with glue or tape.
- Arrange panels on a wall or prop on garden shelves for a vertical garden look.
- Lightly mist to keep moss fresh and perky.
Styling ideas: mix with small succulents or air plants for texture. It’s a soft green interruption that never fails to spark a smile.
Who loves it: design lovers who crave movable greenery and a touch of tactile nature in a compact space.
9. DIY Pebble-Topped Birdseed Snack Rocks
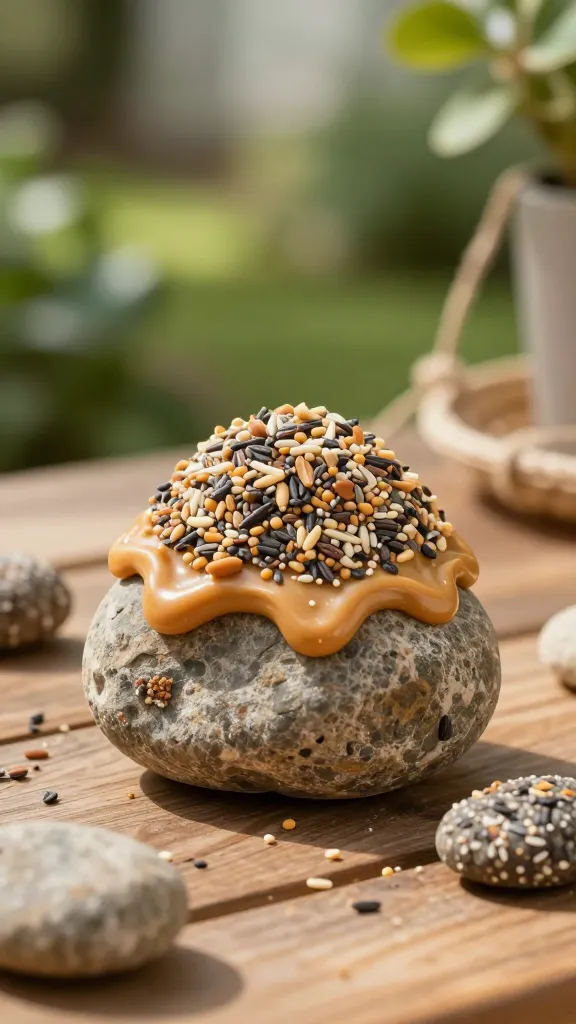
Who knew feeding birds could look so cute? Pebble-topped snack rocks convert birdseed into tiny decorative treats that invite feathered visitors and double as gentle garden decor.
Materials Needed
- Plain nugget-sized rocks
- Birdseed and peanut butter (or a seed mix)
- Strong glue or wrap for grip
- Twine for hanging (optional)
How to Make It
- Coat rocks with peanut butter, then roll in birdseed until fully coated.
- Let set on parchment until the coating hardens. Add a loop of twine if you want to hang them.
- Place on branches, fence posts, or in a snug tray for birds to enjoy.
Pro tips: pick safe birdseed blends and avoid salt or sugar. You’ll love watching chickadees, sparrows, and finches discover your tasty stones.
Who loves it: wildlife enthusiasts, families with kids who love birds, and anyone who enjoys edible decorations for the outdoors.
Conclusion
These 9 diy garden whimsical crafts prove that outdoor spaces can be full of personality without feeling fussy. Grab a few supplies, pick a sunny corner, and start transforming your yard into a playful, Pinterest-worthy retreat. You’ve got this—have fun, experiment, and watch your garden come alive with charm.