6 Trending Craft Ideas That Sell Well Online
Ready to turn crafty vibes into online gold? These six DIY projects are trendy, doable, and totally shoppable—perfect for pins, product pics, and repeat customers. trust me, you’ll love how simple and satisfying each one is.
Let’s dive into six completely unique ideas that people can’t resist buying or recreating. No overlaps, no rehashes—just fresh, income-friendly creativity you can start today.
1. Cozy Needle-Pelted Wall Art: Soft Geometry on Canvas
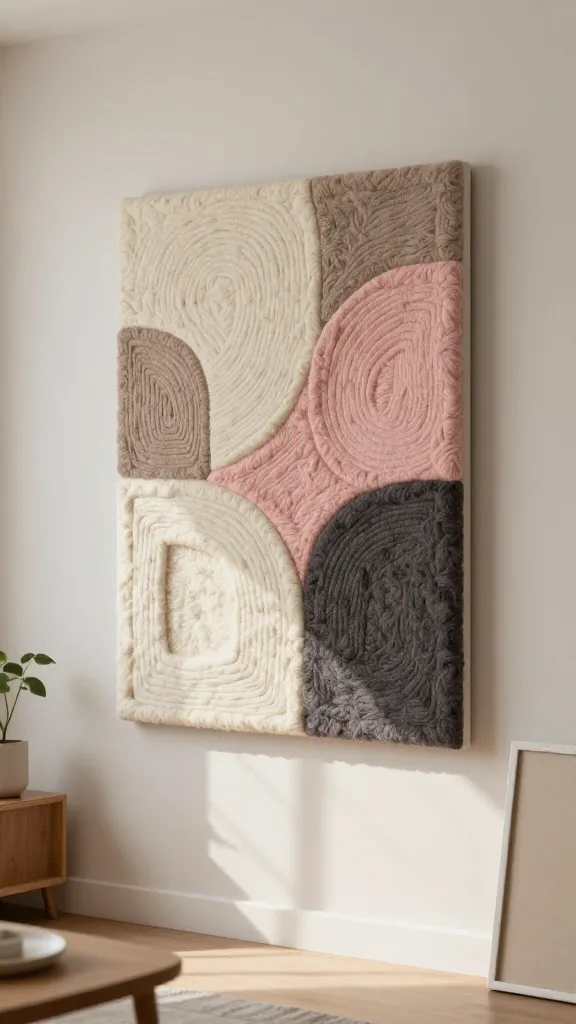
Imagine a bold geometric design that feels tactile and warm, hanging like a soft sculpture on your wall. This needle-pelted wall art blends texture, color, and modern lines to create a statement piece that’s both affordable and gallery-worthy. It’s a conversation starter with serious Pinterest appeal.
Materials Needed
- Canvas panel (12×16 or 16×20)
- Wool roving or chunky felt in 3–4 colors
- Needle felting needles (fine and chunky) and foam pad
- Pencil and ruler for layout
- Optional: spray adhesive and clear sealant
How to Make It
- Sketch a simple geometric pattern on the canvas—think triangles, chevrons, or a bold diamond.
- Plan your color blocks and lay down color with felted wool roving.
- Use the felting needles to fuse the fibers onto the canvas, building texture as you go.
- Refine edges for sharp lines and add a final light spray to set the fibers.
Pro Tips / Styling Ideas
- Keep the color palette cohesive with your room so it reads like a design piece, not a craft project.
- Pair with a single metal or wooden frame for a polished look.
- Vary texture by adding a few knit-felt accents or small fabric scraps for depth.
Who will love it? Minimalist homes, boutique cafés, and anyone craving tactile wall decor that photographs beautifully for online listings.
2. Hand-Poured Resin Coasters With Floral Inlays
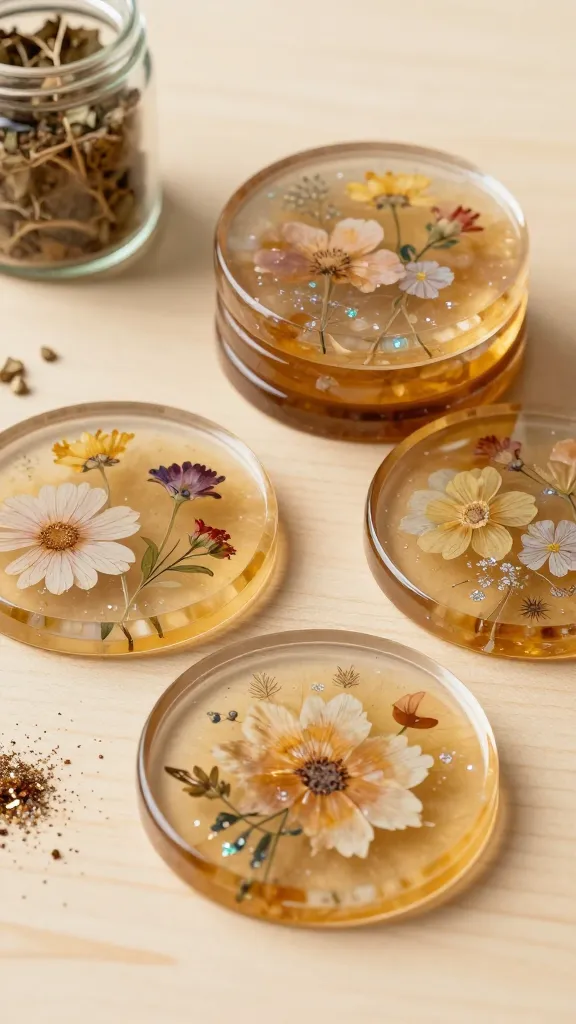
These resin coasters are glossy, protective, and stunning enough to gift or sell in sets. A delicate floral inlay makes each piece feel special, while color choices keep them versatile for any table setting. Seriously, you’ll want a set for your own coffee table too.
Materials Needed
- Epoxy resin and hardener (measure precisely)
- Silicone coaster molds (4-pack or 6-pack)
- Dry botanicals or pressed flowers, plus mica powders or pigments
- Mixing cups, stir sticks, rubbing alcohol
- Heat gun or torch for bubble removal
How to Make It
- Dry-fit your floral inclusions in the mold first to plan placement.
- Mix resin per instructions, add a touch of pigment if you want a tinted base.
- Pour a thin layer, place flowers, then top with another layer, sealing any gaps.
- Pop bubbles with a heat source, cure fully as directed, then pop out and sand edges if needed.
Pro Tips / Styling Ideas
- Pair coasters with a matching resin tray or a coordinating kitchen print for a cohesive shop photo.
- Offer in sets of 4 or 6 with a simple tie-pocket for gifting—easy upsell.
Who will love it? Home entertainers, wedding favors, or anyone who adores glossy, durable table accessories.
3. Upcycled Linen Tote With Embroidered Motifs
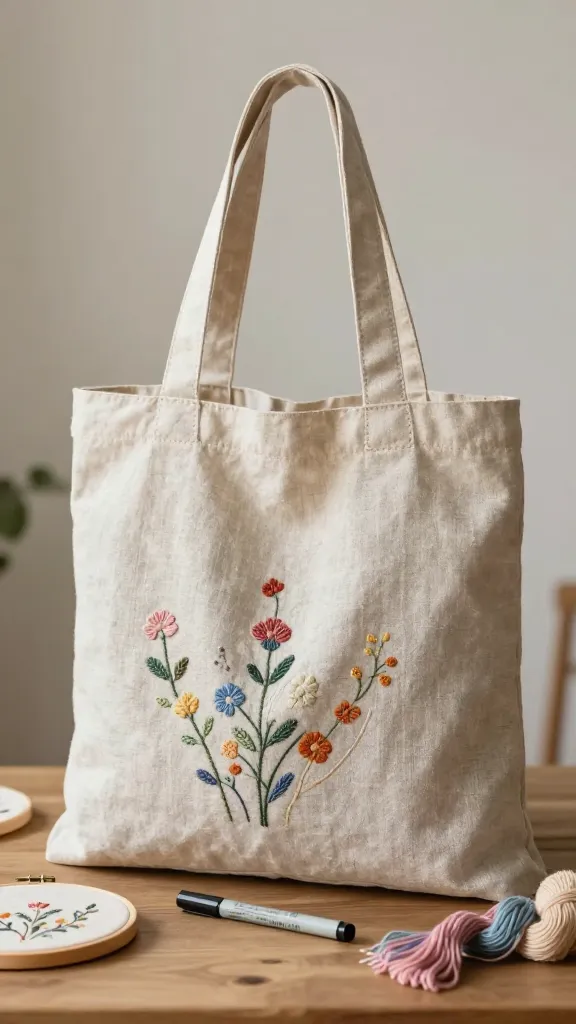
Short, sturdy tote bags with hand-stitched motifs feel both sustainable and chic. This project blends upcycling with delicate embroidery, giving shoppers a unique, reusable accessory that tells a story. You’ll love the earthy textures and practical everyday use.
Materials Needed
- Pre-loved linen or sturdy canvas tote
- Embroidery floss in 4–6 colors
- Embroidery hoop (optional for stability)
- Needle with an eye large enough for floss
- Fabric marker for simple pattern tracing
How to Make It
- Choose a simple motif (floral, sunburst, or geometric) and sketch it on the bag.
- Transfer the design and start stitching using backstitch or satin stitch for clean fills.
- Finish edges with a neat hem or leave raw for a boho vibe; add a tiny tag with your brand name if you like.
Pro Tips / Styling Ideas
- Offer customization: initials or a chosen motif makes the tote feel personal and gift-ready.
- Pair with a matching reusable mask or pouch to create a mini kit for holidays or birthdays.
Who will love it? Eco-conscious shoppers, fashion-forward students, and anyone who wants a durable, stylish bag with a handmade touch.
4. Plush Pom-Pom Wall Hooks: Soft and Fun Accent Pieces
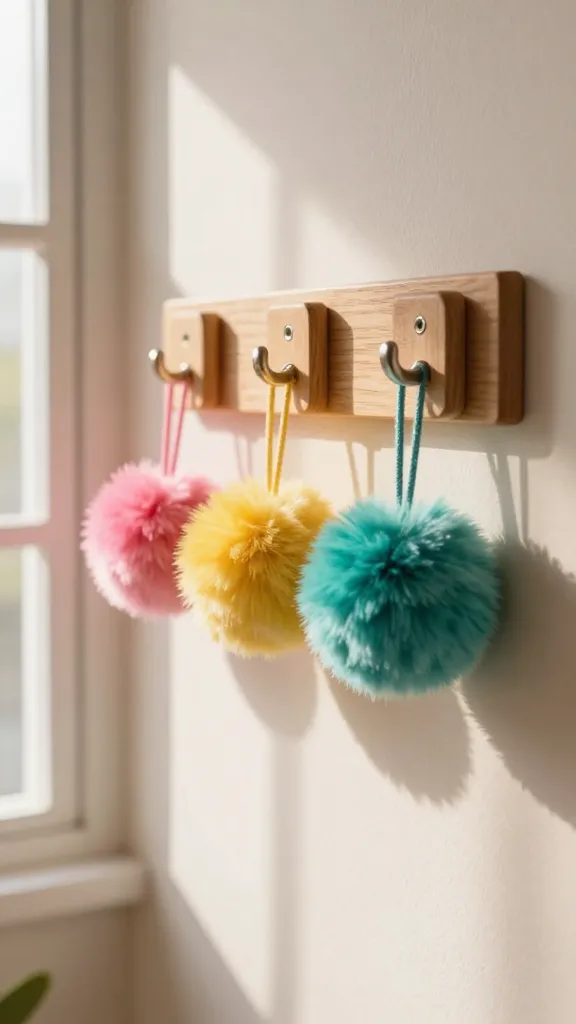
Meet the cuteness upgrade every entryway needs. Plush pom-pom wall hooks add whimsy and warmth, turning a boring wall into a playful focal point. They’re simple to make, impossible to resist photographing, and perfect for selling in sets.
Materials Needed
- Base hooks (wooden or metal) with a mounting screw
- Colorful yarn (chunky or bulky weight)
- Pom-pom maker or cardboard templates
- Hot glue gun and glue sticks
- Strong adhesive strips or nails for wall mounting
How to Make It
- Wrap yarn around your pom-pom template to create dense, fluffy pom-poms in different sizes.
- Attach pom-poms to each hook base with hot glue, varying heights for visual interest.
- Seal the back with a small felt circle to cover glue and provide a clean mounting surface.
Pro Tips / Styling Ideas
- Mix bold colors with soft neutrals to fit modern entryway palettes.
- Group in odd-numbered sets (3, 5, or 7) for best visual impact.
Who will love it? Families with kids, dorm residents, and anyone who loves cozy, tactile home details that earn compliments.
5. Botanical Wax Wraps: Reusable Food Covers You Can Stitch
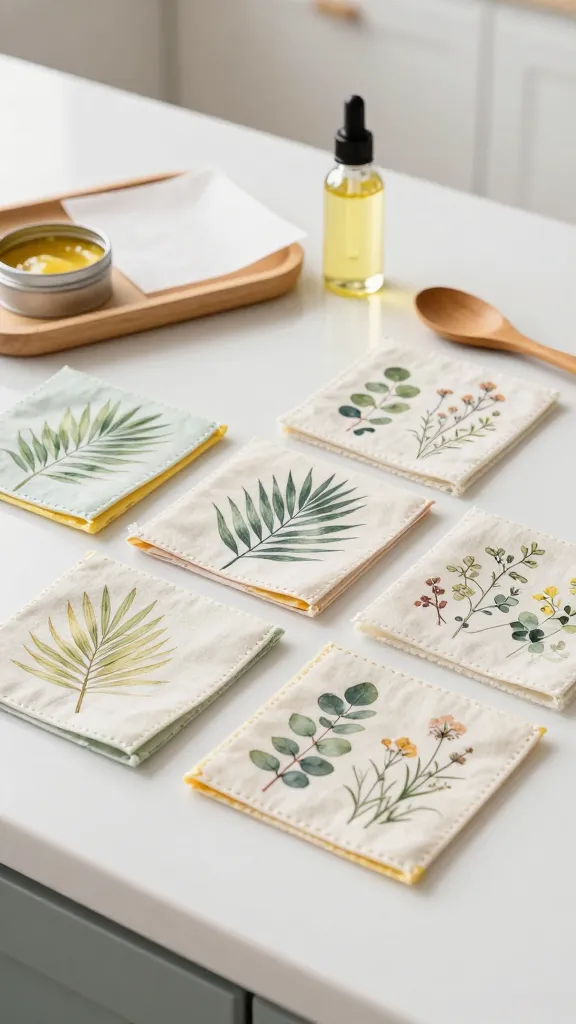
Say goodbye to single-use plastic with these botanical wax wraps. A stitched border frame and botanical prints make each wrap feel premium, eco-friendly, and giftable. They photograph beautifully in white-kitchen vibes and pastel palettes.
Materials Needed
- Organic cotton fabric squares (10×10 inches works well)
- Beeswax, pine resin, and jojoba oil (fusion for flexibility)
- Ironing paper or parchment
- Paintbrush or old credit card for smoothing
- Fabric scissors and a small sewing kit
How to Make It
- Melt beeswax with resin and a touch of oil until smooth.
- Spread fabric on a silicone mat, brush wax mixture evenly, and bake briefly or iron to set.
- Let cool, trim edges, and optionally stitch a decorative border for extra polish.
Pro Tips / Styling Ideas
- Include a care note for customers: wash with cold water and air dry.
- Offer sets with different patterns (flowers, leaves, abstract) for variety.
Who will love it? Eco-friendly shoppers, home chefs, and gift-givers seeking practical, stylish swaps for plastic wrap.
6. Hand-Painted Plant Stands With Mixed Finishes
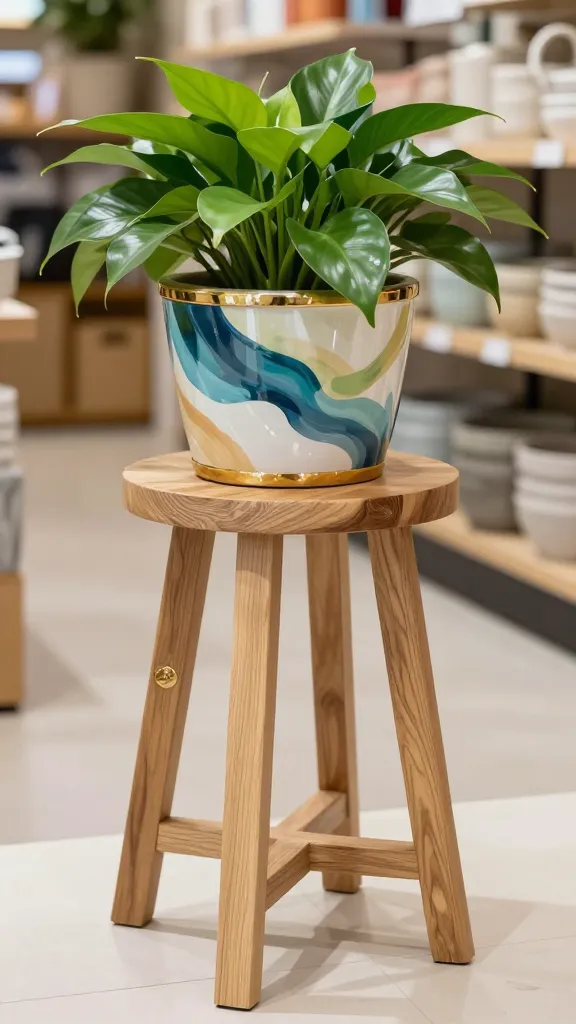
Add texture and personality to indoor greenery with hand-painted plant stands that mix painted wood, stenciled patterns, and metallic accents. They’re functional, photogenic, and the kind of product that looks great in a storefront photo. You’ll enjoy the process of layering colors and textures as much as buyers will enjoy styling them.
Materials Needed
- Plain wood plant stands or small pedestals
- Acrylic paints in 2–3 complementary colors
- Painter’s tape for crisp lines
- Clear acrylic sealer
- Fine paintbrushes and a small foam roller
How to Make It
- Sand lightly for a smooth surface; apply a base coat and let dry.
- Use painter’s tape to create stripes or geometric panels; add a contrasting color on the exposed sections.
- Finish with a clear sealant to protect from humidity and daily wear.
Pro Tips / Styling Ideas
- Offer variations: matte finish with bold color blocking, or distressed edges for rustic vibes.
- Pair with small potted plants and a simple lifestyle photo to boost online appeal.
Who will love it? Plant lovers, home decorators, and anyone seeking a stylish, practical pedestal to showcase greenery.
Conclusion
These six ideas are crafted to be both charming and market-ready, with strong visual appeal for online shoppers. Pick one to start, or batch a few for a cohesive mini collection that feeds your shop’s aesthetic. The best part? They’re all approachable and repeatable so you can scale without losing the handmade magic. Go ahead—start creating, photographing, and selling your way to a thriving craft-based online presence. You’ve got this!