7 Simple Crafts for 8-Year-Old Kids
Ready to spark a wave of creative energy? These 7 crafts are perfect for curious little hands, colorful imaginations, and a splash of DIY bragging rights. Each idea is unique, approachable, and guaranteed to delight both kids and grown-ups. Let’s dive in!
1. Fairy-Tolk Hand-Painted Fairy Garden Stones
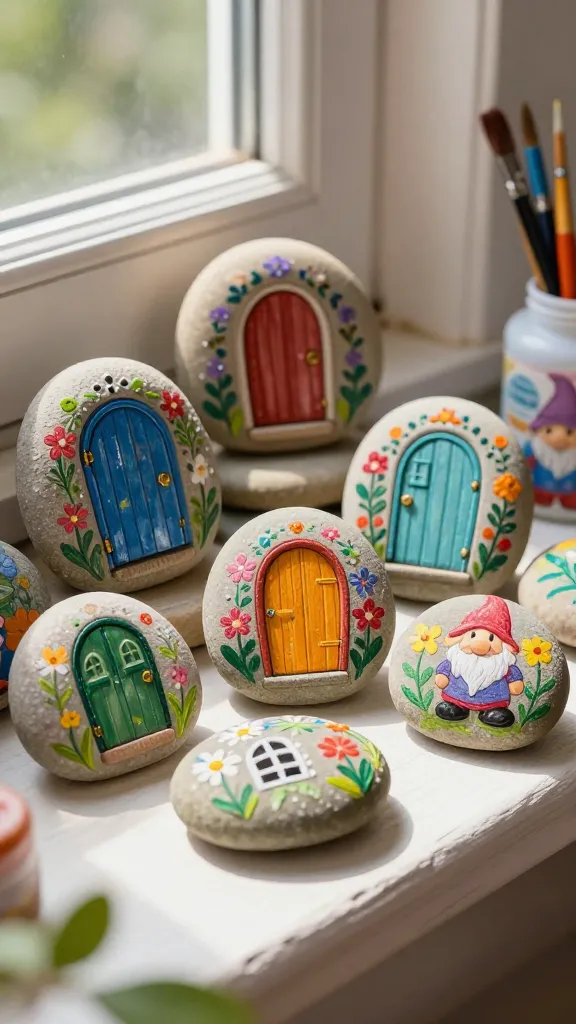
Imagine a mini meadow right on a doorstep or within a sunny windowsill. These hand-painted stones become tiny fairy doors, friendly gnomes, or bright flowers—perfect for stories and springtime decor. The colors pop, the textures feel magical, and the kids get a satisfying tactile project.
- Materials: smooth flat stones, acrylic paints, set of brushes, sealant spray, optional brushes for fine details, pencil for sketching.
- Tools: spray sealant (adult supervision), water cup, paper towels.
How to Make It: Wash and dry stones, sketch simple shapes with a pencil, then fill in with bold colors. Add tiny outlines and dot patterns to bring characters to life. Finish with a clear sealant so the art lasts outdoors or on a sunny shelf.
Pro Tips / Styling Ideas: Create an entire “fairy village” using different sizes and shapes. Add tiny pebbles as stepping stones, or tuck the stones into potted plants for a whimsical surprise. FYI, kids love naming each character after friends or pets.
End note: This craft is perfect for outdoor decor, classroom displays, or a cheerful gift for a grandparent. It’s cozy, creative, and seriously satisfying.
2. Silly Sock Puppets With Recycled Materials
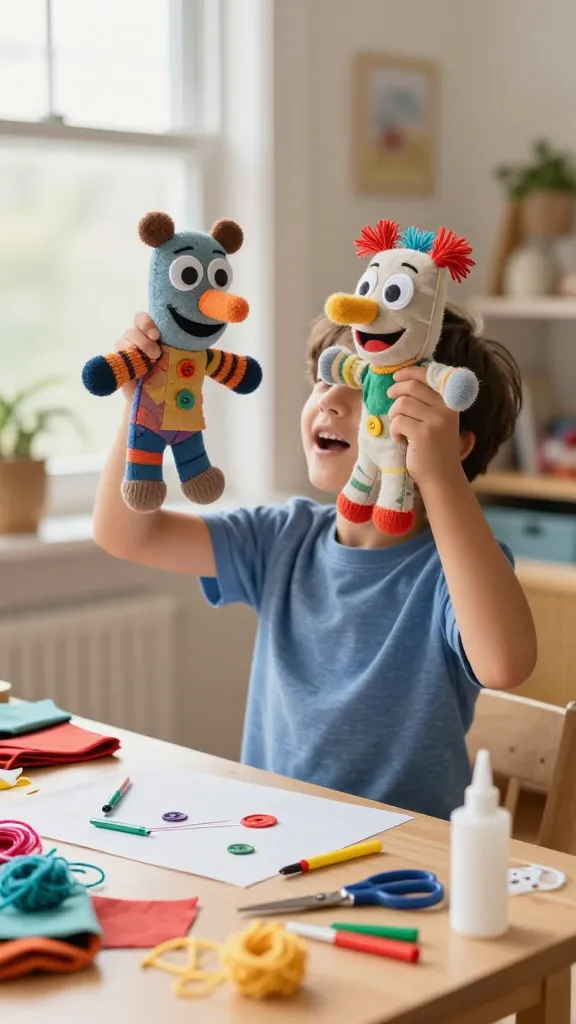
Who knew a single sock could become a charismatic character? These puppets spark storytelling, voice acting, and giggles all around. You’ll love the texture mix—fabric scraps, yarn, googly eyes—and the instant theater they invite.
- Materials: plain socks, fabric scraps, yarn, buttons or googly eyes, fabric glue or safe sewing kit, markers or fabric paint.
- Tools: scissors, optional needle and thread for sturdier faces.
How to Make It: Decorate the sock with eyes, a nose, and a big smile. Clip a fringe of yarn for hair and add a funny hat or scarf using scraps. Slip the puppet on a hand and start a pretend show—your audience is your living room, kitchen, and imagination.
Pro Tips / Styling Ideas: Create a “sock puppet theater” set with a simple cardboard stage. Swap characters for different stories or seasonal themes (zany pirates, polite dragons, space explorers). You’ll love how quickly a giggly show comes to life.
End note: Great for storytelling practice, family theater nights, or a classroom confab. These puppets are goofy, lovable, and unexpectedly durable.
3. No-Sew Felt Monster Wall Banner
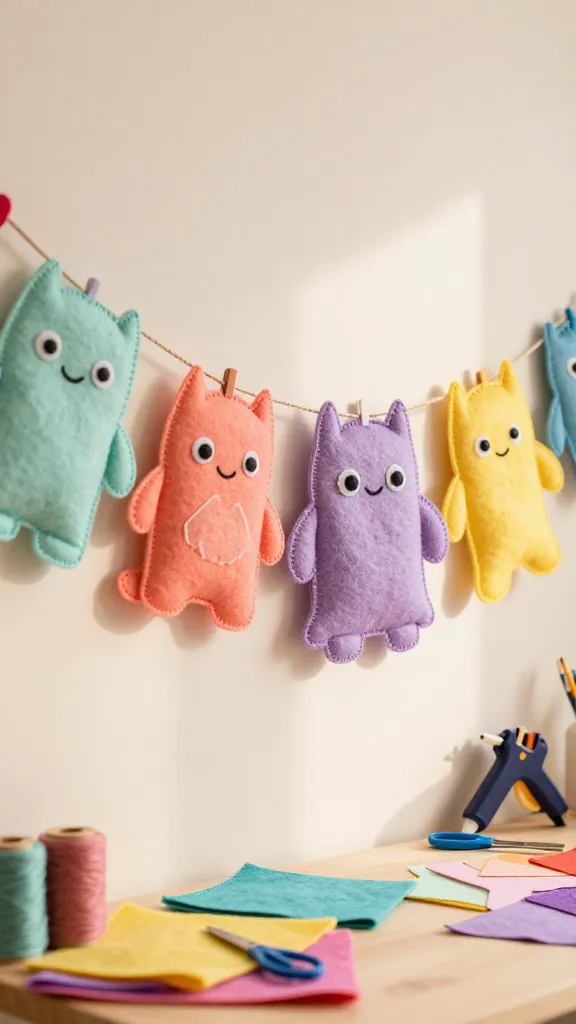
Bright, friendly monsters lounging on a wall—that’s the vibe. This banner uses soft felt, simple shapes, and a bit of imagination to create a playful garland that’s easy to customize and hang anywhere.
- Materials: felt sheets in assorted colors, stuffing (low-loft cotton or scraps), embroidery floss, ribbon or twine, fabric glue or a hot glue gun (adult supervision), scissors.
- Tools: needle (optional), markers for facial details.
How to Make It: Cut monster shapes, sew or glue along the edges, and stuff lightly to create plump little buddies. Add eyes, mouths, and quirky accents with thread and markers. String the monsters together with ribbon to form a banner.
Pro Tips / Styling Ideas: Use a color story (neon accents, pastel pals, or earthy tones) to suit a kids’ room. Drape the banner above a bed, around a window, or on a door. This project scales up beautifully if you want multiple banners for a party backdrop.
End note: A friendly, cuddly display that invites longer play sessions and imaginative naming conventions. It’s art with a personality.
4. DIY Marbleized Watercolor Tiles for Coasters
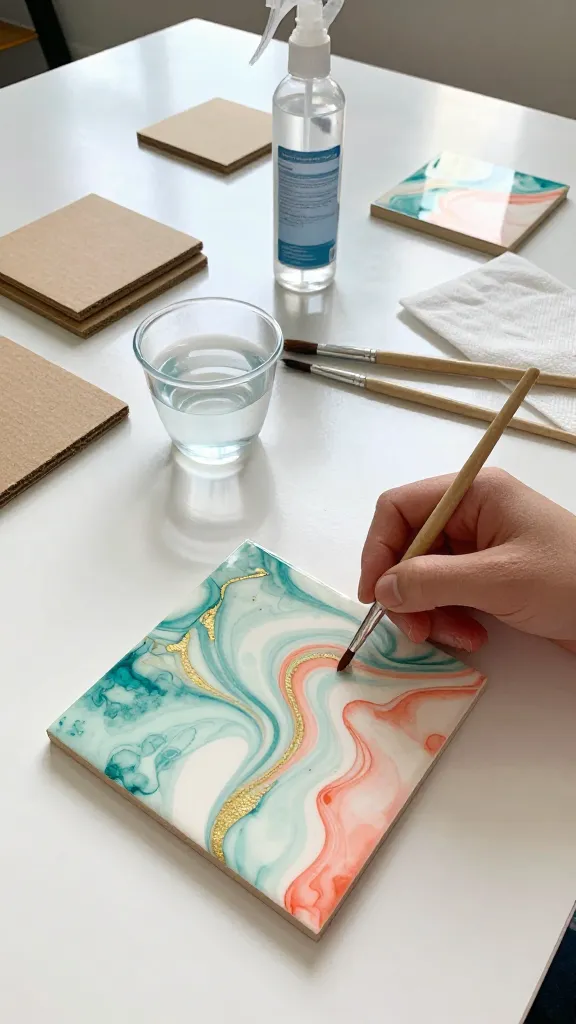
Marbleized patterns are timeless, and making your own watercolor tiles brings that luxe look down to kid-friendly scale. The colors blend, the patterns feel magical, and you’ll end up with a set that’s both functional and chic.
- Materials: ceramic tile coasters or sturdy cardboard tiles, watercolor paints, a cup of water, paintbrushes, clear sealant spray or Mod Podge.
- Tools: paper towels, protective surface for painting.
How to Make It: Prep the tile, then drop or swirl watercolor on the surface to achieve the marble effect. Let colors blend naturally by adding water as needed. Once dry, seal to protect from condensation and wear.
Pro Tips / Styling Ideas: Create a matching trio using three different color families (cool blues, sunny yellows, or rosy pinks). They make a thoughtful gift or party favor. Seriously, these tiles elevate any coffee table or desk with a subtle, artistic vibe.
End note: Kids love the experiment of color mixing, plus you get a finished product that’s ready to use. They’re perfect as gifts or a family room upgrade.
5. Cardboard Cityscape Galaxy Lanterns
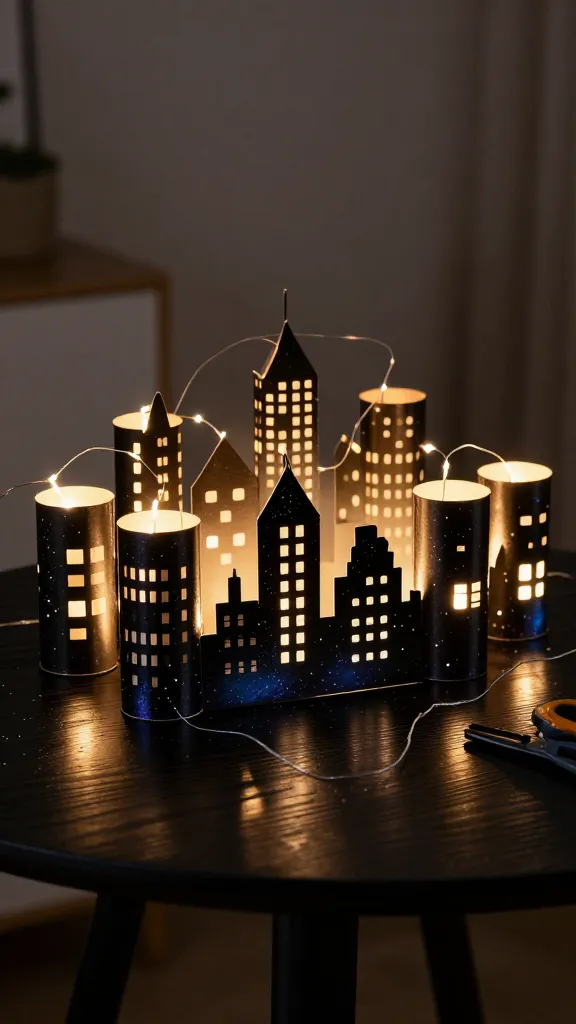
Turn a simple cardboard tube into a glowing, galaxy-rimmed skyline. These lanterns look striking at night and indoors, too. The combination of cardboard, LEDs, and paint feels modern and imaginative.
- Materials: cereal or toilet paper tubes, black acrylic paint, metallic paints, LED tealight or fairy lights, scissors, glue, string for hanging.
- Tools: craft knife (adult supervision), ruler for cutting windows.
How to Make It: Cut windows into the tubes to mimic city buildings. Paint the tubes black, leave windows clear or paint them with gold to mimic lights, then wrap the lanterns with a string of LEDs. Group multiple towers for a dramatic skyline glow.
Pro Tips / Styling Ideas: Create a tiny rooftop party scene with painted silhouettes on the top edges, or add a few stars and planets on a distant backdrop. These lanterns transform a room into an urban nightscape—totally Insta-worthy.
End note: A perfect seasonal project for dusk aesthetics, sleepovers, or a dramatic party backdrop. It’s clever, thrifty, and seriously stunning.
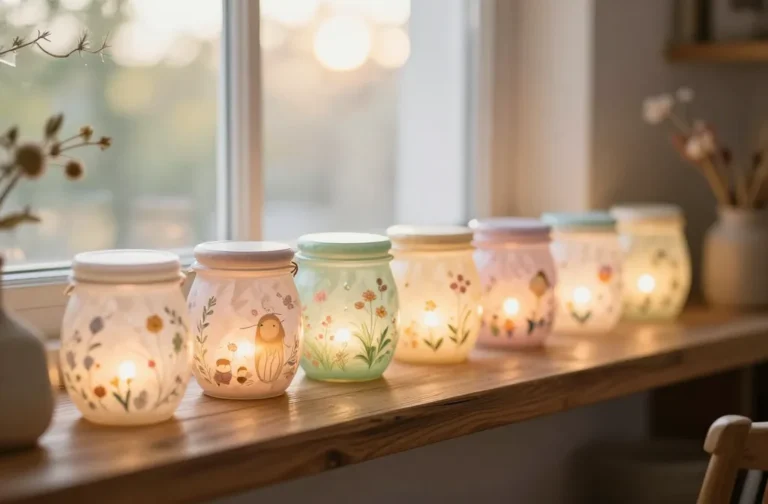
6. Rainbow Cupcake Luddle Jar Dolls
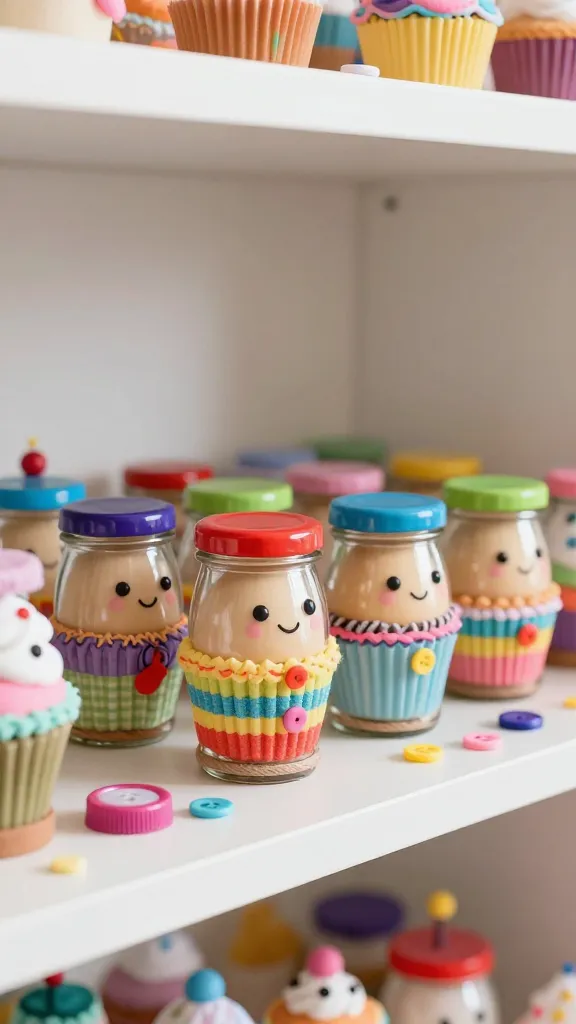
Cutest little jar people ever. Use clean jars, paint, and a handful of craft bits to build cheerful jar dolls that stand on a shelf or double as tiny planters. They’re compact, adorable, and endlessly customizable.
- Materials: small glass jars with lids, bright acrylic paints, bottle caps, yarn for hair, buttons or beads for eyes, fabric scraps for clothing, glue, twine for hanging or standing bases.
- Tools: brushes, scissors, sealing spray (optional).
How to Make It: Paint the jar lids as smiling faces, add yarn hair and a fabric outfit. Glue on the bottle-cap nose or other fun details. Use a small base or stand to help the jar dolls sit upright, or hang them as mini ornaments.
Pro Tips / Styling Ideas: Create a rainbow row on a shelf with jars of different moods or seasons. They’re excellent gifts for friends or classroom treats—they feel handmade and heartfelt.
End note: These dolls celebrate color, texture, and tiny storytelling. They’re cozy, cheerful, and endlessly charming.
7. Pinecone Printpaper Animals

Turn simple pinecones and scrap paper into a zoo of little creatures. This project is nature-friendly and creative fun that blends outdoor textures with bright paper crafts. The result is a gallery of delightful animals that live on a wall or shelf.
- Materials: pinecones, colored craft papers, glue, scissors, markers, eyes (googly or drawn), optional fabric scraps for textures.
- Tools: none special needed beyond basic safety and supervision for scissors.
How to Make It: Glue colored paper shapes onto pinecones to form animals’ bodies, wings, and tails. Add eyes and small details to bring each creature to life. Let the kids decide who belongs to which forest or garden—and maybe even name a few.
Pro Tips / Styling Ideas: Create a mini “forest wall” with multiple pinecone animals perched along a branch display or a homemade felt tree. This project invites storytelling and a little forest magic into any room.
End note: It’s a nature-friendly craft that’s tactile, adorable, and easy for little hands to master. The results are irresistibly shareable, too.
Conclusion
Whether your 8-year-old is chasing bright colors, tactile textures, or tiny imaginative worlds, these seven crafts offer something special for every kid. Each project is designed to be fun, accessible, and proudly kid-made—trust me, they’ll love seeing their ideas come to life. So grab some supplies, pick a project (or all seven), and start crafting your way to a cheerful, creative day.