7 Creative DIY Christmas Card Ideas to Make
Kick off the season with cards that feel handmade, heartfelt, and totally you. These 7 unique ideas are easy, fun, and totally printable-worthy for sharing love with flair. Trust me, your mailbox will thank you.
1. Pop-Up Snowflake Ornaments Card
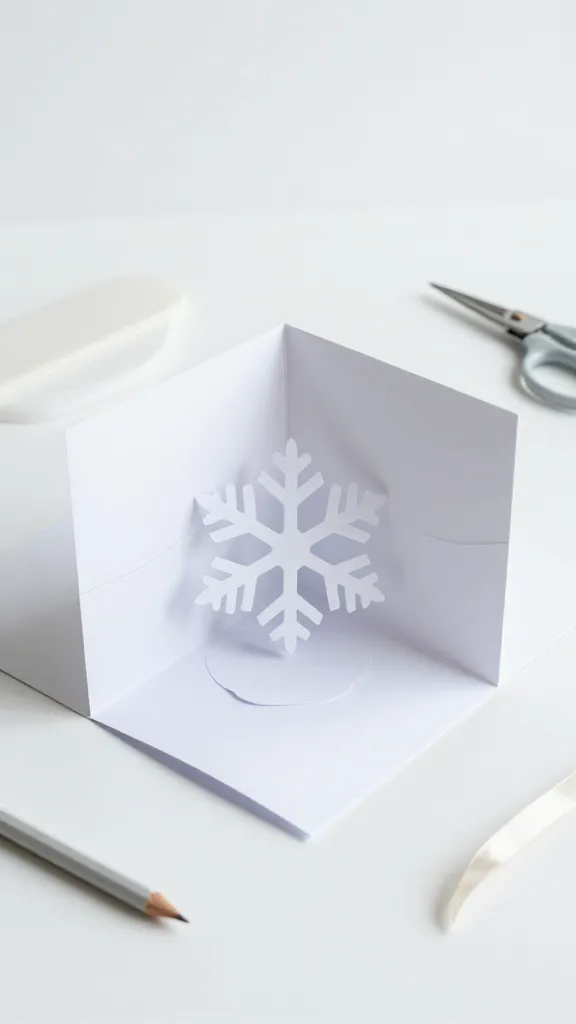
Imagine a greeting that unfolds into a tiny winter wonderland. The pop-up snowflake ornament card delivers a delightful surprise as soon as it’s opened. It’s modern, minimalist, and surprisingly easy to craft.
- Materials: sturdy white cardstock, scissors, bone folder or ruler, pencil, a single-pack snowflake punch or hand-cut snowflake templates, thin ribbon.
- How to Make It:
- Fold a cardstock card in half. Draw a subtle horizon line to anchor the design.
- Cut a center slit that will host the pop-up ornament, then fold the snowflake to stand upright when opened.
- Attach a small ribbon loop at the top of the ornament so it sits snugly when the card is closed.
- Decorate the card surface with a light wash of pale blue or silver ink for a frosty vibe.
- Pro Tips: Use a thin foam square behind the snowflake to help it pop more when opened. Keep the ornament lightweight to avoid sagging.
Finish with a short, warm message like “Season’s greetings from our cozy corner to yours.” This one’s perfect for friends who love a little whimsy and a dash of sparkle.
Best for: Snowy lovers, minimalist designers, people who adore a delightful surprise.
2. Forest Friends Card With Die-Cut Accents
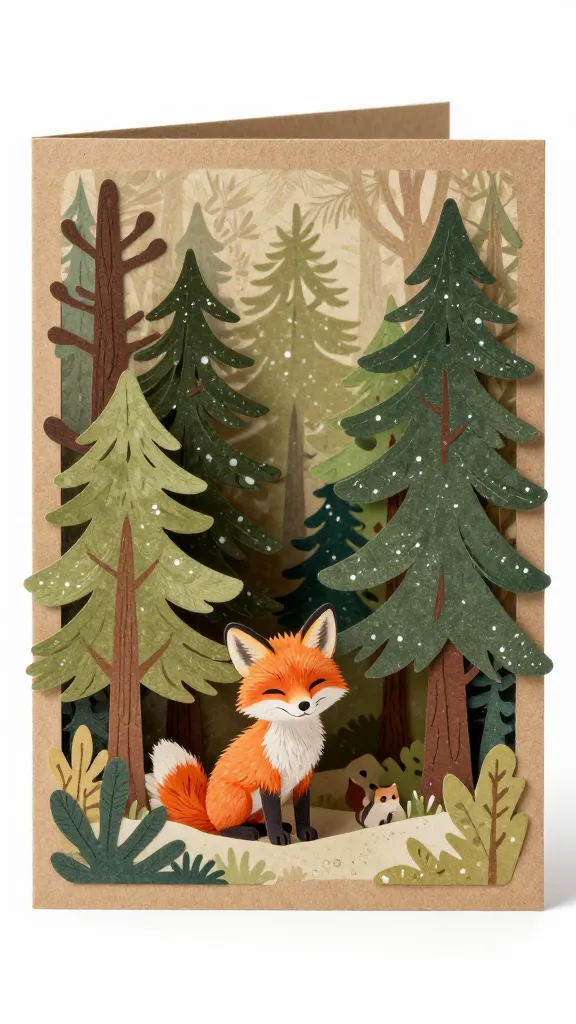
Channel woodland charm with a tiny, winking forest scene—think pine trees, a curious fox, and a dotted snow path. It’s cozy, nature-inspired, and endlessly printable-friendly.
- Materials: kraft or cream card stock, forest green and earthy browns paper, die-cut shapes or hand-cut shapes, glue, fine-tip white pen for highlights.
- How to Make It:
- Use a three-layer card: base, background forest, and foreground critters. Build depth with staggered layers.
- Add tiny white snow specks with a dotting tool or white gel pen.
- Finish with a short sentiment on a small banner across the bottom.
- Styling Ideas: Include a whisper of gold foil on the tree tips or add a small cluster of pinecone textures using textured paper.
Who’ll love it: nature lovers, families with kids, anyone who favors a woodland palette.
3. Embroidered Letterpress Look Card
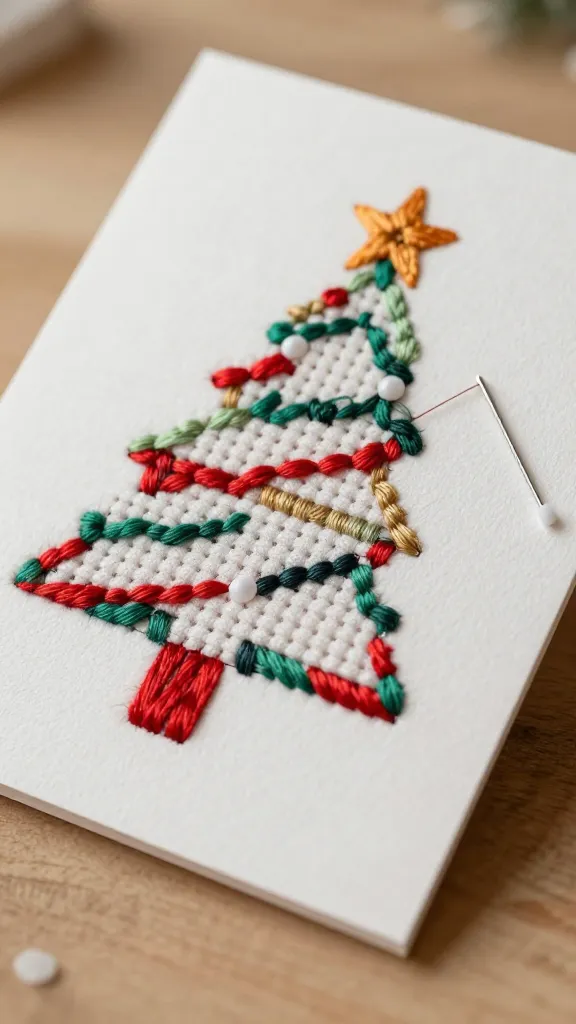
Textile meets paper in this chic, crafty card that mimics embroidery without a needle in sight. The tactile stitches give a warm, handcrafted feel that’s unexpectedly elevated.
- Materials: white or cream card stock, textured embroidery floss in your chosen color, needle with a large eye, simple cross-stitch pattern printed or drawn onto the card, adhesive.
- How to Make It:
- Draw a simple letter or pattern on the card in pencil as your guide.
- Stitch along the lines with a neat backstitch using one or two colors for contrast.
- Embellish with a tiny bead or rhinestone at a focal point if you like.
- Pro Tips: Keep stitches tight and uniform for a polished look; use a stabilizer if your card stock is thinner.
Who will adore this: fans of handmade textures, typography lovers, anyone who appreciates a subtle, classy vibe.
4. Glitter Cloud Parade Card
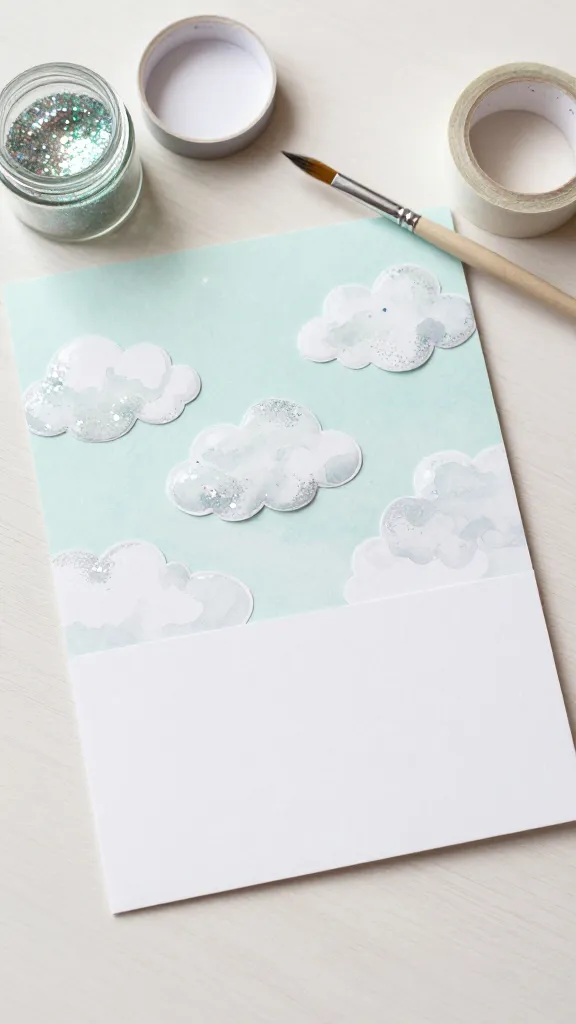
Soft clouds, a whisper of glitter, and a sentiment that shines through. This card combines whimsy with just enough glam to feel festive without going overboard.
- Materials: white or pale pastel card stock, watercolor paints or markers, fine glitter, clear-drying glue, masking tape, sentiment stamp or calligraphy pen.
- How to Make It:
- Paint a pale sky and fluffy clouds across the card base.
- Add glue to the cloud outlines and sprinkle with fine glitter; gently tap off excess.
- Write a playful message like “You light up the season” across a cloud or on the bottom border.
- Styling Ideas: Use a pearlescent paint for the sky for extra glow, or pair with a vellum overlay for a soft finish.
Best for: glitter fans, pastel lovers, friends who deserve a little extra sparkle this season.
5. Minimalist Origami Crane Card

Elegant, roomy white space with a single origami crane perched on the fold. It’s a modern take on a traditional craft that reads chic and thoughtful.
- Materials: white card stock, square craft paper in a gentle hue, glue, scoring tool or bone folder, light ink for a subtle message.
- How to Make It:
- Fold a square of origami paper into a crane following a simple diagram; secure with a tiny dab of glue at the base.
- Adhere the crane so it sits along the card’s fold, allowing the wings to lift slightly when opened.
- Write a clean, contemporary note like “Wishing you a balanced, bright season.”
- Pro Tips: Use a slightly tinted crane to pop against the white card; position it so the crane’s head points toward the message.
Who would love it: fans of clean lines, modern design, or subtle storytelling through texture and form.
6. Rustic Burlap Heart Card
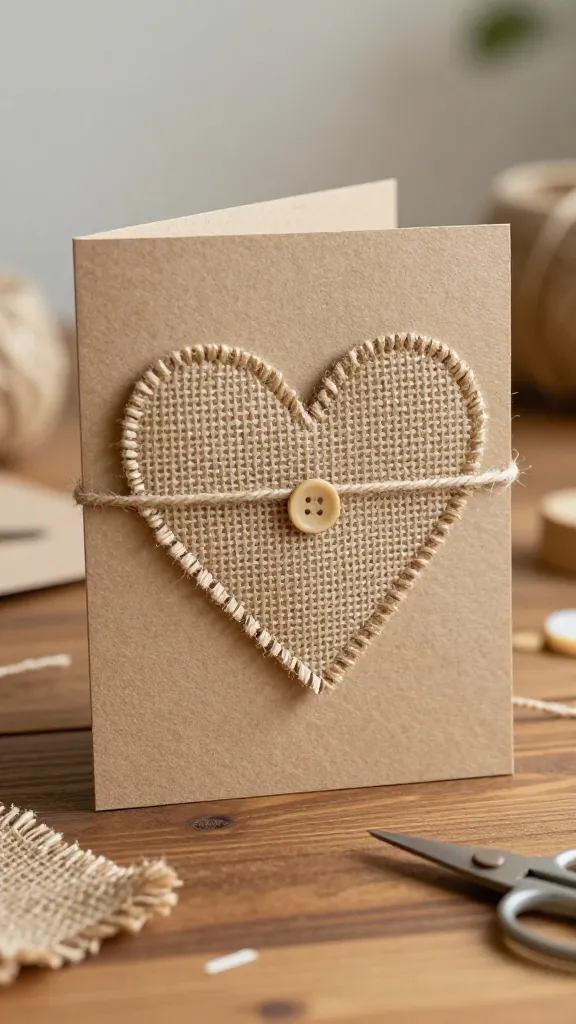
A warm, rustic heart crafted from burlap and twine — perfect for giving a cozy, handmade vibe to close friends and family. It feels homemade without being fussy.
- Materials: kraft card stock, small pieces of burlap, twine, glue, scissors, a tiny button or charm for accent.
- How to Make It:
- Cut a heart shape from burlap and mount it onto the card with a light adhesive.
- Wrap a short length of twine around the burlap heart’s center and secure with a small knot or glue dot.
- Affix a tiny button or charm at the intersection for a cute focal point.
- Styling Ideas: Add a thin wash of whitewash to the burlap to brighten it, or stamp a simple “Joy” sentiment near the bottom.
Who’ll love this: homey, farmhouse style folks; DIY enthusiasts who enjoy texture and tactile gifts.
7. Cursive Foil Letter Card
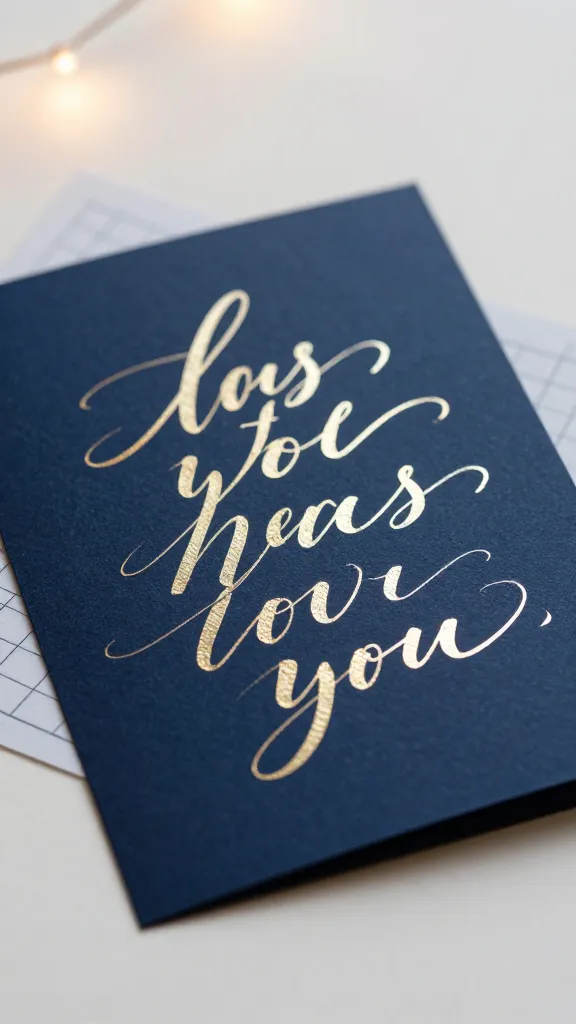
Glam up your greetings with a single word written in foiled script. It’s bold, sophisticated, and surprisingly quick to assemble with printable foiled text or a DIY foil transfer.
- Materials: dark card stock (navy, black, or deep green), foil transfer sheets or metallic gel pen, light-press handwriting guide, adhesive.
- How to Make It:
- Choose a short sentiment word (e.g., “Joy,” “Peace,” “Noel”) and write or transfer in a sweeping cursive script across the card.
- Apply metallic foil to the script or use a gel pen for a shiny, hand-drawn effect.
- Optionally add a small geometric border at the edges for a polished finish.
- Pro Tips: Use a light grid or tracing paper to guide your curves if you’re hand-lettering. Keep the background simple to let the foil pop.
Who would love it: typography nerds, glam minimalists, anyone who wants a single statement piece that feels luxe.
Conclusion
That’s a wrap on 7 completely unique DIY Christmas card ideas you can actually finish this weekend. Each one brings its own vibe—whimsical, rustic, modern, or tactile—so you can match your recipient’s style with ease. Pick one (or all) and start crafting; you’ll have hearts blooming in your mailbox and a festive grin on your face. You’ll love this creative sprint—trust me, cards don’t have to be perfect to feel perfectly you.