15 Paper Craft Birthday Ideas for Chic Celebrations
1. Bold Marble-Effect Birthday Card Holder Roll
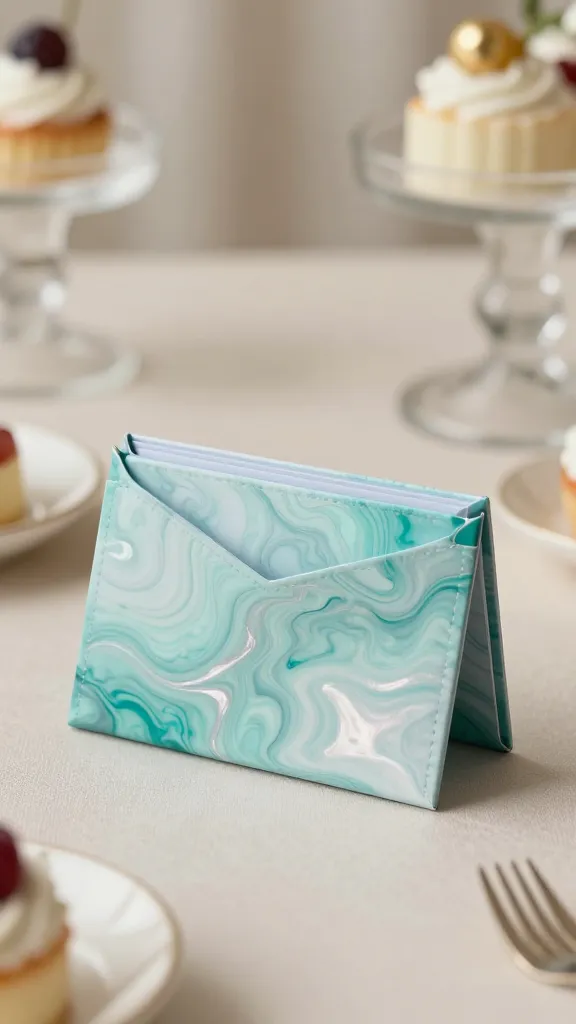
Imagine a chic, standing card holder made from sturdy paper with a swoosh of mermaid marble. It’s a showpiece on a dessert table, yet folds flat for mailing or gifting. The subtle swirls feel luxury without the bulk.
Materials: heavyweight cardstock, marbleized paper or DIY marbling ink, scoring tool, bone folder, glue, acrylic paint (optional accent color).
How to Make It: Score a long strip of cardstock at 2 inches from the edge. Fold into a U-shape stand, then attach a marbleized panel to the back for a dramatic backdrop. Add a small pocket at the base for name tags or place cards.
Pro Tips: Use contrasting metallic ink for guest names to elevate elegance. This is perfect for wedding anniversaries or milestone birthdays.
Who’ll love it: Hosts who adore a polished, modern table setting and a keepsake card display.
2. Paper Confetti Embellished Banner Loop
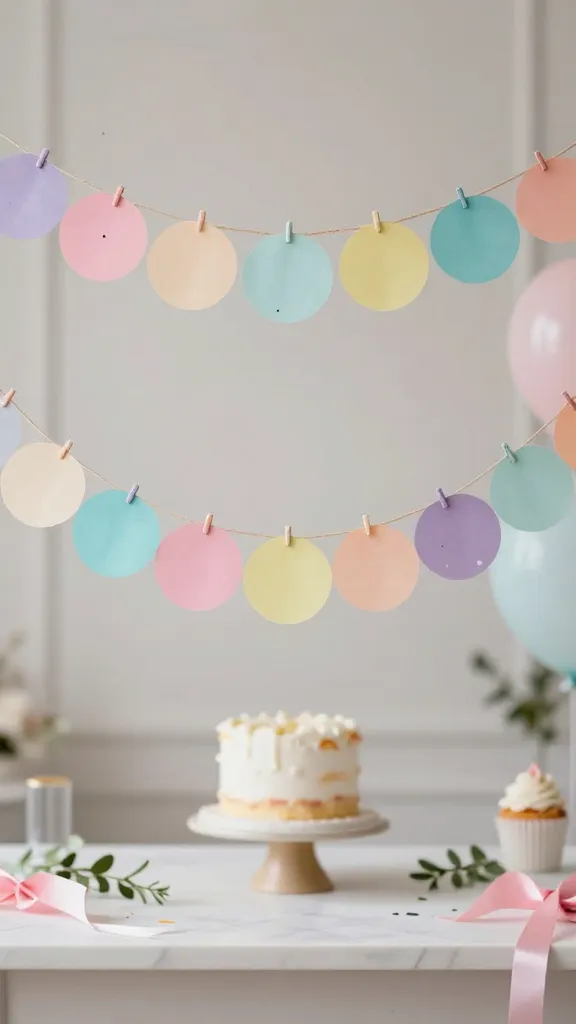
Picture a delicate garland draped above a cake table, speckled with confetti to echo party vibes. This one uses punched paper circles in a color-block gradient for a playful, airy look.
Materials: colored scrapbook papers, circle punch, twine or ribbon, glue, scissors.
How to Make It: Punch a bunch of circles in 3–4 coordinating colors. Create a simple loop garland by threading circles onto twine, varying sizes for whimsy. Knot or glue a few confetti dots for extra pop.
Pro Tips: Mix matte and foil papers for shimmer that photographs beautifully. Use a shorter banner for small spaces or a longer version for big parties.
Who’ll love it: Anyone who adores a festive, feathery-tairy vibe and quick, reusable decor.
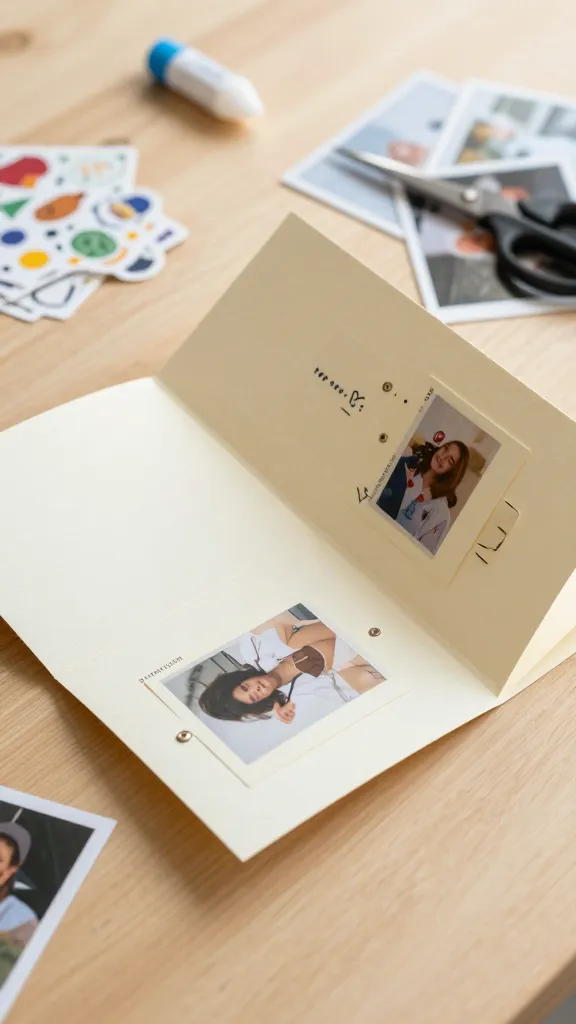
3. Origami Pop-Up Birthday Card Surprise
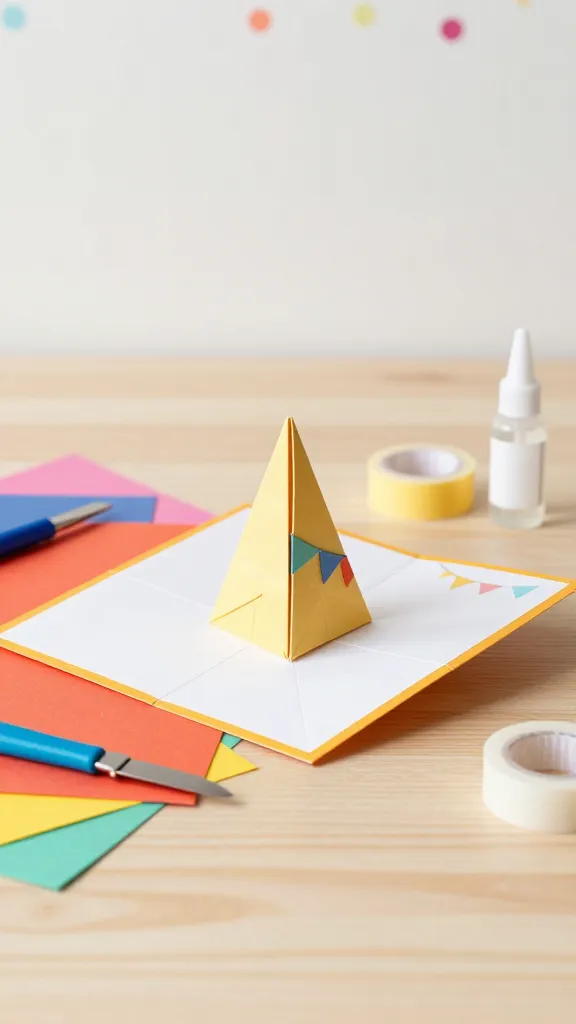
Give a plain card a jaw-dropping twist with a pop-up party hat that springs to life when opened. It’s interactive and surprisingly simple to master.
Materials: sturdy origami paper, blade, glue, double-sided tape, scoring tool.
How to Make It: Fold a small hat shape in origami style, then attach with a folded hinge so it pops up at the card’s center. Decorate with tiny banners and a handwritten birthday message on the base.
Pro Tips: Keep colors bold and coordinate with the recipient’s favorite palette. This one is a guaranteed smiles-per-page moment.
Who’ll love it: Card collectors and anyone who loves a mood-lifting surprise inside the envelope.
4. Paper Pom-Pom Lights on a Wire Branch
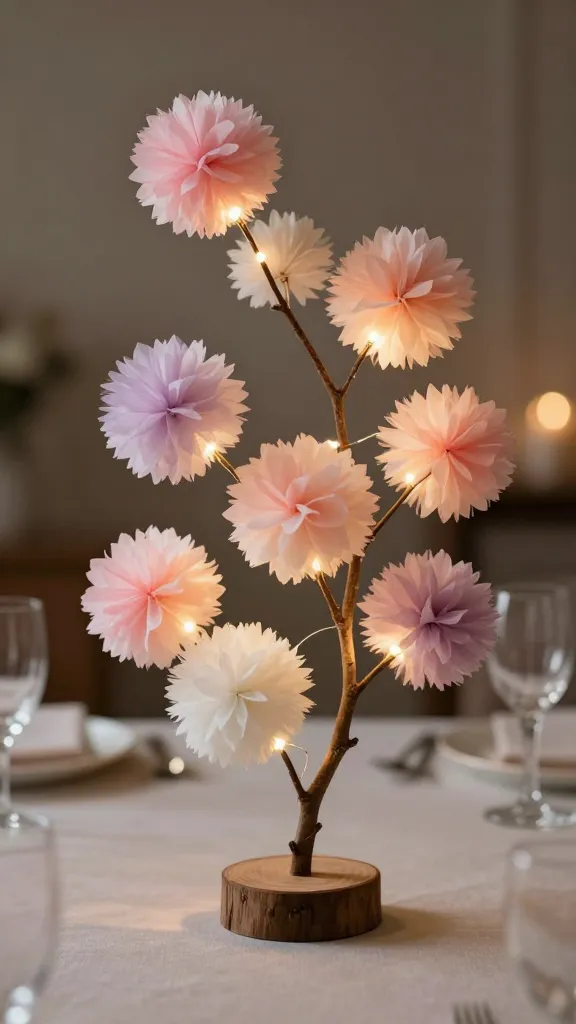
Turn a simple branch into a festive centerpiece by clustering lightweight paper pom-poms along a twig or small branch—an instant party glow-catcher with a DIY twist.
Materials: tissue paper, thin wire, floral tape, scissors, hot glue, fairy lights (battery-powered).
How to Make It: Cut tissue squares, fan-fold, gather with a wire, and seal with floral tape. Clip pom-poms along a bent wire and wrap tiny LED lights around the branch for a soft glow.
Pro Tips: Mix pastel shades for a dreamy look or bright colors for high-energy celebrations. Great for dessert tables or doorway decor.
Who’ll love it: Hosts who want twinkles without breaking the bank or needing electrical expertise.
5. Printable Peel-and-Stick Photo Corner Panels
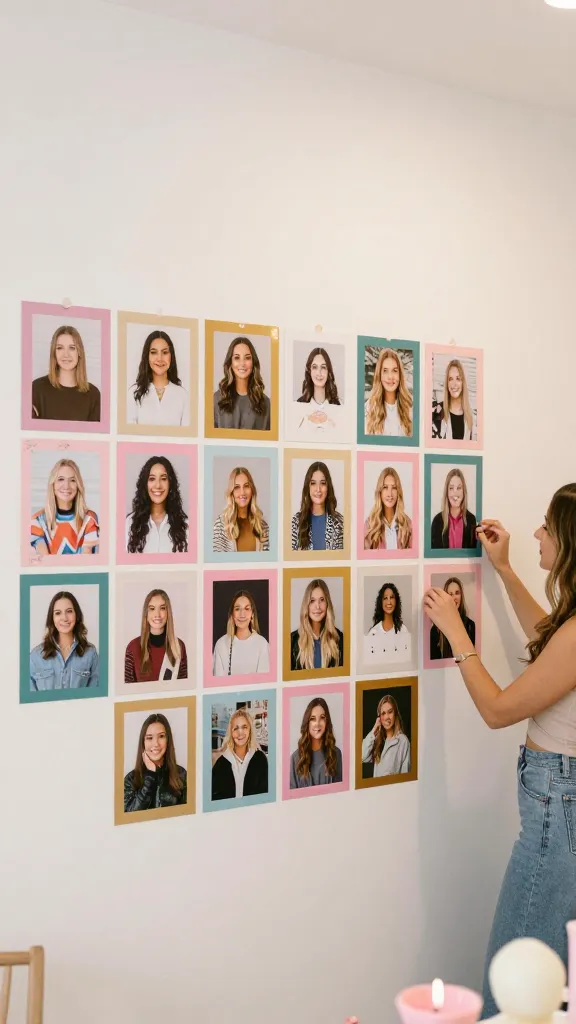
Transform a blank wall into a personalized birthday gallery using printable photo panels that stick and peel like magic. A modern, Instagrammable backdrop with zero hammering.
Materials: printable high-res photo templates, colored cardstock for borders, adhesive strips or removable mounting tape.
How to Make It: Print a grid of mini photos or illustrations, add bold borders, and arrange into a dynamic collage on the wall. Leave a space for a birthday banner at the top.
Pro Tips: Use a consistent color theme to keep the look cohesive. Swap photos yearly for a living memory wall.
Who’ll love it: Photo lovers and DIY decorators who crave a chic, easy-to-update display.
6. Paper Shadow Box Birthday Keepsake
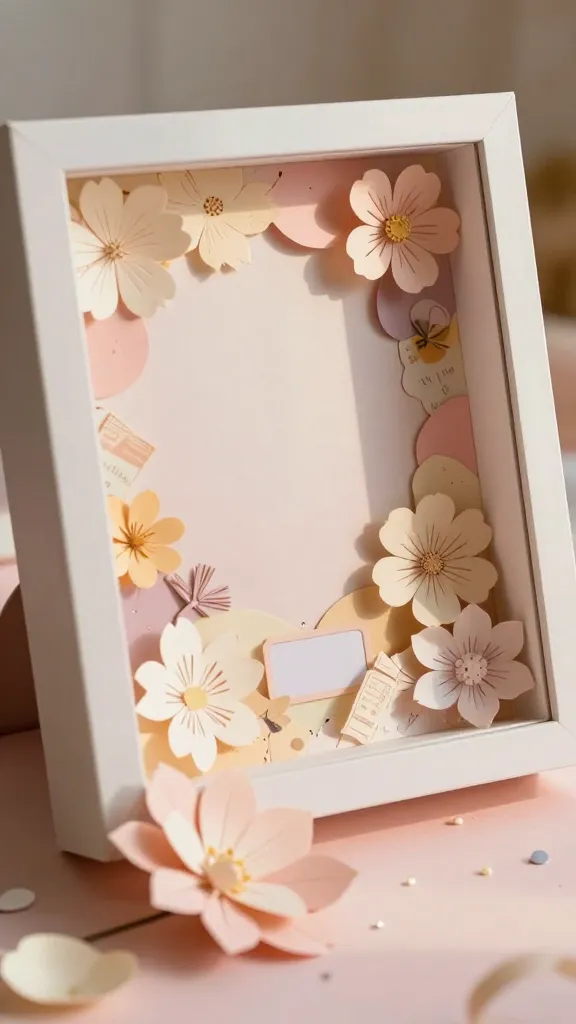
A shallow shadow box becomes a tactile time capsule when filled with cut-paper memories, tiny mementos, and a mini bouquet made from paper petals.
Materials: shadow box frame, decorative paper, cardstock, scissors, glue, mini keepsakes (ticket stubs, ribbons).
How to Make It: Layer pastel cardstock as a soft backdrop, add paper flowers, and tuck small tokens in corners. Add a small plaque with a birthday message for a personal touch.
Pro Tips: Use dimensional foam dots to create depth. This makes a heartfelt centerpiece or a thoughtful gift for a milestone year.
Who’ll love it: Sentimental folks who adore keepsakes and tactile decor.
7. Hexagon Geometric Party Lights Page Banner
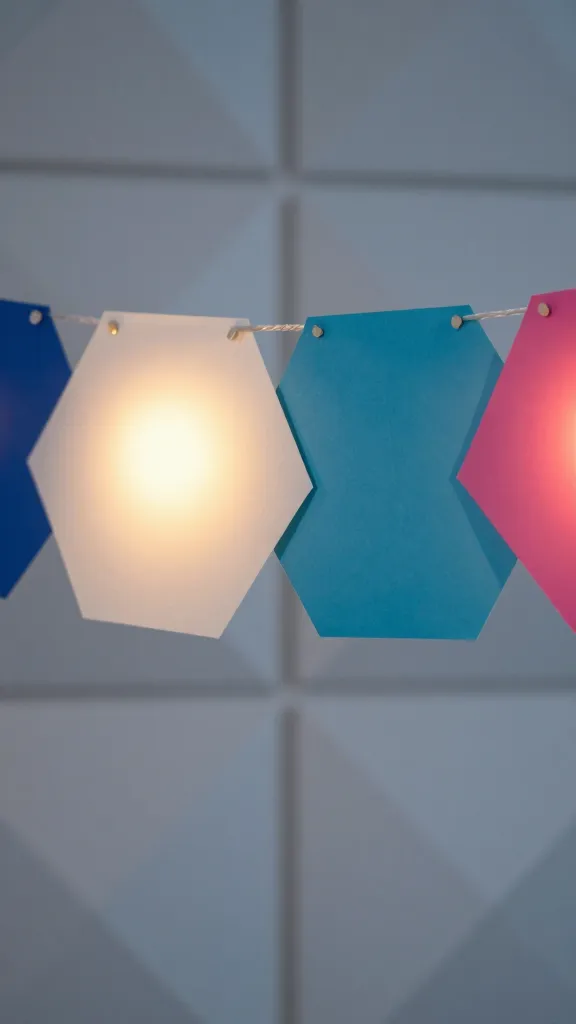
Forgo traditional garlands and craft a bold hexagon banner that catches light from string lights, creating a modern, geometric glow.
Materials: hexagon-shaped templates, colored paper, glue, scissors, string lights (optional).
How to Make It: Cut hexagon shapes in two palettes, glue back-to-back to form double-sided panels. String between two dowels or tack onto a wall with a clean geometric vibe.
Pro Tips: Alternate colors in a gradient for a dramatic effect. This pairs beautifully with a monochrome cake and gold accents.
Who’ll love it: Fans of modern design who want a statement piece that doubles as wall art.
8. Paper Watercolor Balloons Garland

Alive with soft, watercolor washes on paper cut into balloon shapes, this garland feels airy and artistic—perfect for a birthday photo backdrop.
Materials: watercolor paper, soft watercolor paints, scissors, string, masking tape, binder clips.
How to Make It: Paint balloon shapes with loose watercolor swashes, dry, cut out, and string together. Clip or tape to create a floating-feel garland across a wall or doorway.
Pro Tips: Use pale blush, sky blue, and seafoam for a dreamy palette. It looks especially chic with a white cake and gold accents.
Who’ll love it: Dreamy decorators and anyone who wants an artful, non-busy backdrop.
9. Paper Flower Cupcake Toppers Set
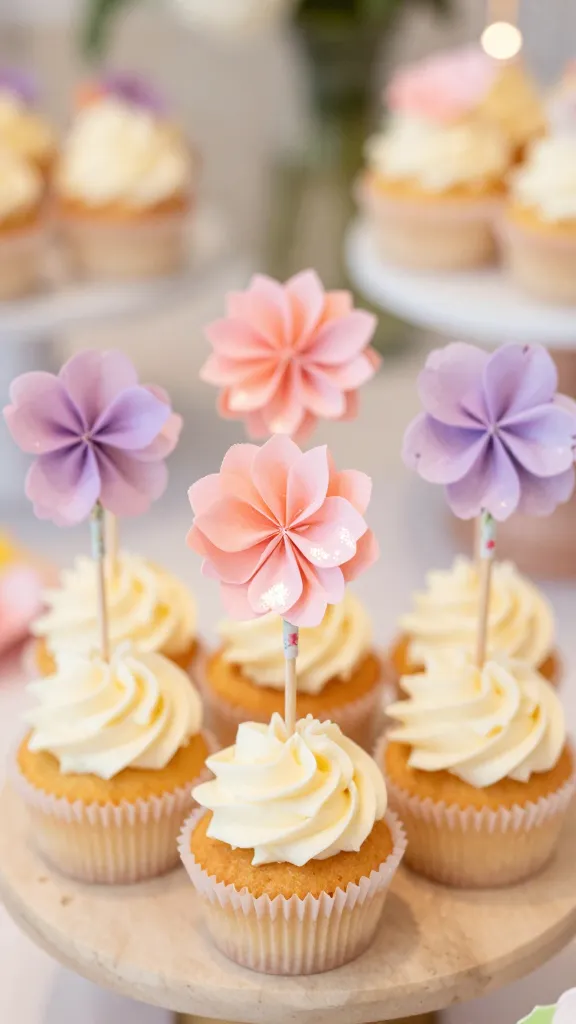
Turn plain cupcakes into a floral fête with delicate paper blossoms perched on sticks. A tiny, tasty pop of color that photographs beautifully.
Materials: colored tissue or origami paper, toothpicks, hot glue, floral tape, scissors.
How to Make It: Fold and sculpt petals into mini blooms, glue to the top of toothpicks, and insert into cupcakes just before serving. Mix sizes for a garden-party vibe.
Pro Tips: Add a dusting of edible shimmer spray to petals for a magical effect under lights. Great for backyard birthdays or tea parties.
Who’ll love it: bakers and party hosts who crave edible décor that isn’t messy or expensive.
10. Interactive Paper Flip-Book Birthday Card
A playful card that lets the recipient flip through mini moments—photos, doodles, and birthday wishes—hidden behind layered panels.
Materials: thick cardstock, patterned paper, small photos or stickers, mini brads, scissors, glue.
How to Make It: Create a multi-panel card with flip panels that reveal pockets of well wishes. Decorate with tiny captions and stickers for personality.
Pro Tips: Keep it compact to mail flat, but add a few interactive elements like pull-out tabs for a surprise moment.
Who’ll love it: People who adore surprises and personalized keepsakes.
11. Coral-Tinted Paper Lanterns for Ceiling Drama
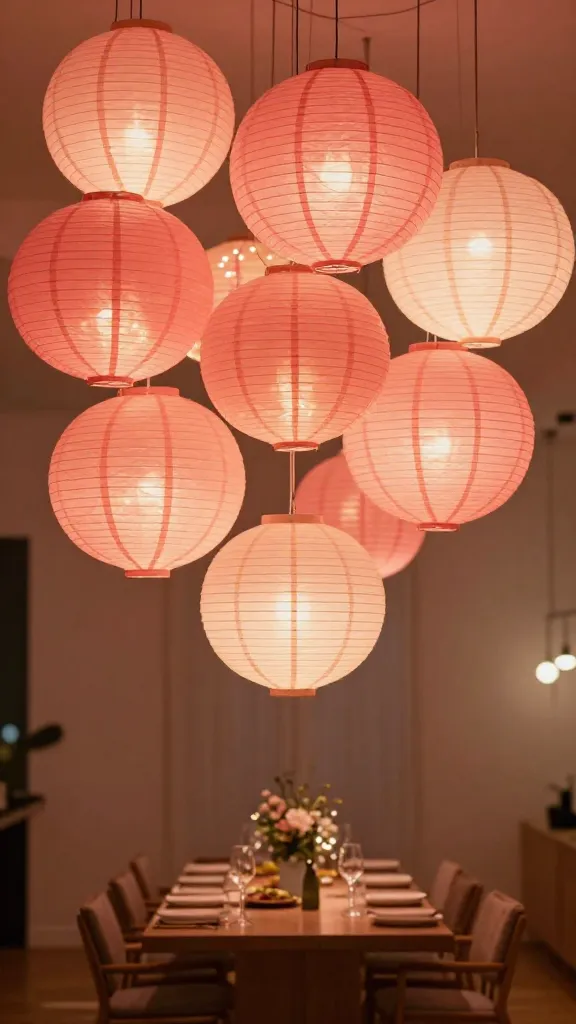
Soft, glowing lanterns hung in a cluster bring a room to life with a warm party aura. Lightweight paper lanterns in coordinated hues feel luxe without the fuss.
Materials: paper lanterns or DIY tissue lanterns, colored tissue, string, scissors, glue, battery-powered fairy lights.
How to Make It: Cover ready-made lanterns with tinted tissue for a gradient rinse. Add a string of lights inside and hang in a cluster above the feast table or dance space.
Pro Tips: Vary the sizes to create depth. This is especially magical in a dim room with twinkle lighting.
Who’ll love it: Big-sparkle enthusiasts and those who want a warm, cozy celebration vibe.
12. Mini Origami Favor Boxes
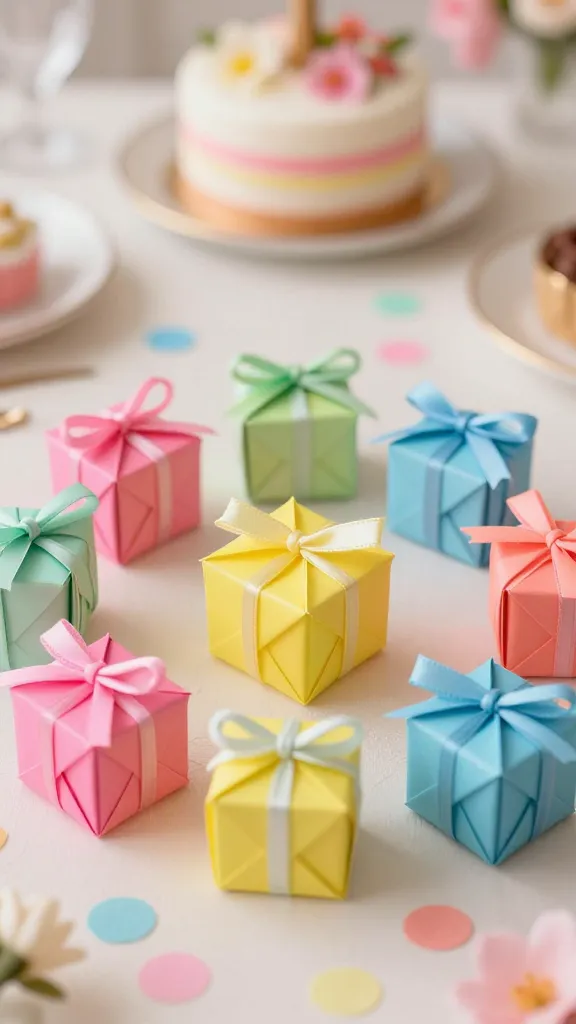
Small, foldable favor boxes in bright hues make the perfect take-home gift while acting as charming decor on the table.
Materials: colorful origami paper, ribbon for ties, glue, scissors, small treats or confetti.
How to Make It: Fold mini square boxes and add a ribbon tie. Fill with candy or a tiny note. Scatter around the cake or place at each seat as a keepsake.
Pro Tips: Print tiny thank-you messages on the inside of the boxes for a sweet reveal when opened.
Who’ll love it: Guests who adore tiny delights and thoughtful party favors.
13. Layered Paper Wreath with Birthday Slogan
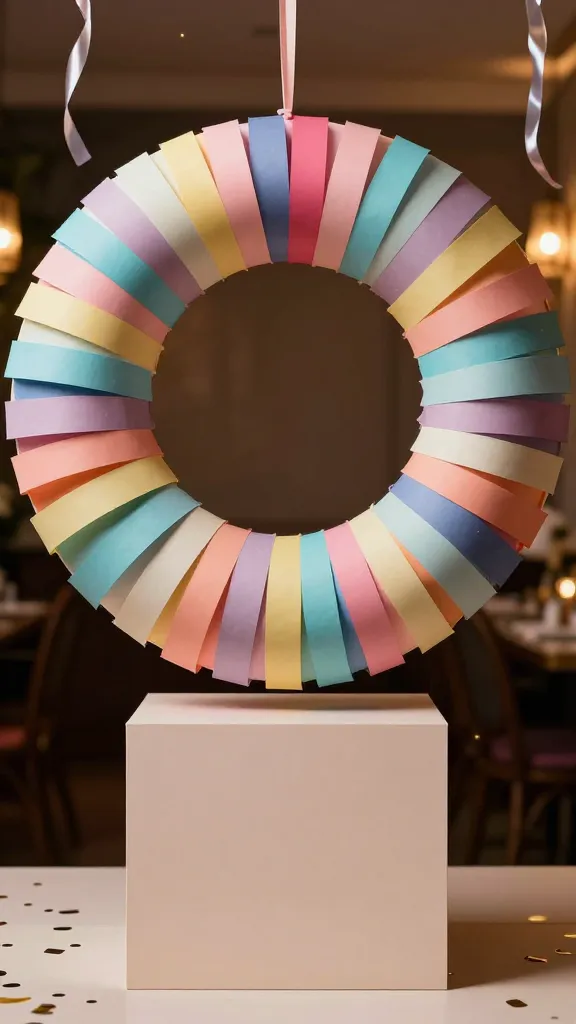
A wreath made from layered paper strips and a bold birthday banner at the center creates a dramatic entrance or backdrop photo area.
Materials: cardstock in multiple colors, circular wreath base, glue, scissors, ribbon for hanging, cardstock letters for slogan.
How to Make It: Cut paper strips, fold into accordion shapes, and glue onto the wreath base in concentric circles. Add a central banner with a catchy birthday slogan.
Pro Tips: Choose a color story that matches the party theme. Hang above the dessert table for maximum impact.
Who’ll love it: Decor lovers who want a statement piece they can reuse with new slogans each year.
14. Paper Garden Mason Jar Labels
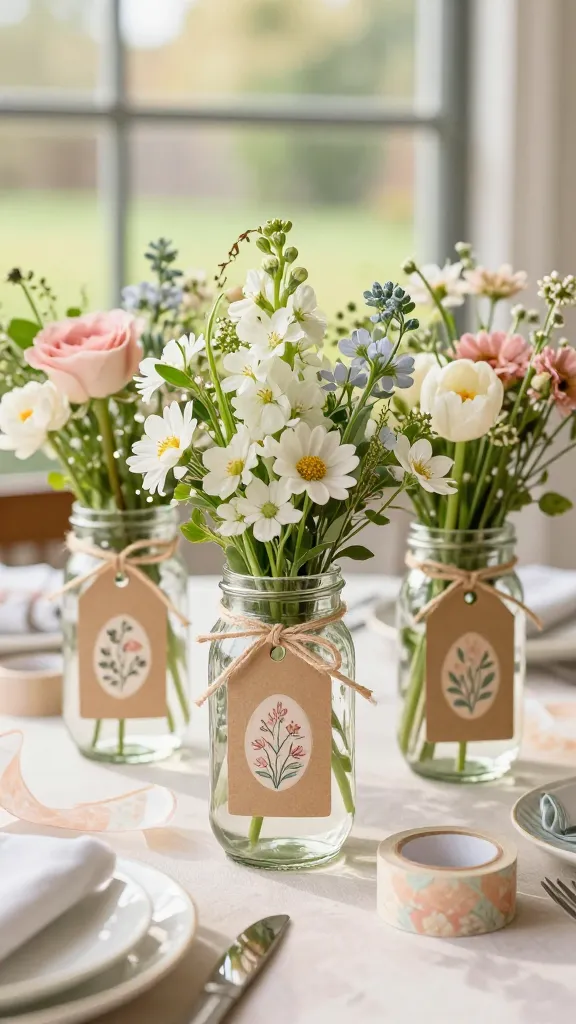
Turn simple mason jars into whimsical vessels with printable plant label tags that double as party favors or drink tags.
Materials: kraft paper tags, printable floral labels, washi tape, twine, scissors, glue, jars.
How to Make It: Print or hand-draw floral labels, cut into tags, and tie to jars with twine. Use as drink identifiers or decorative vases on the table.
Pro Tips: Laminate or coat the labels for longevity. Coordinate with the color palette for a cohesive look.
Who’ll love it: Guests who appreciate subtle, nature-inspired decor and practical keepsakes.
15. Folded Paper Bow Tie Wall Art
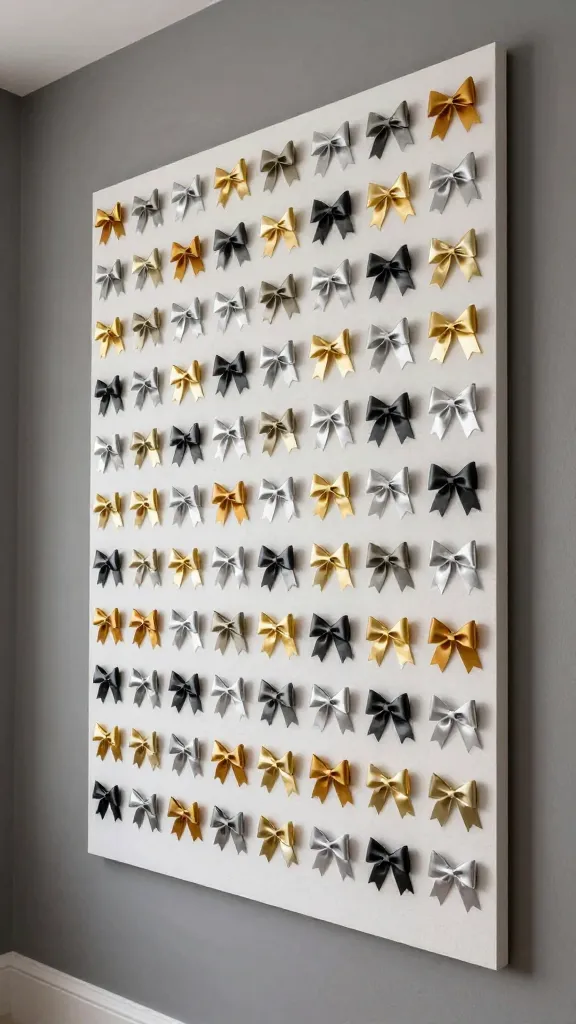
A chic geometric wall piece featuring folded paper bows creates a playful, stylish focal point in any party space.
Materials: colored paper, glue, scissors, foam board or thick card, hanging hardware.
How to Make It: Cut paper into slim rectangles, fold into tiny bows, and mount on a foam board in a diagonal grid. Frame or hang directly on the wall for a high-fashion touch.
Pro Tips: Use metallic accents for luxe vibes and a confident, modern look. This art pairs nicely with a monochrome palette and bright pops of color.
Who’ll love it: Design-minded hosts and art-full party planners who want something stylish and reusable for future birthdays.
Conclusion: Ready to jump into a world of paper-powered birthday magic? Pick one idea to start, or collect all 15 for a full-on DIY party makeover. Trust me, these quick, charming crafts are as rewarding to make as they are to display, pin, and gift.