11 Advanced 3d Craft Ideas for Makers: Jaw-Dropping Projects
Welcome, makers and DIY dreamers! If you crave projects that push boundaries and look stunning on your coffee table, you’re in for a treat. These 11 advanced 3D craft ideas blend texture, color, and clever engineering so you can create show-stoppers that scream “you made this.” Trust me, once you start, you’ll be hooked.
Now, let’s dive into ideas that feel like art projects you can actually finish—and that look amazing photographed for your next Pinterest round-up.
1. Laser-Cut Stackable Woodcity Terrarium
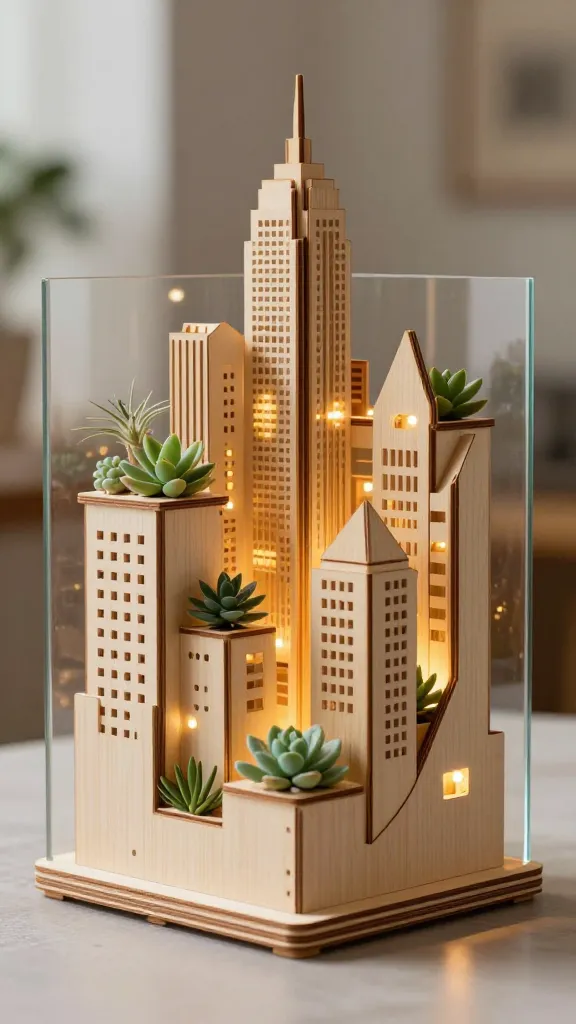
Picture a multi-layer terrarium that looks vertical and complex but comes together with clean lines and warm wood tones. When you stack the laser-cut layers, you create a tiny, sunlit cityscape that doubles as a living scene.
Materials
- Birch plywood sheets
- Laser cutter access or external service
- Small succulent or air plants
- Mini LED warm-white lights
- Wood glue and clamps
- Sandpaper (120–220 grit)
- Optional: tinted varnish
How to Make It
- Design a cityscape cross-section in vector software with stacked layers that interlock.
- Cut each layer carefully, sand edges, and stain or seal for cohesion.
- Assemble with glue, slotting pieces together to form a 3D tower. Thread LEDs along the back for glow.
- Introduce plants in the base or on top layers to bring life to the scene.
Pro Tips / Styling Ideas
- Keep color subtle—natural wood with an accent color on a couple of buildings.
- Place on a shelf with trailing greenery for a lush vignette.
- Use a clear acrylic stand to elevate the top layer for depth.
Who would love it?
Anyone who loves modern dioramas, mini gardens, or striking office decor—especially fans of clean lines and warm wood tones.
2. 3D Printed Geometric Wall Muzzle Lamps
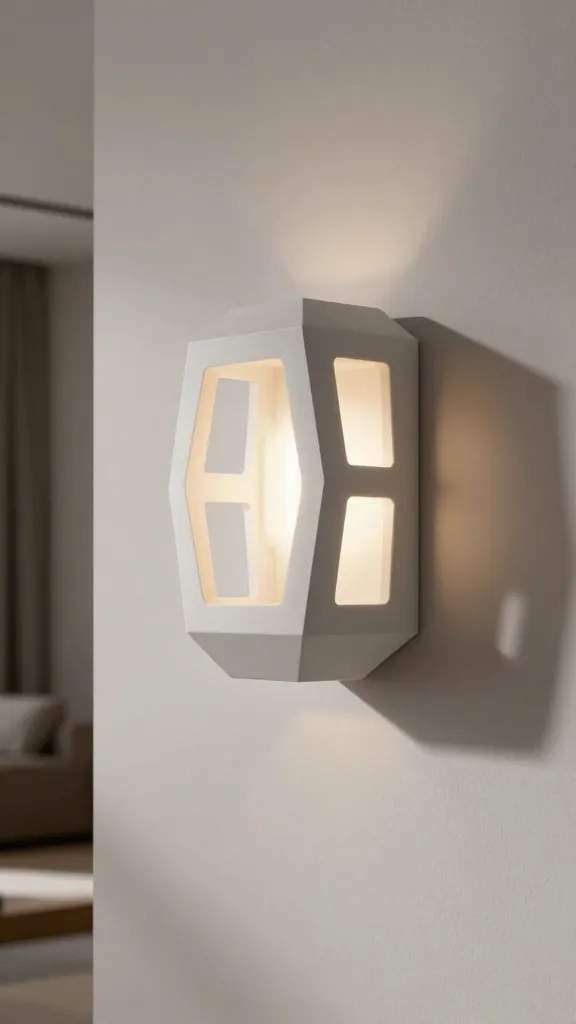
Think bold shadows and sculptural light. A geometric wall piece that doubles as a lamp, casting dramatic 3D patterns across your room. It’s statement lighting that doubles as wall art.
Materials
- 3D-printed geometric shell (PLA or PETG)
- LED strip or small LED puck lights
- Power supply or USB adapter
- Wall mounting hardware
- Primer and spray paint (optional)
How to Make It
- Design a hollow lattice or faceted shell with openings for light to pass.
- Print in two halves for easy assembly around a lighting element.
- Attach LEDs behind the shell, then mount on the wall with a recessed spacer to create a floating look.
Pro Tips / Styling Ideas
- Paint the interior a fluorescent shade to amplify glow when lit.
- Pair with a dimmer to adjust mood—from moody to vivid.
- Coordinate with minimalist black frames for a gallery vibe.
Who would love it?
Tech lovers, design obsessives, and anyone craving architectural lighting with a futuristic edge.
3. Resin-Inlaid 3D Floral Jewelry Display Tower

Okay, imagine a slender, elegant tower with resin-inlaid petals suspended vertically. It looks delicate but stands proud on your dresser, catching light from every angle.
Materials
- Clear casting resin and hardener
- Petal-shaped silicone molds or real dried flowers
- Color pigments or pearls
- UV resin or curing lamp
- Silicone mold release
- Display stand or pedestal
How to Make It
- Layer resin and embedded petals, ensuring a central void for the “floating” look.
- Pour in stages, curing between layers to prevent bubbles.
- Finish with a smooth edge and attach the piece to a small pedestal for vertical display.
Pro Tips / Styling Ideas
- Seal edges with clear polish to maximize shine.
- Alternating translucent colors creates a jewel-toned gradient.
- Use as a chic jewelry display on a vanity or dresser.
Who would love it?
Gift givers, stylish bathroom corners, and anyone who loves delicate, glass-like pieces without the fragility.
4. Elevation-Stacked Concrete Planter Modular System
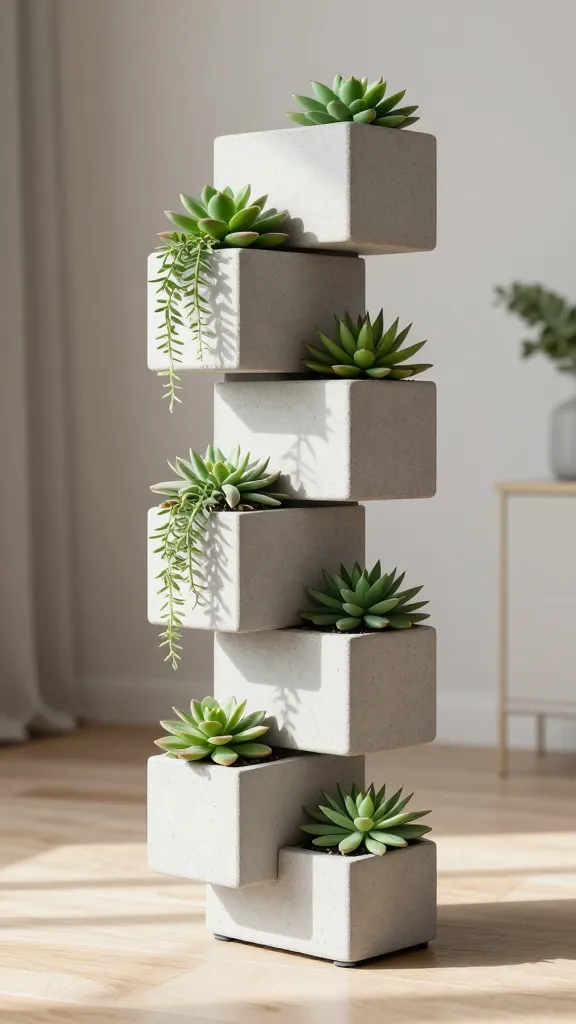
Concrete gets a modern upgrade with a modular, stacked design that forms a vertical garden or a compact desktop planter. It’s industrial chic meets botanical calm.
Materials
- Small concrete mixes or pre-mixed mini planters
- Silicone mold for modular shapes
- Non-slip protective feet
- Hydrostone or decorative pebbles
- Plant cuttings or small succulents
How to Make It
- Pour mini concrete modules in geometric shapes, then let cure fully.
- Dust and seal surfaces if desired for a polished look.
- Assemble modules like a stackable puzzle and fill with soil/pebbles and plants.
Pro Tips / Styling Ideas
- Keep a light color palette to emphasize the texture of concrete.
- Group in odd numbers for a more dynamic display.
- Use a wall-mhelf system to allow adjustments as plants grow.
Who would love it?
Plant lovers, urban readers, and anyone who wants a bold, tactile decor element with a green heart.
5. 3D-Printed Origami Wall Clock with Mesh Shell
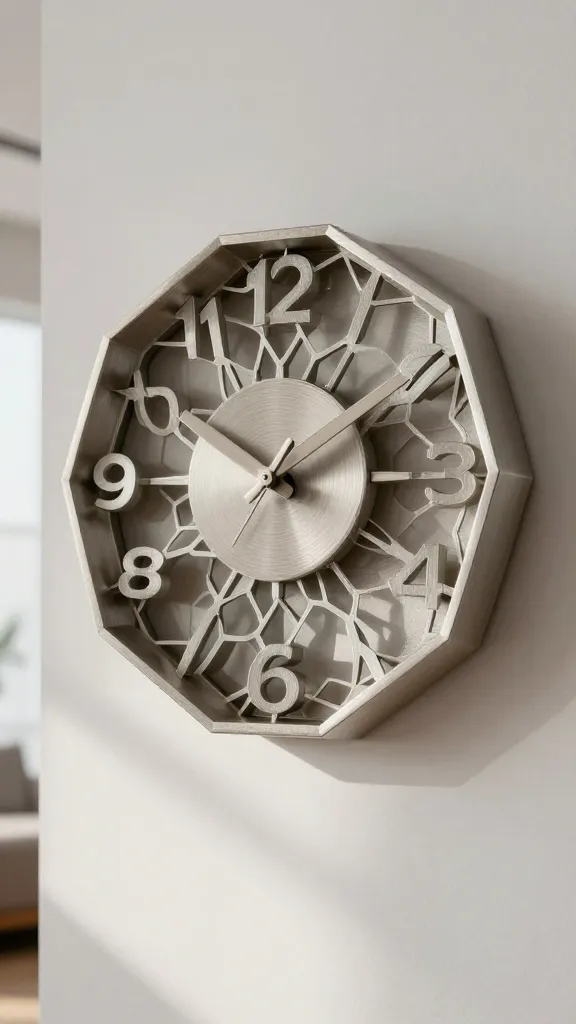
A wall clock that folds into a delicate, honeycomb-like shell. It’s sculptural timekeeping that doubles as wall art—perfect for a creative studio or modern living room.
Materials
- 3D-printed clock face with carved numerals
- LED clock mechanism kit
- Sticky back foam or mounting hardware
- Paint or metallic finishes
How to Make It
- Print a hollow origami-inspired shell with perforations for light and texture.
- Install the clock mechanism in the center and mount on the wall.
- Finish with a metallic paint for a high-end look.
Pro Tips / Styling Ideas
- Keep the face neutral; let the shell do the talking.
- Pair with clean, mid-century furniture to anchor the style.
Who would love it?
Time-tinkerers, interior aesthetes, and anyone who adores a clever blend of function and sculpture.
6. Sculpted 3D Textile Lightbox Pillow

Soft, tactile, and luminous—this project turns fabric into a 3D sculpture that doubles as a cozy pillow and a low-key light source.
Materials
- Lightbox with LED panel
- Stretchy fabric or knit, plus batting
- Clear glue or hot glue gun
- Fabric dye or paint for accents
How to Make It
- Stretch fabric over a soft forms (like a foam core) and glue into a rounded pillow shape.
- Cut fabric into 3D panels and attach to create raised texture.
- Place over a lightbox to glow softly through the fabric layers.
Pro Tips / Styling Ideas
- Use a pale palette with contrasting stitches for subtle drama.
- Place on a couch or armchair for an inviting glow at night.
Who would love it?
Texture lovers, cozy homebodies, and anyone who wants an ambient, tactile accent piece.
7. Animated Kinetic Paper Sculpture
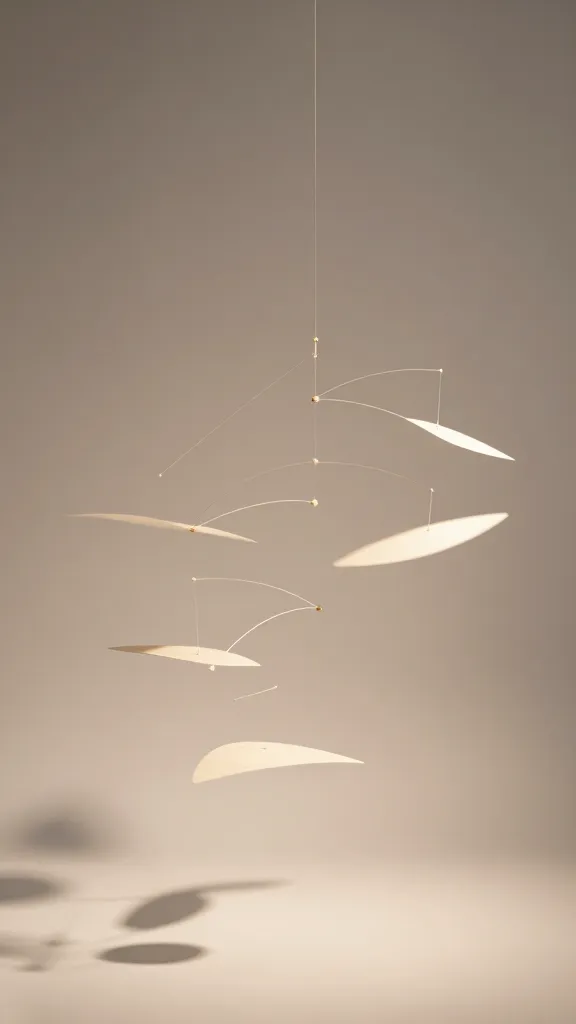
A true hands-on sculpture that gently sways with airflow, creating living motion in a minimal frame. It’s 3D, but you’ll impress with the delicate motion. FYI, relax and watch it evolve.
Materials
- Rigid cardstock or lightweight plywood
- Fine thread or fishing line
- Small magnets or pivot joints
- Wax or clear sealant
- Airflow source (desk fan or natural breeze)
How to Make It
- Cut shapes with laser or craft knife and assemble into a suspended mobile.
- Attaching lines at strategic balance points creates a natural sway when air moves.
- Seal edges to prevent moisture distortion.
Pro Tips / Styling Ideas
- Hang near a window or fan area for maximum motion.
- Paint in high-contrast, crisp colors to catch the eye.
Who would love it?
Quirky decor fans, makers who love motion, and anyone who wants an art piece that behaves like a breeze-tickled sculpture.
8. 3D-Printed Plant Petal Orbs
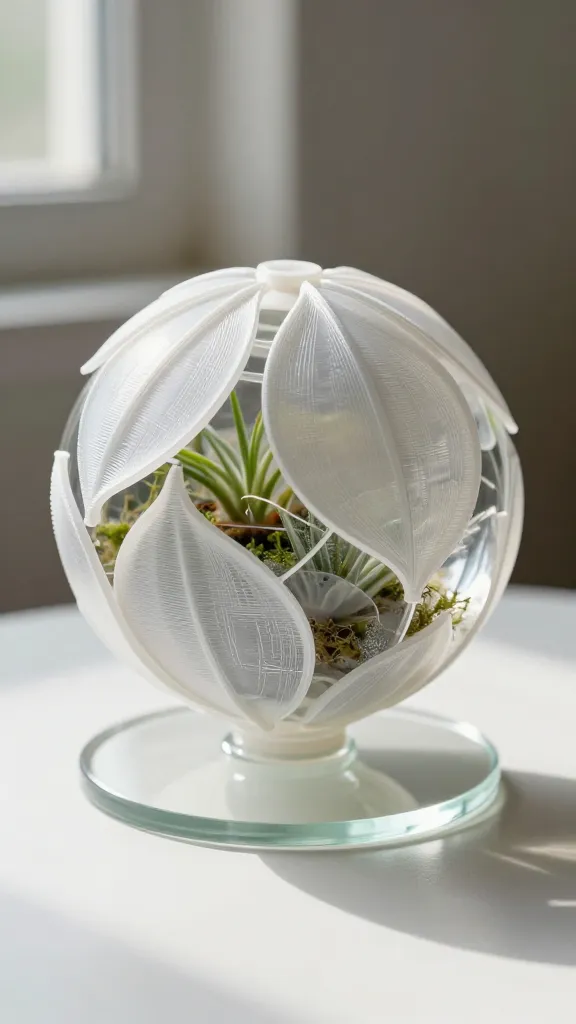
Imagine hollow orbs that hold tiny plants inside, with petal-like panels creating a softly faceted exterior. It’s living sculpture you can place on a shelf or table.
Materials
- 3D-printed hollow spheres with petal panels
- Small air plants or moss
- Rounded glass or acrylic stands
- Transparent sealant or resin
How to Make It
- Print or assemble the orb with several petal panels forming a flower-like exterior.
- Fill with a bit of soil and secure plants inside using a breathable membrane.
- Seal edges to protect from moisture while letting air pass.
Pro Tips / Styling Ideas
- Use soft greens and earthy tones for a botanical look.
- Group in a cluster at different heights for a garden-esque display.
Who would love it?
Houseplant lovers who crave sculptural forms and those who want botanical decor with a futuristic twist.
9. 3D Mandala Glass Tile Mosaic
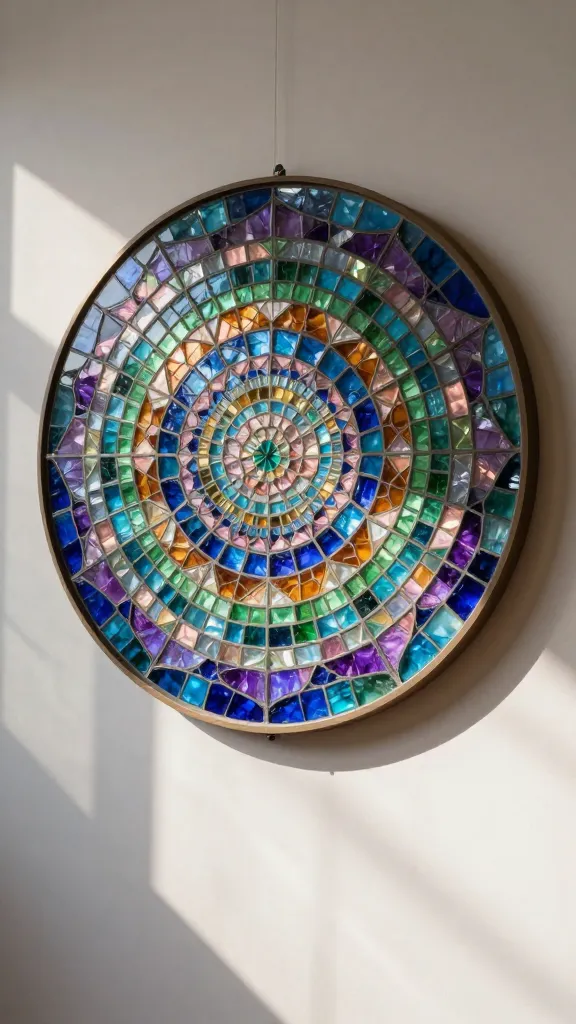
A mosaic that transcends typical tile work, with layered glass tiles arranged in a circular mandala that refracts light beautifully. It’s a meditative, colorful wall piece that catches eyes from across the room.
Materials
- Colored glass tiles or acrylic tiles
- Thin wood or metal backing
- Strong adhesive for glass
- Grout sealant
- Protective UV spray (optional)
How to Make It
- Plan a symmetrical mandala layout on the backing, then adhere tiles in concentric rings.
- Grout with a tight line and wipe clean for a polished finish.
- Seal to reduce wear and preserve color vibrancy.
Pro Tips / Styling Ideas
- Hang against a bright wall to maximize color pop.
- Prefer cool blues and purples for a serene vibe.
Who would love it?
Color lovers, glass art enthusiasts, and anyone wanting a reflective focal point in a hallway or living room.
10. 3D-Layered Cardboard Architectural Models
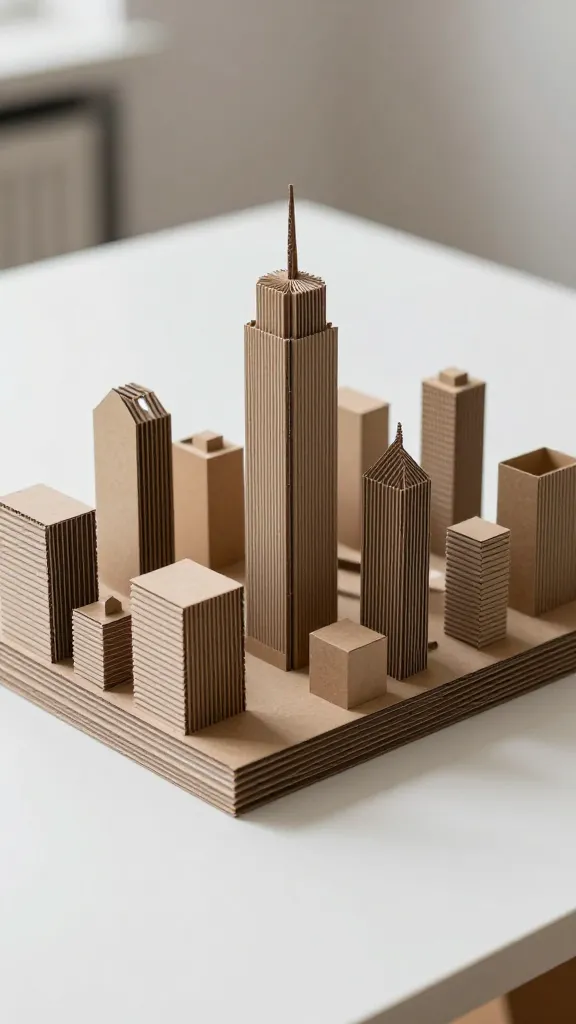
Turn simple cardboard into a sophisticated, layered architectural model that can sit on a desk as a modern mini-cityscape. It’s cardboard magic that feels premium when finished with care.
Materials
- Corrugated cardboard sheets
- Ruler, craft knife, cutting mat
- White glue and clamps
- Water-based sealant or paint
- Fine sandpaper (optional)
How to Make It
- Cut interlocking layers of cardboard to form a skyline with varying heights.
- Glue layer by layer to build a 3D composition, then seal edges for longevity.
- Paint or leave natural for a minimalist look.
Pro Tips / Styling Ideas
- Use a pop color on a single building to draw the eye.
- Display on a clean white shelf with a few small potted succulents.
Who would love it?
Architectural buffs, school project fans, and anyone who loves clever, sustainable craft using everyday materials.
11. 3D Embossed Paper Lanterns With Layered Petals
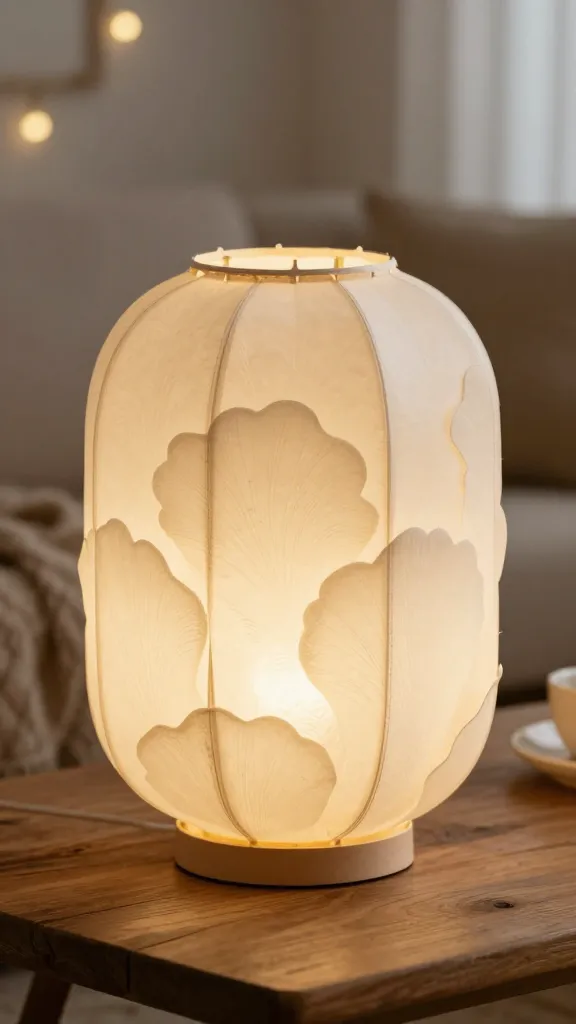
Delicate, luminous, and surprisingly sturdy, these lanterns use layered paper petals to form a soft, sculptural glow. They’re perfect for cozy dinners or atmospheric photoshoots.
Materials
- Thick craft paper or cardstock
- LED tea lights or small battery LEDs
- Wire or sturdy paper rolls for structure
- Adhesive and scissors
- Optional: vellum for diffused light
How to Make It
- Cut petal shapes and stack them in a circular pattern to form a lantern shell.
- Create a lightweight internal frame to keep the petals expanded.
- Place LEDs inside and suspend or mount as a hanging fixture.
Pro Tips / Styling Ideas
- Use warm white LEDs for a cozy glow.
- Combine several lanterns at different heights for a magical table centerpiece.
Who would love it?
Party hosts, photographers, and anyone who loves handcrafted lighting with a soft, romantic vibe.
Conclusion
These 11 advanced 3D craft ideas prove that you can push creative boundaries without losing the playful, DIY spirit. Pick one (or all) and start building—your space will thank you, and your followers will be bookmarking every step. Ready to dive in? Grab your tools and let the making begin!