8 Clever Recycled Craft Ideas to Reduce Waste
Feeling crafty and eco-friendly at the same time? You’ve come to the right place. These 8 completely unique ideas prove that waste can be wonderful, stylish, and totally practical. Grab a cup of coffee, and let’s turn trash into treasure together.
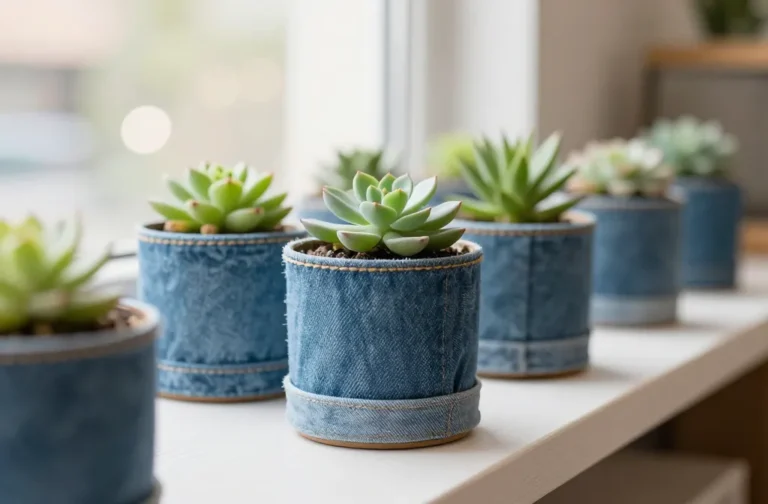
1. Upcycled Denim Tote Bag With Patches Of Fun
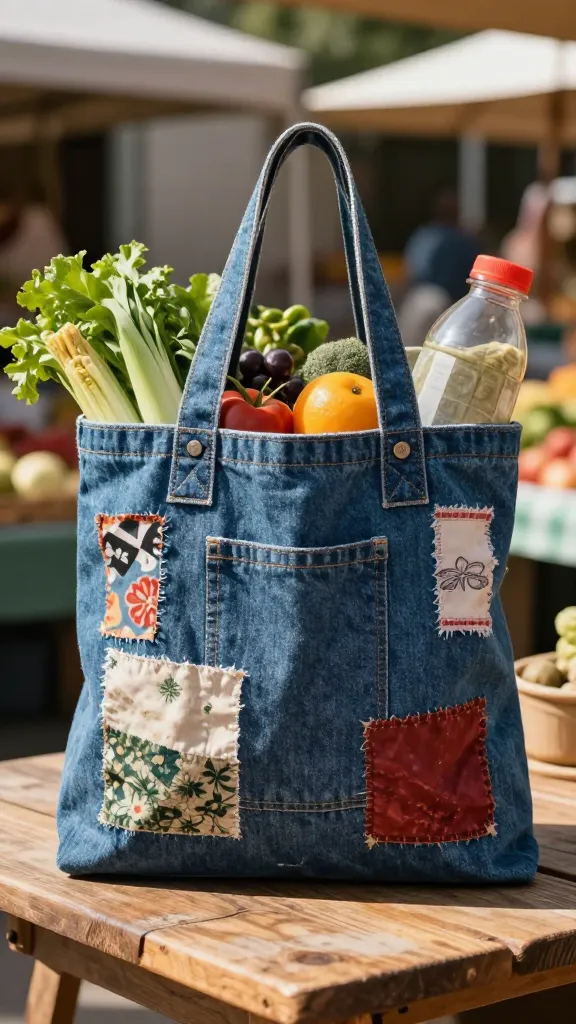
Picture a breezy tote, made from old jeans, carrying sunlit groceries or a weekend farmer’s market haul. It’s sturdy, stylish, and totally one-of-a-kind. The secret? bold patches from scrap fabric that jazz up the classic denim canvas.
Materials
- Old jeans (preferably three pairs for color variety)
- Fabric scraps or thrifted patches
- Sewing machine or sturdy needle and thread
- Webbing strap or sturdy fabric for handles
- Scissors, ruler, tailor’s chalk
How to Make It
- Cut a large rectangle from your jeans for the bag body, plus two handles from the same fabric or webbing.
- Arrange fabric patches on the front and back panels; sew them down with a zigzag or straight stitch for a playful mosaic look.
- Assemble the bag by sewing sides, bottom, and attaching handles. Finish with a simple top stitch for a clean edge.
Pro Tips / Styling Ideas
- Use contrasting stitch colors to highlight the patchwork.
- Line the interior with a lightweight removable liner for easy cleaning.
- Great for gift-giving—fill with goodies and wrap in brown paper for a rustic twist.
Who’ll love it? Anyone craving a sturdy, stylish everyday tote that sparks conversations about reuse. FYI, it’s a perfect project for denim lovers or anyone with a treasure trove of old patches.
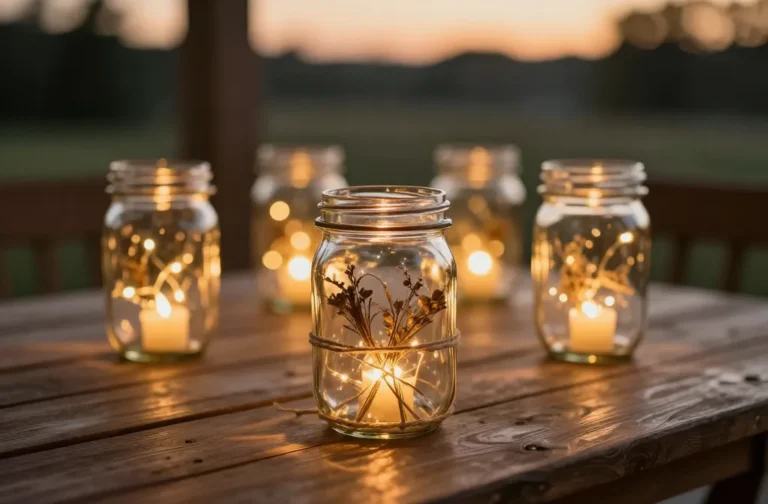
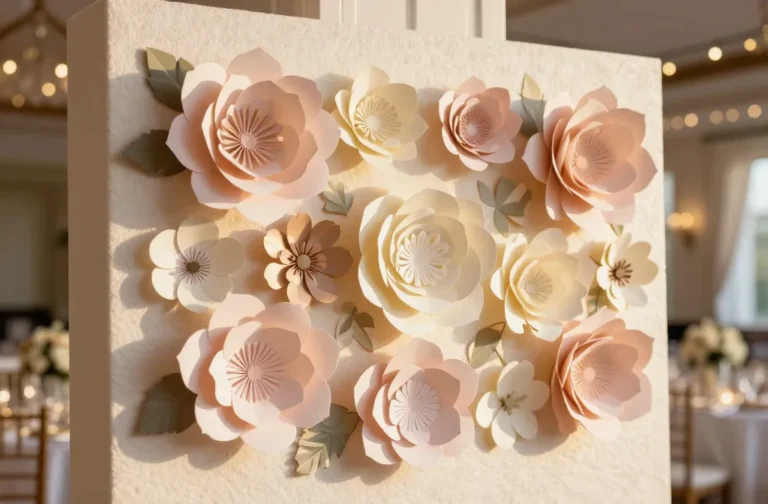
2. Cascading Jar Lanterns Made From Recycled Tea Jars
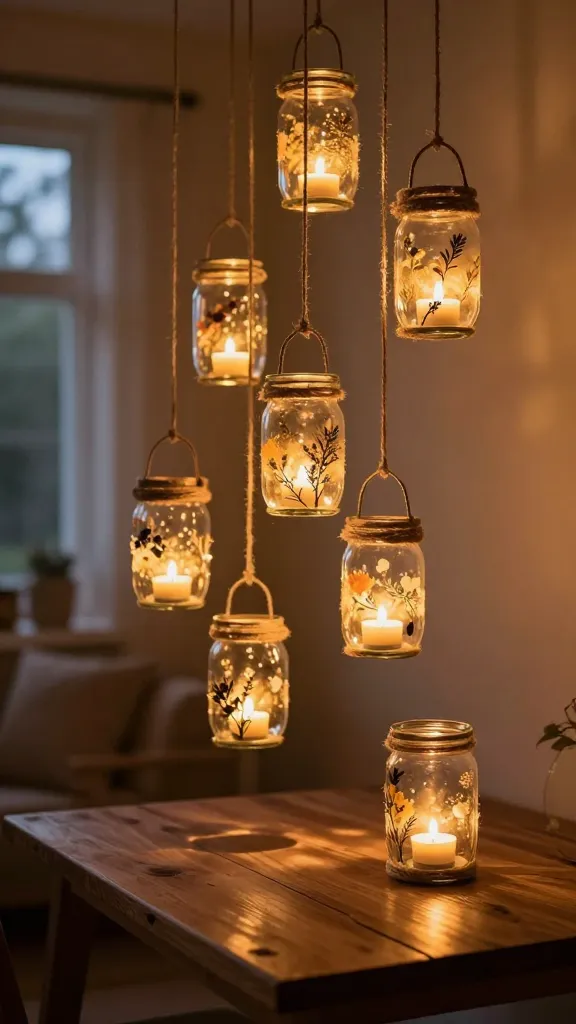
Imagine a warm evening glow, soft and amber, dancing across your walls thanks to glass jars rescued from the recycling bin. These lanterns feel magical, yet they’re incredibly simple to assemble.
Materials
- Empty empty glass jars of various sizes
- Tealights or LED tea lights
- Jute twine or decorative ribbon
- Hot glue or strong adhesive
- Optional: dried botanicals, paint, or decoupage paper
How to Make It
- Decorate the jars with twine wraps, dried leaves, or paint splashes for color and texture.
- Place a tealight inside and tie a little tag with a message or quote for extra charm.
- Group them on a table, rail, or patio to create a magical, candlelit mood.
Pro Tips / Styling Ideas
- Mix glass sizes at different heights for visual interest.
- Create a color story by using jars in a cohesive palette (warm ambers, berry tones, or frosted whites).
- For outdoor use, switch to LED lights to avoid heat and weather concerns.
Who’ll love it? Ideal for cozy nights, garden corners, or a charming wedding decor setup. Trust me, these little lanterns will glow up your space.
3. Cardboard City Wall Art That Speaks Your Style
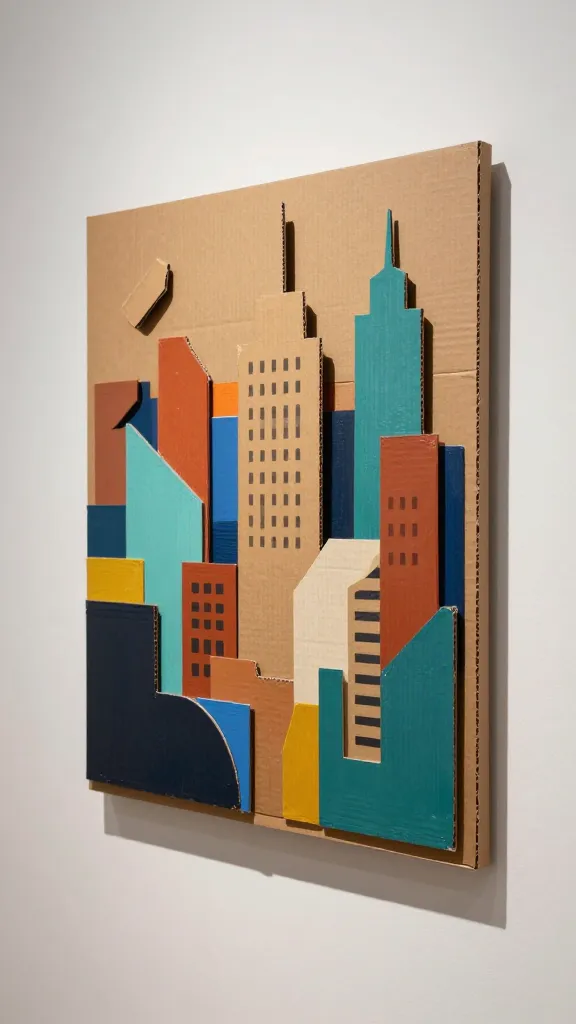
Turn scrap cardboard into a bold, gallery-worthy centerpiece. This project is all about shape, texture, and a dash of personality—no two pieces look alike.
Materials
- Takeout box cardboard or any sturdy recycled cardboard
- Acrylic paints, markers, or colorful washi
- Ruler, pencil, craft knife
- Glue or double-sided tape
- Optional: string for hanging, small decorative elements
How to Make It
- Cut the cardboard into bold geometric shapes or city silhouettes. Layer pieces to create depth.
- Paint or decorate each shape with a bold color palette that fits your room.
- Assemble on a backing board with some spacing between shapes; finish with a hanging cord.
Pro Tips / Styling Ideas
- Use metallic accents or a matte-black frame for a dramatic look.
- Try negative space by leaving gaps between shapes for an architectural vibe.
- Hang above a sofa or on an entry wall for instant personality.
Who’ll love it? Perfect for renters who want big impact without committing to new materials. Seriously, your walls will thank you.
4. Jar Lids Flower Mosaic Magnets
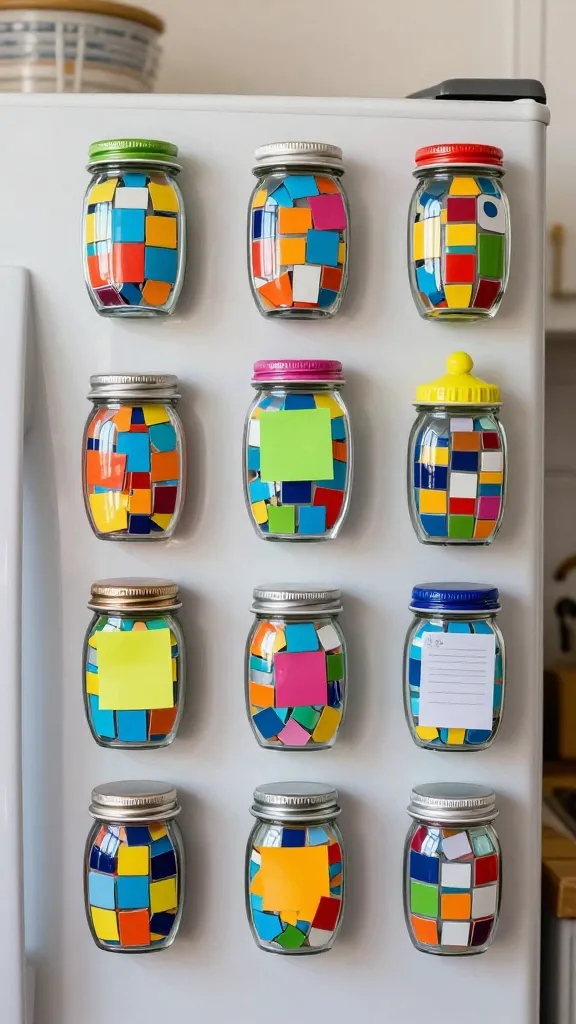
Small, bright, and wildly satisfying to assemble, these mosaic magnets use everyday jar lids to create cheerful art on your fridge. The finished set feels like a tiny gallery of color.
Materials
- Used jar lids (metal or plastic)
- Colorful paper scraps, bottle caps, or tiny tiles
- Strong glue, hot glue gun
- Magnets with strong adhesive
- Clear sealant or Mod Podge
How to Make It
- Cut or trim scraps to fit the lid interiors, then glue down in a mosaic pattern.
- Seal with Mod Podge to keep colors vibrant and resistant to wear.
- Attach a magnet to the back and let them dry fully before popping on the fridge.
Pro Tips / Styling Ideas
- Group several lids in a row for a bright, retro gallery look.
- Coordinate with kitchen decor—think sunny yellows, sea-glass greens, and coral pinks.
Who’ll love it? Crafty teens, busy adults, or anyone who wants a splash of color on a magnetic board. You’ll love how easy it is to swap in new designs.
5. Eco-Ware Picture Frames: From Pallets to Frames
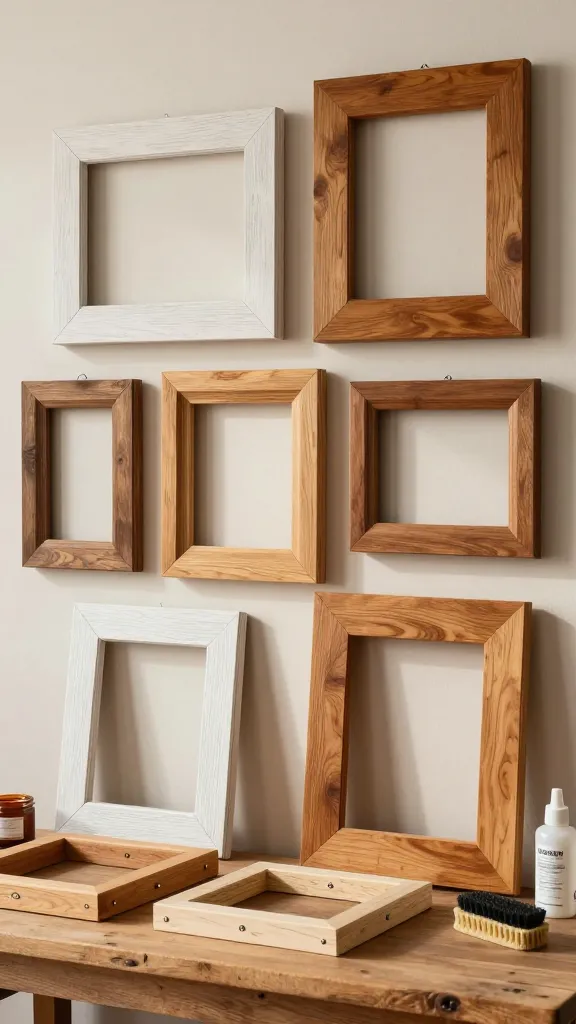
Who knew discarded pallet wood or old picture frames could become gallery-worthy accents? This project turns rough edges into warm, natural frames ready for your favorite memories.
Materials
- Old picture frames or pallet wood planks
- Sandpaper, wood stain or whitewash, sealant
- Glossy or matte finish spray
- Back support staples or mounting hardware
How to Make It
- Disassemble frames or cut pallet wood into equal lengths for a DIY multi-frame display.
- Sand smooth, then stain or whitewash to taste. Seal for durability.
- Assemble into a collage or align as a single large frame; mount your photo or art inside.
Pro Tips / Styling Ideas
- Mix finishes (a little oak, a touch of gray wash) for a warm, eclectic vibe.
- Create a rotating gallery by swapping photos seasonally.
Who’ll love it? Home decor lovers who want a rustic-chic touch without buying new frames. Seriously, it adds character to any wall.
6. Sock Yarn Curtain String Art
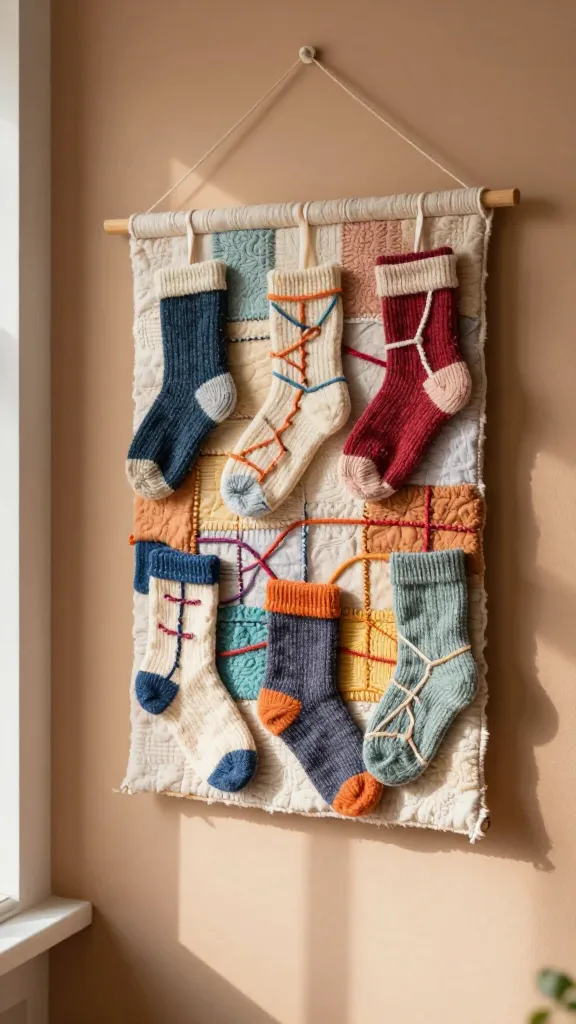
Turn old socks, ribbon scraps, and yarn into a soft, tactile wall piece that doubles as a cozy curtain accent. It’s fiber art with a forgiving, playful vibe.
Materials
- Old socks or fabric scraps
- Yarn in multiple colors
- Wooden dowel or curtain rod
- Glue, needle, or small nails
- Optional: beads or buttons for extra texture
How to Make It
- Flatten the fabric scraps, and lay them in rows or a geometric pattern on a backing board.
- Wrap yarn around the fabric shapes to create a stitched, string-art look.
- Attach the finished panel to a dowel for easy hanging as a wall feature or window curtain accent.
Pro Tips / Styling Ideas
- Choose a neutral background and pop in a few bright yarn hues for a playful pop.
- Use in a reading nook or kids’ room for a soft, whimsical touch.
Who’ll love it? Yarn lovers and fabric collectors who want tactile art that cozies up a space. You’ll seriously enjoy running your fingers along the texture.
7. Refinished Glass Bottle Vases With Nature’s Accent
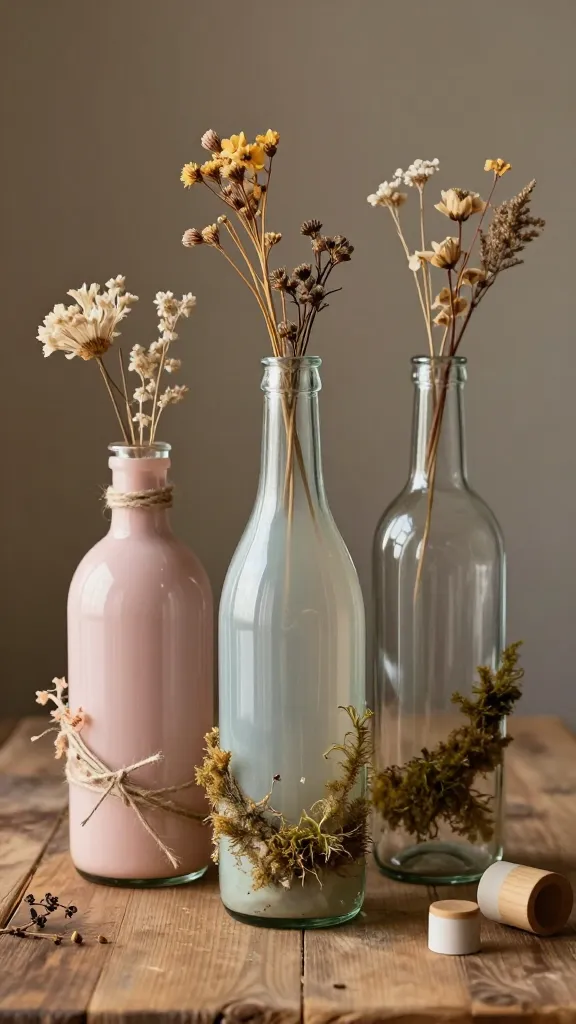
Give old glass bottles a fashionable glow with a dab of color and a sprinkle of real-world textures. These vases are simple, chic, and endlessly giftable.
Materials
- Empty glass bottles (wine, beer, or soda bottles)
- Acrylic paint, spray paint, or glass paint
- Natural elements: dried flowers, twine, dried moss
- Wooden or ceramic stop-end caps (optional)
- Adhesive for securing accents
How to Make It
- Rinse bottles and dry them completely. Paint or apply a color wash to the exterior.
- Fill with dried flowers or natural accents and seal with a clear finish.
- Wrap the neck with twine or attach a small charm for added character.
Pro Tips / Styling Ideas
- Group bottles of varying heights on a windowsill or dining table centerpiece.
- Coordinate colors with your season—soft pastels for spring, earthy tones for autumn.
Who’ll love it? Gift-givers, plant lovers, and anyone who enjoys miniature, nature-inspired decor. You’ll be amazed how such simple bottles become showpieces.
8. Plastic Spoon Wall Clock: A Playful Timepiece From Kitchen Scraps

Resembling a modern art piece, this wall clock is made from repurposed plastic spoons, arranged in a sunburst or geometric pattern. It’s quirky, functional, and surprisingly stylish.
Materials
- Plastic spoons (colorful varieties look best)
- Clock mechanism kit (with hands)
- Plywood or sturdy backing board
- Hot glue, strong adhesive
- Paint or spray paint (optional)
How to Make It
- Arrange spoons into a circular or sunburst design on the backing board; glue in place but leave space for the clock mechanism at the center.
- Attach the clock mechanism through the center and fix the hands according to the instructions.
- Optionally paint spoons or backboard for a cohesive color story.
Pro Tips / Styling Ideas
- Use two or three colors for a bold, graphic look.
- Mount over a minimalist wall for a playful contrast that still looks chic.
Who’ll love it? Creative thinkers, kitchen crafters, and anyone who wants a functional art piece. Seriously, it’s conversation-starting and totally impractical to ignore.
Conclusion
These 8 clever recycled craft ideas prove that reducing waste can be a fun, stylish, and highly satisfying hobby. Pick one (or all eight) and watch your space transform—without adding clutter or buying new materials. Trust me, you’ll love the creative rush of turning everyday castoffs into something you’ll proudly display.