8 Viral Aesthetic Pinterest Craft Ideas to Try
Ready to turn your DIY day into a scroll-stopping, pin-worthy session? These eight completely unique crafts are designed to vibe with Pinterest aesthetics and keep your hands busy (and your feed buzzing). Each idea is easy, affordable, and totally shareable—trust me, you’ll want to save them all.
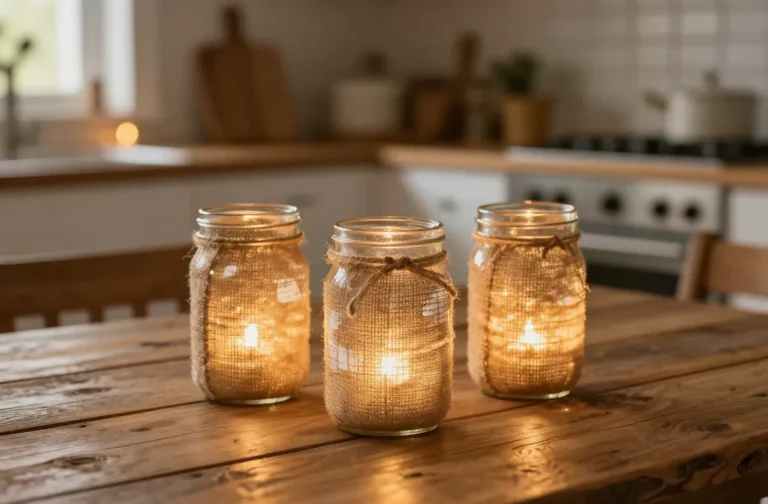
1. Rustic Mason Jar Lantern With Fairy Lights
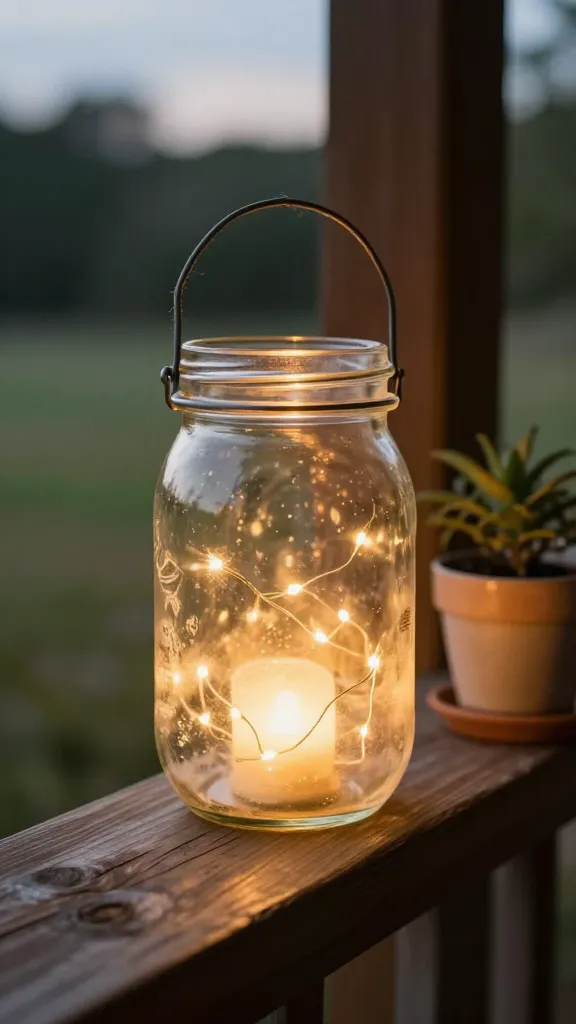
Picture this: a soft-glow lantern perched on your porch or coffee nook, breathy amber light drifting through a frosted jar. This project blends rustic charm with a dreamy glow that instantly elevates any space.
Materials Needed
- Wide-mouth mason jars (clear or frosted)
- Warm-white LED fairy lights
- Chalk paint or kraft paint in ivory or cream
- Fine-grit sandpaper
- Jute twine or rustic handle
- Glass etching cream (optional for a frosted look)
- Battery pack (tiny, tucked away)
How to Make It
- Gently sand the jar for a soft, matte surface.
- Paint a thin, even coat in your chosen color; let dry, then add a second coat for depth.
- Wrap the fairy lights around the inside, securing the battery pack hidden at the back.
- Wrap jute around the neck, knotting it for a rustic handle. If you want extra texture, lightly brush on a frosted finish with etched cream.
Pro Tips / Styling Ideas
- Place two or three on a tray with eucalyptus stems for a cozy centerpiece.
- Switch to solar-powered lights for an outdoor-friendly glow.
- Use as a warm wedding favor or a backyard retreat accent.
Who would love it: cozy porch loungers, garden hosts, anyone chasing warm, inviting vibes. You’ll love the soft, ambient glow—great for evenings that feel straight out of a fairytale.
2. Velvet Monogram Wall Shadow Box
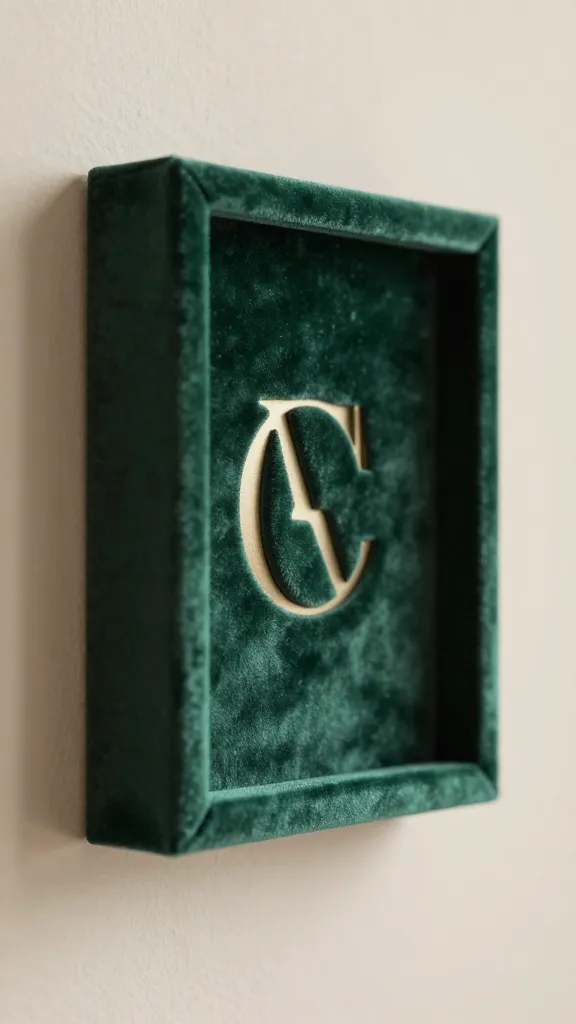
Soft textures meet bold personalization in this velvet monogram shadow box. It’s luxe, tactile, and instantly elevates a plain wall with a touch of royalty—without the hefty price tag.
Materials Needed
- Plain shadow box frame (8×10 or 11×14)
- Velvet scrap in a rich color (emerald, blush, navy)
- Cardstock for backing
- Foam adhesive or double-sided tape
- Scissors, ruler, fabric glue
- Metallic or foil letter cutouts for monogram
How to Make It
- Cut velvet to fit the backing, leaving a slight margin to tuck edges.
- Mount the velvet onto the backing with a light spray of fabric glue.
- Adhere foil letters to spell the monogram; pop into the shadow box so the velvet peeks around the edges.
Pro Tips / Styling Ideas
- Coordinate velvet with other textiles in the room for cohesive styling.
- Swap colors seasonally—lush greens for fall, soft pinks for spring.
- Hang solo or cluster in a gallery wall for major impact.
Who would love it: typography lovers, chic apartment dwellers, anyone craving luxe texture. It feels premium but is secretly simple enough for a weekend project.
3. Geometric Terrazzo Painted Plant Pots
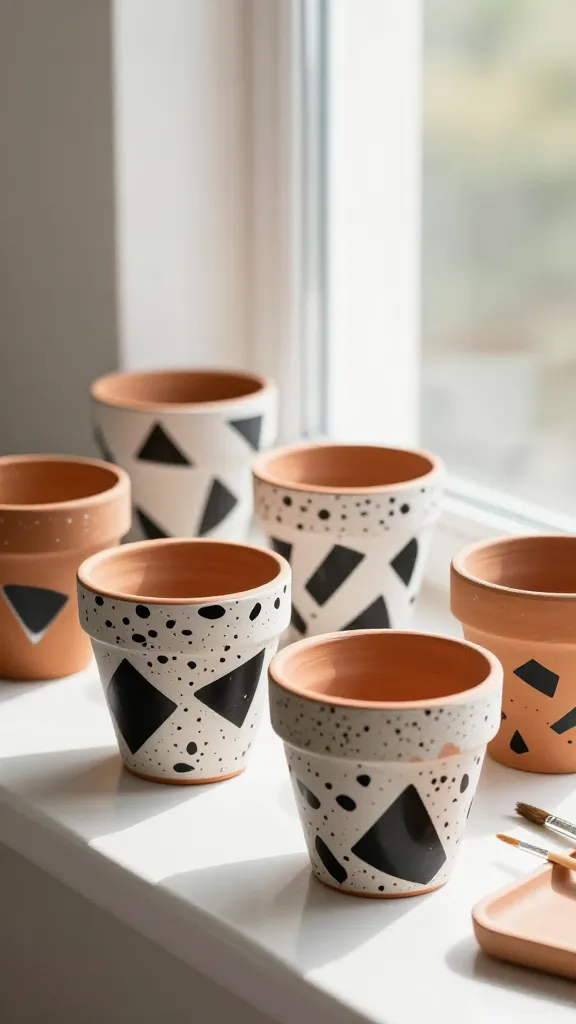
Terrazzo vibes without the heavy commute to a design studio. These geometric pots are playful, modern, and perfect for sprucing up a sunny windowsill or desk corner.
Materials Needed
- Terracotta pots in small to medium sizes
- Acrylic paints in white, black, and 2–3 bold accent colors
- Painter’s tape
- Topcoat sealant (matte or satin)
- Small brushes or sponge blenders
How to Make It
- Base coat the pots in a solid color and allow to dry.
- Use painter’s tape to map off triangles or diamonds; paint in contrasting colors for a terrazzo-inspired look.
- Seal with a protective topcoat to keep colors vibrant.
Pro Tips / Styling Ideas
- Pair with a mix of green succulents and trailing vines for a lively tiered display.
- Group pots of different shapes and sizes on a shelf for a gallery effect.
- Use as gifts by filling with small cuttings or herbs.
Who would love it: color lovers, modern minimalists, plant moms. The geometric pattern reads artsy but stays approachable and fun.
4. Ribbon-Tied Glass Jar Trinket Box Set
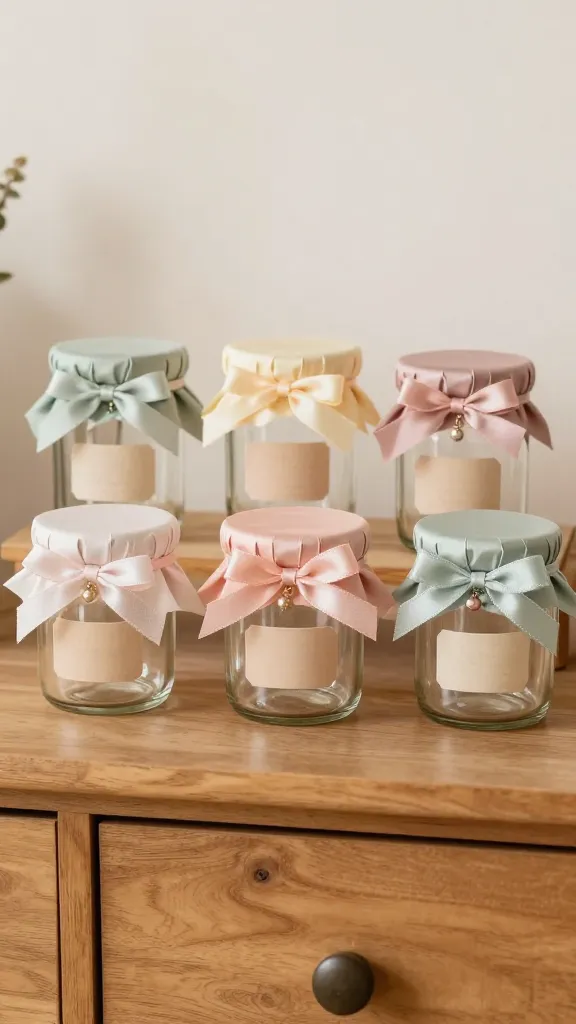
Treasures deserve a pretty home. A set of glass jars dressed with ribbons makes a delightful storage solution and a charming display, whether on a dresser or a desk.
Materials Needed
- Small glass jars with lids
- Ribbon in coordinating colors and textures
- Hot glue gun or strong craft glue
- Labels or adhesive-backed tags
- Optional: tiny charms or beads for embellishment
How to Make It
- Wrap ribbon around the lid or body of the jar; secure with a dab of glue and tie a bow.
- Label each jar with what it holds—rings, buttons, spices, or confetti.
- Embellish with a small charm or bead for personality.
Pro Tips / Styling Ideas
- Line a tray with a soft fabric beneath for a cozy organizer set.
- Mix ribbon textures (satin, velvet, grosgrain) for interest.
- Use as a wedding shower favor holders filled with candy or seeds.
Who would love it: organizers, gift-givers, anyone who loves a touch of whimsy. It’s a delight to curate a little jewelry or keepsake stash in gorgeous glass.
5. Textured Knit Wall Hanger
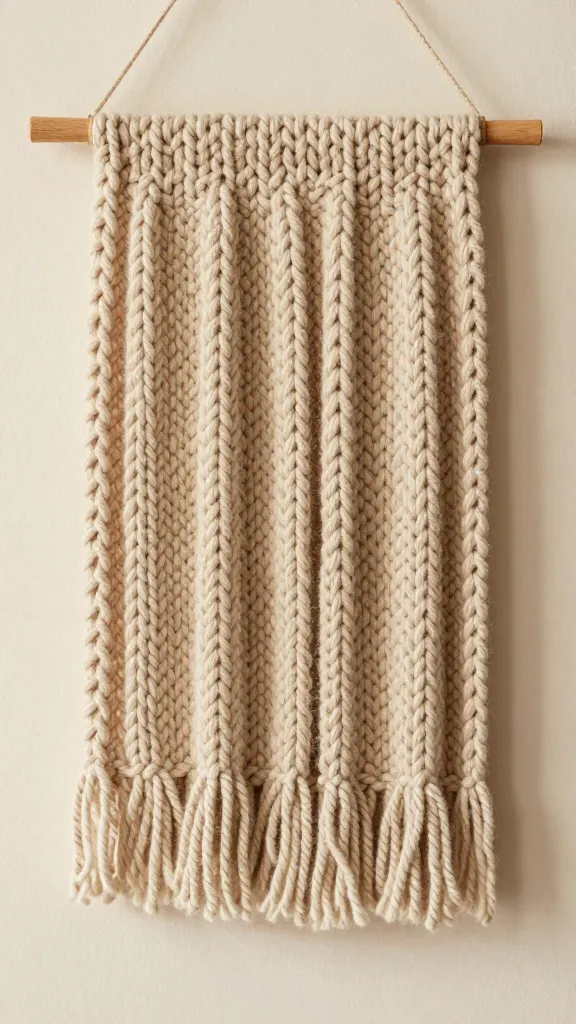
Soft, tactile yarn meets wall décor in this cozy knit hanger. It doubles as wall art and a functional perch for lightweight scarves or keys—seriously, it’s practical charm.
Materials Needed
- Wooden dowel or branch
- Chunky yarn in two coordinating colors
- Yarn needle or crochet hook
- Small nails or hooks for mounting
How to Make It
- Slip a long length of yarn over the dowel, then knot in a simple knit pattern to create a fringe-textured panel.
- Weave in the ends with a yarn needle for a clean finish.
- Mount on the wall with hooks or small nails, adding a few decorative pins for flair.
Pro Tips / Styling Ideas
- Pair with a few small plants or a framed print for a gallery wall vibe.
- Use bold color combinations to match your room’s mood—cozy autumn tones or crisp seaside blues.
- Hang near the entryway for a stylish catch-all spot.
Who would love it: tactile lovers, boho dreamers, anyone wanting a soft, handmade focal point. Immediate coziness guaranteed.
6. DIY Woven Photo Hoop Wall Decor
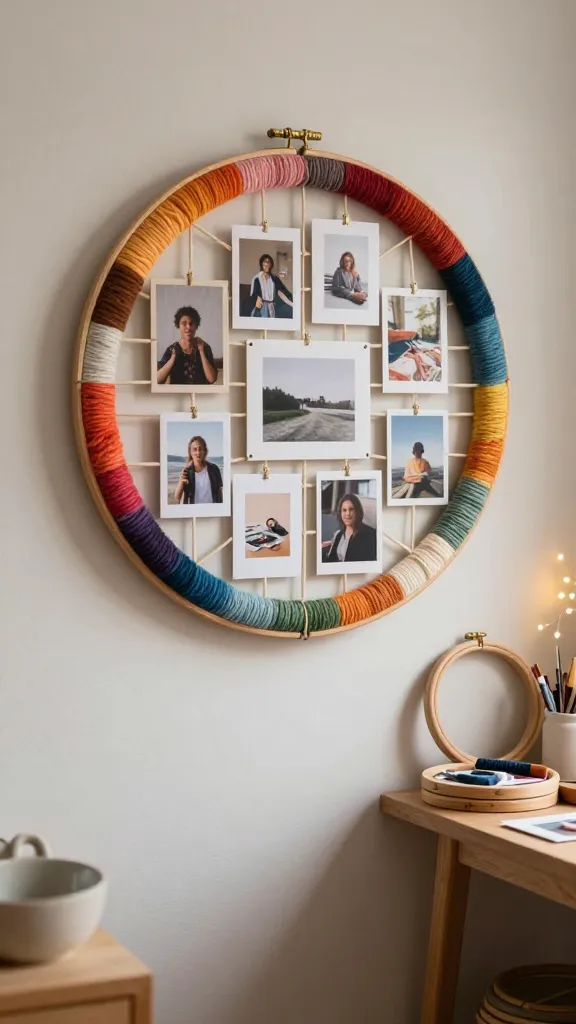
Turn memories into art with a woven photo hoop display. It’s a perfect way to display favorite photos, postcards, or pressed leaves in a textural, woven frame that screams “you.”
Materials Needed
- Wood or metal embroidery hoops (various sizes)
- Colored yarn or embroidery floss
- Photos or lightweight art prints
- Scissors, glue, and pins for securing photos
How to Make It
- Wrap the hoop with color yarn, layering hues for depth.
- Layer photos around the inner hoop or weave a small lattice with yarn to cradle them.
- Secure photos with simple pins or glue dots behind the yarn lattice.
Pro Tips / Styling Ideas
- Mix black-and-white with color photos for a dynamic display.
- Use a mix of metal and wood hoops for an eclectic wall collage.
- Change out photos seasonally to refresh the look.
Who would love it: memory-keepers, typography fans, anyone who wants a flexible, changeable art piece. It’s a warm way to showcase life’s little moments with handmade charm.
7. DIY Marble-Effect Coasters
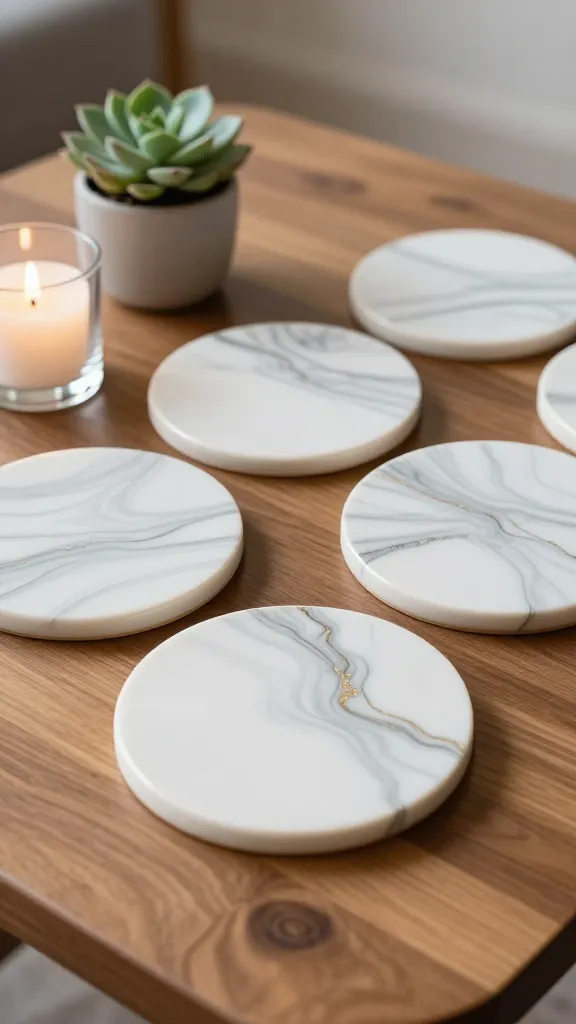
Marble vibes without the pricey slab—these coasters look luxe but are infinitely forgiving. They’re ideal for coffee tables, entertaining, or gifting with a tiny plant or candle.
Materials Needed
- Plain ceramic or cork coasters
- Acrylic paints in white, gray, and a touch of gold or copper
- Alcohol or glaze medium (to blend)
- Sealer (matte)
How to Make It
- Drop small amounts of white and gray paint on each coaster; swirl with a clean tool to create marble veins.
- Lightly brush with alcohol or glaze medium to push the colors into wispy veins.
- Seal thoroughly so regular use won’t wear away the design.
Pro Tips / Styling Ideas
- Pair with a matching tray and a scented candle for a luxury-feel setup.
- Keep one paint color metallic for a touch of glam.
- Gift a set with a tiny plant or handmade coaster stand.
Who would love it: entertainer hosts, surface-design enthusiasts, anyone who adores a chic, high-end look without the big price tag. You’ll love how quickly they elevate a coffee moment.
8. Folded Paper Landscape Wall Art
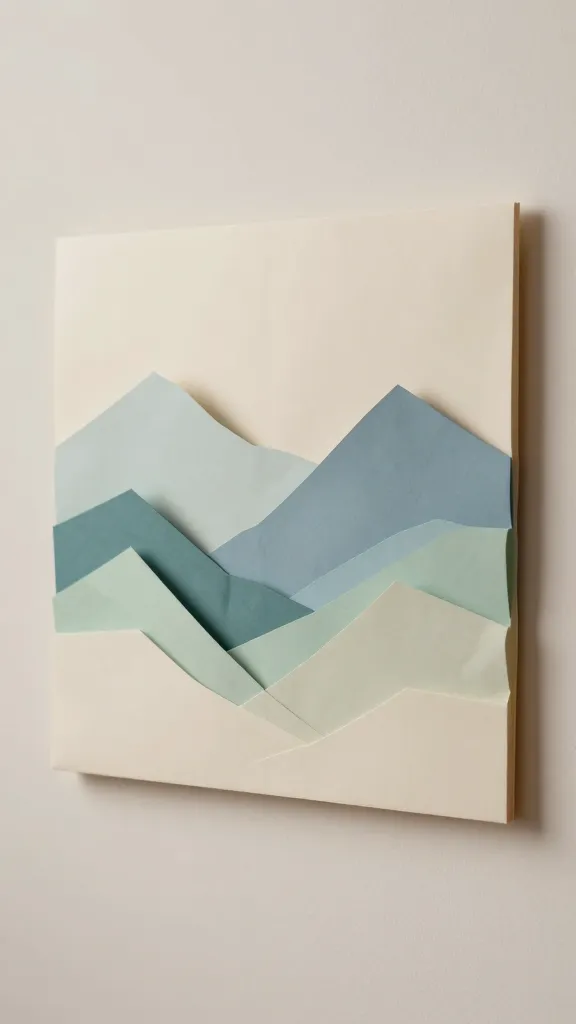
Delicate, ethereal, and surprisingly bold in person, this paper-folding project morphs a plain wall into a gentle landscape. It’s minimal, striking, and incredibly satisfying to finish.
Materials Needed
- Heavyweight paper or cardstock in a calm palette
- Parchment or kraft paper for backdrop
- Craft knife or scissors
- Double-stick tape or glue dots
- Optional: thin wooden frame or clip to mount
How to Make It
- Fold the paper into simple geometric shapes to form a layered landscape (mountains, hills, sky).
- Layer the folded pieces on the backdrop using double-stick tape to create depth.
- Trim edges for a clean, finished look and mount to the wall.
Pro Tips / Styling Ideas
- Coordinate with wall color or a contrasting frame for a bold effect.
- Use a matching color family to keep the piece cohesive with room decor.
- Group with a few miniature art pieces for a serene gallery wall.
Who would love it: paper crafts lovers, minimalists, anyone wanting a calm, scenic focal point. It’s surprisingly dramatic in person and delightfully low-cost.
Conclusion
These eight crafts mix high-visual appeal with easy execution, perfect for saving, pinning, and actually making. Pick one (or dare to try them all) and watch your space transform into an airy, stylish haven that feels like a curated Pinterest board come to life. Have fun, be bold, and trust me—your future self will thank you for the creative glow-up.