5 Stunning DIY Christmas Decoration Crafts
Ready to deck the halls with show-stopping handmade magic? These 5 completely unique ideas are easy, fun, and totally shareable—perfect for DIY-obsessed friends and last-minute decorators alike.
Trust me, you’ll love these projects: they look chic, don’t require crafter-level skills, and make your home feel festive in seconds. FYI, you’ll want to start today so you’re ready for holiday gatherings and cozy evenings by the tree.
1. Rustic Mason Jar Snow Globe Ornaments
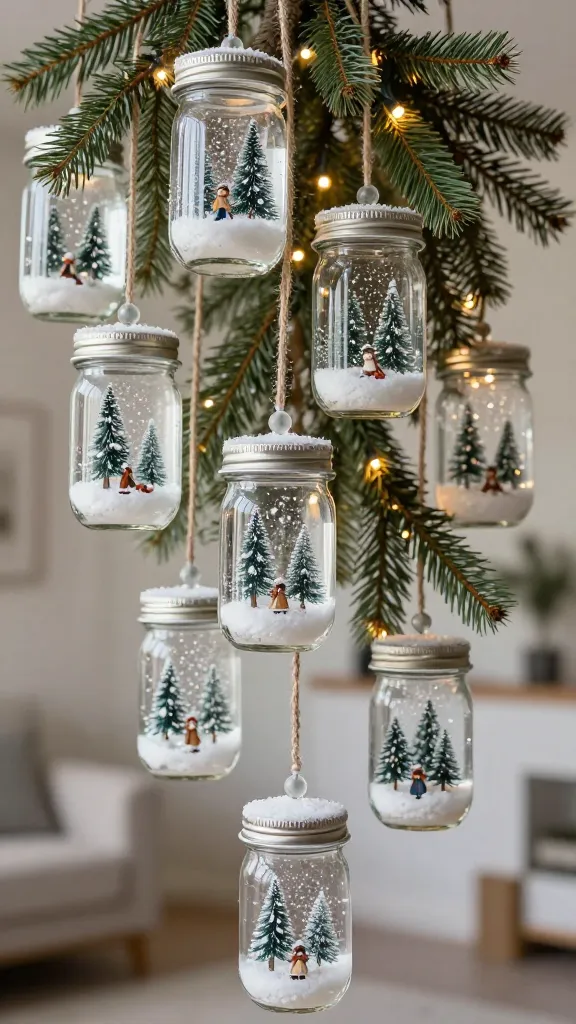
Picture this: a cluster of clear mason jars hung on a garland, each containing a tiny winter scene and a gentle shake that brings a sparkling snowfall. These ornaments feel nostalgic, yet modern with metallic lids and frosted beads. Seriously, they’re adorable on a farmhouse-style tree or a minimalist spruce tree.
Materials Needed
- Small mason jars with lids
- Mini figurines (winter animals or woodland figures)
- Epsom salt or clear glitter
- Glycerin (optional, for slower snow)
- Water
- Twine or ribbon for hanging
- Hot glue gun
How to Make It
- Glue a tiny figurine to the inside of the jar lid with hot glue—glue on the outside of the lid latches, not where the glass will trap water.
- Fill the jar with a tablespoon of Epsom salt or glitter and about 1/2 cup of water mixed with a few drops of glycerin for shimmer.
- Screw the lid on tightly and invert the jar, giving it a gentle shake to see the “snow.”
- Tie a length of twine around the lid or lid ring and hang on a tree branch or a festive garland.
Pro Tips / Styling Ideas
- Use frosted jars or paint the outside with frosted glass spray for a dreamy look.
- Vary heights by using different lengths of ribbon; cluster several on a single branch for a dramatic display.
Who’ll love it: Lovers of rustic, cozy vibes and farmhouse-inspired decor. Great as family-made keepsakes that become holiday heirlooms.
2. Geometric Candy-Cainted Paper Ornaments
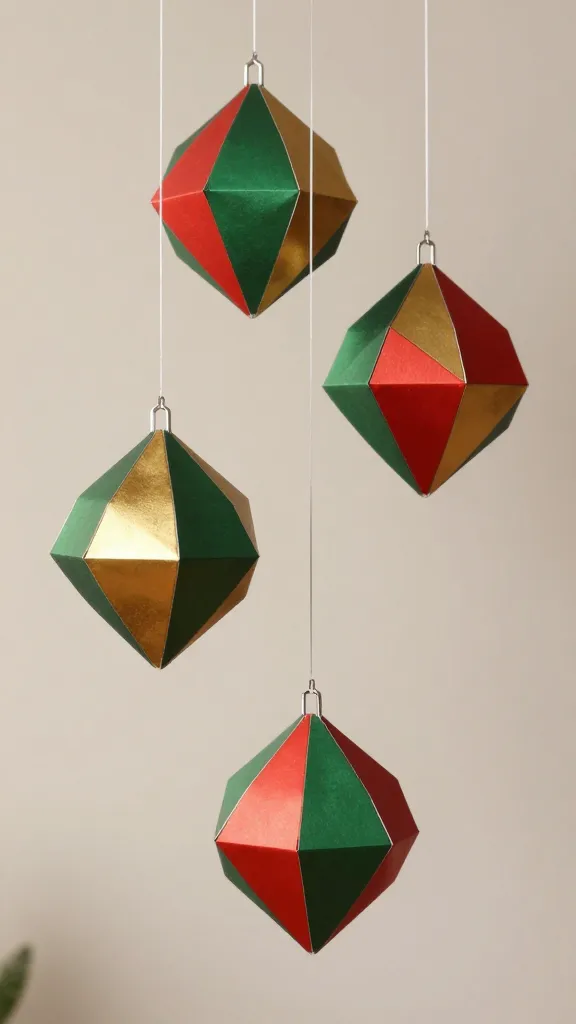
Think bold, modern shapes with a candy-sweet twist. These geometric paper ornaments bring a pop of color and a playful, contemporary vibe to your tree or a wall hanging. They’re even fun to gift in a set—cute, affordable, and seriously satisfying to assemble.
Materials Needed
- Sturdy cardstock or special craft paper (red, green, metallics)
- Ruler, craft knife or scissors
- Double-sided tape or glue
- String or fishing line for hanging
- Optional: gold/foil accents
How to Make It
- Cut three identical geometric shapes (for example, triangles, hexagons, or diamonds) from contrasting papers.
- Fold each shape along the lines to create a 3D form, then glue the edges to assemble a hollow ornament.
- Glue two sides together with a small opening left for stuffing a tiny treat or note if you want a surprise inside.
- Attach a string to the top of each ornament and hang in a corner nook or on a slim branch in a vase.
Pro Tips / Styling Ideas
- Mix metallics with bold primary colors for a gallery-worthy vibe.
- Stack them on a mantle in a row, or suspend them in a cluster above a dining table for a festive centerpiece.
Who’ll love it: Color lovers and modern minimalists who want a statement without the glitter overload. Also perfect as a playful gift enclosure.
3. Cozy Knit-Wrapped Cones with Tiny Terrarium Snow
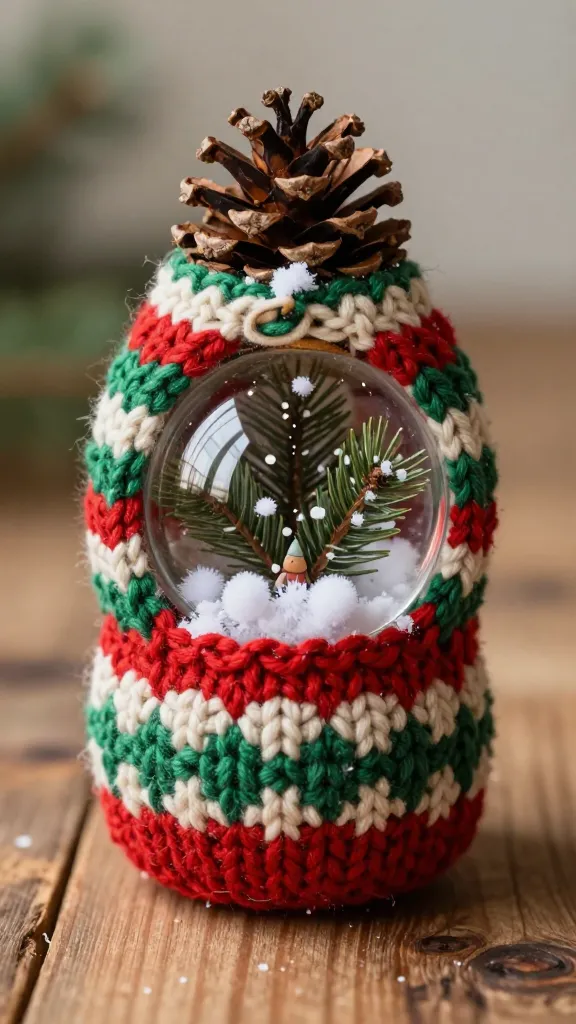
These knit-wrapped cones are like warm sweaters for your tree. Each cone houses a tiny terrarium scene—mini pine sprigs, faux snow, and a miniature figurine perched inside a glass bead. It’s whimsical, cozy, and surprisingly easy to pull off with basic supplies.
Materials Needed
- Pinecone or cardboard cone shapes
- Natural or acrylic yarn in festive colors
- Hot glue and glue gun
- Small glass beads or terrarium-inspired minis
- Faux snow or white pom-poms
How to Make It
- Wrap the cone from top to bottom with yarn, securing with glue as you go for a snug knit look.
- Inside the cone, place a tiny miniature scene or a single sprig and a dab of faux snow.
- Finish with a loop of yarn at the top for hanging.
Pro Tips / Styling Ideas
- Use natural fibers like wool or cotton for a rustic texture; metallic threads add sparkle.
- Group several cones of different sizes on a mantle or centerpiece for a warm, woodland feel.
Who’ll love it: Fans of hygge vibes and handmade texture. They’re a perfect gift idea for neighbors or teachers who love cozy aesthetics.
4. Frosted Birch Bark Wall Plaques
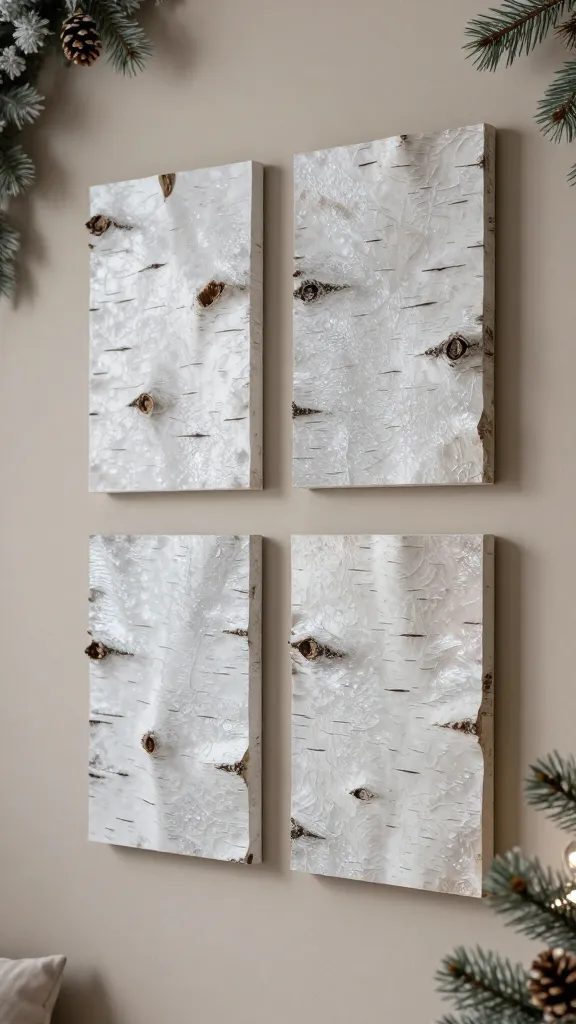
These wall plaques bring the outdoors in with a frosty, birch-bark-inspired texture. You’ll create panels that mimic winter birch trunks, then layer on glittered frost quotes or simple snowflake silhouettes. It’s an elegant, nature-inspired way to decorate a bare wall during the holidays.
Materials Needed
- Birch bark printable wallpaper or faux birch panels
- White paint or acrylic glaze
- Fine glitter (blue or silver)
- Foam brushes and sponges
- Optional: stencils for snowflakes or cursive quotes
How to Make It
- Apply birch bark panels to a sturdy backing or frame as your base.
- Using a dry brush technique, dab white paint across the surface to simulate frost.
- Sprinkle a light dusting of glitter for a shimmering frost effect.
- Add a simple quote or a decorative snowflake using a stencil.
Pro Tips / Styling Ideas
- Hang two or three in a row on a living room accent wall for a crisp gallery feel.
- Pair with a monochrome palette and a few metallic accents to keep it chic.
Who’ll love it: Minimalists with a soft spot for nature and a love for statement wall decor. Great for entryways and dining rooms during the season.
5. Glass Globe Spheres Filled With Miniature Winter Scenes
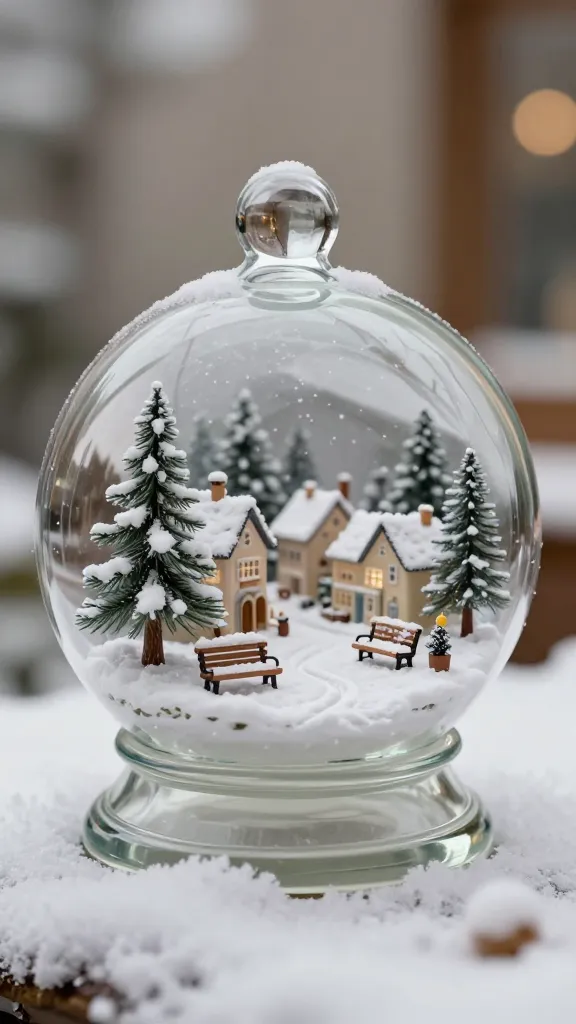
Globe ornaments never go out of style, but these are elevated with tiny, handcrafted winter dioramas inside. Think a snowy village, a little pine tree, or a tiny bench with inside-the-glass detail. They’re cinematic, conversation-starting, and seriously adorable when arranged in a glass hurricane or on a decorative stand.
Materials Needed
- Clear glass or plastic globe ornaments with removable tops
- Miniature figurines, trees, benches, or village pieces
- Fine artificial snow or white glitter
- Plastic wrap or clear film to separate layers
- Thin wires or pins for securing items
How to Make It
- Open the globe and layer a small amount of snow at the bottom.
- Arrange a tiny diorama using miniature pieces; secure with a dab of clear glue or pins.
- Replace the globe cap and hang or place on a stand. Lightly shake to see the “blizzard” effect.
Pro Tips / Styling Ideas
- Vary the dioramas—one globe can hold a cozy cabin, another a tiny market scene.
- Pair with warm LED lights for a magical glow in the evenings.
Who’ll love it: Dreamers who adore cinematic, storybook vibes. They make stunning centerpieces for tabletops or mantles, and you can customize them year after year.
Conclusion
These 5 stunning DIY Christmas decoration crafts are all about charm, ease, and a touch of whimsy. Pick one to start your creative glow-up, or tackle them all for a cohesive, memory-filled holiday display. Save, pin, and get ready to wow guests with handmade magic that feels both modern and heartfelt.