5 Cute Craft Ideas for a 6-Year-Old Girl
Jump into a world of sparkle, color, and giggles with your little crafter. These ideas are playful, easy, and totally doable with kid-friendly materials. Trust me, you’ll love how proud she’ll be showing off her handmade treasures.
1. Fairy Garden in a Upcycled Teacup
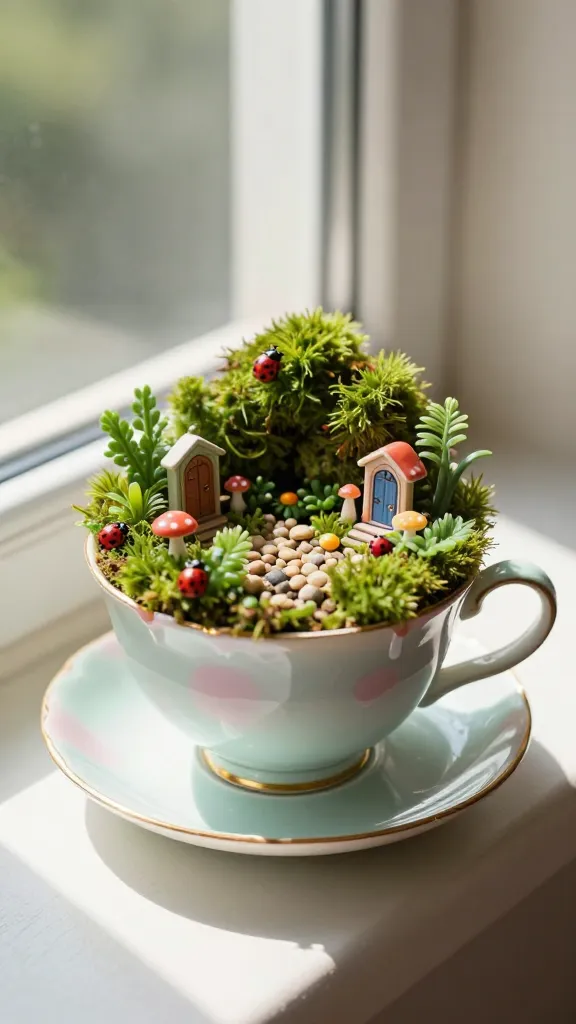
Imagine a tiny, magical scene perched on a windowsill, with ladybugs and mini mushrooms peeking out from lush faux moss. This upcycled teacup fairy garden is whimsical, portable, and perfect for little hands to assemble. It feels like a mini storytelling stage she can rearrange daily.
Materials
- Old teacups and saucers (optional: mismatched sets for charm)
- Shredded moss, faux greenery, tiny pebbles
- Miniature figurines, tiny doors, or fairy furniture
- Non-toxic glue and lightweight acrylic paint
- Optional: battery-operated fairy lights
Tools
- Paint brushes
- Glue gun or strong craft glue
- Scissors
Key steps
- Tidy the teacup: a quick wipe and a fresh base of moss.
- Decorate the interior: arrange moss, tiny pebbles, and miniature pieces to tell a story.
- Seal lightly with glue (if needed) to keep pieces in place.
- Add lights for twinkly magic after dark.
Styling ideas
- Place on a small shelf or sunny windowsill to catch natural light.
- Swap out decorations for seasons—flowers in spring, pumpkins in fall.
Finish with a flourish: a tiny painted door or a painted pathway to invite more imagination. This one’s perfect for little dreamers and a cozy nook that’s all their own.
Who will love it? Any kid who adores mini worlds and stories. It’s a sweet gift or a festive centerpiece you can move around the house for whimsy.
2. Hand-Painted Tote Bags for Mini Artists
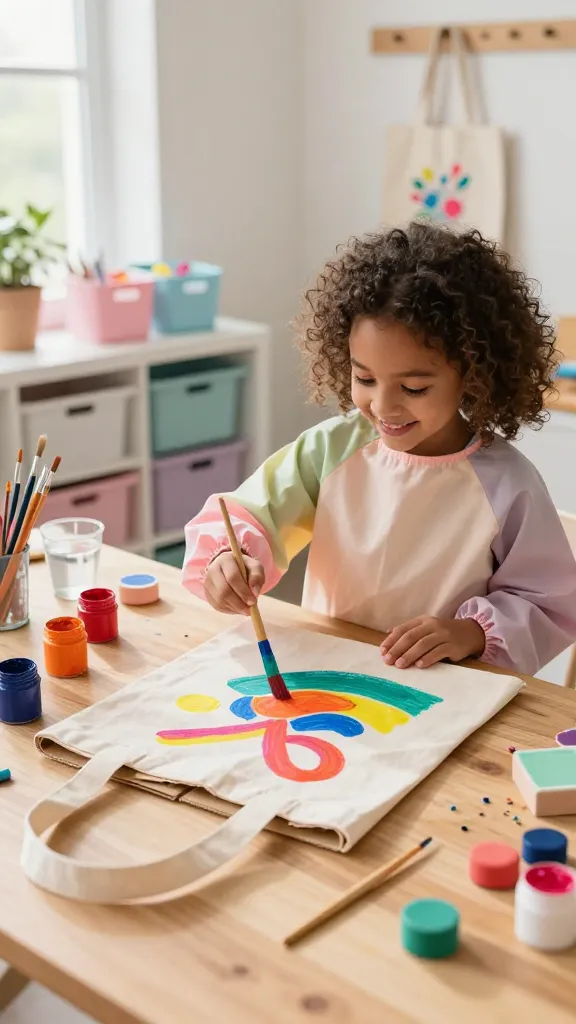
Bright colors, bold doodles, and a finished product kids can actually use tomorrow. A hand-painted tote bag is a canvas for imagination and a practical keepsake she’ll carry to school or the library. Easy to customize, hard to put down, and a guaranteed smile-generator.
Materials
- Plain tote bag (cotton works best)
- Non-toxic fabric paints or fabric markers
- Paint brushes in a few sizes
- Cardboard to stiffness the bag while painting
- Optional: stencils, sponge stamps
Tools
- Water cups for rinsing
- Paper towels
- Iron (to set paint—check fabric instructions)
Key steps
- Line the bag with cardboard to prevent bleed-through.
- Sketch a simple design with pencil—flowers, animals, or a smiley sun.
- Fill in with bold colors. Let each layer dry before adding details.
- Set the paint according to instructions (some need ironing).
Styling ideas
- Pair with matching hair clips or a pencil pouch for a coordinated gift set.
- Use as a library bag for summer reading challenges—super practical!
Finish with a personal touch: a child’s name or a favorite quote. This tote becomes their art, their responsibility, and their proud little world on the go.
Who will love it? Little artists who love to show off their own unique style and carry their treasures in a bag that screams creativity.
3. DIY Pom-Pom Fairy Necklace Craft
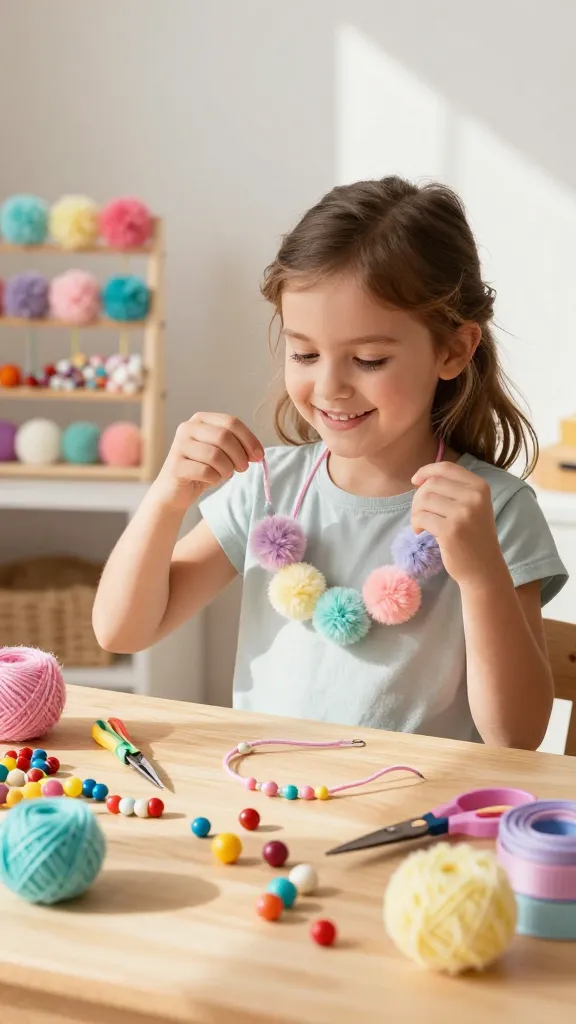
Colorful, textural, and perfectly sized for 6-year-olds, this necklace project brings fluffy joy to daily dressing. It’s a wearable craft that doubles as a soft-hug accessory—fun to make, even more fun to wear with a favorite tee.
Materials
- Bright, chunky pom-poms (various sizes)
- Cotton cord or ribbon
- Safe, plastic toy beads or wooden beads
- Non-toxic glue (optional for secure knots)
- Small, split-ring keychains (optional for latching the clasp)
Tools
- Scissors
- Needle-nose pliers (for tiny beads, if needed)
Key steps
- Cut a piece of cord long enough for a necklace with extra length for knots.
- Thread pom-poms and beads in a playful pattern. Alternate sizes for whimsy.
- Knot the ends securely; tie a simple loop or add a clasp if you want it to be removable.
Styling ideas
- Pair with a simple dress for a party-ready look.
- Make an entire set with bracelets to match the necklace.
Finish with a sprinkle of personality: a tiny bow on one pom-pom or a glittery bead for extra sparkle. This is the kind of accessory that makes little outfits feel complete and cozy.
Who will love it? Kids who love texture, color, and a little sparkle—great for birthday party favors or a weekend craft session with a friend.
4. Paper Plate Animal Parade Wall Art
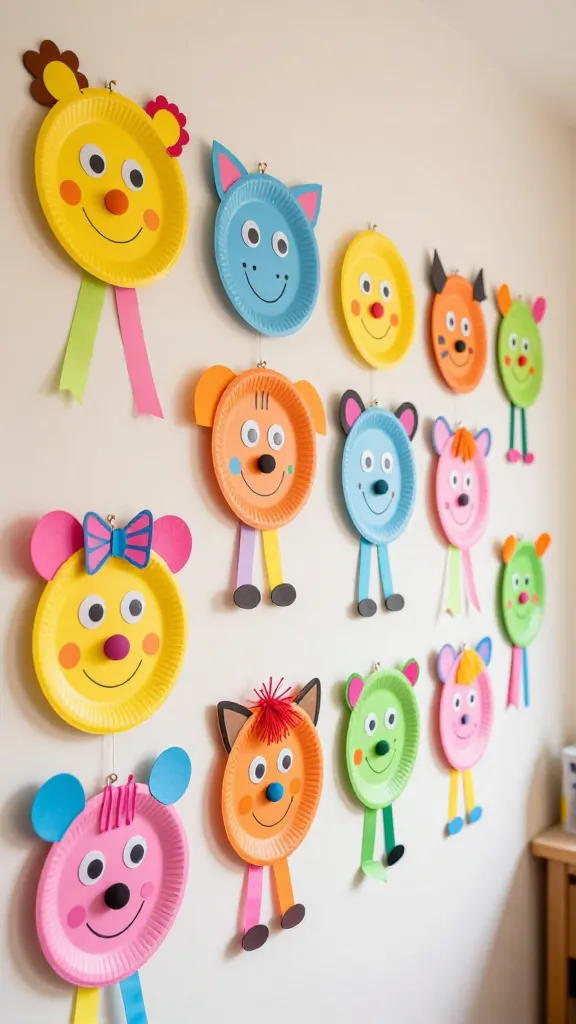
A quick, adorable project that doubles as wall decor and a party centerpiece. Create a parade of friendly animal faces using basic shapes, bright colors, and a splash of personality. It’s playful, kid-friendly, and a fabulous confidence booster as each little artist sees their work up on the wall.
Materials
- Plain paper plates
- Colored construction paper
- Googly eyes, markers, crayons
- Non-toxic glue or glue sticks
- String or ribbon for hanging
Tools
- Scissors
- Ruler (optional for symmetry)
Key steps
- Paint or color the base plate as the sky or ground.
- Cut simple animal shapes from construction paper—ears, noses, snouts, spots.
- Glue pieces onto the plate to create a colorful parade. Add googly eyes for character.
- Glue a loop of string to the back for easy hanging.
Styling ideas
- Arrange a few plates in a row to create a living wall collage.
- Change out the animals with the seasons or holidays for an ongoing project.
Finish with a cheerful vibe: a sky full of fluffy clouds or a sun smiling down. It’s a joyful reminder that art can be big in a small space.
Who will love it? Kids who love storytelling and making their own little zoo or forest scene. It’s a friendly, zero-pressure way to practice color and shape recognition.
5. Mini Chalkboard Calendars for Easy Scheduling
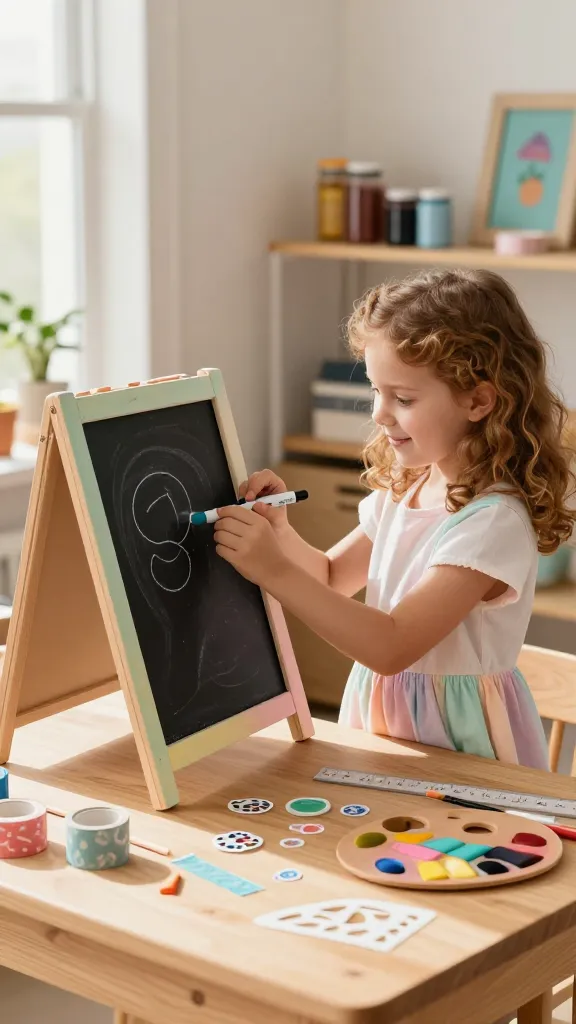
Teach time-telling and responsibility with a mini chalkboard calendar she can decorate and update daily. It’s practical, customizable, and the kind of keepsake she’ll treasure as she grows. Plus, it doubles as a cute seasonal prop for photos and school projects.
Materials
- Small wooden chalkboard or a repurposed frame with chalkboard paint
- Non-toxic chalk or chalk markers
- Paint for the frame (optional)
- Decorative washi tape, stickers for embellishment
Tools
- Paint brushes
- Ruler or stencil for grid lines
Key steps
- Prep the chalkboard surface; if using a frame, paint and seal the frame first.
- Draw a neat calendar grid; a simple month at a time works best.
- Let her decorate with stickers and tape—celebrate her personal flair.
- Show her how to update the calendar daily with chores, events, or school tasks.
Styling ideas
- Place on the kitchen wall near the calendar and grocery list for easy planning.
- Match the frame color to a room’s decor for a cohesive look.
Finish with a little prep: a dusting of chalk dust as a signature smell of creativity. It’s genuinely practical and endlessly adorable on a child’s wall.
Who will love it? Schedule-curious kids who enjoy organization and a little daily ritual. It’s a sweet starter project for early planning skills and a daily dose of accomplishment.
Conclusion
These five ideas prove that crafting with a 6-year-old can be playful, simple, and seriously satisfying. Pick one to start, or grab a few materials and let her lead the way—creative confidence grows with every bright color and tiny triumph. Ready to dive in? Grab your supplies, set a cozy crafting space, and let the magic unfold. You’ll have fun, she’ll be thrilled, and you’ll both end the day with a little more sparkle in your world.