6 Cool Craft Ideas for a 6-Year-Old Boy (Action-Packed & Fun!)
Stuck in a crafty rut? Grab the kiddo and your glue sticks, because these six ideas are built to wow and jam-packed with imagination. Each project is punchy, kid-friendly, and totally share-worthy for pins and playtime alike. FYI, you’ll probably want to do all of them—trust me.
1. Cardboard Superhero Hideout Garage
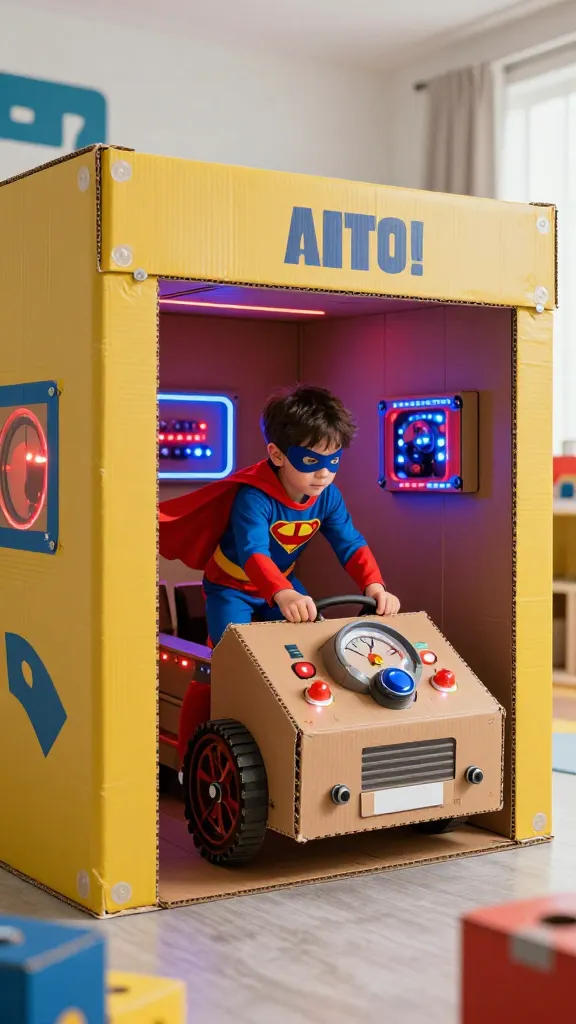
Imagine a turbo-charged cardboard fortress where fantasy meets pretend play. This little hideout turns a simple box into a secret hangout with engines that glow (well, with LED accents) and doors that flip open. It’s bold, bright, and surprisingly sturdy for fearless play battles.
Materials Needed
- Large cardboard box or two
- Acrylic paints in primary colors
- Foam brushes, masking tape
- Velcro strips, scissors, ruler
- LED tea lights or battery-operated LEDs
- Construction paper for signage
How to Make It
- Cut doors into the box with kid-safe scissors, then tape back to create secret compartments.
- Paint the exterior in bold superhero hues. Add black rally stripes with masking tape for a race-car vibe.
- Glue LED accents along the doorway and window slits. No wiring—just battery-powered sparkles!
- Create faux control panels on the interior walls with colored paper and markers.
Pro Tips / Styling Ideas
- Keep a stash of “workshop” props: toy wrenches, capes, and goggles to fuel imagination.
- Use velcro to attach removable badges or mission lists for new adventures.
- Place it in a playroom corner with a plush rug to mimic a garage pit stop.
Who’ll love it or when to use it
Perfect for dramatic play sessions, birthday party props, or a rainy-day “mission control” retreat. It feels epic but is totally kid-friendly and sturdy enough for daily use.
2. Mini Volcano Science Clock
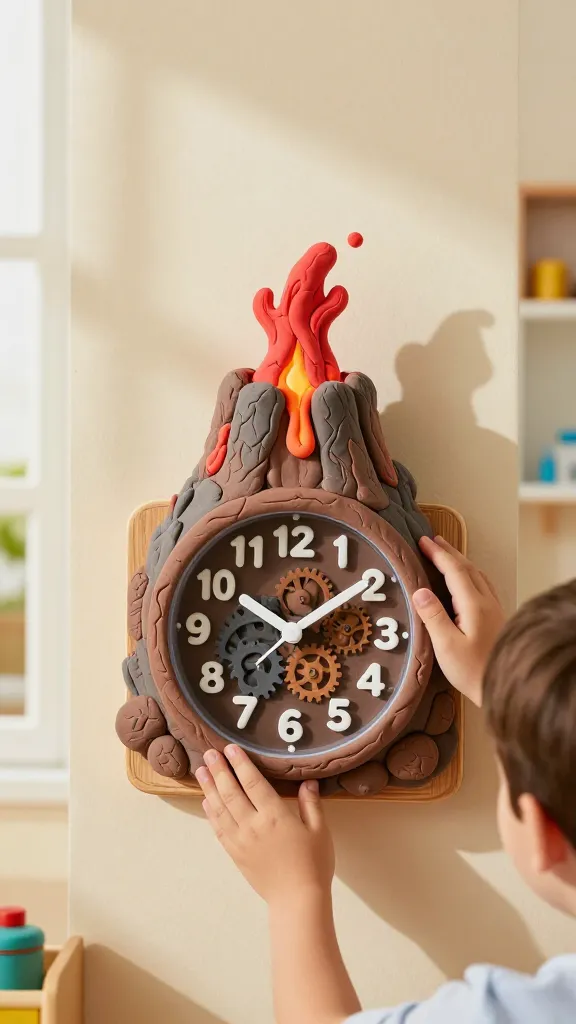
Science meets imagination in a handheld, wall-mountable volcano that doubles as a clock. When the “eruption” erupts with safe foam and food coloring, your little scientist gets a show and a time-telling buddy all in one. Seriously, this is science with a flourish.
Materials Needed
- Plastic soap dispenser or small bottle
- Air-dry clay or papier-mache
- Paints (earth tones + bright lava color)
- Clock insert kit or printable clock face
- Foam for eruption “lava”
How to Make It
- Build a volcano shape around the bottle using clay or papier-mache. Let it dry.
- Paint the mountain in browns and greens, then add a bold lava plume at the crater.
- Attach a small clock face to the front or back; install the clock mechanism according to the kit.
- Fill the crater with a bubbling, kid-safe foam mixture or colored vinegar and baking soda for a DIY eruption.
Pro Tips / Styling Ideas
- Use a cork or bottle cap as a “control panel” dial to adjust eruption intensity.
- Mount it on a wooden plaque for a museum-style display that doubles as a timer for activities.
- Coordinate colors with a space-themed or jungle theme for the playroom.
Who’ll love it or when to use it
Great for curious minds who love both science and time-telling. It’s a standout classroom or bedroom decor piece that also teaches patience and curiosity.
3. DIY Pirate Treasure Map Play Mat
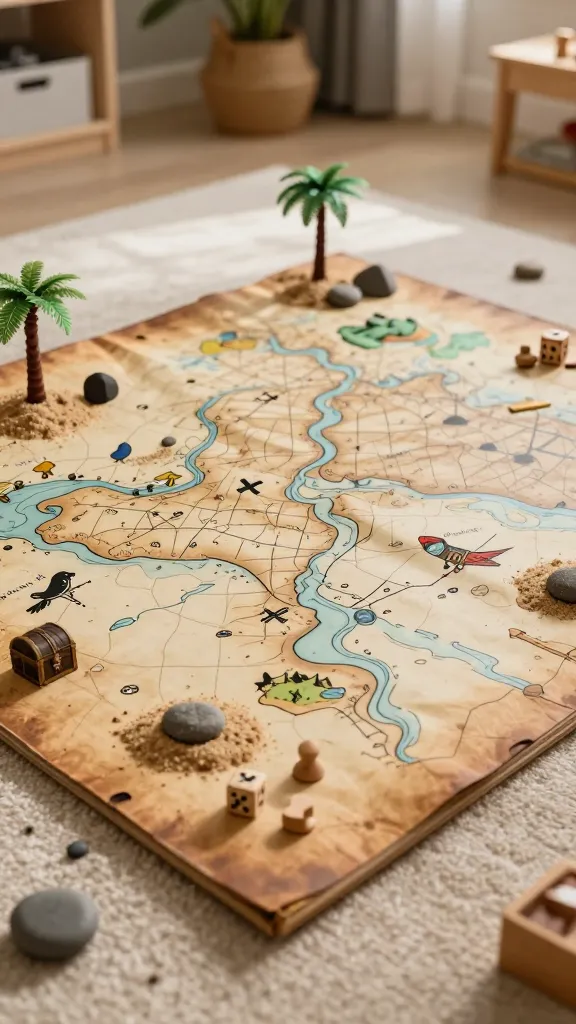
Anchors aweigh, matey! Create a treasure map mat that doubles as a floor board game and a whimsically detailed pirate scene. It’s immersive, teaching kids about geography and storytelling while they hunt for “X marks the spot.”
Materials Needed
- Strong cardboard or cork board as base
- Map paper, tea or coffee for aging
- Markers, crayons, and colored pencils
- Miniature palm trees, sand, and rocks (optional)
- Non-slip rug grip or glue to secure pieces
How to Make It
- Lay out your base and sketch a winding treasure map path with dotted lines and landmarks.
- Age the paper by brushing it with tea or coffee to give a vintage parchment look; affix to the mat.
- Add treasure icons, ships, and islands with markers. Create one big “X” for the treasure.
- Place tiny figures and props on the map and add a faux “shoreline” border with beach sand for texture.
Pro Tips / Styling Ideas
- Seal with a matte spray to keep colors vibrant and mat-friendly for kids’ hands.
- Turn it into a play mat by laminating or covering with clear vinyl for easy cleanup.
- Use the map as a storytelling prompt: “Who finds the treasure and what loot do they bring back?”
Who’ll love it or when to use it
Ideal for pretend play afternoons, party activities, or a cozy corner activity that invites imagination and gentle storytelling.
4. Color-Plex Construction Vehicle Plushies
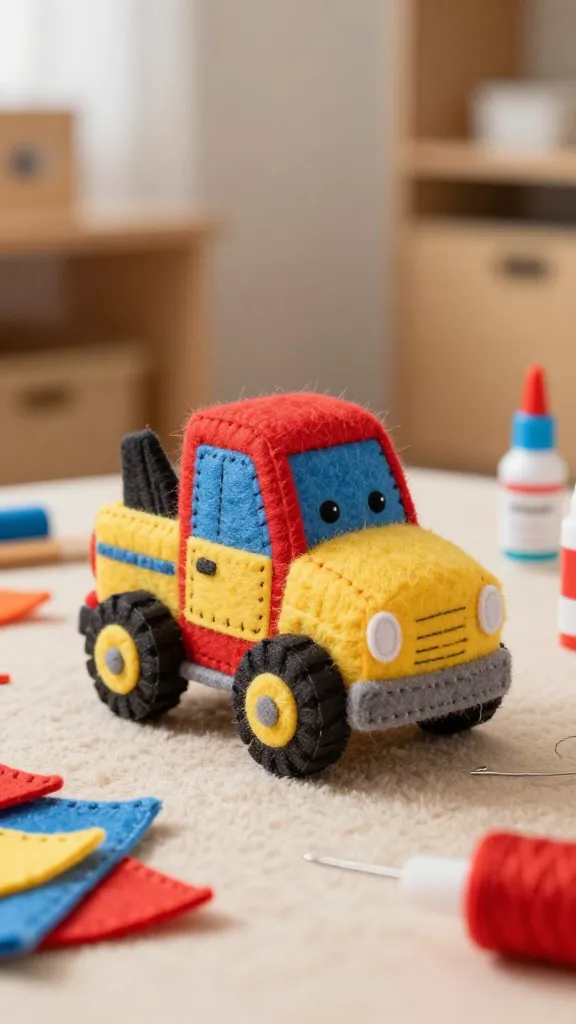
Soft, squishy vehicles? Yes, please. These plushy construction trucks transform felt scraps into cuddly, action-packed buddies. They’re adorable, tactile, and perfect for snuggling after a day of heavy-duty pretend play.
Materials Needed
- Felt sheets in primary colors
- Polyester stuffing
- Fabric glue or needle and thread
- Safety eyes or stitched eyes
- Optional decorative fabrics for detailing
How to Make It
- Cut simple vehicle shapes (truck, bulldozer, crane) from felt outlines for head, body, and wheels.
- Stitch or glue pieces together, add stuffing, and seal the seams.
- Attach safety eyes or sew on small embroidered eyes for a friendly look.
- Add decorative details with contrasting felt: windows, stripes, warning signs.
Pro Tips / Styling Ideas
- Make a mini “cab” with a pocket for a tiny driver figurine.
- Pair with a soft carrying bag to tote them to friends’ houses or museum days.
- Create a small display shelf with a few woods and rocks to simulate a construction site.
Who’ll love it or when to use it
Kids who adore vehicles will cherish these plushies as bedtime friends, sensory toys, or playful add-ons to a toy garage and road map setup.
5. Glow-In-The-Dark Space Rover Printer Tray Craft
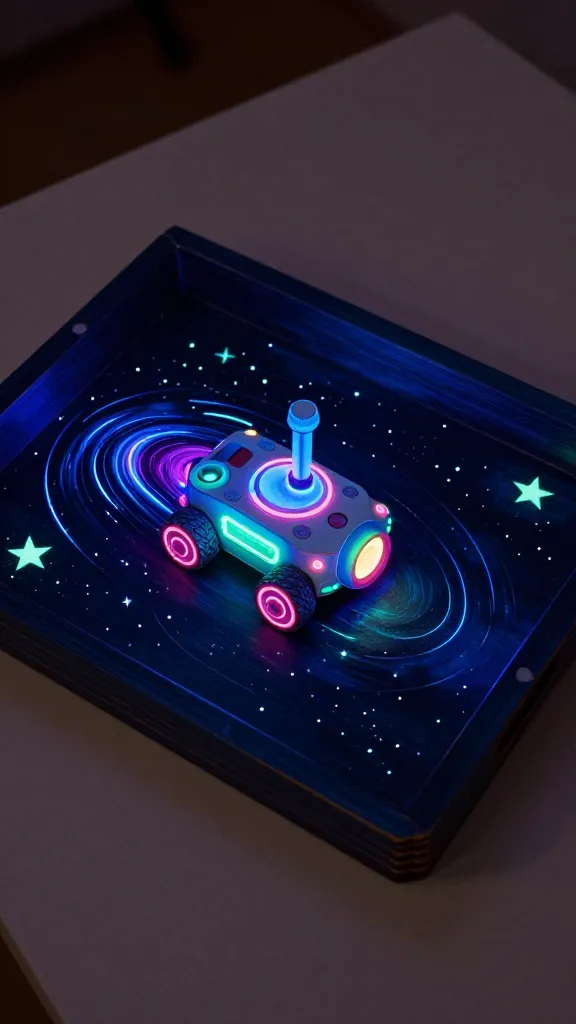
Stamp and glow into outer space with a mini “printer tray” rover that leaves glowing star trails in the dark. It’s a quick, clever craft that merges stamping, painting, and cosmic imagination for a stellar night-time project.
Materials Needed
- Small wooden printer tray or sturdy cardboard tray
- Acrylic paints (neon colors)
- Glow-in-the-dark paint
- Foam stamps or bottle caps for rover prints
- Black light (optional) or dark room for glow effect
How to Make It
- Paint the tray as a space backdrop: deep blue/black with hints of nebula color.
- Stamp rovers and alien terrain across the tray, then fill in with glow paint for accents.
- Finish with a glow patch trail that arcs behind the rover as if moving through space.
Pro Tips / Styling Ideas
- Place small LED string lights around the tray to mimic starry lighting during playtime.
- Use it as a nightlight-worthy decor piece that doubles as a creative activity during the day.
- Invite a friend to stamp their own space rover for a mini collaboration project.
Who’ll love it or when to use it
Perfect for budding astronauts who love crafts and late-night space stories. It’s a striking centerpiece for a space-themed room or classroom activity.
6. Customize-It Gnome Garden Tech Decor
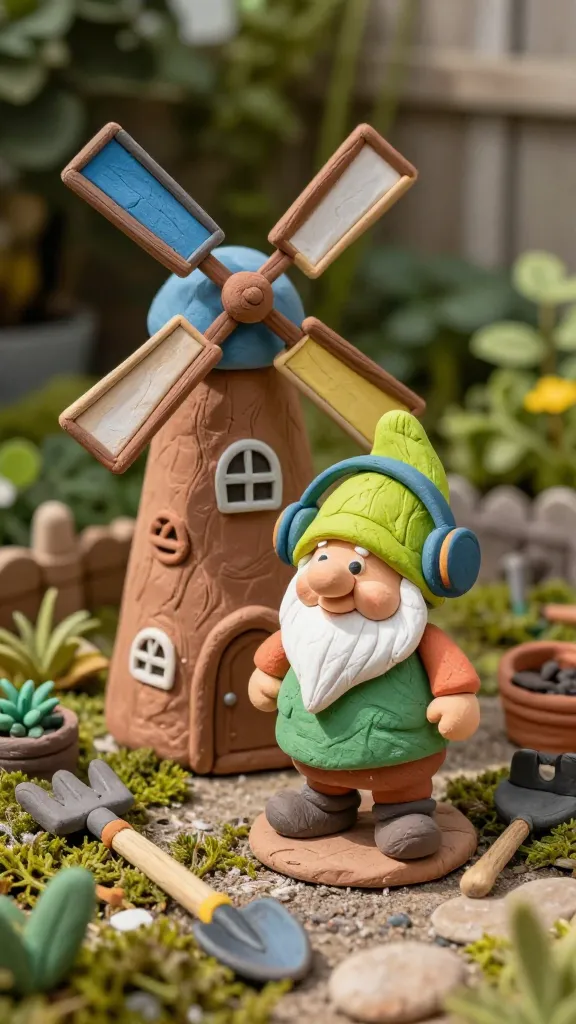
One part garden charm, one part DIY tech homage: a tiny gnome wearing a headset standing by a peppy windmill. This decor piece is adorable, whimsical, and surprisingly simple—kiddos get to design their own goofy gnome and bring a tiny landscape to life with textures and color.
Materials Needed
- Air-dry clay or polymer clay
- Acrylic paints in bright and earthy tones
- Miniature garden accents (stones, moss, tiny tools)
- Wooden stick or dowel for stand
- Clear sealant spray
How to Make It
- Mold a friendly gnome figure with a long beard and hat; attach a small headset if you want a “tech” vibe.
- Attach the gnome to a wooden stand and add a mini windmill or satellite dish using clay or found objects.
- Paint details, then seal with a clear spray to protect from playtime wear and weather if placed outdoors.
Pro Tips / Styling Ideas
- Embed a tiny garden scene with moss and pebbles for a tactile landscape.
- Create a tiny “tech desk” in front of the gnome with clay gadgets for storytelling.
- Place it on a sunny shelf or garden bench to give kids a magical landscape they designed.
Who’ll love it or when to use it
For nature lovers who crave a cute, story-led decor piece. It’s a fantastic weekend project that doubles as a thoughtful gift or a whimsical garden display.
Conclusion
These six ideas are crafted to spark action-packed imagination and effortless creativity. Each project is unique, kid-friendly, and designed to be Pinterest-ready from concept to finished piece. Pick one (or all six) and dive into a world of colorful, playful making—your 6-year-old will be thrilled, and you’ll love the easy, joyful process.