5 Fascinating Upcycled Craft Ideas Using Old X-Rays
Ready to turn clinical rejected images into totally gallery-worthy decor? These upcycled crafts use old X-rays to create quirky, modern pieces you’ll actually want to display. Trust me, they’re easier than you think and seriously addictive to make.
1. Celestial X-Ray Wall Mob: A Cosmic Dance of Bone and Light
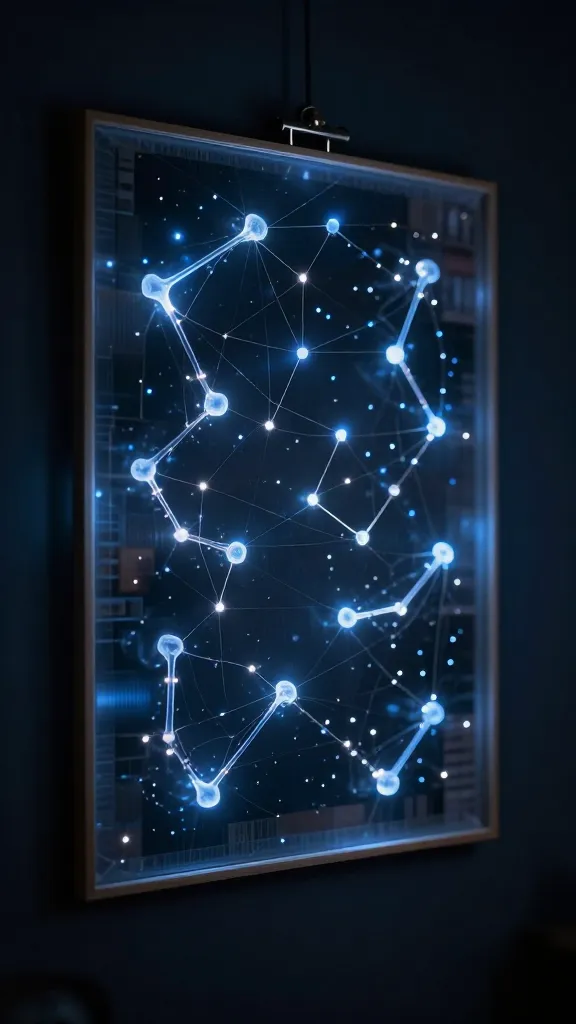
Picture a night-sky wall hanging that gently glows when the lights go low. That’s your finished look with this Celestial X-Ray Wall Mob. The translucent bones reading as delicate constellations give your space a dreamy, sci-fi vibe.
Materials Needed
- Old X-ray sheets (labeled is fine) or film negatives
- Thin metal or wooden embroidery hoop frames
- Thin fishing line or clear thread
- LED fairy lights or a small battery-powered LED string
- Spray adhesive or double-stick tape
- Blue and silver acrylic paints (optional)
How to Make It
- Cut X-ray sheets into irregular shapes that resemble moonlets and little planets. No two pieces should be the same, and you’ll layer them to create depth.
- Arrange pieces inside the hoop, then secure with spray adhesive. Use a second hoop if you want a double-layered effect.
- Weave clear thread between pieces and thread them to the outer hoop, creating a hanging mobile. Tie the ends to the inner rim for even spacing.
- Wrap a thin LED string around the outer hoop and tuck the battery pack discreetly behind the frame. Optional: lightly mist with a touch of blue or silver paint for ethereal glow.
- Hang near a window or a dim corner to catch the light and cast soft, eerie shadows.
Pro tips: Use slightly curved edges to mimic lunar craters, and stagger lengths for dynamic movement. This piece shines in living rooms or bedrooms, especially with moody lighting. You’ll love this for a modern, mysterious vibe.
Who would love it: anyone craving a bold, statement piece with a futuristic twist. Perfect for dorm rooms, studios, or a chic hallway transit from day to night.
2. Anatomical Plant Gallery: Steel-Rooted Florals from X-Ray Glass
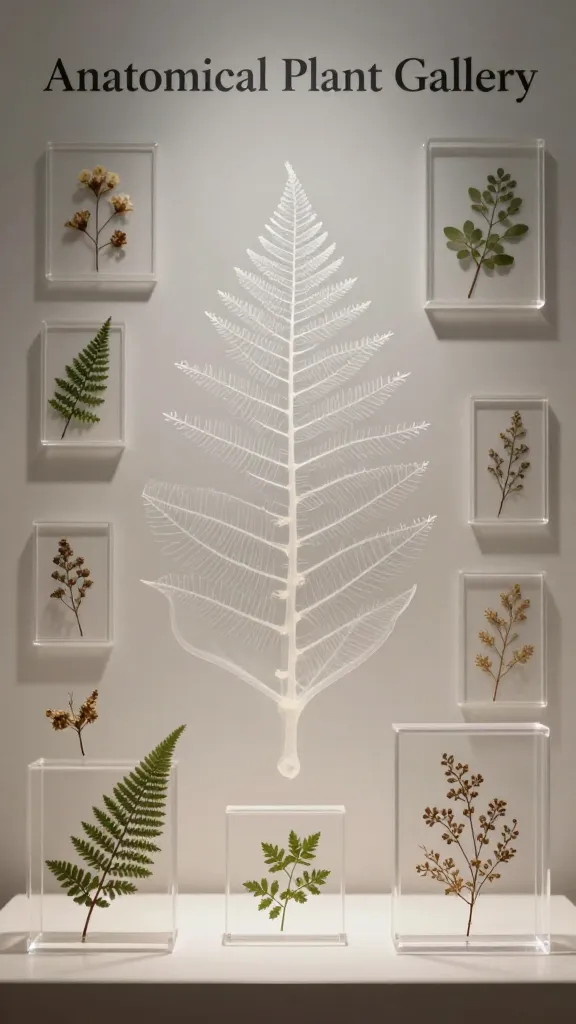
Turn skeletal silhouettes into delicate botanical art that doubles as a plant-happy display. The Anatomical Plant Gallery blends the clinical with the botanical for an unexpectedly serene centerpiece.
Materials Needed
- Old X-ray sheets
- Clear acrylic frames in varying sizes
- Pressed plants or dried florals
- Mod Podge or clear sealant
- Scissors or a craft knife
- Permanent marker (optional for labeling)
How to Make It
- Trim X-ray sheets to fit your frames, leaving a little wiggle room for mats.
- Arrange pressed plants or dried florals on the X-ray background like a little botanical specimen spread.
- Brush a thin layer of Mod Podge over the top to seal the arrangement. Let dry fully.
- Slide into frames and hang in a grouping or a neat grid for a gallery wall effect.
- If you’re feeling nerdy-cute, label each “specimen” with a marker on the mat edge for a faux-science vibe.
Styling ideas: Mix sizes and frame finishes—matte black, brass, or white—to create a curated lab-meets-living-room look. Place above a console or in a sunlit nook to catch subtle reflections.
Who would love it: plant lovers who want a botanical twist, science nerds who adore quirky wall art, and anyone who enjoys a clean, minimalist aesthetic with a wink.
3. X-Ray Lightbox City Skyline: Glow-Through Architecture Under Glass
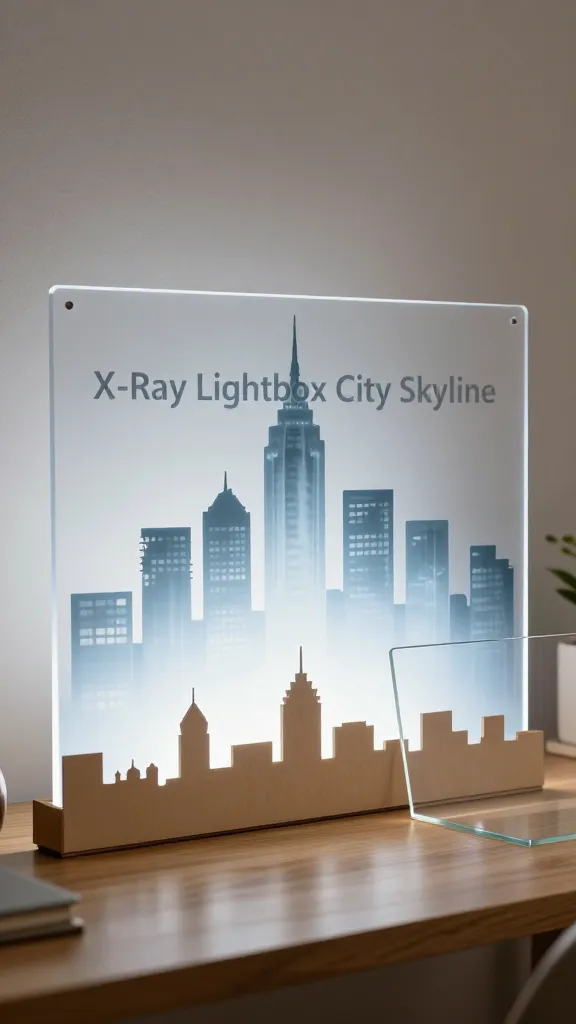
Imagine a mini skyline that glows softly from behind—your desk or side table just found its new urban glow-up. The X-Ray Lightbox City Skyline blends industrial edge with cozy luminescence.
Materials Needed
- Old X-ray sheets
- Backlit LED panel or lightbox
- Plexiglass or glass sheet to place behind the X-ray cutouts
- Thin wooden or cardboard cityscape silhouettes (or cut them yourself)
- Double-stick tape or mounting squares
- Optional: black acrylic paint for framing edge
How to Make It
- Cut X-ray sheets into slim, vertical rectangles to simulate tall buildings. Layer them to create a dense skyline when viewed from the front.
- Place the skyline silhouettes in front of the lightbox. Secure with tape at the bottom to keep them aligned.
- Slide the Plexiglass behind the X-ray pieces to protect the art while letting light pass through.
- Power on and admire the internal glow that renders the “windows” as warm little squares of life.
Pro tips: Vary the cut heights for a more dynamic cityscape. Mount on a wall or set on a shelf with a slim frame to keep the modern vibe intact. This is a fantastic desk accessory or a nightstand feature piece.
Who would love it: urban dwellers, night-owls, and design lovers who want a dramatic, luminous focal point without heavy glare.
4. X-Ray Shadow Box Keepsakes: Framed Memories with a Clinical Twist
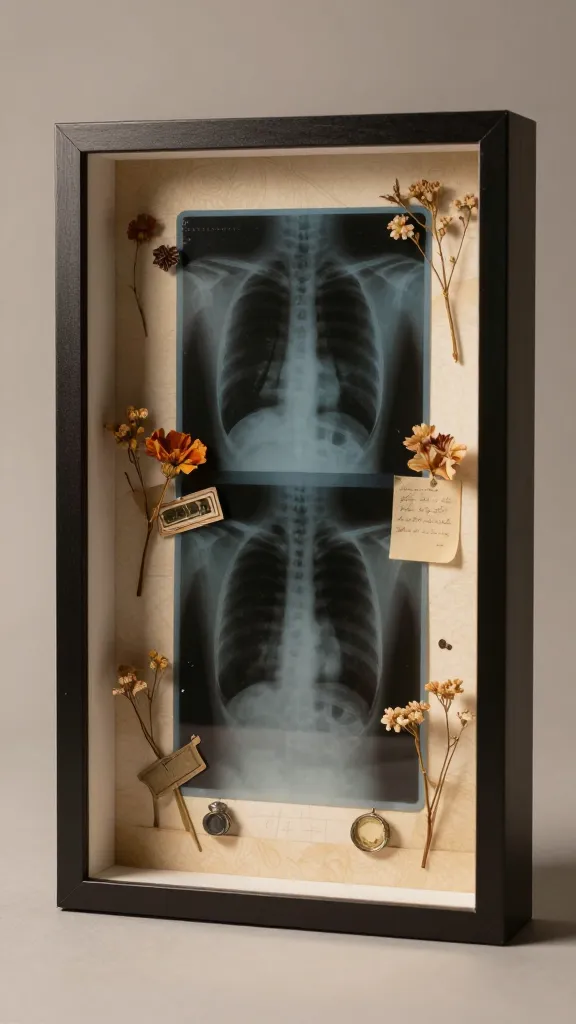
Here’s a sentimental twist: transform old X-rays into a heartfelt shadow box that memorializes moments while staying delightfully unconventional. It’s quirky, meaningful, and totally one-of-a-kind.
Materials Needed
- Old X-ray sheets
- Shadow box frame with deep interior
- Keepsakes: dried flowers, tiny trinkets, notes
- Adhesive spray or glue dots
- Matting or decorative paper
How to Make It
- Line the back of the shadow box with decorative paper to create a soft backdrop.
- Layer a few chosen X-ray pieces as the “ceiling” and “floor” within the box, creating a little diorama.
- Tuck keepsakes into the layers, attaching with glue dots so they don’t shift when the box is opened.
- Add handwritten notes or dates on small cards and tuck them into the sides for a personal touch.
- Close the box and display in a cozy corner or on a shelf with other mementos.
Styling ideas: Keep the color palette soft—cream, pale blush, and sage—to let the X-ray motifs feel delicate rather than clinical. This makes a heartfelt gift for anniversaries or milestones.
Who would love it: sentimental folks who want to honor memories in an unexpected, slightly spooky but sweet way. Great for a bedside table or living room display.
5. Industrial X-Ray Tray Mats: Tabletop Mood with a Medical-Minimalist Edge
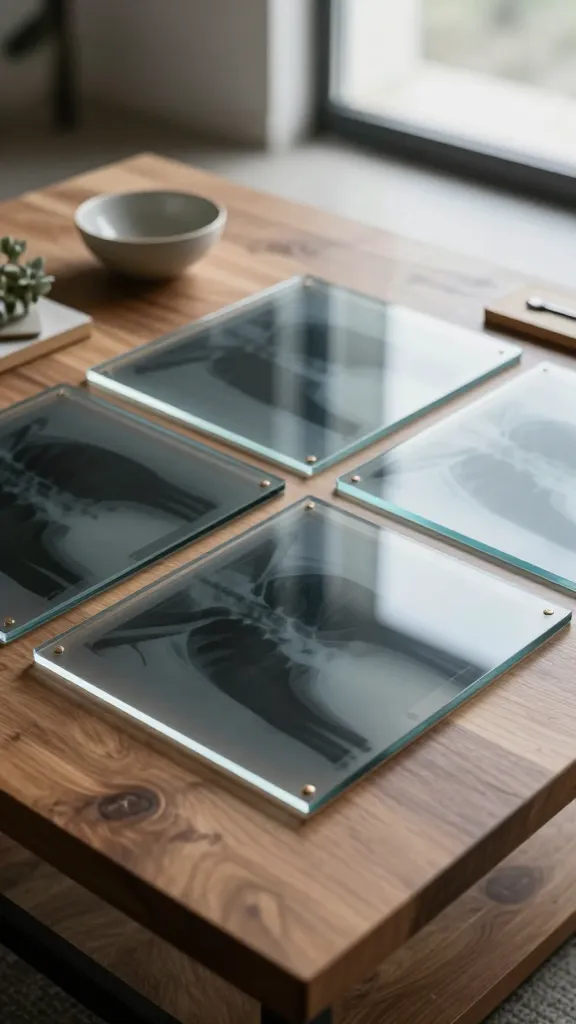
Upgrade your coffee table with a set of tray mats that fuse industrial texture with artful transparency. The X-Ray Tray Mats are functional, eye-catching, and perfect for showcasing a few bold X-ray images.
Materials Needed
- Old X-ray sheets
- Clear glass or acrylic sheets (cut to tray size)
- Wooden backing or thin metal trays
- Non-slip pads or cork feet
- Adhesive spray or E6000 glue
- Sealant spray (optional for longevity)
How to Make It
- Cut X-ray sheets to the same dimensions as your glass/acrylic tray tops.
- Laminate the X-ray pieces between the tray top and a backing board using clear adhesive. Add a thin layer of sealant on the exterior if you want extra durability.
- Attach non-slip pads to the bottom to prevent sliding and surface damage.
- Place on a coffee table or ottoman and use as an artful, conversation-starting centerpiece.
Pro tips: Create a matching trio with different bone visuals for a cohesive set. Layer the mats over a fabric runner to soften the look or juxtapose with metal accents for an industrial vibe.
Who would love it: hosts and interior aesthetes who love functional art with a punchy, modern twist. It’s also a striking housewarming gift for design-forward friends.
Conclusion
These five upcycled crafts using old X-rays prove that creativity can turn the unexpected into stunning, usable art. Each project is unique, stylish, and surprisingly approachable—no need for fancy equipment or a full studio. Pick one (or go wild and tackle all five) and watch your space transform from clinical to creative in no time.