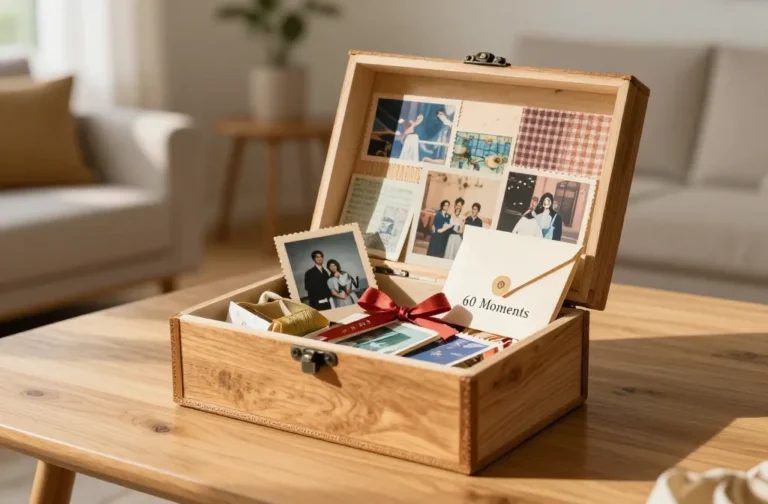
6 Fun Crafts to Do with Friends on Crafternoon
1. Tangled Yarn Wall Garland: Cozy Color Cascades for Your Space
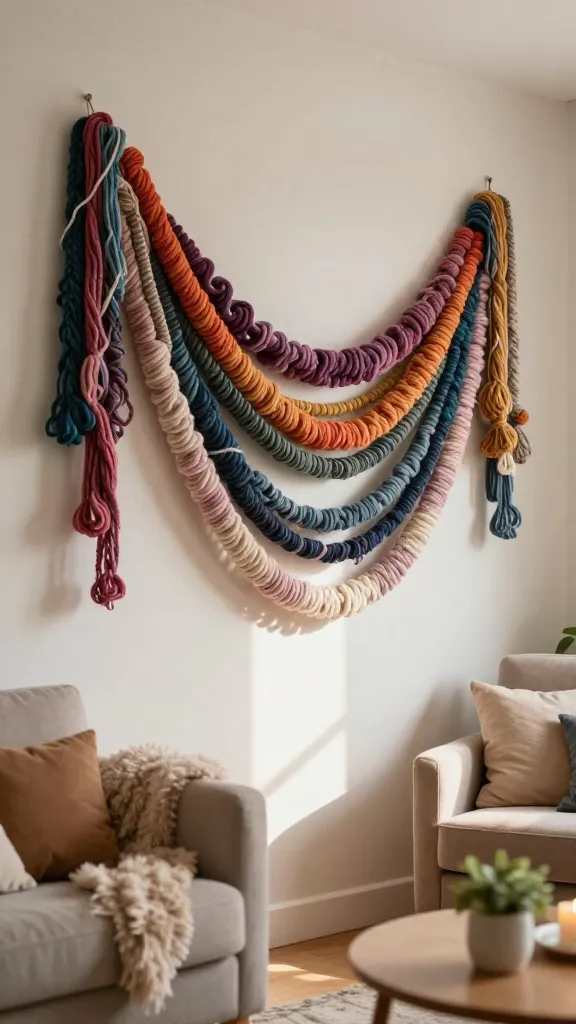
Picture a soft, swoopy garland draped across a wall, catching light and compliments alike. The Tangled Yarn Wall Garland turns a stash of scrap yarn into a lush, tactile centerpiece that screams cozy living room vibes.
What makes it special is the texture—multi-hued strands create depth, almost like a mini textile tapestry you can style any season. It’s low-pressure crafting with high-impact results, perfect for a relaxed afternoon with pals.
Materials Needed
- Assorted yarn scraps (various weights and colors)
- Jute twine or lightweight rope
- Scissors
- Hot glue gun (optional for securing ends)
How to Make It
- Cut yarn into 12–18 inch lengths in a rainbow of colors.
- Fold each piece in half and loop it over the twine, creating a simple lark’s head knot. Repeat until you’ve covered a 4–6 foot span.
- Leave some gaps for a light, airy look, or fill it in for a dense tapestry.
- Trim ends for a clean edge, then hang using command hooks or nails.
Pro Tips / Styling Ideas
- Group three garlands at different heights for major textural drama.
- Add metallic thread or ribbon accents for a festive twist.
- Swap colors with the season—pastels for spring, jewel tones for fall.
Who would love it: this is a fantastic statement piece for a living room, a cozy backdrop for photos, or a playful accent for a bedroom nook. Trust me, the compliments will roll in.
2. Painted Terrazzo Plant Pots: Modern Dots for Green Thumbs
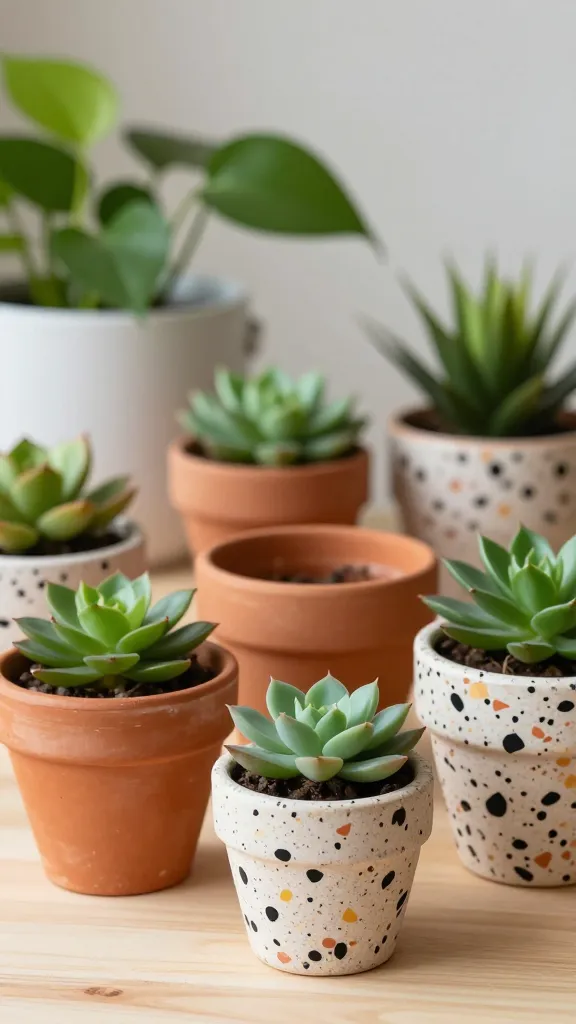
Terrazzo vibes meet indoor greenery in these DIY Painted Terrazzo Plant Pots. The tiny speckles transform plain terracotta into chic, modern planters that are totally Instagram-worthy.
What makes it special is the customization—choose your palette, mix sizes, and create a cohesive set that reads like a curated collection. It’s simple, affordable, and seriously satisfying to finish.
Materials Needed
- Terracotta pots (various sizes)
- Acrylic craft paints in white, black, and 2–3 accent colors
- Fine-tipped brush or dotting tools
- Painter’s tape (optional for clean lines)
- Sealant spray
How to Make It
- Base coat the pots in white or a light neutral. Let dry thoroughly.
- Use a dotting tool or fine brush to apply random terrazzo dots in your chosen colors. Vary dot sizes for a more authentic look.
- Seal with a clear spray to protect the paint from water and dirt.
Pro Tips / Styling Ideas
- Mix small and medium pots in a cluster on a windowsill or bookshelf.
- Add a matte topcoat for a soft, luxe finish.
- Coordinate with the plant’s leaf color—bold pots pair well with lush greens.
Who would love it: plant lovers who crave a polished, modern vibe. It’s a great gift for housewarmings, or a chic way to label your own herb garden on the kitchen counter.
3. Fold-Leaf Bookmark Buddies: Paper Craft That Keeps Your Place With Flair
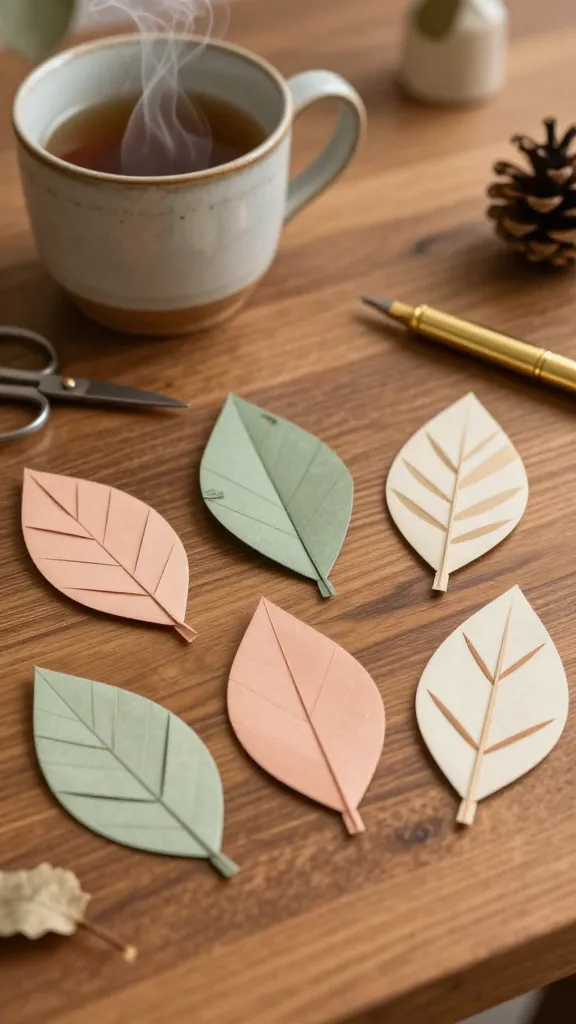
Turn a reading habit into a mini craft session with Fold-Leaf Bookmark Buddies. These crisp, origami-inspired bookmarks bring a touch of nature to your desk and pair perfectly with a mug of tea.
The finished bookmarks feel surprisingly luxe for a paper project, and their cheerful designs make them irresistible to gift to friends who love to read or journal.
Materials Needed
- Decorative heavyweight paper or origami paper
- Scissors
- Gold or metallic gel pen (optional)
- Clear corner protectors (optional)
How to Make It
- Cut paper into rectangles about 6 x 2 inches.
- Fold along the long edge to create a slim bookmark with a folded crease at the top to form a leaf-like shape.
- Add a simple vein line with a gel pen for a leaf texture, or keep it minimalist.
Pro Tips / Styling Ideas
- Bundle a set of four with different colors and tie with twine for a ready-made gift.
- Laminate a thin strip of extra durability if you’ll be using them in a library or café setting.
Who would love it: bookworms, teacher friends, or anyone who enjoys a tiny, thoughtful handmade gift. It’s stationery that smiles back.
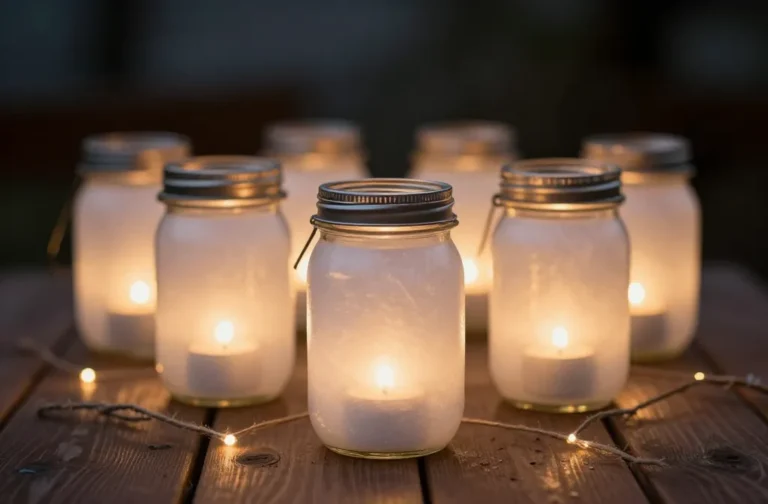
4. Upcycled Tin Can Lanterns: Glow Up Your Curb Appeal
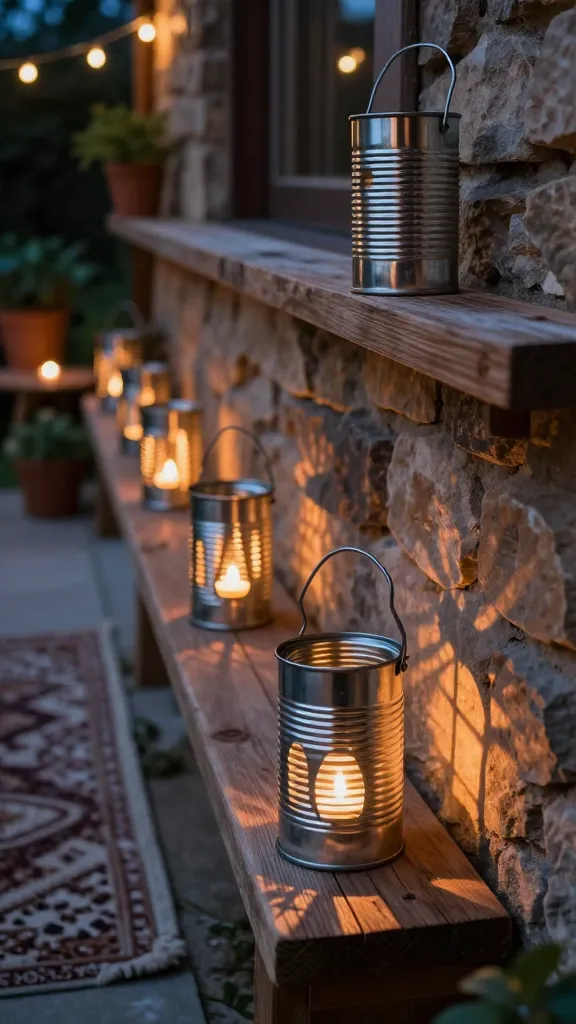
Turn everyday cans into warm, glow-y lanterns that set a cozy mood for evenings outdoors or a candlelit indoor nook. Upcycled Tin Can Lanterns bring a rustic-industrial vibe with a touch of whimsy.
What makes them special is the way simple cutouts cast playful geometric shadows on walls. They’re forgiving for beginners, yet striking enough to feel like a pro-level project.
Materials Needed
- Aluminum cans (rinsed and label removed)
- Hammer and nail set or a metal punch
- Tea lights or LED tealights
- Ribbon or twine for hanging (optional)
- Varnish or spray sealant (optional)
How to Make It
- Plan a simple pattern on the can’s side (dots, hearts, or geometric shapes).
- Gently punch or hammer through the metal to create the design. Take care around sharp edges.
- Place a tealight inside and set on a safe, heat-resistant surface or hang with twine.
- Optionally spray with a sealant to prevent rust if you’ll be outdoors.
Pro Tips / Styling Ideas
- Create a row of cans in different heights for a magical outdoor corridor.
- Paint the cans in metallic or matte finish for different moods—gold for glam, matte black for modern chic.
- Pair with potted herbs for a charming balcony display.
Who would love it: balcony barbecues, patio dinners, or a warm, ambient indoor lounge. Seriously, they’re hypnotic in candlelight.
5. Cushioned Clip Corner Desk Organizer: Practical Charm for Your Workspace
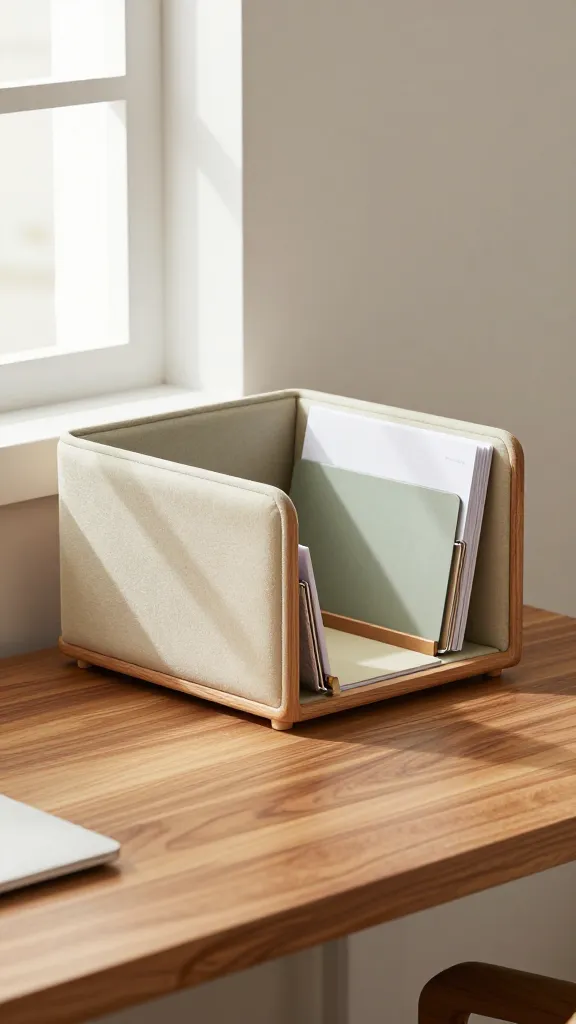
Meet the Cushioned Clip Corner Desk Organizer, a playful yet functional piece that corrals your desk clutter with style. It’s like a tiny piece of furniture you can customize to fit your workspace personality.
What makes it special is the soft, cushioned edge that feels welcoming to touch, plus the clever use of clips to hold papers and lightweight tools. It’s a confidence-boosting upgrade to any creative corner.
Materials Needed
- Wooden corner shelf or small wooden crate
- Foam or fabric padding scraps
- Fabric or decorative paper for lining
- Binder clips or small metal clips
- Hot glue gun
How to Make It
- Line the inside of the corner space with fabric or decorative paper for a soft backdrop.
- Attach padding along the outer edge with hot glue to create a cushioned lip.
- Affix binder clips to the corner edges to hold notes, cords, or small tools.
Pro Tips / Styling Ideas
- Choose a color palette that matches your desk—mint + brass, blush + wood, or monochrome.
- Use as a lipstick/office station for quick access to essentials.
- Add a tiny planter on the top for a charming desk micro-garden.
Who would love it: freelancers, designers, or students who want a hint of luxury in everyday organization. This one says “you’ve got this” with every glance.
6. Mini Shadow Box Theater: Tiny Scenes, Big Wow
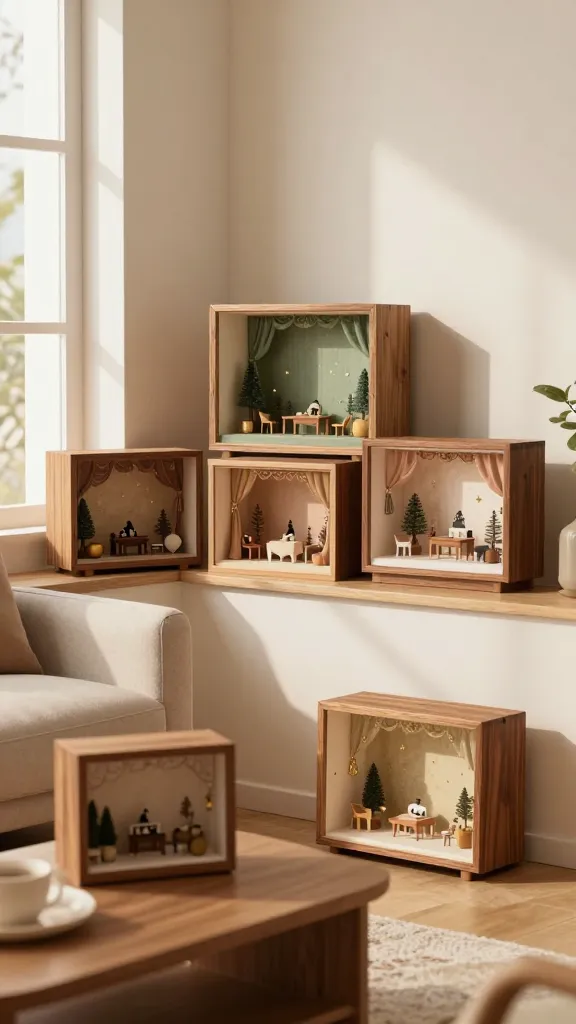
Close your eyes and imagine a micro theater you can build, stage, and rearrange with friends. The Mini Shadow Box Theater turns small silhouettes and little props into dramatic, seasonal scenes you can swap weekly.
What makes it so delightful is the storytelling aspect—each box becomes a tiny stage where your group crafts a scene, a joke, or a memory. It’s perfect for cozy coffeehouse corners, mantelpieces, or playful decor for a party.
Materials Needed
- Small shadow box frames or shallow wooden boxes
- Colored paper, fabric scraps, and minimal stickers for scenery
- Miniature figurines or cut-out silhouettes
- Glue, scissors, and a craft knife
How to Make It
- Decorate the inside back with a painted sky, cityscape, or forest backdrop.
- Arrange and glue silhouettes and props to tell a moment or seasonal vignette.
- Swap scenes as your mood or season changes (put a small tab on the back for easy updates).
Pro Tips / Styling Ideas
- Keep a rotating “scene kit” nearby so you can quickly change the display with minimal effort.
- Use vellum or semi-opaque paper for floating effects behind silhouettes.
- Pair with a tiny LED string light to illuminate the stage in the evenings.
Who would love it: theater lovers, diorama fans, or anyone who enjoys storytelling through craft. A quirky, heartfelt project that sparks conversation and imagination.
Conclusion: Grab a friend, pick a theme, and dive into a Crafternoon you’ll both brag about. Each project bursts with personality, practicality, and a touch of whimsy that makes crafting together feel effortless and endlessly fun. You’ll love the glow of a finished piece, the stories you’ll trade, and the simple joy of creating something with friends by your side.