5 Quick Crafts Aesthetic Ideas
Ready to turn your space into a vibe on a budget? These five quick crafts are designed for maximum impact with minimal effort. They’re fun, approachable, and totally Pinterest-worthy, trust me.
Grab a cup of coffee, pick a project, and let your creativity run wild. Each idea is unique, practical, and guaranteed to add a little extra charm to your everyday life.
1. Dreamy Moss-Panel Wall Clock
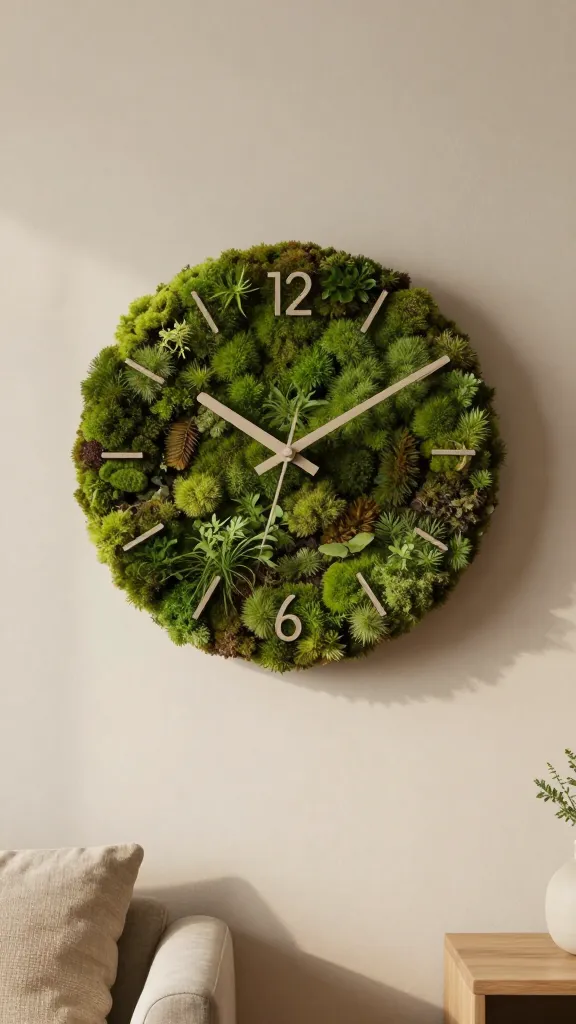
Imagine glancing up at a wall clock that feels like a tiny forest scene—soft greens, natural textures, and a whisper of whimsy. This moss-panel clock is surprisingly simple and endlessly soothing, a perfect focal point for living rooms or bedrooms.
What makes it special is the texture play: real or preserved moss, a lightweight clock base, and minimalistic hands. It borders on art and function, which is exactly the aesthetic we crave.
Materials Needed
- Minimalist clock mechanism (battery-operated)
- Thin wooden plaque or frame (12–14 inches)
- Preserved moss or faux moss sheets
- Adhesive spray or hot glue
- Thin craft wire or hanging hardware
- Optional: small dried grasses or pebbles for texture
How to Make It
- Attach the clock mechanism to the back of the wooden plaque per the kit instructions.
- Trim the moss to fit the front panel, leaving a clean border.
- Spray the back of the moss with adhesive and press onto the plaque, smoothing out any bubbles.
- Glue on any extra textures (grasses, pebbles) for depth.
- Install the hanging hardware and set the time. Voilà—nature meets timekeeping.
Pro Tips / Styling Ideas
- Place near natural light for vibrant moss color, or keep away from direct sunlight to preserve it longer.
- Pair with matte ceramic planters and warm wood tones for a cohesive nature-inspired corner.
- Change the moss seasonally with light accents like dried florals in fall or soft whites in winter.
Who will love this? Anyone craving a nature-inspired statement piece without the DIY overwhelm. It’s a conversation starter that doubles as a gentle time-teller.
2. Color-Blocked Ceramic Planter Set
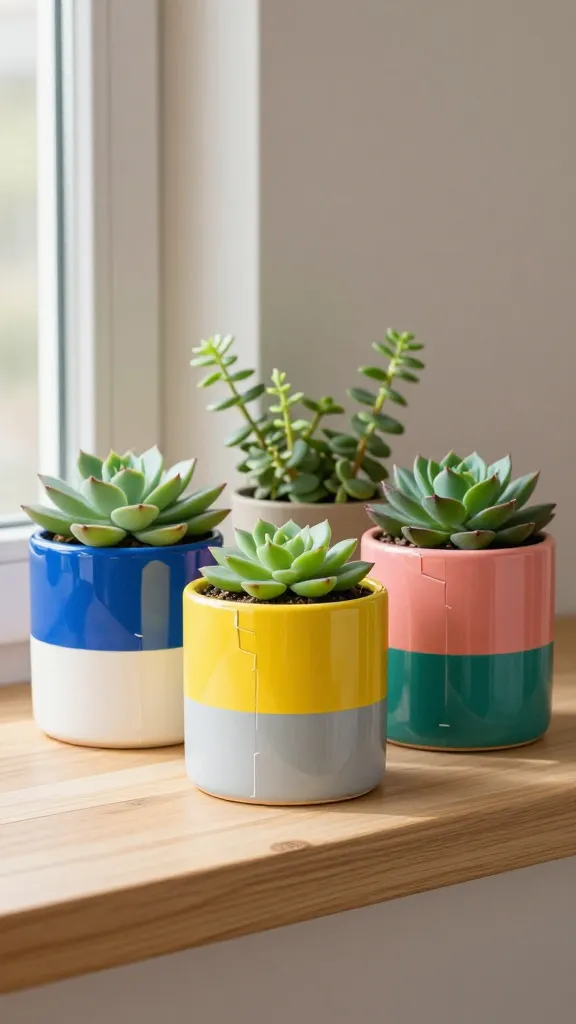
Bright pops of color don’t have to be loud to make a statement. This color-blocked planter set uses simple ceramic pots, painter’s tape, and bold hues to create a chic, modern display that plays nicely with greenery or succulents.
The appeal is in the crisp lines, contrasting tones, and the little bit of handmade magic that feels effortlessly stylish. It’s the kind of project you can finish in an afternoon and be proud to display on a windowsill or coffee table.
Materials Needed
- 3–4 plain ceramic pots (3–4 inches each)
- Acrylic craft paints (at least 2–3 contrasting colors)
- Painter’s tape
- Paintbrushes (varied sizes)
- Clear sealant spray (optional for longevity)
- Potting mix and small plants or succulents
How to Make It
- Wash and dry the pots thoroughly before painting.
- Apply painter’s tape to create clean, geometric sections—think half-mone or vertical blocks.
- Paint each section with a different bold color. Let dry, add another coat if needed.
- Seal with a light spray coat to protect the finish if you’ll be indoors. Remove tape after the last coat dries.
- Plant and group together for a splashy display.
Pro Tips / Styling Ideas
- Use colors that echo your room’s accent pieces for a cohesive look.
- Mix sizes for visual interest—tuck a tiny pot next to a larger one with a trailing plant.
- Line them up on a tray to keep things tidy and photo-ready for social posts.
Who would love it? Color enthusiasts and styling editors alike. This set is a versatile upgrade for kitchen counters, sunlit shelves, or balcony corners.
3. Soft Texture Needle-Felt Wall Ribbons
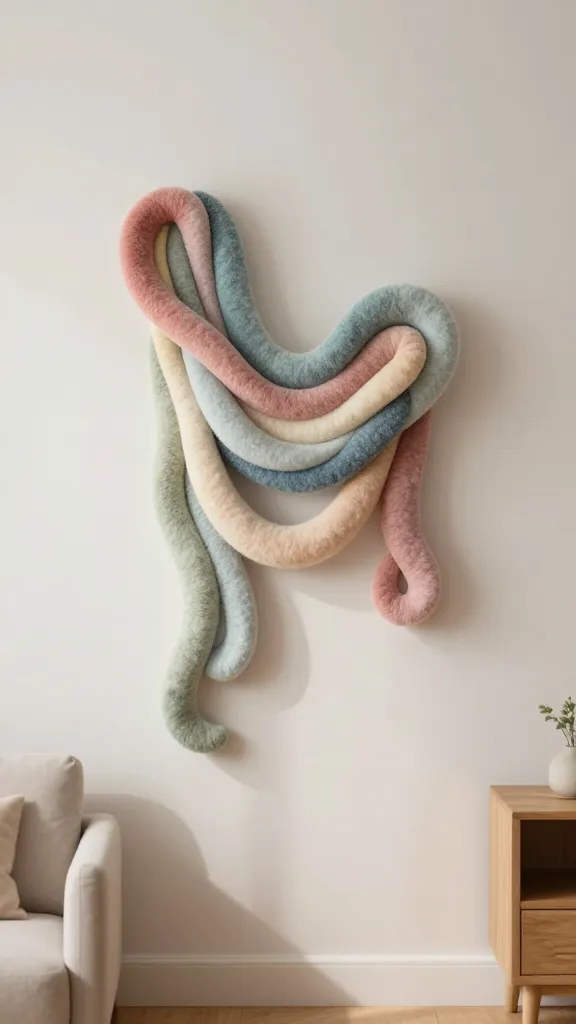
Up your wall game with a delicate felted ribbon installation. This project uses soft colors and a looped or waved arrangement to create a tactile, cozy wall feature that reads as art rather than craft.
The magic is in the texture: plush felt, gentle curves, and a handmade charm that feels like a warm hug for your space. It’s one of those projects you can tailor to your wall size and color palette, FYI.
Materials Needed
- Felt sheets in 2–3 complementary colors
- Needle felting needle or hot glue (depending on technique)
- Thin craft thread or fishing line for hanging
- Scissors and measuring tape
- Optional: small wooden dowel as a decorative rod
How to Make It
- Cut long strips of felt in varying widths for a layered effect.
- If using needle felting, sculpt soft curves or wave shapes. If using glue, create loose loops or petal-like ribbons and glue to a backing fabric or directly to the wall.
- Arrange on the wall in a flowing pattern, securing with thread or small nails. Space evenly for a calm, balanced look.
Pro Tips / Styling Ideas
- Keep colors soft and cohesive—dusty rose, sage, and ivory read especially chic.
- Pair with a matte frame or a minimalist shelf to ground the texture.
- Change the arrangement with seasons; it’s easy to re-hang ribbons for a fresh update.
Who will adore it? Texture lovers and maximalists alike. It’s a gentle, artistic touch that looks luxe on a feature wall or above a cozy reading nook.
4. Vintage-Inspired Linen Lanterns
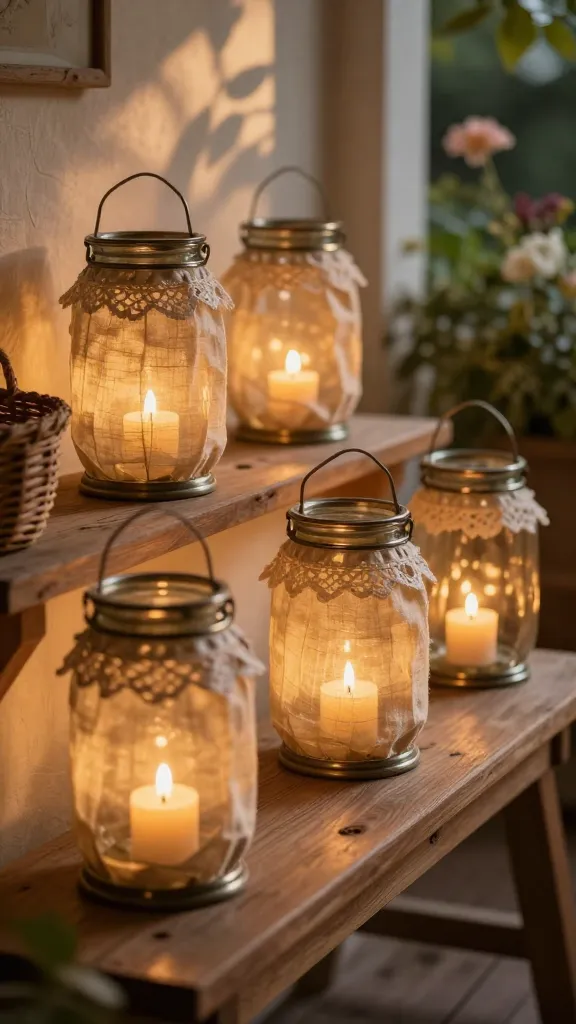
Glimmering candlelight meets soft linen in these vintage-inspired lanterns. Reworking thrifted jars and tea-light holders with linen fabric and a touch of lace creates a warm, nostalgic glow perfect for mantels, patios, or romantic dinners at home.
The appeal lies in the cozy, timeless vibe and the ease of assembly. It’s the kind of project that feels like a little treasure you’d find in a sunlit market stall.
Materials Needed
- Varied glass jars or tea-light holders
- Lightweight linen fabric (in neutral colors)
- Lace trim (optional)
- Mod Podge or fabric glue
- Rafia twine or jute for handles
- LED tea lights
How to Make It
- Cut fabric to wrap around the jar with a little overlap.
- Brush a thin layer of Mod Podge on the jar and press the fabric in place. Smooth edges.
- Add lace trim along the top or bottom for a vintage touch. Seal with another light layer of glue.
- Attach a twine handle if you want a hanging version, or leave as a tabletop lantern.
- Place LED tea lights inside for a safe, flickering glow.
Pro Tips / Styling Ideas
- Group in a trio on a tray with greenery for a restaurant-worthy vignette.
- Use warm white LEDs for that authentic candlelight effect.
- Pair with brass accents or soft wood tones to elevate the vintage vibe.
Who would love it? Perfect for romantics, hosts, and anyone who wants a soft glow without the risk of real flames. Great as a centerpiece or a calming bedside nightlight.
5. Minimalist Geometric Coaster Grid
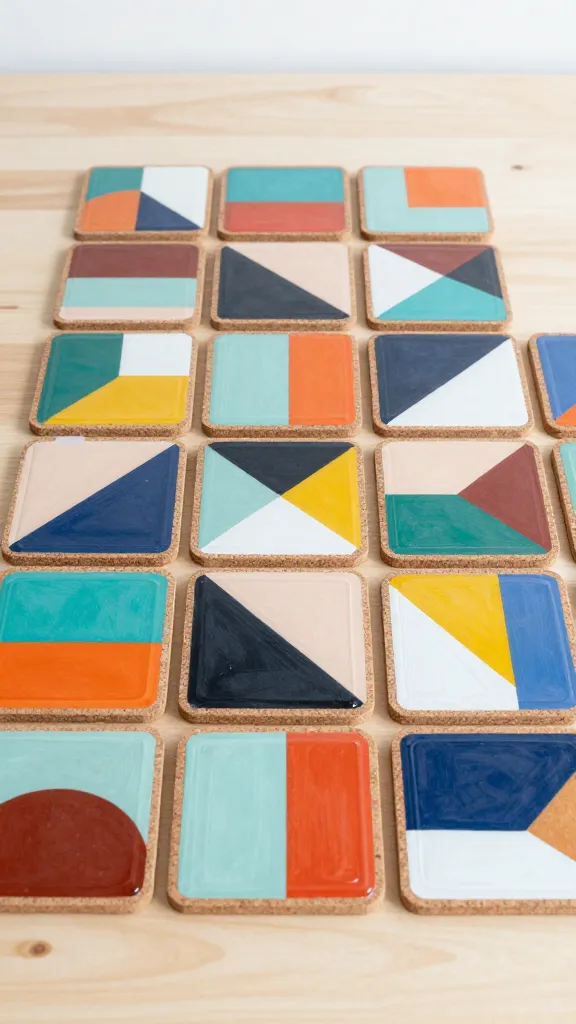
Coasters that are not just functional but also a design statement? Yes, please. Create a sleek grid of geometric coasters using cork, acrylic paint, and a crisp sealant. It’s a tiny project with a big punch, seriously.
The charm comes from the clean lines and the tactile contrast between cork and glossy paint. It’s a practical decor piece that makes every coffee moment feel a little more curated.
Materials Needed
- Cork tiles or circles (2–3 inches each)
- Acrylic paints in 2–3 colors
- Painter’s tape for sharp lines
- Clear sealant spray or Mod Podge
- Palette knife or small brushes
How to Make It
- Arrange cork shapes on a protected surface in a grid pattern to plan colors.
- Paint each tile with a bold solid color using clean, even strokes. Let dry.
- Apply painter’s tape to create tiny geometric accents on some tiles for visual interest.
- Seal with a clear spray or Mod Podge to protect the finish. Let dry completely.
- Optional: attach a soft felt pad underneath to prevent scratching surfaces.
Pro Tips / Styling Ideas
- Keep the palette cohesive with your room’s tones—think taupe, olive, and cream.
- Stack a couple of tiles on a tray with a small plant for a chic coffee table display.
- Gift a mini set to a friend who loves clean, modern decor.
Who would love it? Minimalists, design lovers, and anyone who appreciates a small, stylish home accessory. It’s a simple win for daily use and daily bragging rights on social feeds.
Conclusion
These five quick crafts bring bold aesthetics into reach without bogging you down in complexity. Pick one to start (or dive into all five for a weekend of creative momentum) and watch your space transform with personality, texture, and color. You’ll love the sense of accomplishment—and your finished pieces will thank you every time you glance their way.