10 Holiday 3d Craft Ideas for Christmas: 3d Magic You Can Make Now
1. Paper-Clad Christmas Tree Shadow Box with 3D Florals
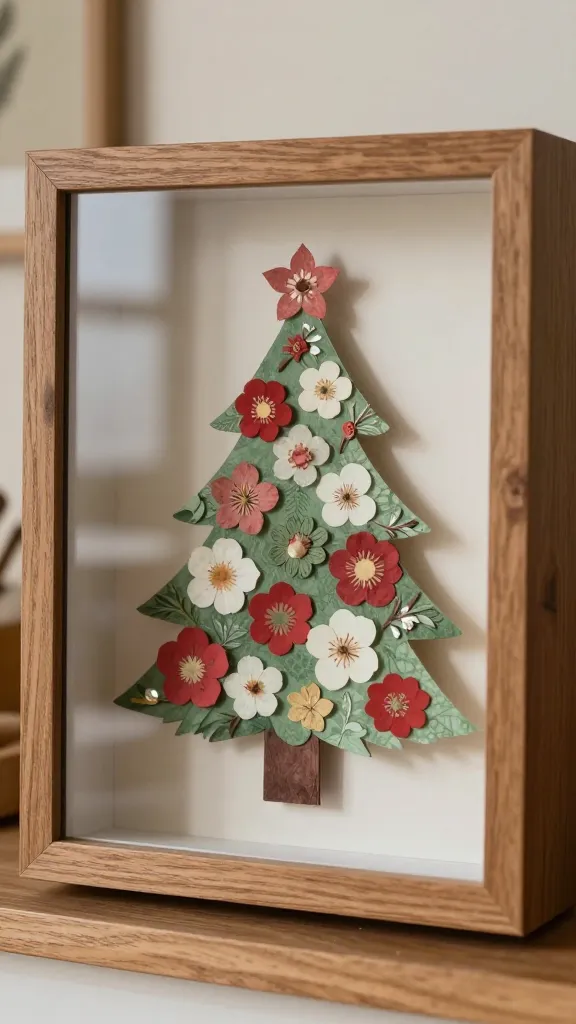
Picture a mini Christmas tree peeking out of a glass-shadowed scene, blossoms popping in 3D from the frame. This little wonder feels boutique and personal, perfect for a mantel or bedside table. It’s not just decor—it’s a tiny year-round memory you can refresh seasonally.
Materials Needed
- Wooden shadow box frame
- Patterned scrapbook paper (green tones)
- Cardstock in red, white, and metallic accents
- Mini hot glue gun and glue sticks
- Thin floral wire or curling ribbon
- 3D paper stickers or laser-cut paper shapes
How to Make It
- Line the back with layered green paper to form a soft, dimensional tree backdrop.
- Cut small blossoms from white and red cardstock; glue them in clusters at varying depths to create a 3D effect.
- Attach a few metallic gold stars or bells for sparkle.
- Place a tiny 3D tree shape toward the center and fix it with a dab of glue. Add a ribbon bow for the finishing touch.
Pro Tips / Styling Ideas
- Switch the background to a wintery blue for a cool, contemporary vibe.
- Display with small fairy lights draped around the frame for glow at night.
Who will love it: a chic, crafty friend who adores personalized home accents and a dash of whimsy.
2. Foam-Pressed Santa Ornaments: Lightweight Joy in 3D

Three-dimensional Santa faces carved from layered foam create cheerful ornaments that stay light on the tree. They’re simple, fast, and holders of festive personality that won’t weigh down branches. Seriously, they’re a snap to customize with paints and glitter.
Materials Needed
- Craft foam sheets in red, white, black, and skin tones
- Hot glue and glue sticks
- Acrylic paint and fine brushes
- Assorted beads or sequins for embellishment
- Ribbon for hanging
How to Make It
- Cut layered foam pieces to form Santa’s hat, face, and beard in stacked levels for depth.
- Glue layers from bottom to top, allowing each to stand slightly apart for a 3D effect.
- Paint facial features, add a little glitter on the hat, and finish with a bead nose or pom-pom.
- Attach a ribbon loop at the top for hanging.
Pro Tips / Styling Ideas
- Vary skin tones and hat colors to create a forest of Santa faces for a garland.
- Hang in clusters on a white tree to mimic snow-dusted noses and beards.
Who will love it: anyone who loves playful, kid-friendly crafts with bold color blocks.
3. 3D Snowflake Wall Art Using Layered Card Stock
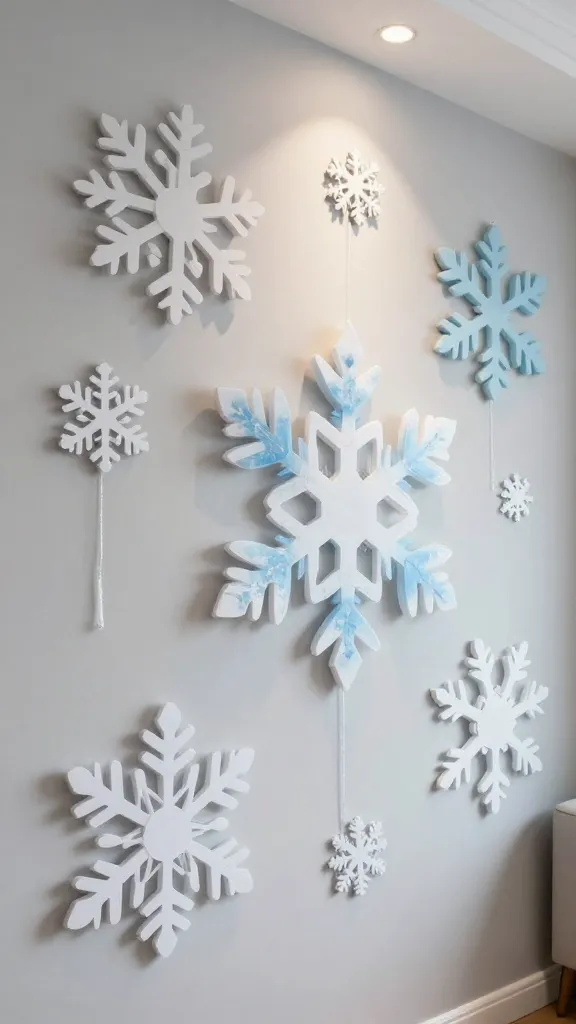
Transform a plain wall into a snow-kissed gallery with 3D layered snowflakes. This isn’t your ordinary flat décor—it’s architectural, delicate, and totally Pinterest-ready. Each snowflake has its own personality, so mix different shapes for a wintry display worth admiring.
Materials Needed
- Cardstock in white and icy blue
- Ruler, craft knife or scissors
- Frosted acrylic yarn or thin string
- Double-sided mounting tape or small nails
How to Make It
- Cut snowflake templates in multiple sizes; score lines to create fold lines for 3D effect.
- Fold and glue overlapping layers to build depth, letting some pieces jut slightly outward.
- String a few through the center and mount them on the wall at various heights for a snow-drift arrangement.
Pro Tips / Styling Ideas
- Use metallic accents (silver or pale gold) for extra shimmer.
- Group with a soft white string lighting to mimic a frosty glow.
Who will love it: minimalist lovers who crave elegant, scalable seasonal decor with a delicate touch.
4. 3D Lantern Centerpiece Made From Cardboard Tubes

This eco-friendly centerpiece uses discarded cardboard tubes to form a stacked, lantern-inspired sculpture. It’s a striking table focal point that pairs with tea lights or LED candles for a warm, cozy glow. Trust me, it looks expensive but is delightfully DIY-friendly.
Materials Needed
- Cardboard tubes (toilet paper rolls work too)
- Hot glue gun and glue sticks
- Jute twine or ribbon
- Acrylic paint, metallic paint optional
- String lights or LED tealights
How to Make It
- Trim tubes into varying heights and glue them into a stack, forming a lantern silhouette.
- Wrap the entire stack with twine or ribbon to hide seams and add texture.
- Paint or decorate with small metallic flecks for festive shine.
- Place a light inside or behind, so the 3D layers cast warm shadows on the table.
Pro Tips / Styling Ideas
- Pair with pine cones and velvet ribbons for a rustic-chic vibe.
- Set on a mirrored tray to amplify the glow and reflect light beautifully.
Who will love it: a creative upcycler who enjoys texture and ambient lighting—great for holiday dinner tables.
5. 3D Poinsettia Paper Flower Garland
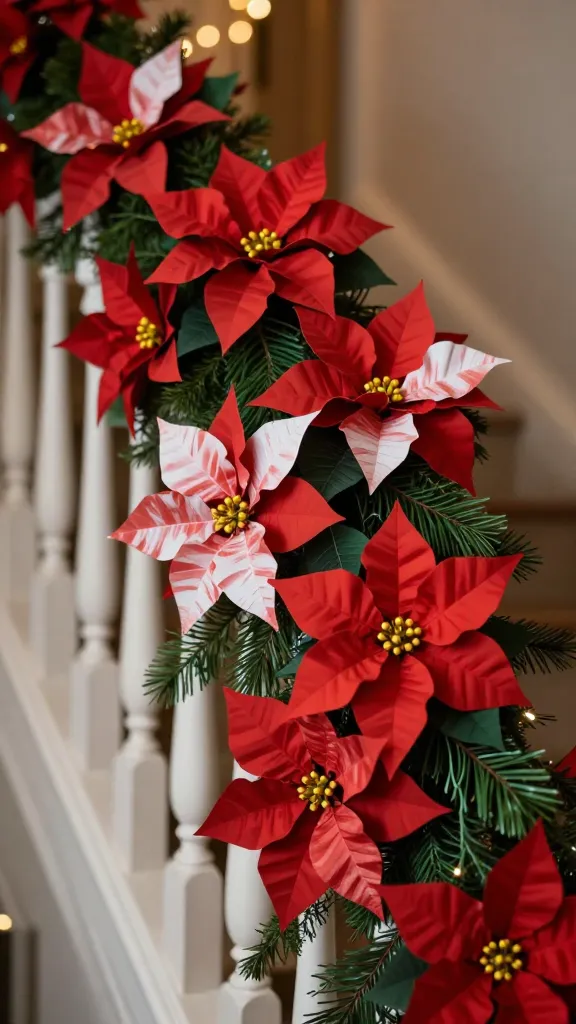
Turn simple red and green paper into lush, layered poinsettias that spring to life in 3D along a garland. This isn’t your typical flat garland; it adds volume and drama to a staircase, doorway, or mantel. You’ll be amazed by how affordable and dramatic it feels.
Materials Needed
- Colored cardstock (reds, greens, and a touch of white)
- Wire or floral stems
- Hot glue and glue sticks
- String or fishing line for hanging
How to Make It
- Cut multiple petal shapes and layer them around a central yellow bead or punched circle to form a 3D bloom.
- Attach blooms to thin wire stems and secure with a dab of glue, bending stems to create a natural curve.
- String the blooms along a length of twine to create a garland, spacing blooms evenly.
Pro Tips / Styling Ideas
- Mix sizes for an organic flow; alternate with tiny pinecones for texture.
- Use it as a door swag or drape over a chandelier for a festive statement.
Who will love it: plant-lovers and color-masters who want bold, handmade holiday flair.
6. 3D Gingerbread House Cardboard City
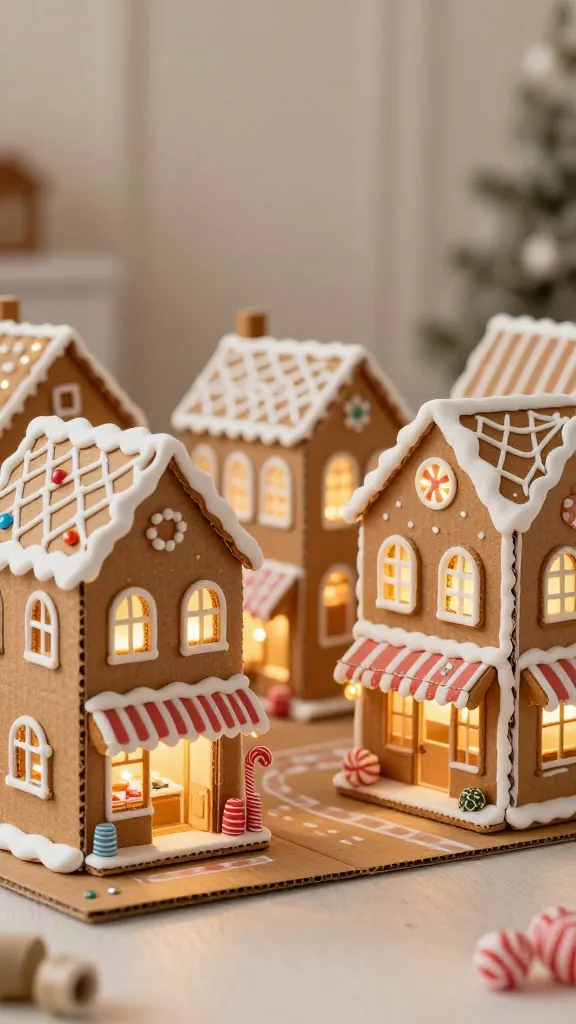
Turn simple cardboard into a tiny, charming gingerbread village with 3D façades. It’s a playful centerpiece you can customize with candy accents and twinkling lights. Imagine guests peeking into their own little edible-illusion—without the sugar rush!
Materials Needed
- Cardboard or foamboard sheets
- Acrylic paints in gingerbread-brown, white, and candy colors
- Craft glue, scissors, craft knife
- Mini LEDs or fairy lights
- Decorator goodies: faux candy, washi tape, rhinestones
How to Make It
- Cut out walls and roof shapes, then fold and glue into cubic houses with small gaps for windows.
- Paint windows with white icing lines and add candy details with bright paints or embellishments.
- Arrange houses into a little village on a base; tuck lights behind to glow through windows.
Pro Tips / Styling Ideas
- Place on a platter with fake snow for a magical display.
- Use as a table centerpiece or a floating shelf scene for a cozy kitchen vibe.
Who will love it: playful families and anyone who adores whimsical, storybook-style décor.
7. 3D Snow Globe Keepsake Jar
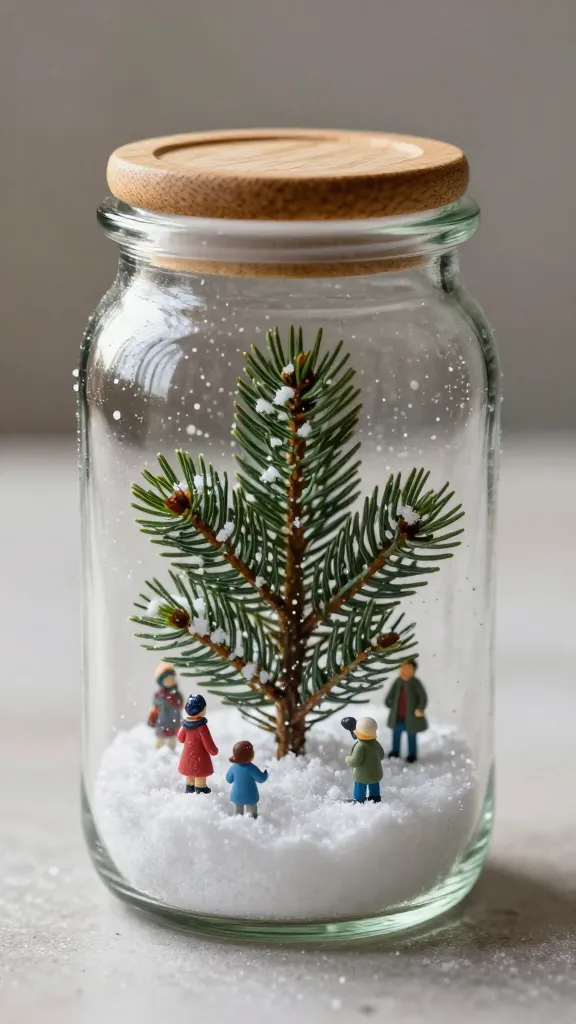
Repurpose a glass jar into a tiny 3D snow globe scene. Layering miniature winter elements inside gives you a charming keepsake that captures a season in a single container. It’s a sweet, slow craft that ends with a burst of magical glisten.
Materials Needed
- Clear glass jar with lid
- Miniature evergreen branch or tree, small figurines
- Miniature artificial snow or glitter
- Waterproof silicone sealant
- Glycerin (optional for slow snow fall)
How to Make It
- Glue the tiny evergreen branch and figurines to the lid or inside the bottom of the jar.
- Pour a small amount of snow and fill with water or glycerin for a slow drift effect.
- Seal tightly and shake to test the snowfall—adjust with more glitter or snow as needed.
Pro Tips / Styling Ideas
- Label with a hand-written name or year for a personalized gift.
- Add a ribbon bow around the lid to finish the look.
Who will love it: sentimental folks who enjoy keepsakes and cozy, snow-princess vibes.
8. 3D Ribbon Tree Wall Sculpture
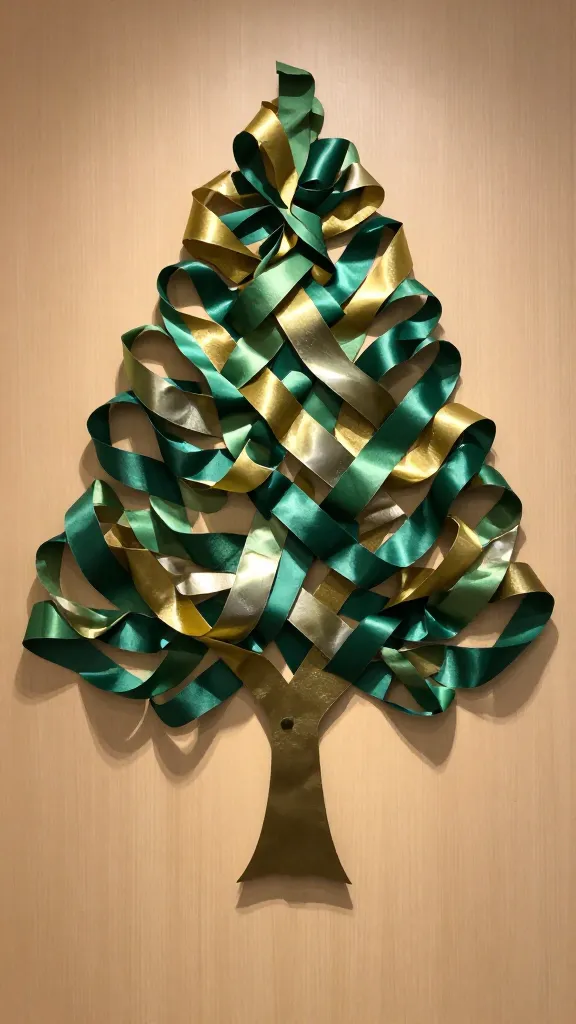
A sculptural ribbon tree is equal parts sculpture and holiday décor. Layered ribbons in varying widths radiate from a center trunk to create a lush, textile tree that stands proudly on a wall. It’s contemporary, tactile, and surprisingly easy to pull off.
Materials Needed
- Wood or sturdy cardboard backing
- Assorted ribbons in greens and metallics
- Hot glue gun and glue sticks
- Small decorative pins or glue dots
How to Make It
- Cut a simple tree silhouette from the backing board.
- Starting at the bottom, layer ribbons in fan shapes, securing with glue as you go up.
- Finish with a metallic star or ornament at the top using glue dots.
Pro Tips / Styling Ideas
- Vary ribbon textures (moire, velvet, satin) for depth.
- Pair with a small shelf of neutral-toned decor to keep it chic.
Who will love it: fabric lovers and modern art fans who want a bold, soft-textured statement.
9. 3D Christmas Word Art: Layered Lighted Letters

Light up the season with layered word art that spells out Christmas cheer. Build each letter in dimensional strips, then back with LED strips for a warm, glowing sign. It’s a confident, high-impact piece that still feels homey and handmade.
Materials Needed
- Cardboard or wood letters
- Cardstock or thin wood veneer for layers
- LED light strip or tiny fairy lights
- Hot glue and double-sided tape
How to Make It
- Cut several thin layers for each letter and stack them with spaces in between to create depth.
- Wrap the back with LED lights or place a small battery pack behind the letter on the frame.
- Mount on a contrasting backing board and hang or set on a mantel.
Pro Tips / Styling Ideas
- Use warm white lights for a cozy glow; cool white for a modern edge.
- Pair with a simple greenery spray along the bottom for a festive touch.
Who will love it: design-curious readers who want a statement piece that doubles as a nightlight.
10. 3D Pinecone Christmas Centerpiece You Can Build
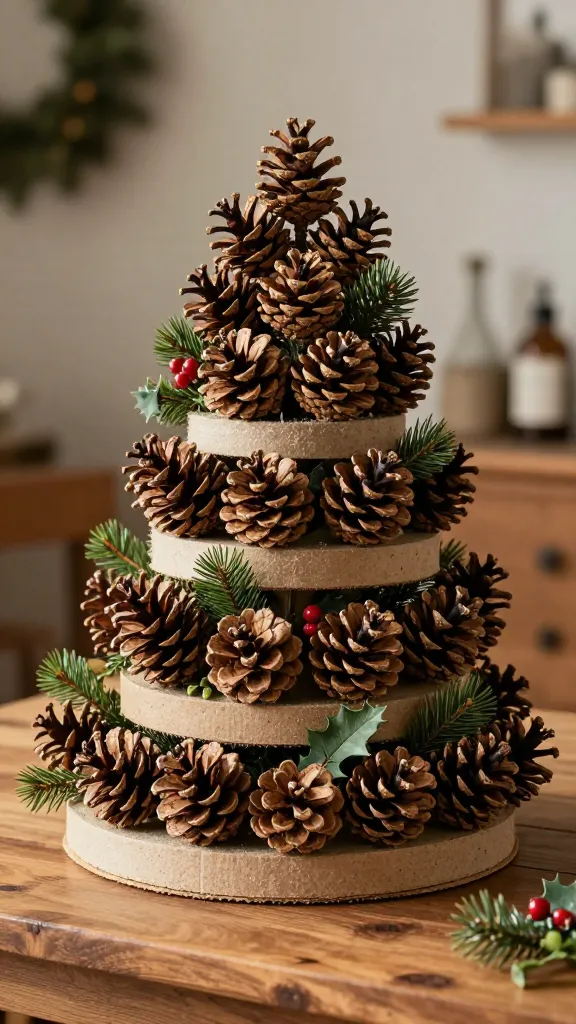
Fresh pinecones meet craft foam and ribbon in a 3D centerpiece that’s rustic-chic and totally reusable. The layered pinecones create natural texture and dimension that suit a farmhouse table or entryway vignette. FYI, it smells amazing too, if you use a touch of pine-scented spray.
Materials Needed
- Assorted pinecones (cleaned)
- Foam or card stock shapes to act as base and layers
- Hot glue, twine or jute
- Pine greenery, berries, or faux holly for accents
How to Make It
- Build a layered pedestal using foam blocks or stacked cardstock circles to create height.
- Attach pinecones around the base and create a crown of greenery on top.
- Wrap with twine to tie the pieces together and add a festive bow at the front.
Pro Tips / Styling Ideas
- Place on a mirrored tray with a few white candles for a classic holiday table.
- Use as a door-step decoration or entryway focal point to greet guests.
Who will love it: nature lovers and home stylists who crave warm, woodsy holiday vibes.
Conclusion
These 10 holiday 3D craft ideas for Christmas offer a playful mix of texture, color, and wow-factor—without requiring a fancy studio or giant budget. Which one will you start first? Grab your scissors, glue, and a sip of cocoa, and get ready to pin, share, and actually make something magical this season.