5 Creative 2nd Grade Craft Ideas Kids Will Love
As a proud crafty friend, you know the joy of watching ideas come to life—and this age loves a project that’s bold, colorful, and doable. These five crafts are designed to be kid-friendly, quick to finish, and seriously Instagram-worthy. Trust me, your dining table will become a mini art studio in no time.
Ready to dive in? Grab some bright supplies, a splash of imagination, and your best “we can do this” attitude. These ideas are engineered for 2nd graders, but grown-ups will want in on the action too.
1. Rainbow Paper Mosaic Wall Art That Pops
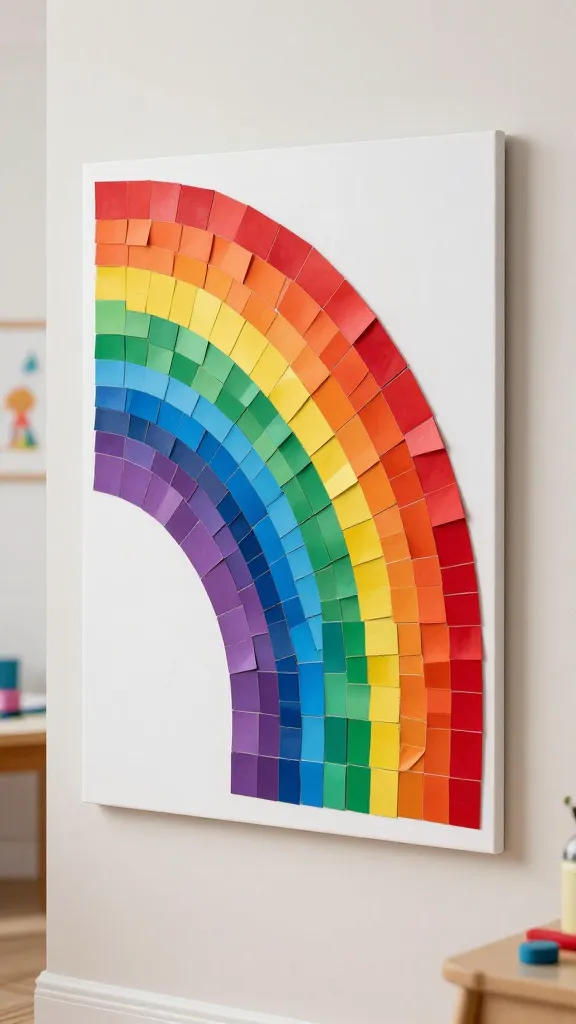
Picture a wall-worthy burst of color—an abstract rainbow made from tiny paper tiles that glow with personality. This project creates a bold statement piece that doubles as a confidence booster for little artists. The result looks like a pro gallery piece, but it’s delightfully simple to assemble.
Materials Needed
- Colored construction paper in a rainbow spectrum
- White poster board or canvas
- Clear adhesive or glue stick
- Scissors (child-safe) or a paper punch for uniform shapes
- Ruler and pencil
How to Make It
- Cut small shapes (squares, triangles, circles) from the colored papers. Aim for variety and tiny sizes for a mosaic look.
- Arrange a soft rainbow arc across the poster board before gluing. Kids love adjusting the layout until it feels just right.
- Glue shapes in place, overlapping slightly to create texture and depth.
- Let it dry flat, then hang in a sunny spot where light catches the colors.
Pro Tips / Styling Ideas
- Try a metallic accent color (gold or silver) for a hint of shimmer.
- Seal with a spray fixative if you want extra durability for a hallway display.
- Turn it into a seasonal piece by swapping in seasonal colors or adding a small central motif (heart for Valentine’s, leaf shapes for fall).
Who would love it: This is a perfect starter project for kids who love pattern and color. It’s a bright, up-close artwork that feels personal and celebratory.
2. DIY Felt Monster Pals (Cuddly Desk Buddies)
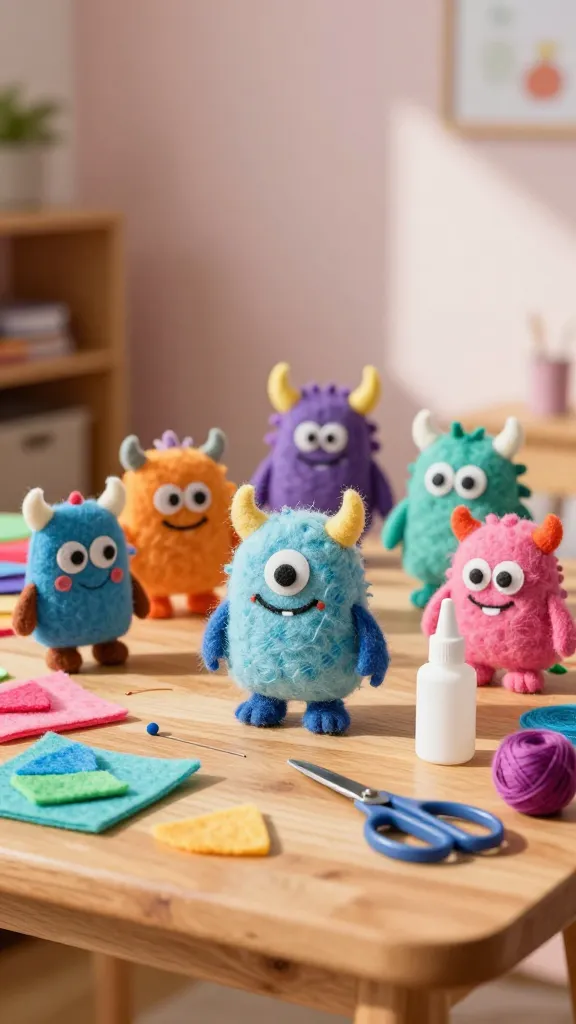
Imagination runs wild with these friendly felt monsters. Each kid designs their own goofy character, complete with goofy eyes, quirky horns, and fuzzy textures. The result is a set of mini desk companions that spark daily storytelling and pride in crafting.
Materials Needed
- Assorted felt squares
- Googly eyes or felt circles for eyes
- Fabric glue or hot glue (adult supervision for hot glue)
- Scissors
- Needle and embroidery thread (optional for faces)
- String or yarn for a hanging tag (optional)
How to Make It
- Cut two identical body shapes from felt (like a rounded triangle or blob).
- Glue the pieces together, leaving a small opening for stuffing. If you want them plushier, add a tiny amount of cotton or crinkle paper for light stuffing.
- Add eyes, mouths, and any silly features using glue, felt shapes, or simple stitching.
- Seal up the opening and add a small loop if you want to hang them as ornaments.
Pro Tips / Styling Ideas
- Let kids name their monsters and write a tiny backstory on the back of the tag for extra storytelling fun.
- Make a family of monsters in different colors to display on a shelf or corkboard.
- Use these as playful pencil toppers or bag charms—super cute and functional.
Who would love it: For kids who adore creatures and cozy textures, these pals feel like new best friends you can hug in your imagination.
3. Sparkly Stress-Relief Scented Coiled Paper Orbs
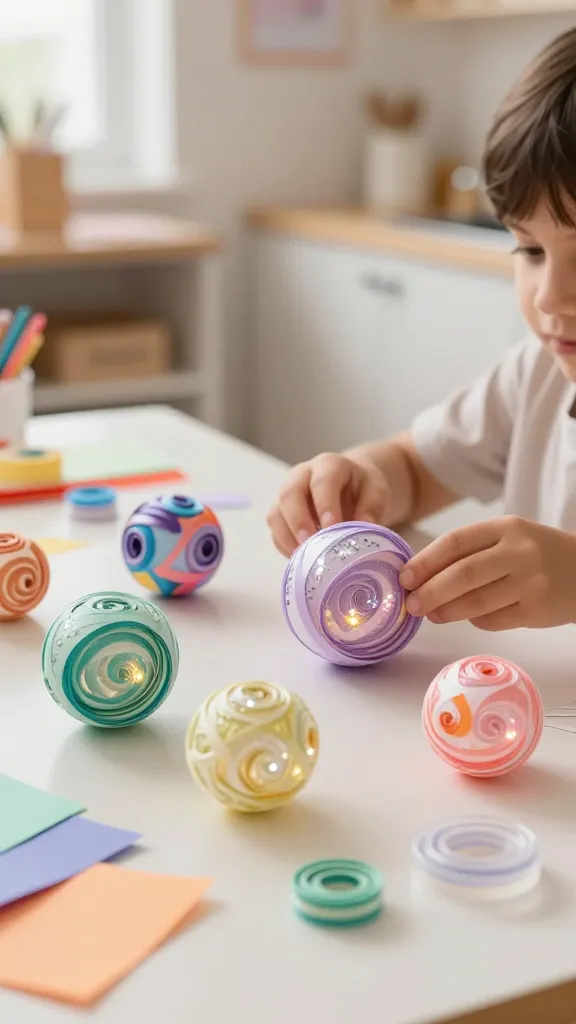
This project adds a little magic to a kid’s desk with shimmering paper orbs that catch light from every angle. They’re lightweight, decorative, and surprisingly soothing to craft—plus they offer a gentle sensory experience with curling paper and tiny sparkles. Seriously, it’s the kind of craft that makes you pause and smile.
Materials Needed
- Colorful tissue paper or tissue paper squares
- Thin floral wire or pipe cleaners for the coil
- Clear craft glue or Mod Podge
- Fine glitter (optional)
- String for hanging
How to Make It
- Layer tissue squares and glue them together in small stacks. Press firmly to set.
- Roll the stack into a tiny cone and wrap with wire or a pipe cleaner to form a spiral orb.
- Dust with a pinch of glitter if you like extra sparkle.
- Attach a string to hang or simply place on a desk as a topper.
Pro Tips / Styling Ideas
- Group several in different sizes for a balloon-like centerpiece on a table or shelf.
- Use pastel colors for a calming vibe or neon hues for party flair.
- Combine with a light fairy LED string to make them glow at night—magical for storytime corners.
Who would love it: Kids who enjoy tactile crafts and a little sparkle will be obsessed. It’s a decorative project with a soothing twist.
4. Customizable Cardboard City Mini-Block Scene

Turn a messy box into a bustling tiny world where cardboard becomes brick, sky, and street. This is a fantastic way to reuse materials, stretch imagination, and build a portable set for storytime or playtime. The only limit is your kiddo’s creativity—and a healthy dose of cardboard curvature.
Materials Needed
- Cardboard boxes of various sizes
- Acrylic paints or markers
- Construction paper for details
- Glue, tape, scissors
- Optional: small figurines, bottle caps, fabric scraps for texture
How to Make It
- Flatten a large box to form the base street. Cut windows, doors, and architectural shapes from other pieces of cardboard.
- Paint or draw a cityscape on the pieces, then glue them onto a larger board or stand-up platforms to create layers and depth.
- Add small details with construction paper and found textures—fabric awnings, bottle-cap wheels, paper trees, etc.
- Create a simple skyline backdrop and tuck your characters into the scene for dramatic effect.
Pro Tips / Styling Ideas
- Leave some “construction” edges un-glued to encourage adjustable layout as stories evolve.
- Use this as a storytelling stage—kids can narrate adventures set in their own cardboard city.
- Display on a coffee table or bedroom shelf as a colorful daily centerpiece.
Who would love it: Great for kids who like architecture, storytelling, and hands-on building. It’s a collaborative project perfect for family craft time.
5. Personalized Magnetic Bookmarks With Doodled Doodles
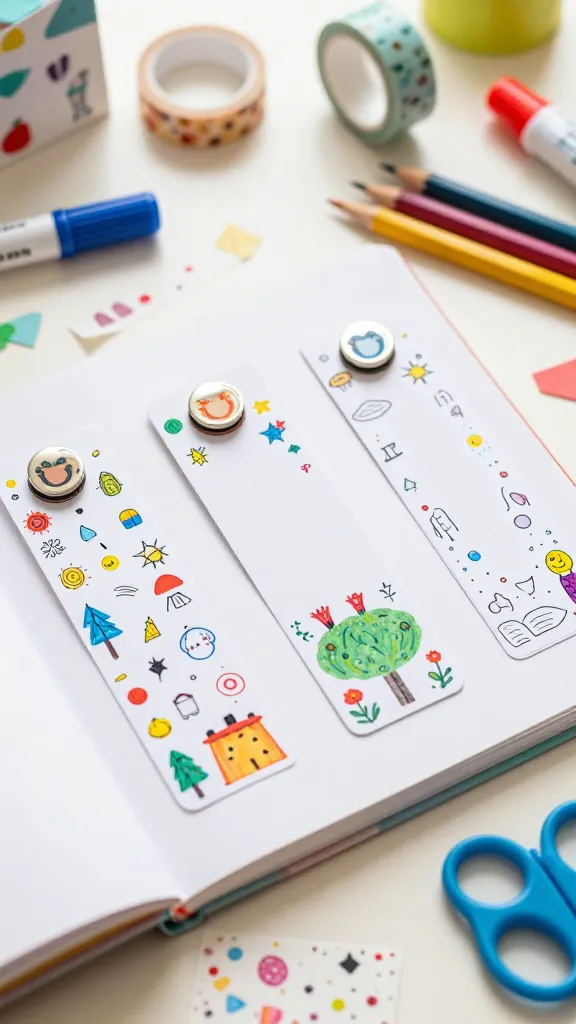
Readers unite! These magnetic bookmarks are not only useful but incredibly charming when personalized with doodles, stickers, and tiny drawings. They clip neatly onto pages and stay put, making reading time feel like a mini celebration each chapter. It’s a small project with a big payoff.
Materials Needed
- Cardstock or sturdy paper
- Magnetic sheet or small magnets
- Markers, colored pencils, washi tape
- Stickers, scrap paper for collage
- Scissors and glue
How to Make It
- Cut two rectangular bookmarks from cardstock, about 2×6 inches each. Glue magnets to the back side of each bookmark so they cling together when closed around a page.
- Decorate the front with doodles, sticker accents, and collage papers. Let each kid’s personality shine through.
- Optionally seal with a light coat of Mod Podge for durability (supervised).
Pro Tips / Styling Ideas
- Pack a mini “doodle kit” with a couple of markers in a small pouch for on-the-go creativity.
- Gift them as a reading club starter kit or a classroom treasure for book lovers.
- Create a set for siblings or friends with a color-coordinated theme (ocean, forest, space).
Who would love it: A dream for budding readers who want a personal touch to their books. Quick, cute, and always useful.
Conclusion
Five completely unique, totally doable crafts await you and your kiddo—no overlaps, no repeats, just creative spark after spark. Each project is built for quick wins with big impact, so you can see results in a single afternoon and proudly pin your finished pieces. Ready to start? Pick one (or all) and dive in—your 2nd grader will love the chance to create, show off, and share their handiwork with pride.