5 Simple 1st Grade Craft Ideas for Classrooms
Ready to turn ordinary classroom days into colorful, kid-approved moments? These 5 completely unique crafts are playful, quick, and perfect for 1st graders. You’ll love how each project doubles as a learning moment and a keepsake your students will treasure.
Trust me, these ideas are easy to set up, visually striking, and designed to engage young crafters without chaos. Let’s dive into five distinct, ready-to-move-right-into-the-classroom crafts that will have you pinning for more. FYI, your students will be begging for “one more craft” time!
1. Alphabet Garden Seed Cards: Grow Literacy While You Grow Kindness
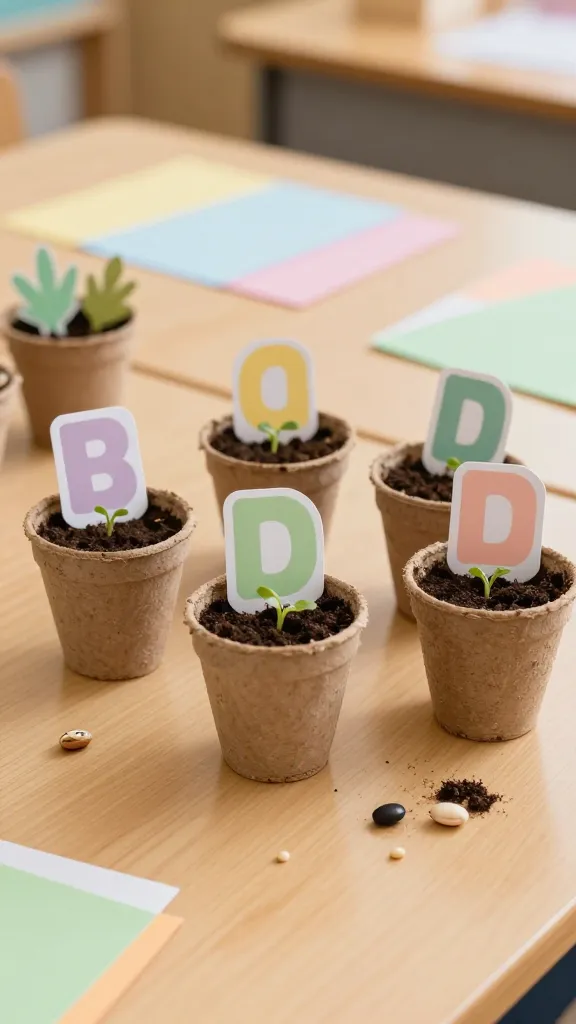
Picture this: seed cards shaped like letters, ready to plant in mini paper pots with a splash of color and a note of encouragement. This craft blends literacy with a tiny garden moment, and it’s surprisingly tidy for a classroom setting.
Materials Needed
- Colored card stock (assorted greens and pastels)
- White or kraft seed paper (or plain seed paper you can attach to cards)
- Pot-sized paper cups or mini pots
- Soil or potting mix (for a small classroom demo)
- Dry beans or fast-glower seeds (sunflower, basil, or nasturtium work well)
- Markers or colored pencils
- Glue or double-sided tape
How to Make It
- Cut seed paper into the shape of upper- or lower-case letters. Keep each letter the size of a postcard for easy handling.
- Decorate the back with a friendly message like “Grow Kindness with Letters.”
- Attach the seed paper letter to a card stock background with a small patch of glue. Include planting instructions on the back of the card so families can garden at home.
- Place a little potting mix into the mini pot and nestle a seed inside. Tape or glue the seed card to the pot so it reads as a tiny, growing garden starter.
Pro Tips / Styling Ideas
- Use a color palette that matches your classroom theme—soft greens and sky blues read calm and inviting.
- Pair each letter with a sight-word or a number to blend literacy with early math skills.
- Set up a “seed library” shelf where students can choose a letter to plant during a station rotation.
End note: This is perfect for back-to-school or parent-teacher nights; families will love the hands-on, plant-and-learn approach. Who would adore this? Curious minds, budding readers, and nature lovers alike.
2. Rainbow Texture Collage Monsters: Celebrate Texture and Color
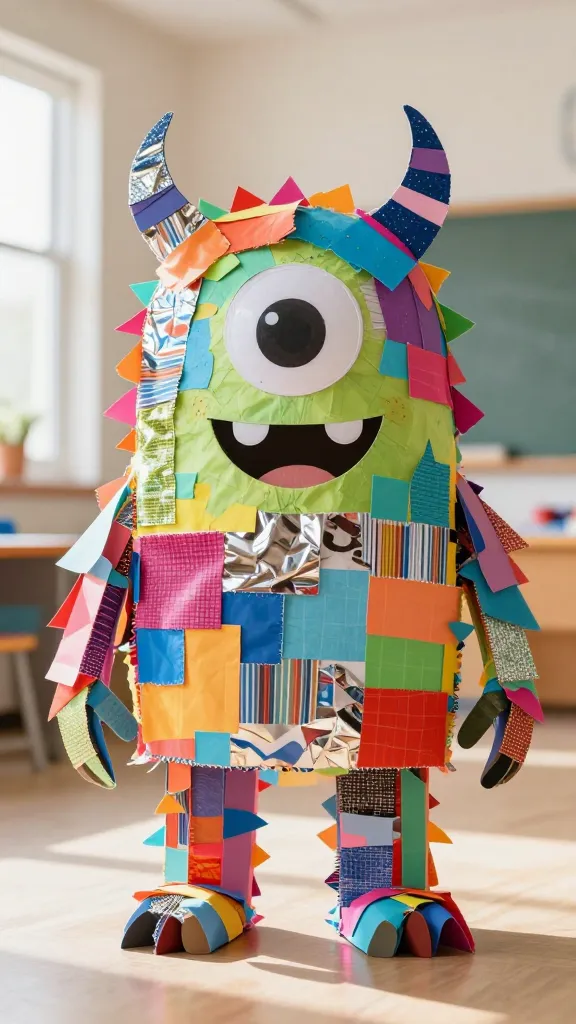
Imagine a friendly paper monster whose body is built from textures you find around the classroom. This project is tactile, giggle-inducing, and yields wall-ready art that brightens any bulletin board.
Materials Needed
- Plain cardstock or construction paper in a large sheet
- Magazines, fabric scraps, ribbons, and foil scraps for texture
- Safety scissors
- Glue sticks or liquid glue
- Googly eyes or drawn eyes with markers
- Marker or colored pencil for details
How to Make It
- Fold the large sheet into a playful creature shape (round belly, pointy ears, etc.).
- Pass around a texture tray and let kids choose materials to cover different body parts—feelings-colored choices add a learning layer too.
- Glue pieces onto the monster, layering to create a rainbow, textured vibe.
- Add eyes, a mouth, and little accessories with markers for personality.
Pro Tips / Styling Ideas
- Create a gallery wall of different texture monsters—each student’s creature becomes a learning badge of creativity.
- Keep a “texture swap” corner where kids trade scraps with a buddy to diversify patterns.
- Photograph each finished monster and compile a mini class art book—instant memories!
End note: This craft screams “fun wall art” and builds fine motor skills through tearing, sorting, and gluing. It’s a hit with kids who love hands-on play, and you’ll love the zero-fuss cleanup. A perfect fit for a seasonal display or a cozy reading corner.
3. Storybook Shadow Puppets With a Paper-Backdrop Scene
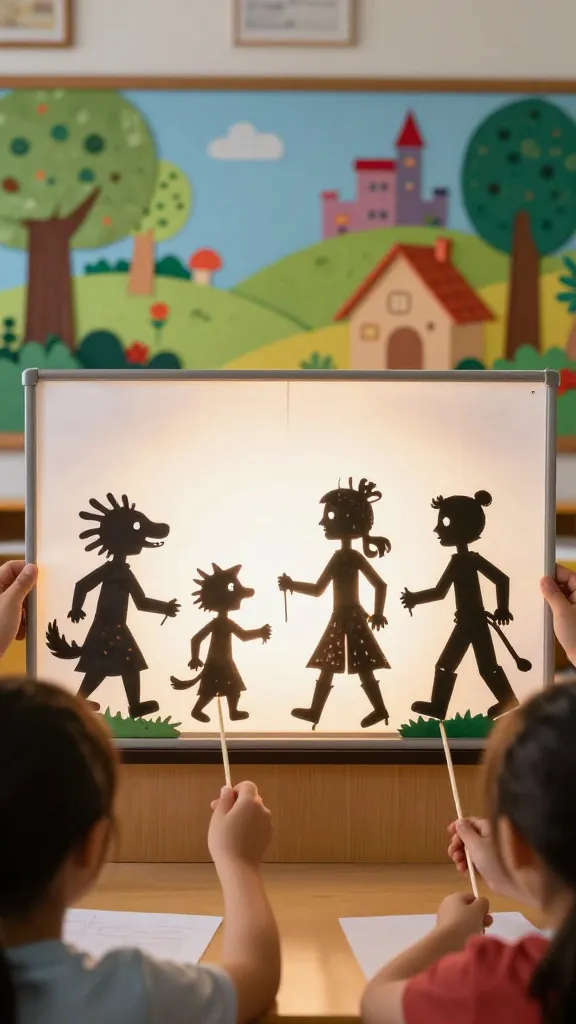
Turn beloved classroom read-alouds into interactive puppetry! These simple shadow puppets bring characters to life against a backlit backdrop, sparking imagination and storytelling confidence.
Materials Needed
- Black construction paper or cardstock
- Colored paper for backdrop and scenery
- Sturdy craft sticks or popsicle sticks
- Glue or tape
- Optional: page-sized white poster board or an interactive felt board
How to Make It
- Color or decorate a backdrop that suits the story you’re focusing on. Think nighttime forest, sunny meadow, or underwater reef.
- Cut out stand-alone character shapes from black paper—animals, heroes, or fantastical figures.
- Attach the puppets to craft sticks to create your shadow performances.
- Sit in a dim corner with a tablet or small projector to cast shadows on a white screen or poster board.
Pro Tips / Styling Ideas
- Try a “story in 5 pictures” sequence to structure a mini performance that pairs with a read-aloud.
- Encourage students to design their own characters after the story and write a one-line bio for each one.
- Laminate the backdrops for durability and reuse across units.
End note: This idea is particularly fantastic for language arts and dramatic play. It’s perfect for a small group center, a classroom theater corner, or a family night performance. Kids who love acting will be in their element, and you’ll get big smiles in return.
4. Folded Paper Quilts: A Quick Geometry and Color Lesson

Who knew folding paper could become a stunning piece of “quilting” art? These folded-paper quilts are a kid-friendly crash course in geometric shapes, symmetry, and color harmony—all wrapped up in a cozy, tactile craft.
Materials Needed
- Colorful construction paper in 6–8 shades
- Scissors
- Ruler and pencil for neat folds (optional)
- Glue stick
How to Make It
- Cut each color paper into squares of the same size for uniformity.
- Fold each square into a simple geometric shape (triangle, hexagon, rectangle) by accordion-folding or basic square folding.
- Arrange pieces on a larger sheet to create a quilt-like grid. Use glue to secure and hide edges beneath overlapping shapes for a clean look.
Pro Tips / Styling Ideas
- Create a “seasonal quilt” with colors that reflect the time of year—think warm tones in fall, cool blues in winter.
- Incorporate tiny cut-out pictures from magazines or printable icons for a mixed-media effect.
- Hang the finished quilts in a classroom corner or hallway display to celebrate student work.
End note: This project makes a striking wall piece and doubles as a geometry mini-lesson. It’s easy to scale up or down for different grade levels, and it respects short attention spans with a quick, satisfying result. Your future quilt gallery will brighten any space—and you’ll love the calm, organized outcome.
5. Mini Recipe Bookmarks: Reading Fuel in a Cheery Charm
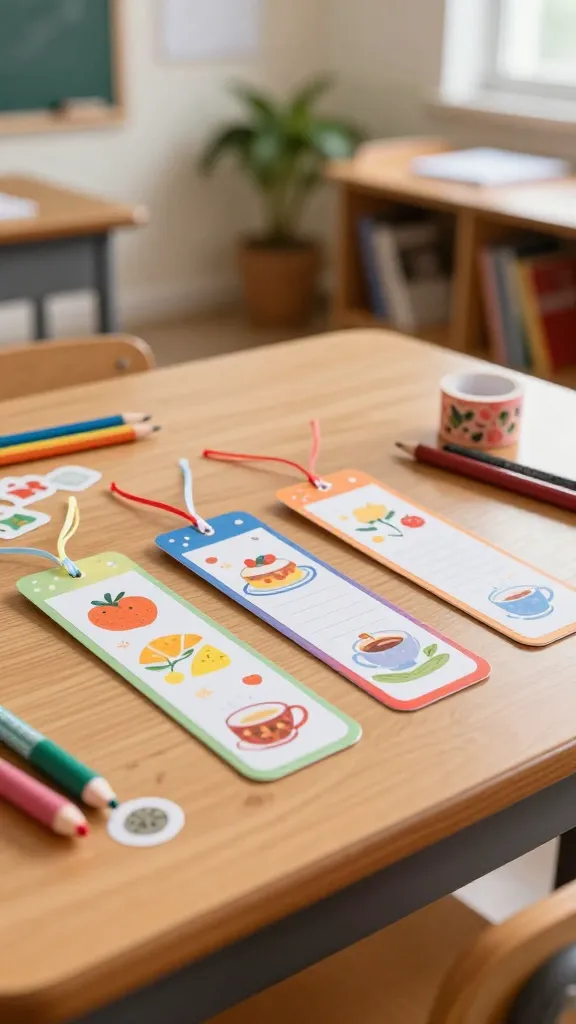
Let’s bake up some bookish joy with edible-looking, paper-thin bookmarks that double as mini recipe cards. They’re delightful, giftable, and a clever way to sneak in a little reading comprehension and handwriting practice.
Materials Needed
- Colored index cards or heavyweight paper
- Markers, colored pencils, or gel pens
- Stickers or washi tape for decoration
- Ribbon or yarn for tassels (optional)
- Pencil for sketching
How to Make It
- Cut the paper into bookmark-sized rectangles (about 2 x 6 inches).
- Decorate the front with a favorite book character, a short quote, or a simple illustration of a recipe-like theme (e.g., “Story Soup: Stir in Imagination”).
- Write a short literacy prompt on the back such as “What’s your character’s favorite snack?”
- Attach a small tassel using a piece of ribbon punched through the top, if you like.
Pro Tips / Styling Ideas
- Turn these into a classroom incentive: earn a bookmark for completing a book report or reading a certain number of pages.
- Laminate for durability; these can become heirloom classroom keepsakes.
- Pair with a tiny recipe card crafting station after read-alouds to mix narrative with a tactile craft.
End note: These bookmarks are the kind of “small but mighty” project that makes a big classroom impact. They’re cute, practical, and perfectly suited for a quick-fill activity between lessons. Kids will treasure their own mini keepsakes—and you’ll appreciate the calm, focused energy they bring to literacy time.
Conclusion
Ready to try one (or all) of these 5 Simple 1st Grade Craft Ideas for Classrooms? Each project is designed to be quick, visually appealing, and stage-ready for a lively elementary classroom. Not only do they look fantastic on display, they also turn learning moments into memorable experiences. Grab a few supplies, pick a story or theme, and watch your classroom shine with creativity and confidence. You’ll love how easy they are—and so will your students.