7 Simple Crafts for 3 to 5-Year-Olds (Preschool Fun)
Ready to spark tiny hands and big smiles? These 7 completely unique crafts are designed for preschoolers, easy on parents, and totally Instagram-worthy. Trust me, your little artist will beg to do them again and again.
1. Mini Garden in a Jar: Whimsical Terrarium for Tiny Hands
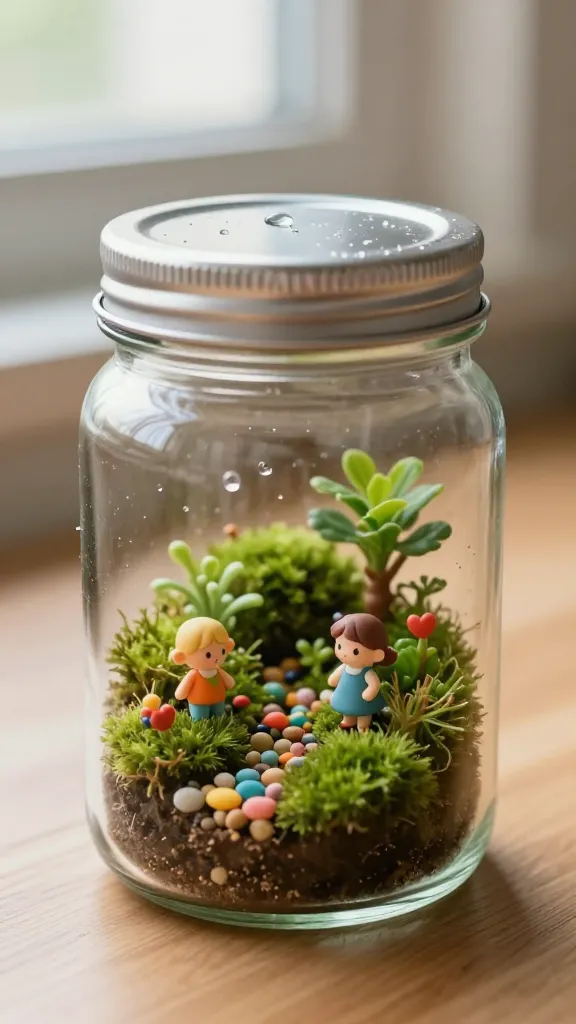
Imagine a tiny world that fits in a jar, complete with grassy moss, colorful pebbles, and cheerful figurines. This little terrarium lets preschoolers explore textures, colors, and pretend-play garden scenes.
Materials
- Clear glass jar with lid (baby food jars work well)
- Decorative moss, small plastic plants, and mini figurines
- Colored pebbles or aquarium gravel
- Fine soil or potting mix (optional, for a planted look)
- Spray bottle with water
- Optional: small ribbon for a decorative lid topper
How to Make It
- Let your child layer moss, pebbles, and a bit of soil in the jar, talking about color names and textures as you go.
- Place tiny figurines to create a playful scene—think a tiny playground, garden, or pond.
- Give a few spritzes of water from the spray bottle to settle the textures.
- Cap the jar or add a decorative lid topper for a finished look.
Pro Tips / Styling Ideas
- Use a drop of glue on the jar rim to prevent slipping, then let kids press in accents.
- Choose a color theme (pastel, autumn tones) to suit a room’s decor.
- Switch the scene with seasonal miniatures—pumpkins in fall, snowflakes in winter.
End note: This craft is perfect for a calm activity corner or a gift for grandparents. Your little green thumb (in miniature) will adore it.
Who loves it: Kids who adore pretend play and tactile exploration. Great for a quiet afternoon activity.
2. Sock Puppet Parade: Plush Critters Made from Everyday Socks
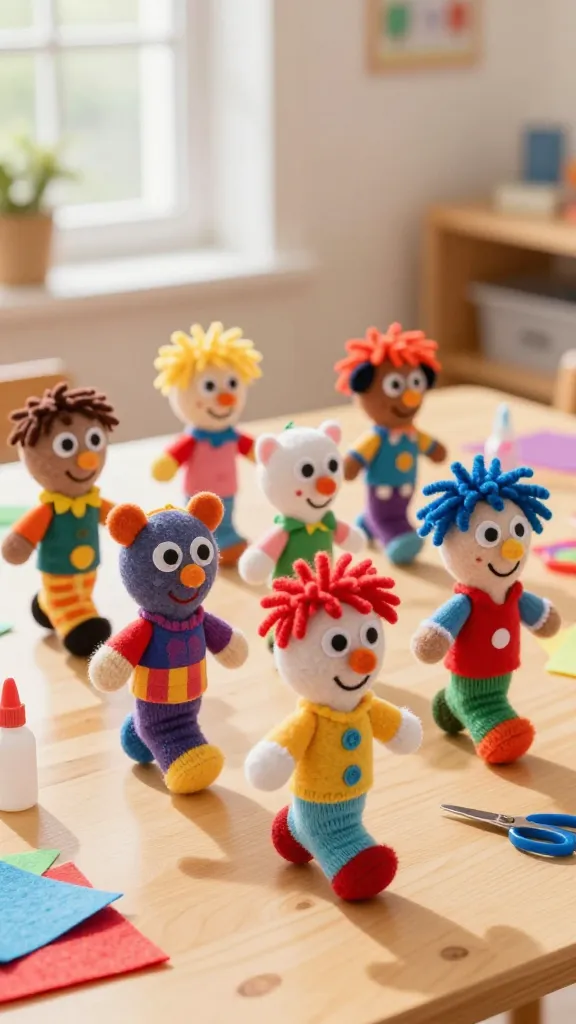
Imagine a parade of silly sock creatures marching across a craft table. Soft textures, easy sewing (or no-sew options), and big giggles make this a preschool staple.
Materials
- Old colorful socks (tube socks or ankle socks work best)
- Felt scraps for eyes, noses, ears
- Non-toxic glue or fabric glue
- Googly eyes (optional)
- Yarn for hair
- Fabric scraps for outfits
How to Make It
- Turn a sock into a friendly character by adding felt features and yarn hair.
- Glue on eyes, a nose, and a mouth. Let it dry a bit so pieces stay put.
- Decorate with felt accessories or a tiny scarf from fabric scraps.
Pro Tips / Styling Ideas
- Match colors to a theme—forest friends, ocean pals, or birthday buddies.
- Put on a short puppet show for family and friends to practice storytelling.
- Attach a small stick to the bottom for a hand puppet version.
End note: These puppets are perfect for language prompts, early storytelling, and interactive playdates. They’ll love the chance to bring characters to life.
Who loves it: Kids who enjoy storytelling, role play, and dressing up. Great for a creative morning ritual.
3. Paint With Nature: Leaf-Pressed Monoprints

Turn a breezy walk into a vibrant art session with leaf-pressed prints. This project is all about texture, color, and outdoor inspiration that lasts on the wall or a tote bag.
Materials
- Flat washable paints (assorted colors)
- Heavy paper or cardstock
- Fresh leaves (maple, oak, dandelion, etc.)
- Rolling pin or brayer (optional)
- Newspaper or a drop cloth to protect surfaces
How to Make It
- Spread a thin layer of paint on a flat surface.
- Gently press a leaf into the paint, then press the leaf onto paper to leave a print.
- Layer colors and leaves to create a garden of prints.
Pro Tips / Styling Ideas
- Try single-color prints for a bold look or mix several hues for a vivid bouquet effect.
- Use leaves with different shapes to create interesting negative space patterns.
- Seal finished pieces with a kid-safe varnish if you want to reuse a tote bag or frame prints.
End note: A perfect nature stroll turned crafting spree—free, fun, and fabulously educational.
Who loves it: Little artists who love textures and patterns. A wonderful tactile experience and a simple way to learn about colors.
4. Cardboard City Builders: Sturdy Street Play Sets
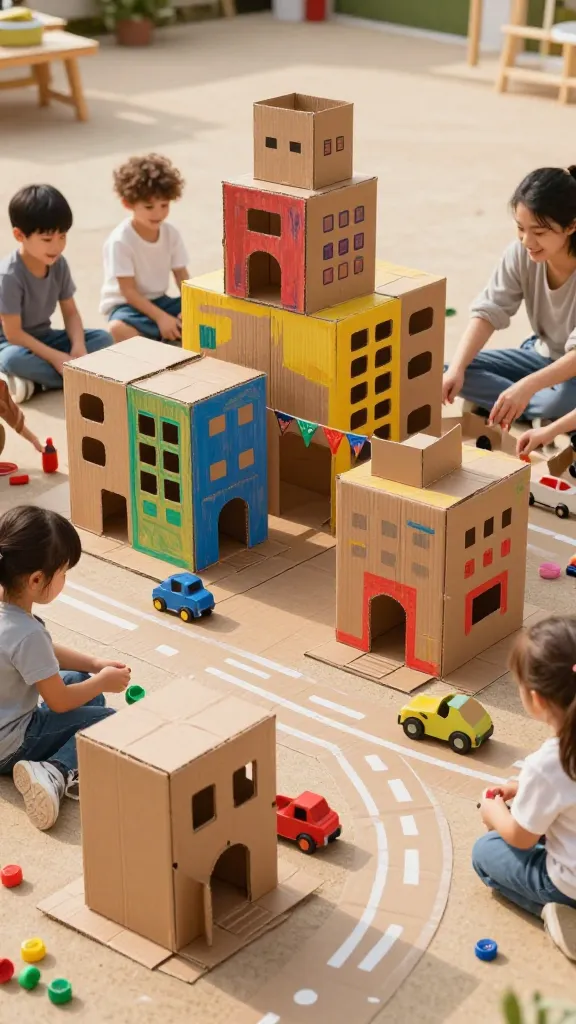
Cardboard becomes a magical playground when little builders get their hands on it. This project teaches spatial awareness, creativity, and the joy of repurposing materials into a bustling cityscape.
Materials
- Large cardboard boxes (recycled from deliveries)
- Colored markers, crayons, or paint
- Scissors (adult supervision) and craft knife if needed
- Glue or tape
- Optional: bottle caps for wheels, fabric scraps for banners
How to Make It
- Cut doors and windows into cardboard buildings or use whole boxes for blocks and towers.
- Decorate walls with color, windows, and doors. Create a road from masking tape.
- Add vehicles, people, and signs from extra cardboard and fabric scraps.
Pro Tips / Styling Ideas
- Coordinate colors in palettes (city, bridge, park) to tell a story.
- Make a modular layout so you can rearrange the city every day.
- Turn a corner of the city into a park with printable sticker trees or drawn grass.
End note: An affordable, endlessly entertaining setup. Watching a tiny city come to life is pure preschool magic.
Who loves it: Builders, planners, and little designers who crave open-ended play. Perfect for a rainy afternoon.
5. Sensory Rainbow Rice Cloud: Texture Play in a Bag
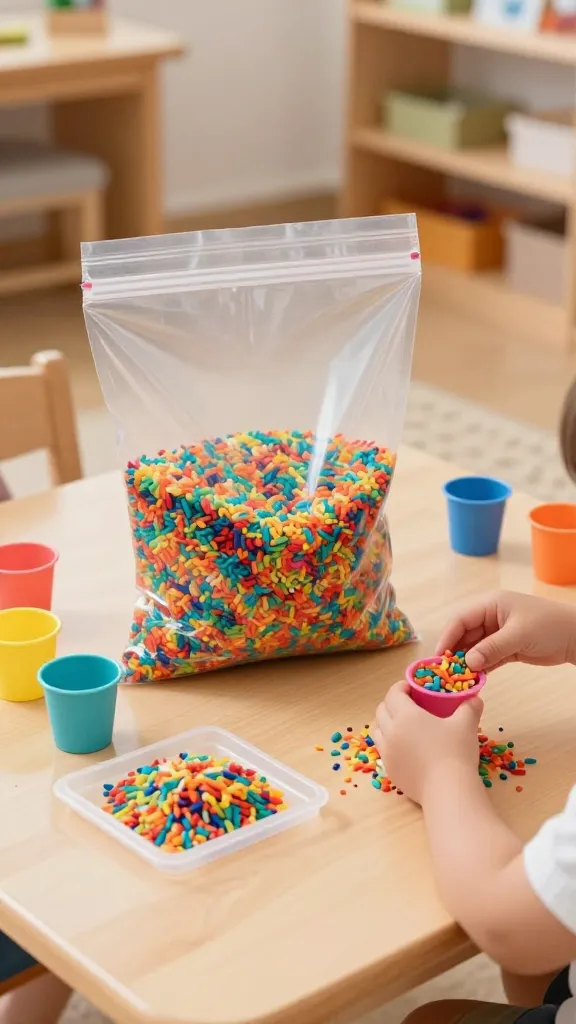
Bright, silky, crunchy—this rainbow rice cloud is a sensory dream. It feels magical to scoop, pour, and explore color as the grains slide between fingertips.
Materials
- Rice (colored with safe food coloring, dried completely)
- Large resealable plastic bag or shallow tray
- Dry pasta or small scoops for digging
- Optional: small cups or bowls for sorting by color
How to Make It
- Spoon colorful rice into a bag or tray. Let kids mix and shake to distribute color.
- Provide scoops and small containers for sorting and pouring.
- Encourage pattern creation with color blocks (e.g., red next to orange).
Pro Tips / Styling Ideas
- Seal bags well to avoid spills; place on a tray for easy cleanup.
- Set a scented mood with a touch of vanilla or citrus when you open the bag—FYI, it’s simply delightful.
- Hide tiny treasures in the rice for a mini scavenger hunt.
End note: A soothing, crunchy, colorful activity that doubles as an early math and sensory lesson.
Who loves it: Sensory seekers and color-loving kids. Great for calm-down corners and classroom centers.
6. Paper Plate Pinwheels: Instant Colorful Wind Comes Alive

Turn a simple paper plate into a spinning rainbow with bright colors and a drop of kid-approved magic. It’s fast, satisfying, and perfect for windy days or pretend-play parades.
Materials
- Plain paper plates
- Paint, markers, or colored pencils
- Colorful brads or pushpins (with a plastic handle)
- Skewers or wooden dowels
- String (optional) for hanging
How to Make It
- Decorate plates in vibrant colors. Let dry completely.
- Cut a spiral across the plate to create a fan-like shape.
- Attach a brad in the center and connect a dowel to spin freely.
Pro Tips / Styling Ideas
- Use bold color combos (turquoise, coral, lemon) for maximum appeal.
- Attach a string to hang indoors as a mobile for a playful twist.
- Turn this into a tiny wind-powered garden decoration by placing it near a sunny window.
End note: A quick, cheerful craft that yields a kinetic reward—your kid will love watching it whirl.
Who loves it: Kids who adore motion, color, and quick results. Great for a burst of energy between activities.
7. Foam Sticker Collage Butterflies: Colorful Wings of Imagination
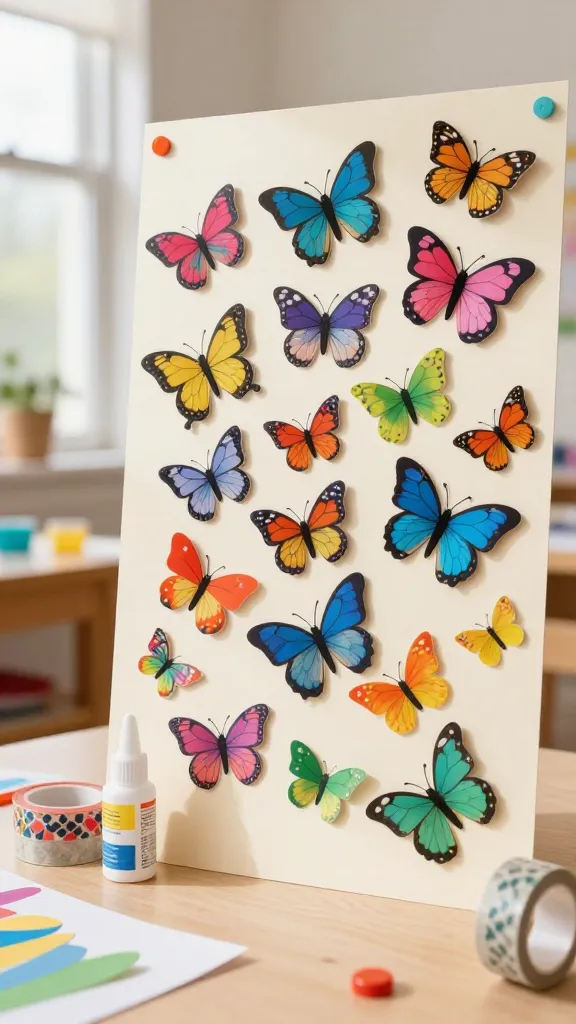
Small foam stickers, a little glue, and a bold idea equal a butterfly-filled wall of color. This project blends fine motor practice with big, imaginative butterflies that flutter across your fridge or wall.
Materials
- Plain cardstock or sturdy paper
- Assorted foam butterfly stickers
- Glue sticks or glue dots
- Optional: glitter glue, washi tape, markers
How to Make It
- Let kids place foam butterflies onto the cardstock to form a flying parade.
- Encourage patterns: alternating colors, sizes, and positions.
- Add extra flair with glitter glue trails or tiny antennae drawn with markers.
Pro Tips / Styling Ideas
- Create a wall mural by arranging several sheets into a sky-like collage.
- Turn masterpieces into a framed gallery by mounting on a string and clipping to a wall.
- Add a touch of whimsy with a faux sun and clouds in the background.
End note: A light, joyful craft that champions color and creativity without fuss. Your little artist will be proud to show off their fluttering gallery.
Who loves it: Sticker lovers and aspiring artists who enjoy quick results and big color blocks.
Conclusion
These seven crafts are all about quick wins, kid-friendly materials, and bold, Pinterest-ready results. Each project invites imagination, texture play, and a dash of mischief—exactly what preschool fun should feel like. Pick one (or all) and let the creativity spark fly. You’ll love the mess-free moments, and your child will treasure the handmade memories.