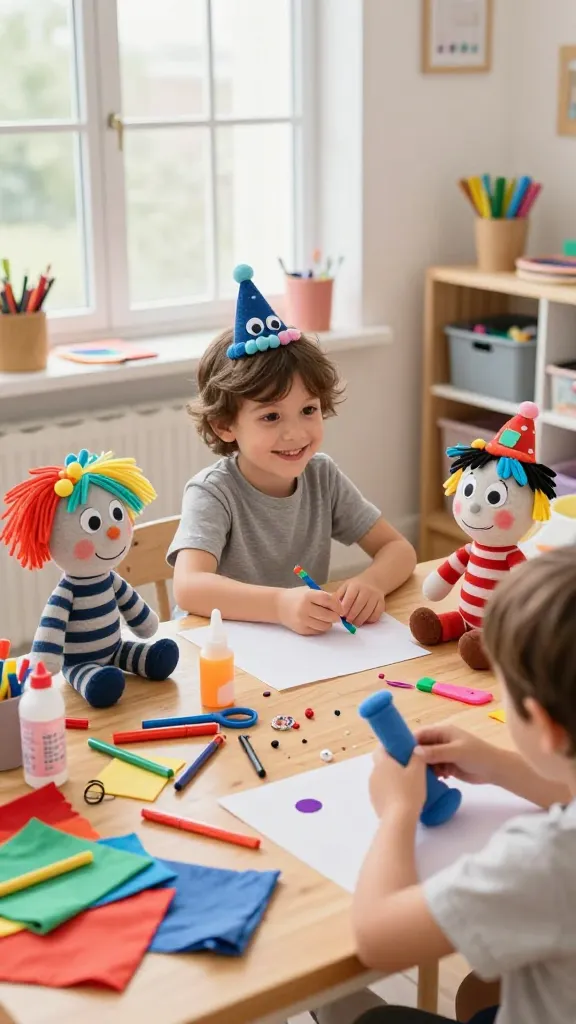
8 Creative Craft Ideas for 6 to 9-Year-Olds
Kids aged 6 to 9 crave hands-on fun, and these eight crafts are perfect for short attention spans, big imaginations, and a mess-free (ish) table setup. Grab a cup of cocoa, because you’ll be buzzing with ideas once you see these. Trust me, your mini-makers will be buzzing with pride and joy when each project is finished.
1. Rainbow Paper Plate Creature Parade
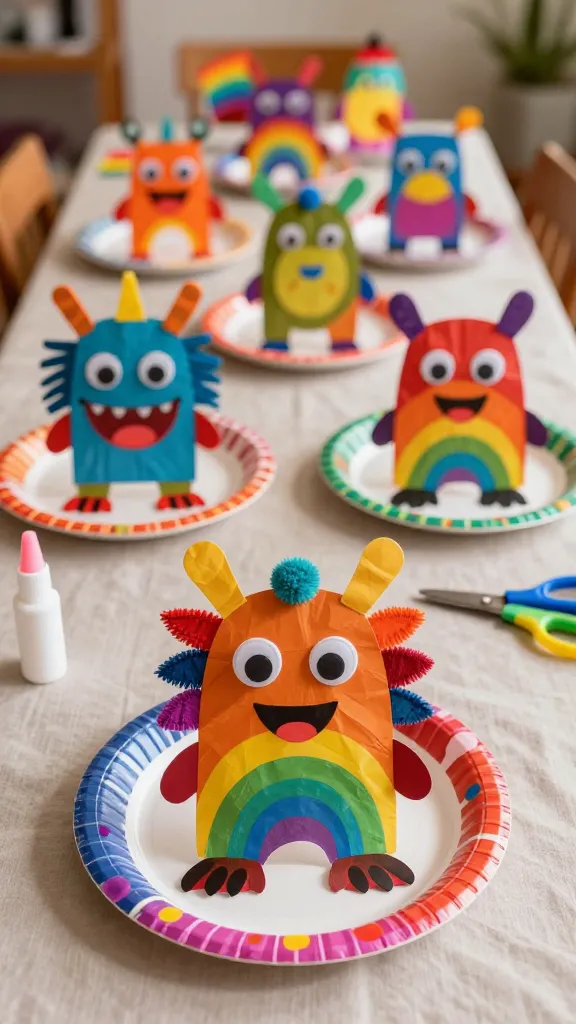
Imagine a gleeful parade of friendly creatures marching across your dining room table. This craft turns simple paper plates into a menagerie of zany characters with bright colors and bold textures. It’s instantly shareable for a fridge gallery or a playful classroom display.
Materials Needed
- Plain paper plates (one per creature)
- Acrylic paints or washable markers
- Construction paper scraps
- Googly eyes or markers for eyes
- Glue sticks and scissors (kid-safe)
- Optional: yarn for fringe, pom-poms for noses
How to Make It
- Paint the plate with a bright base color and let it dry.
- Cut out ears, horns, tails, or wings from construction paper and glue them on.
- Decorate with googly eyes, yarn hair, and other embellishments to give each creature its own personality.
- Write a tiny name or trait on the plate’s edge for extra character.
Pro Tips / Styling Ideas
- Line them up to tell a tiny story or create a “parade trail” along the fireplace mantle.
- Use metallic paints for a magical shimmer—who wouldn’t want a gold-eyed dragon? FYI, glitter can get messy, so a tray helps.
Who’ll love it: little dreamers who adore critters, colors, and a touch of whimsy. Perfect as a bedtime display or party decor.
2. Tiny Terrarium Jars With Paper Plant Buddies
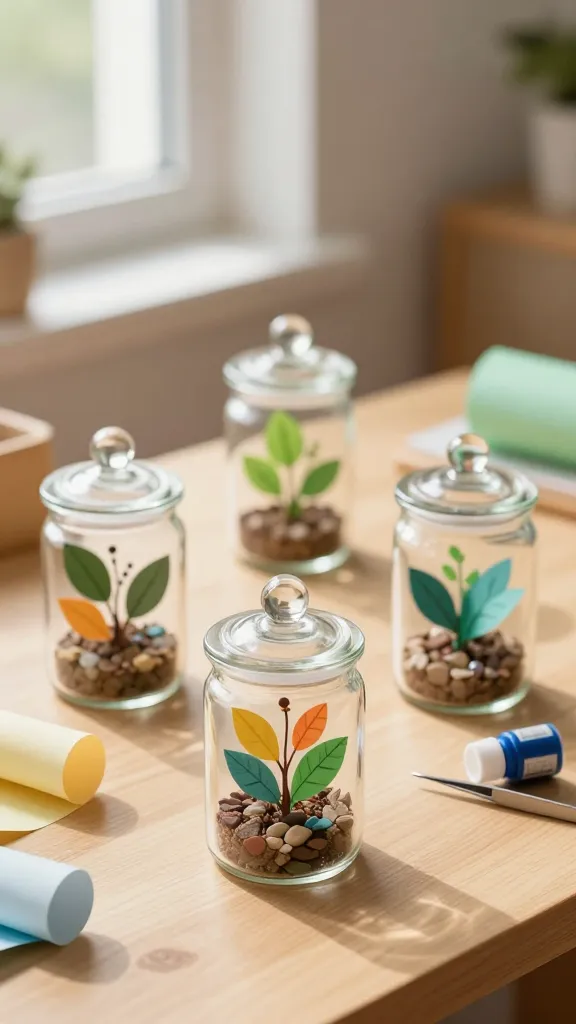
Glow up a shelf with mini terrariums crafted from jars and celebrate plant vibes without real watering drama. These little ecosystems look adorable on a desk, a nightstand, or a classroom window ledge.
Materials Needed
- Small glass jars with lids
- Colored tissue paper or craft moss
- Thin wire, pipe cleaners, or faux plant stems
- Colored beads or tiny pebbles
- Acrylic paints (optional accents)
How to Make It
- Cut tissue paper into tiny leaves and shapes; glue to the inside of the lid or jar top to form a “terrarium canopy.”
- Layer beads or pebbles at the bottom for a child-friendly soil look.
- Twist wire or pipe cleaners into plant stems and tuck them into the jar, adding a few tissue leaves for depth.
Pro Tips / Styling Ideas
- Label each jar with a kid’s name or a cute plant pun for a mini garden exhibit.
- Use pastel or neon colors to match room decor—these make excellent gifts too.
Who’ll love it: budding botanists and science-friendly kids who adore tiny worlds and curious textures.
3. Painted Rock Story Stones
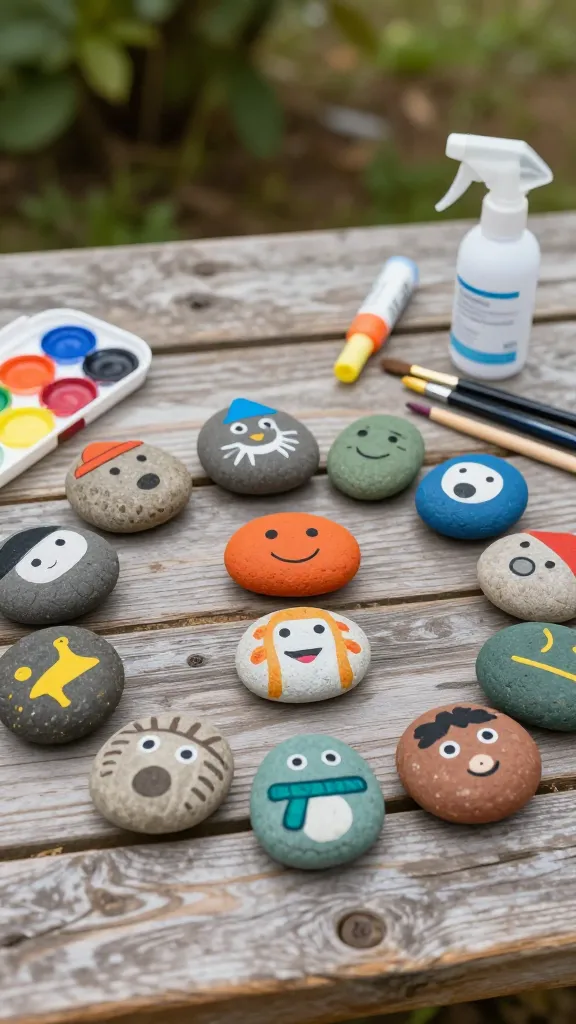
Turn ordinary river rocks into a storytelling toolkit. Each stone becomes a character, part of a plot, or a decorative prop for imaginary adventures. This project blends art, literacy, and dramatic play in one delightful bundle.
Materials Needed
- Smooth flat rocks (wash and dry)
- Acrylic paints and brushes
- Fine-tip permanent markers
- Sealer spray (optional, for durability)
How to Make It
- Paint simple faces, animals, or symbols on the rocks. Let dry.
- Add tiny details with markers, like hats, scarves, or smiles.
- Seal if you want outdoor-friendly stones (and to keep colors vibrant).
Pro Tips / Styling Ideas
- Use a sack of story prompts to spark quick mini-dramas—a rock chooses the hero, the quest, and the ending.
- Create a “story stone map” on a tray so kids can line up characters as they narrate a tale.
Who’ll love it: aspiring authors and theater lovers who enjoy cozy storytelling and tactile art.
4. Sock Puppet Shop: Tiny Characters, Big Personalities
Turn an old sock into a cast of silly, expressive puppets. This practical project keeps hands busy and minds giggling as kids practice voices, storytelling, and social play.
Materials Needed
- Old socks (one per puppet)
- Fabric scraps, googly eyes, yarn for hair
- Glue or fabric glue
- Markers or fabric pens
- Scissors
How to Make It
- Turn the sock into a face by gluing eyes and drawing a mouth. Add fabric scraps for hair and hats.
- Glue on cheeks with small circles of pink or use markers for blush.
- Let kids give each puppet a quick voice and personality.
Pro Tips / Styling Ideas
- Store puppets in a decorated shoebox theater for convenient pretend play sessions.
- Pair with simple scripts to spark early literacy and rhythm in dialogue.
Who’ll love it: performers-in-training and kids who live for imaginative role-play and giggles.
5. Marshmallow Nebula Suncatchers
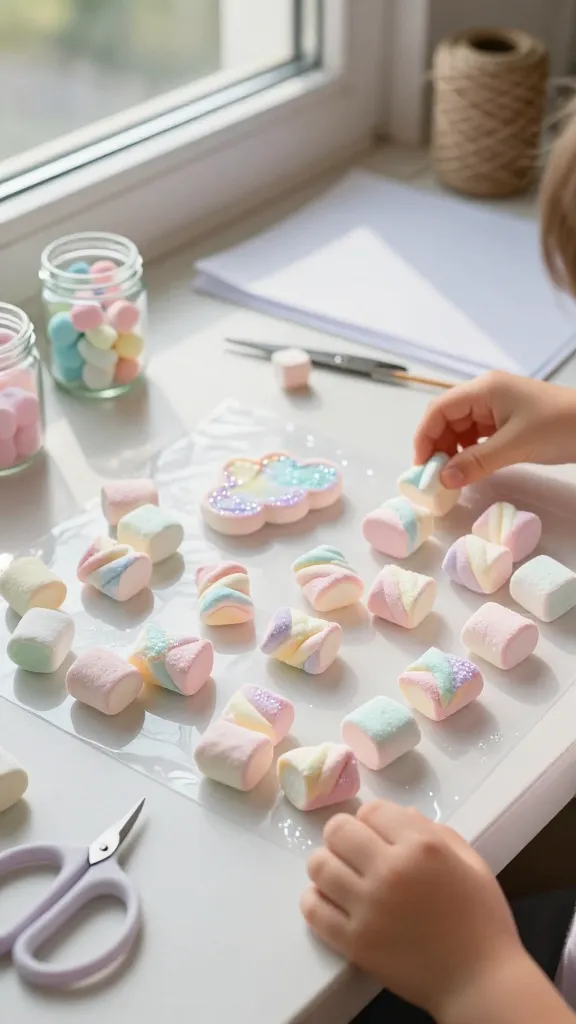
Bright, fluffy, and super kid-friendly, these suncatchers turn ordinary marshmallows into shimmering cloud constellations. They’re an instant mood-lifter and a fantastic way to practice color blending.
Materials Needed
- Mini marshmallows
- Food coloring or candy-safe ink
- Clear contact paper or lamination sheets
- String for hanging
How to Make It
- Color the marshmallows in swirled hues by placing a few drops of color on each and gently pressing to blend.
- Place colored marshmallows between two sheets of contact paper and press flat to seal. Trim edges.
- Punch a hole and thread with string for a hanging nebula.
Pro Tips / Styling Ideas
- Hang near a sunny window to catch light and create a soft rainbow glow.
- Make a whole galaxy by varying colors and stacking multiple suncatchers on a string.
Who’ll love it: little stargazers who adore color, texture, and a touch of whimsy. FYI, it’s a sweet gift topper too.
6. DIY Sensory Texture Boards
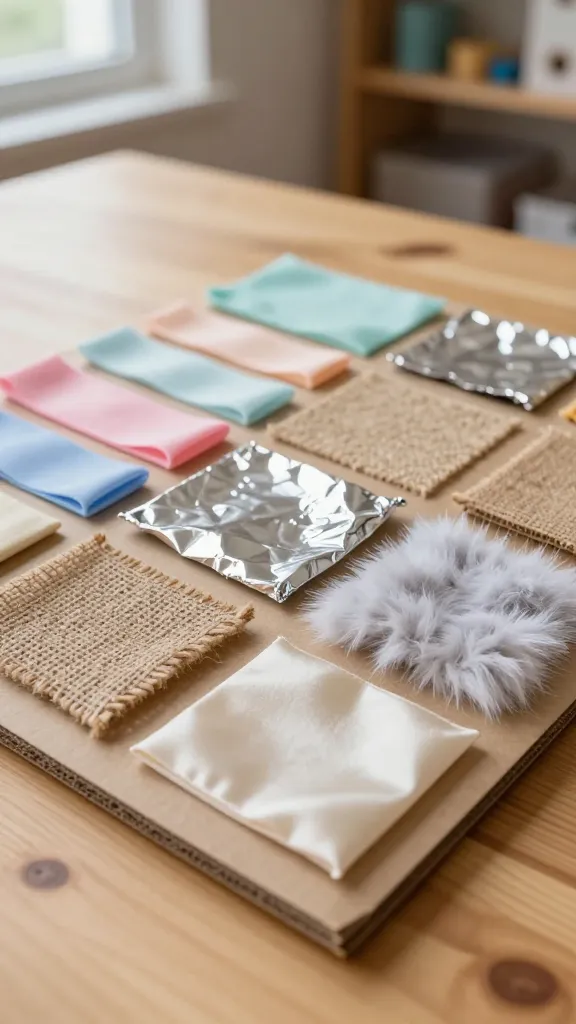
Texture boards engage curious hands with a tactile playground of fabric, foil, sandpaper, and more. This sensory-rich project is great for refinement of motor skills and a calm, exploration-driven session.
Materials Needed
- A thick piece of cardboard or wood board
- Texture samples: fabric swatches, ribbon, aluminum foil, felt
- Non-slip adhesive or hot glue (adult help optional)
- Labels or doodles with markers
How to Make It
- Lay out patches of each texture on the board and glue them in an appealing pattern.
- Add small, safe embellishments like felt shapes or fabric pompoms for extra intrigue.
- Decorate the title or theme with markers to make it a stylish wall piece.
Pro Tips / Styling Ideas
- Use the board as a quiet corner activity where kids explore textures and sounds as they press different materials together.
- Create a “textured alphabet” with a letter on each patch to pair with early literacy practice.
Who’ll love it: tactile explorers and kids who prefer hands-on learning with a cozy, cozy vibe.
7. Cardboard City: Recyclable Build-and-Play World
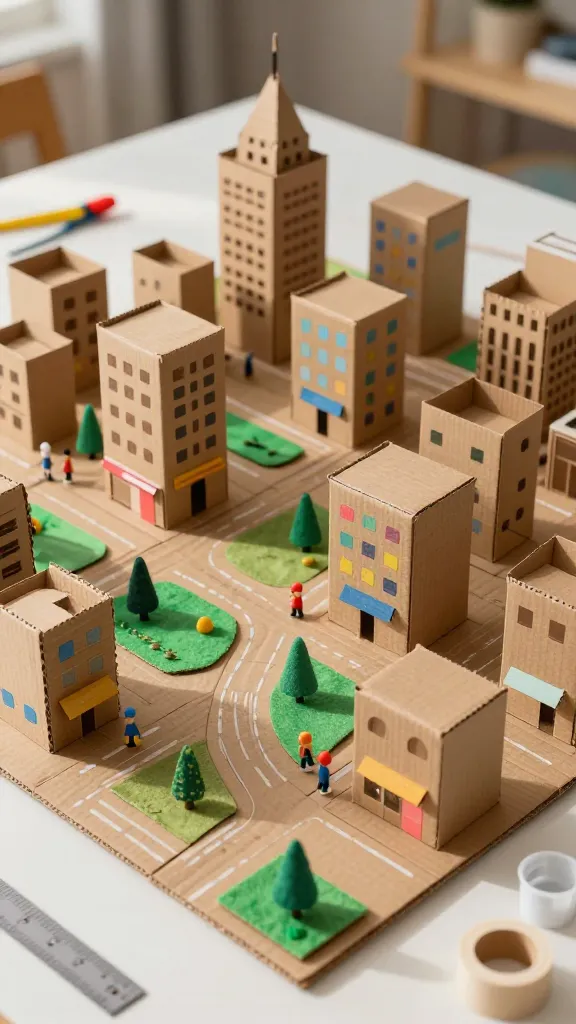
Turn sturdy cardboard into a dreamy mini-city with buildings, roads, and tiny parks. This project champions creativity, problem-solving, and a simple DIY setup that’s big on imagination but gentle on the budget.
Materials Needed
- Clean cardboard boxes
- Acrylic paints or markers
- Ruler, craft knife (adult supervision)
- Glue and tape
- Small action figures or printable paper people
How to Make It
- Cut cardboard into building shapes, then assemble a small city on a large baseboard or table.
- Paint windows, doors, and rooftops with bright colors; add roads with markers.
- Place tiny parks, benches, and figures to create a bustling, imaginative scene.
Pro Tips / Styling Ideas
- Encourage kids to design a theme: futuristic city, fairytale village, or underwater metropolis.
- Photograph the completed city from above for a keepsake poster or a DIY calendar page.
Who’ll love it: builders at heart and kids who enjoy scale, planning, and transforming everyday materials into a world of play.
8. Upcycled Water Bottle Stamps Garden
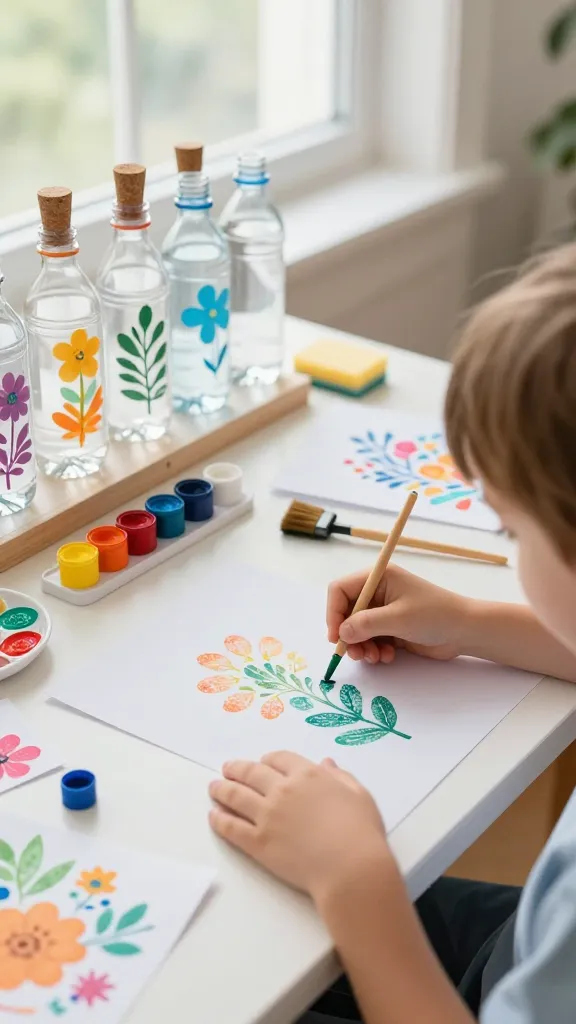
Turn leftover bottles into a stamp station that creates leafy textures and floral patterns on paper. It’s a clever way to recycle, and stamping never gets old for little artists who love instant results.
Materials Needed
- Clean plastic water bottles (lid-off)
- Acrylic paints
- Foam brushes or sturdy sponges
- Paper or card stock for stamping
- Palette or plastic plate for paint
How to Make It
- Cut the bottles into shape-friendly stamps (flowers, leaves, circles) and attach to a cork or handle using tape.
- Pour paint onto a plate and dip the stamps to press patterns onto paper.
- Experiment with layering to create vibrant garden scenes or abstract textures.
Pro Tips / Styling Ideas
- Pair stamped papers with a simple frame or use as greeting cards for family and friends.
- Create a nature-inspired wall collage by stamping different patterns on a big sheet of paper and framing it.
Who’ll love it: eco-conscious crafters who enjoy quick, satisfying results and colorful, nature-inspired art.
Conclusion
These eight creative ideas for 6 to 9-year-olds are a burst of inspiration—easy to set up, endlessly adjustable, and seriously fun to finish. Pick one, or dive into all eight with a weekend full of art, giggles, and proud “I made this” moments. You’ll love how each project sparks imagination, builds confidence, and turns everyday items into magical creations.
So, which idea will you try first? Grab a buddy, set out a colorful craft station, and let the creative play begin. Have fun, and happy crafting!