6 Fun Craft Activities for 8-Year-Olds to Build Skills
Ready to spark creativity and confidence in little hands? These six unique, kid-friendly crafts are perfect for 8-year-olds who love color, texture, and a little hands-on magic. Each project is designed to be doable, delightfully printable to Pinterest, and totally share-worthy.
Let’s dive into a batch of bright, beginner-friendly activities that build fine motor skills, planning, and a ton of quirky joy. FYI: you’ll want a messy mat, a playlist, and a big bag of enthusiasm.
1. Paper Quilt Collage Wall Banner
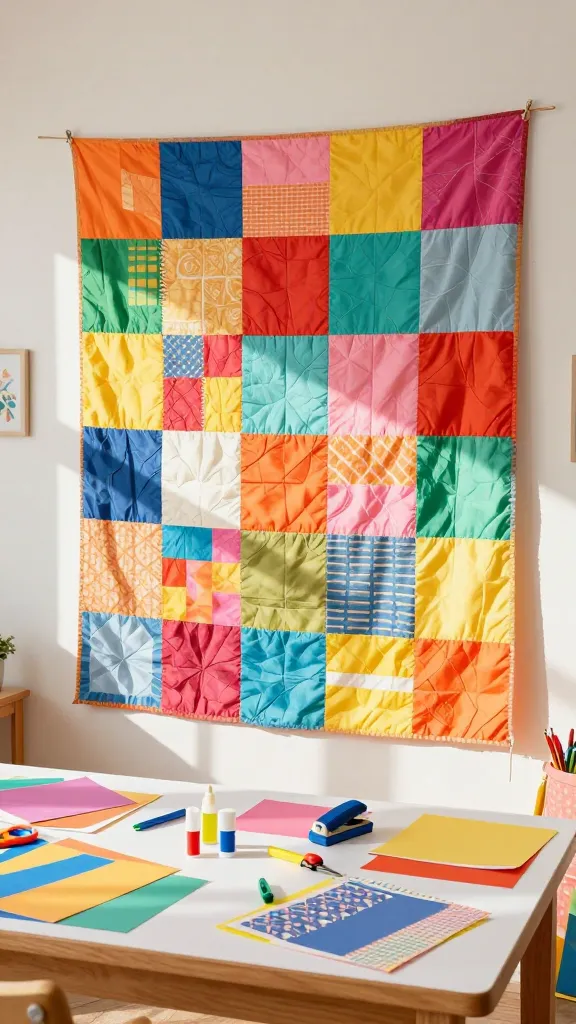
Picture a wall that feels sunny and cozy, made from a patchwork of paper squares in screen-printed hues. This paper quilt collage banner looks polished yet playful, and it helps kids practice composition and cutting with confidence. You’ll love the bold color blocks and the texture of layered papers.
Materials Needed
- Colored craft paper or scrapbook paper (assorted patterns)
- White poster board or a fabric banner base
- Glue sticks or kid-friendly glue
- Scissors (child-safe) and a paper punch (optional)
- Ribbon or string for hanging
How to Make It
- Cut the paper into small squares (about 2×2 inches). Mix and match patterns for visual interest.
- Arrange the squares on the banner base to form a quilt-like layout. Play with spacing until it feels balanced.
- Glue the squares in place, flattening any bubbly edges with a fingertip.
- Optionally, add a few larger “accent” shapes (stars, hearts) for focal points.
- Attach ribbon at the top for easy hanging.
Pro Tips / Styling Ideas
- Make a seasonal version: reds and greens for holidays, pastels for spring.
- Swap in textured papers or recycled grocery bags to add dimension.
- Frame it or prop it on a shelf for a cozy, homemade touch.
Who would love it: This is a perfect weekend craft for kids who love collage and color, plus a sweet wall-decor payoff for their room or a classroom display.
2. Eco-Cave Shadow Box City
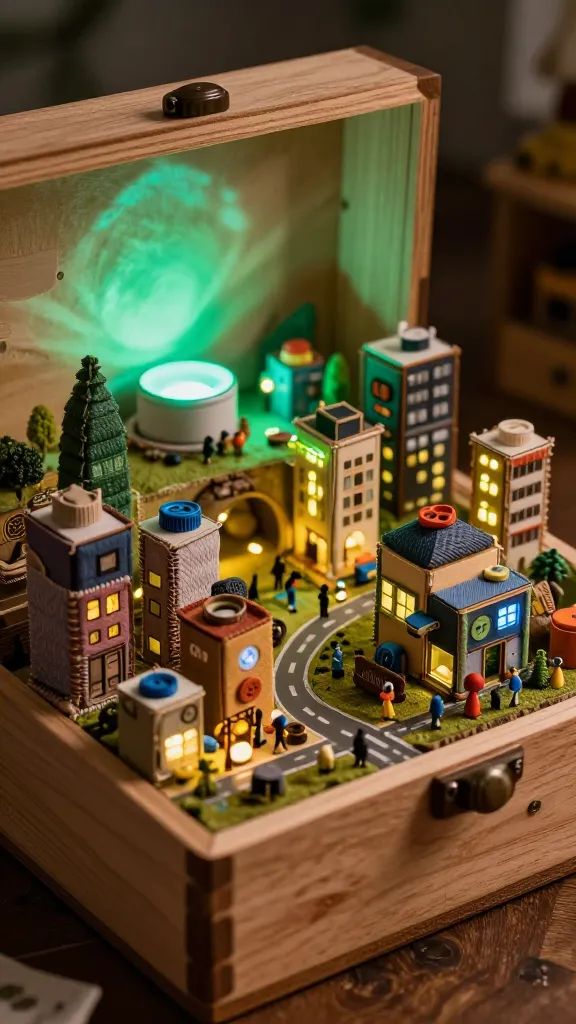
Imagine a tiny, glowing city built from upcycled materials and clever shapes. This eco-shadow box is a delightful blend of storytelling and three-dimensional art that teaches spatial thinking and storytelling flair. The glow-in-the-dark accents are pure magic when the lights go down.
Materials Needed
- Wooden shadow box or shoebox with lid
- Cardboard, fabric scraps, fabric tape
- Non-toxic paint, markers, and a small battery-powered LED tea light
- Upcycled bottle caps, buttons, and small trinkets
- Glue, scissors, and double-sided tape
How to Make It
- Paint the inside of the shadow box to set the mood (night sky, city vibe, etc.).
- Cut simple building shapes from cardboard; decorate with fabric scraps and paper.
- Place the LED tea light behind a “window” cut from cardboard to cast a gentle glow.
- Add upcycled details—tiny balconies from bottle caps, windows from buttons, and a few palm trees from paper.
- Create a mini skyline along the back wall for depth.
Pro Tips / Styling Ideas
- Use metallic markers for streetlights and windows to catch the glow.
- Hang in a dim corner for a cozy night-sky effect.
- Tell a tiny story with the city scene: which house hosts a party, where does the dragon live?
Who would love it: Ideal for kids who enjoy stories and design, plus a charming night-light that doubles as a storytelling prompt.
3. Plush Pom-Pom Planet Orbs
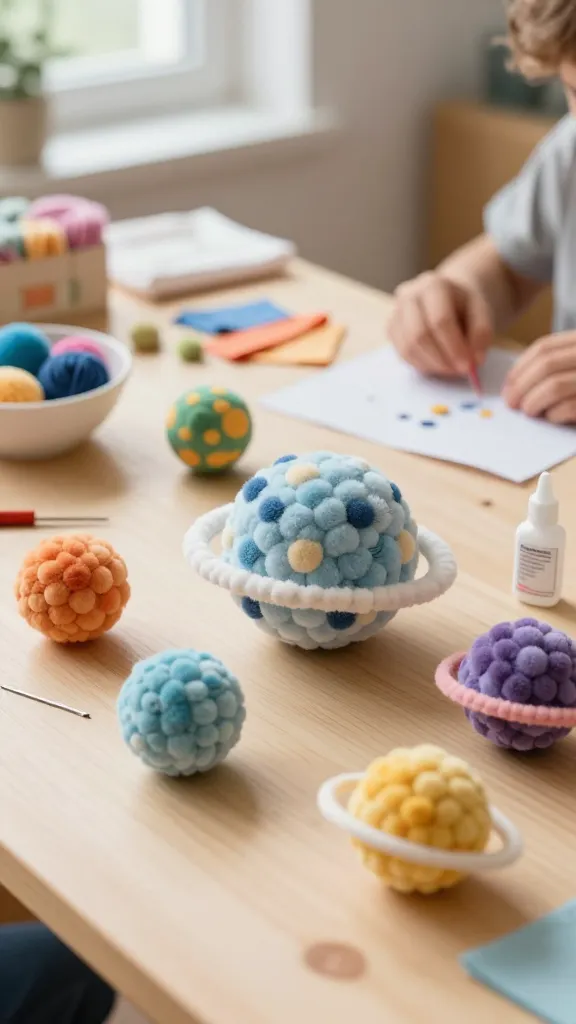
Turn yarn into a tiny solar system you can cuddle or display. These plush pom-pom planets are soft, cute, and surprisingly simple to assemble. They teach sequencing (which planet is closest to the sun?) and basic sewing in a gentle, kid-friendly way.
Materials Needed
- Colorful yarn (varied weights for texture)
- Cardboard or foam balls as bases
- Needle with a large eye or blunt-tip plastic needle (supervised)
- Fabric scraps for rings or rings from pipe cleaners
- Fabric glue or hot glue (adult supervision for hot glue)
How to Make It
- Wrap yarn around the ball to create a fuzzy sphere, tying off at the end and trimming excess.
- Group planets by size and color to mimic a solar system layout.
- Add a simple tail or ring using pipe cleaners or a fabric strip for Saturn-like charm.
- Seal lightly with a dab of glue to keep threads in place.
Pro Tips / Styling Ideas
- Different fibers (fuzzy, metallic, cotton) create diverse textures.
- Label each planet with a tiny tag showing its name and a fun fact.
- Display on a shelf or string them into a mobile for a “space” vibe.
Who would love it: For budding scientists and space lovers who enjoy tactile, cozy crafts that double as cute room decor.
4. Recycled Bottle Cap Mosaic Magnets
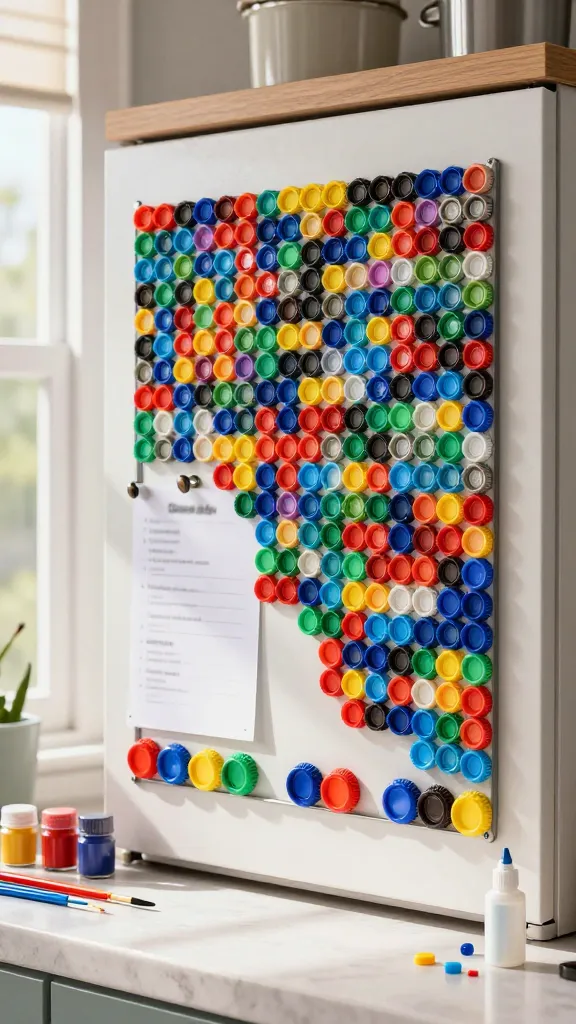
Brighten up the fridge with a mosaic made from everyday bottle caps. This project is fast, inexpensive, and perfect for showcasing a child’s growing eye for color and pattern. It’s a satisfying win when the magnets actually hold the grocery list.
Materials Needed
- Assorted plastic or metal bottle caps
- Strong craft glue or hot glue (adult supervision for hot glue)
- Flat magnets or magnet strips
- Acrylic paint and brushes (optional for painting caps)
- Glue dots or tape for magnet backing
How to Make It
- Arrange bottle caps on a flat surface to form a simple mosaic pattern or a tiny image (like a sun or flower).
- Glue caps together in small clusters, then attach magnets to the back of each cap cluster.
- Optionally paint some caps to refresh colors or add tiny details before assembly.
Pro Tips / Styling Ideas
- Create themed sets: ocean, sunshine, or animals—great as a gift for grandparents!
- Use a clear acrylic sealant over painted caps to keep colors vibrant.
- Group in a magnetic board or fridge gallery for a playful daily reminder board.
Who would love it: Great for kids who like making tiny, high-joy accents and for gifts that pack a punch with personal flair.
5. Salt-Dough Suncatcher Orbs
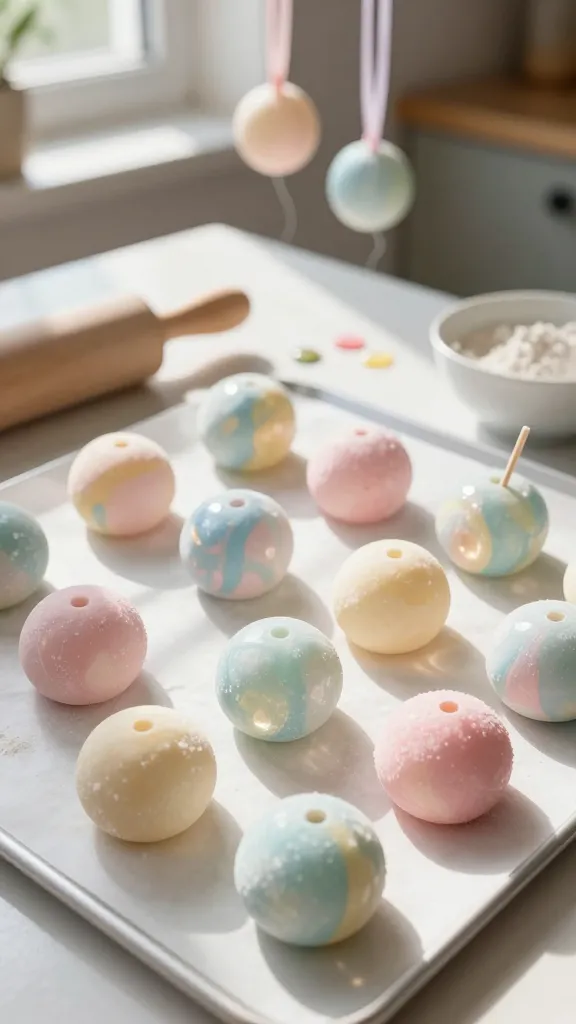
Bright, translucent, and surprisingly easy, these salt-dough suncatchers let the sun become a craft partner. They’re a sensory delight with color mixing, and you’ll get tiny masterpieces that dangle like glass—without the glass risk.
Materials Needed
- Salt dough (1 cup flour, 1/2 cup salt, 1/2 cup water—mix to dough)
- Food coloring or liquid watercolors
- Baking sheet and parchment paper
- Straw or skewer for holes
- Ribbon or fishing line for hanging
How to Make It
- Knead dough with a few drops of color until evenly tinted. Roll into small orbs or cut into shapes.
- Make a small hole near the top of each orb for hanging.
- Bake at a low temperature (about 200-250°F) until hard and dry—this may take a couple of hours, flip halfway.
- String with ribbon and hang in a sunny window to catch light.
Pro Tips / Styling Ideas
- Make a set of seasonal colors: yellow suns, green leaves, blue skies.
- Seal with a clear acrylic spray for extra durability if you want to hang outdoors.
- Combine with real pressed leaves or tiny beads for texture.
Who would love it: Perfect for kids who enjoy color play and a bit of science-y light interaction—their own little stained glass effect at home.
6. Mini Herb Fairy Garden in a Dough Bowl
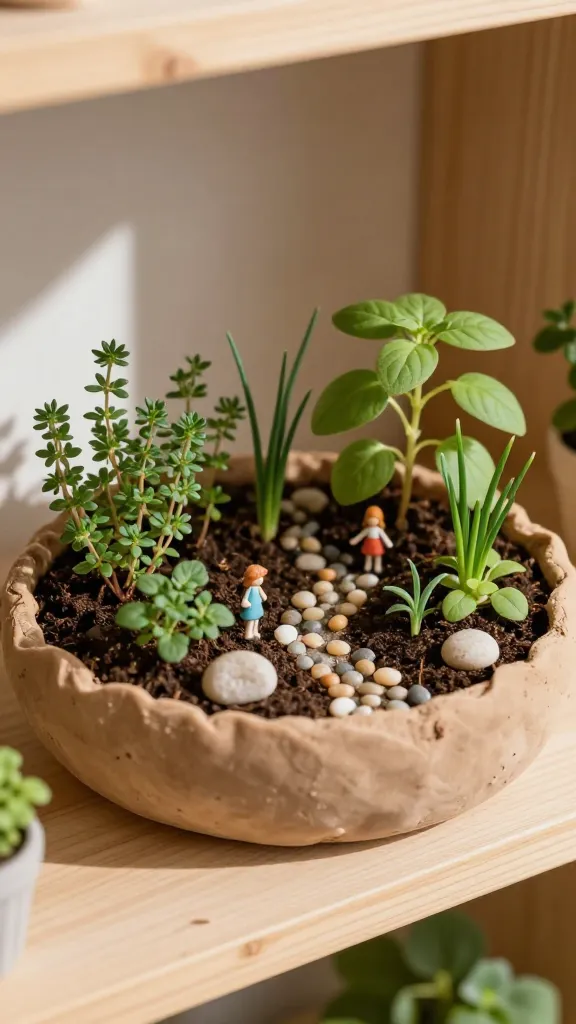
A tiny, touchable garden that fits on a shelf—yes, please. This mini herb fairy garden blends practical growing with imaginative play. It teaches plant care, responsibility, and a sprinkle of outdoor whimsy in a compact, kid-friendly format.
Materials Needed
- Small shallow container or dough bowl
- Potting soil
- Small herbs or edible greens (like thyme, oregano, chives)
- Pebbles or decorative stones
- Miniature figures or fairy-ty items (optional)
How to Make It
- Layer soil in the dough bowl to create a tiny garden bed.
- Plant the herbs in raised pockets, press gently, and pat soil around them.
- Decorate with pebbles and a few miniature figurines to stage a scene.
- Water carefully and place in a sunny spot with good light.
Pro Tips / Styling Ideas
- Rotate herbs weekly so kids observe growth and changes.
- Label each herb with a mini card for a learning moment (taste, scent, use in cooking).
- Keep it indoors on a bright windowsill for a year-round charm.
Who would love it: This one’s a winner for budding gardeners, storytellers, and anyone who enjoys a little nature indoors with a playful twist.
Conclusion
These six craft activities for 8-year-olds are designed to spark creativity, build skills, and deliver that satisfying, “I made that!” moment. Pick one to start, or dive into all six for a full week of colorful adventures. Trust me, you’ll be surprised by how much confidence your kid gains with each tiny project—and how proud they’ll be to display their handmade masterpieces.