7 Trendy Craft Ideas for a 14-Year-Old Girl
Hey crafty friend! If you’re hunting for fresh, affordable, totally doable projects, you’re in the right spot. These 7 Trendy Craft Ideas for a 14-Year-Old Girl are easy, goofy-fun, and perfect for sharing with friends. Trust me, you’ll want to try every single one.
1. Neon Resin Keychain Rainbow That Sparkles in the Sun
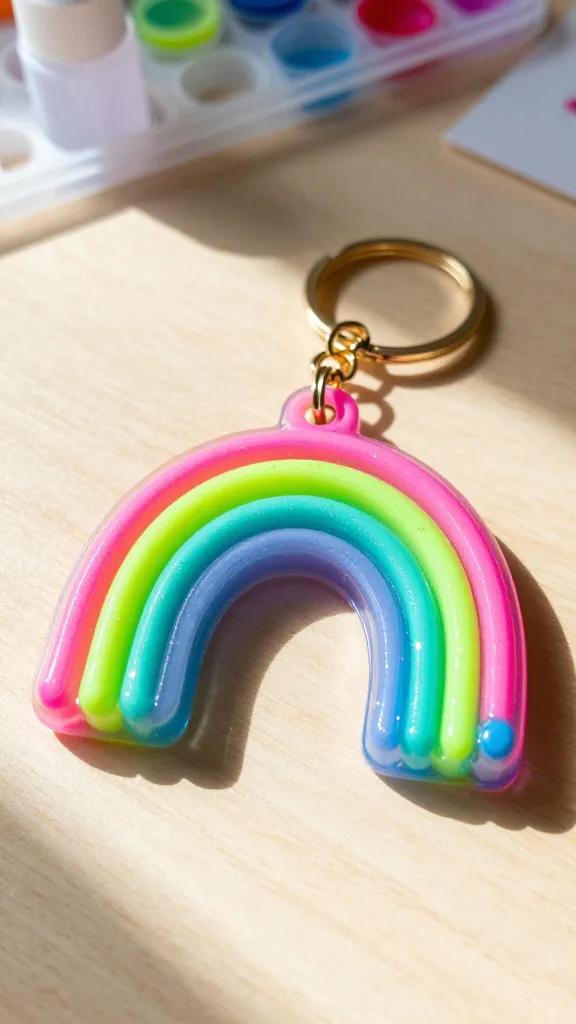
Picture this: a tiny, glossy keychain that catches the light and screams “cool girl vibes.” This resin keychain special is all about bold color and a dash of glitter. It’s small enough to be a school accessory, but polished enough to feel fancy.
Materials
- Clear epoxy resin kit (with hardener)
- Colored pigment drops or mica powders (neon pink, lime green, electric blue)
- Mini silicone molds or a small rectangular mold
- Gold or silver eye pins, jump rings, and a split keyring
- Glitter, tiny charms, and a stir stick
- Gloves and protective workspace
How to Make It
- Mix resin as directed, then divide into 3–4 small cups.
- Color each portion a bold neon shade, swirling lightly for a marble effect.
- Pour into the mold in layers, adding glitter and mini charms between layers.
- Pop out once fully cured, attach the eye pin and keyring, and seal with a glossy top coat if needed.
Pro Tips / Styling Ideas
- Sprinkle tiny star confetti for extra sparkle.
- Pair with a neon lanyard or backpack for a pop of color.
- Keep a small tray for resin curing to avoid dust specks.
End note: This little glittery keychain is totally something a tween or teen would love to carry, gift, or trade with friends. You’ll love the glossy finish and the custom color combos.
2. Mood-Board Wall String Art Using Scraps
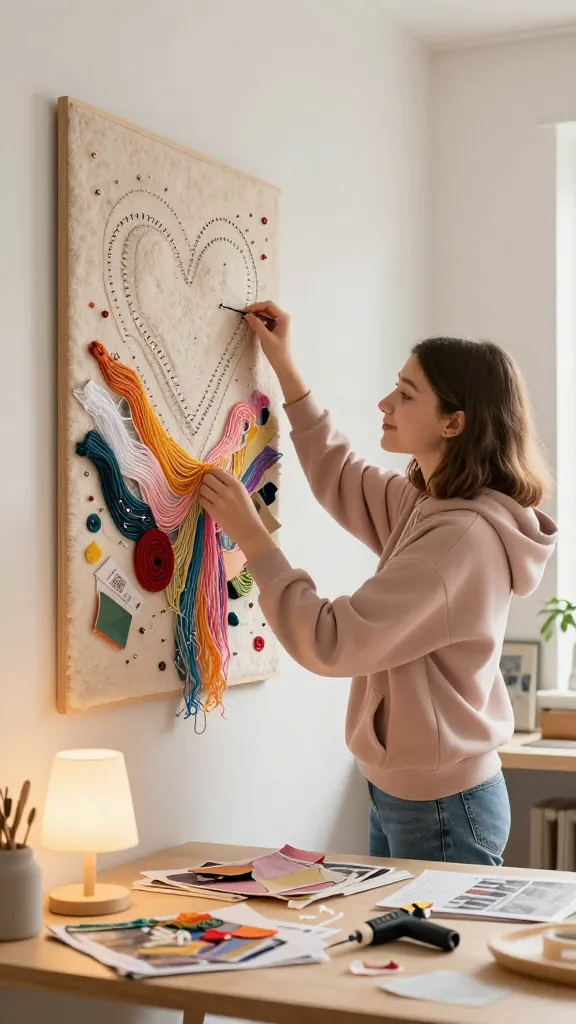
Turn a jumble of scrap fabric, threads, and old magazines into a trendy, tactile wall piece. This mood-board string art looks like a curated gallery corner, but it’s super forgiving and totally customizable.
Materials
- Thin wooden board or canvas
- Colorful yarns, thread, or embroidery floss
- Hot glue gun or craft glue
- Magazines, fabric scraps, washi tape
- Small nails or push pins (optional)
How to Make It
- Sketch a simple shape or a word on the board (heart, star, or initials work well).
- Place nails around the outline or simply wrap string in a freeform, looping pattern.
- Weave colors in and out, letting textures from magazines and fabric peek through.
- Glue down loose ends and trim excess string.
Pro Tips / Styling Ideas
- Layer with a few magnets or mini photos for a changing mood board.
- Use a color palette that matches a room or dorm corner.
- Hang with washi tape for an easy, removable setup.
End note: This piece looks effortlessly chic in a teen’s bedroom or a shared basement hangout. It’s a great way to repurpose leftovers while making something that feels intentional and stylish.
3. DIY Embroidered Denim Patches With Personal Flair
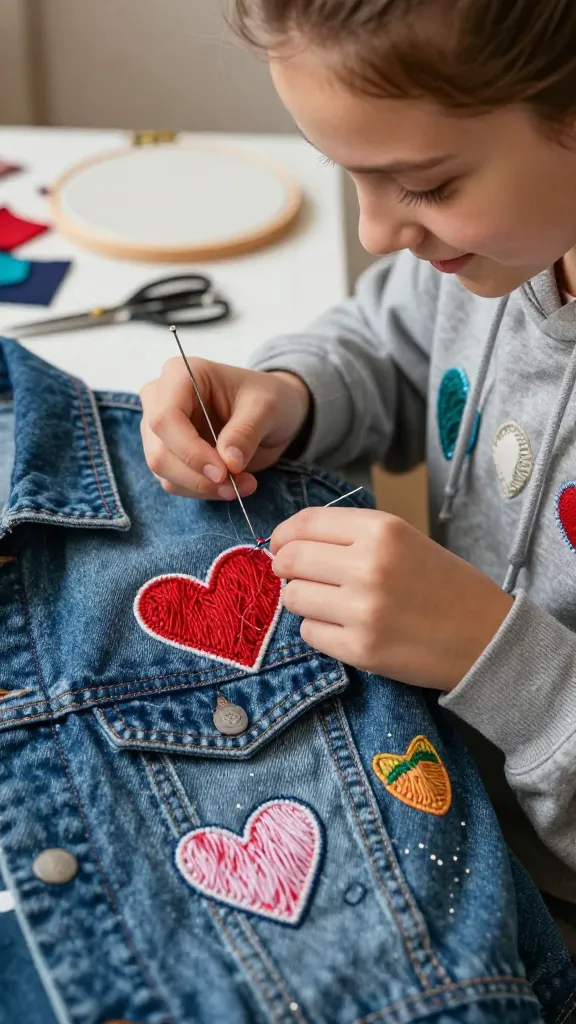
Elevate a hoodie, backpack, or jeans with hand-stitched patches that scream personality. Embroidered patches are a tactile, cozy way to show off hobbies, favorite bands, or inside jokes.
Materials
- Old denim patches or fabric scraps
- Embroidery hoop (optional) and embroidery floss
- Needle, scissors, fabric glue
- Basic patterns (heart, paw print, lightning bolt, or initials)
How to Make It
- Draw a simple design on your fabric patch or print a small stencil.
- Fill in the design with a few bold stitches (backstitch, satin stitch, and french knots are beginner-friendly).
- Seal with a light fabric sealant or sew securely onto a jacket, bag, or tote.
Pro Tips / Styling Ideas
- Mix colors that match your go-to outfits for a cohesive look.
- Place multiple patches together for a collage effect.
- Consider high-contrast thread colors for extra pop on darker denim.
End note: Wear these patches like personality stickers—tiny details, huge impact. You’ll love the texture, the stories you can tell, and the way they make a simple garment feel totally you.
4. Customizable Floating Shelves Made From Paint Sticks
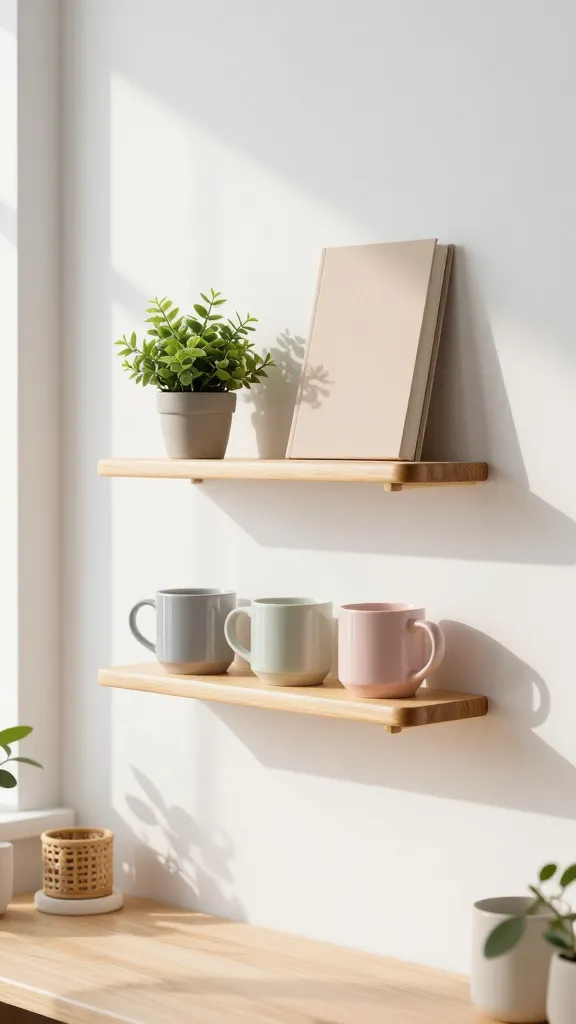
DIY shelves that look like a boutique find? Yes, please. Repurpose lightweight paint sticks into simple, modern shelves that float on the wall and hold your favorite little treasures—journals, mini plants, or a cute mug collection.
Materials
- Paint sticks or thin wooden boards
- Wood glue and strong adhesive
- Sandpaper, small brackets or L-brackets
- Paint or stain and a clear sealant
- Wall anchors and screws
How to Make It
- Cut sticks into small shelf lengths and sand edges smooth.
- Glue together in an L-shape with a bottom lip to rest items on.
- Sand, paint, or stain to match your room’s vibe, then seal.
- Mount with sturdy brackets or strong anchors on the wall at your chosen height.
Pro Tips / Styling Ideas
- Paint one shelf in a bold accent color and the other in a neutral for contrast.
- Display a tiny plant, a stack of zines, and a favorite candle for a cozy vibe.
- Add a small decorative quote sign on the bottom lip for personality.
End note: These shelves are a clever, kid-friendly way to level up storage with style. They bring a boutique feel to a teen room without breaking the bank.
5. Hand-Painted Sneakers With Fun Doodles
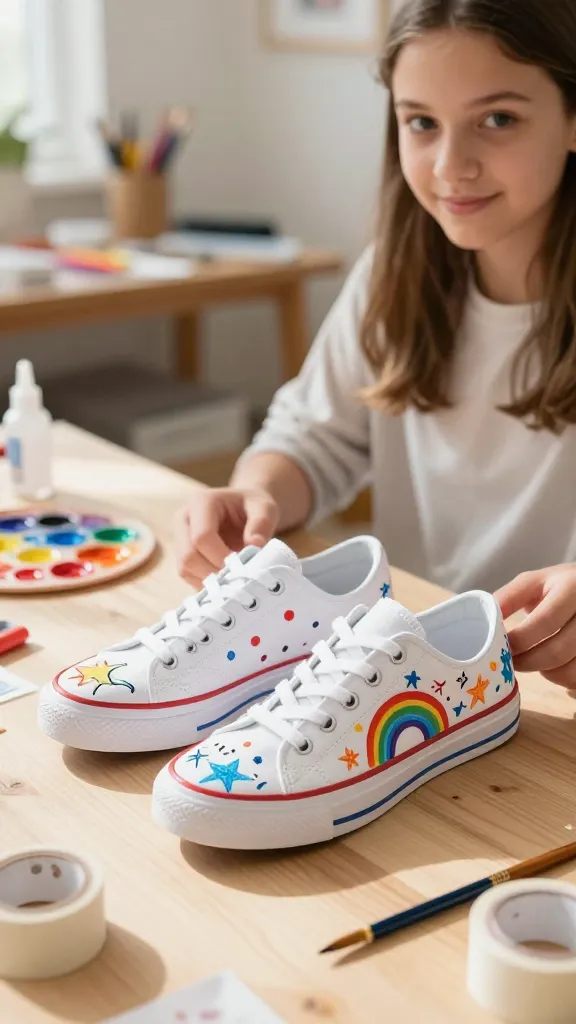
Sink into creativity with a sneaker revamp that’s all you. Hand-painted sneakers are a bright, wearable canvas—perfect for school days, weekend hangouts, or a quick gift for a friend.
Materials
- Plain white canvas sneakers
- Acrylic fabric paints or markers
- Fine brushes, masking tape, and a clear fabric sealant
- Palette or paper plate for mixing
How to Make It
- Plan a simple design: doodle rainbows, stars, or mini glyphs across the shoes.
- Use masking tape to keep edges clean if you’re doing geometric shapes.
- Paint in light layers; let each layer dry before adding details.
- Seal with a spray or brush-on fabric sealant to protect the art.
Pro Tips / Styling Ideas
- Keep color palette cohesive across both shoes for harmony.
- Pair with casual outfits or a pop of color with neutral basics.
- If you’re worried about mistakes, practice on a scrap corner of the canvas first.
End note: Custom sneakers are a wearable mood board—fun, expressive, and totally unique. You’ll love showing these off and maybe inspiring a sneaker-artist friend in class.
6. Personalized Bath-Salt Gift Jars With Cozy Scents

Surprise someone you care about with a homemade spa-in-a-jar. These personalized bath-salt gift jars smell amazing and look adorable on a shelf or desk. They’re easy to customize for birthdays, holidays, or “just because.”
Materials
- Epsom salt or sea salt
- Essential oils (lavender, citrus, peppermint—your pick)
- Food coloring or dried petals for color and texture
- Clear square jars, ribbon, and cute labels
How to Make It
- Combine salt with a few drops of essential oil until you reach the scent level you want.
- Add a touch of color or petals for texture and visual appeal.
- Layer colors for a pretty gradient effect in the jar.
- Attach a personalized label with a short message for the recipient.
Pro Tips / Styling Ideas
- Write a small note on the label about a shared memory for extra sentiment.
- Pair with a tiny wooden scoop or a handmade spoon for a cozy gift set.
- Use pastel tones for a soft, spa-like vibe or go bright for a bold gift.
End note: These bath-salt jars are easy to customize and incredibly satisfying to put together. They feel thoughtful and luxe without costing a fortune, and they’re sure to brighten any bathroom shelf.
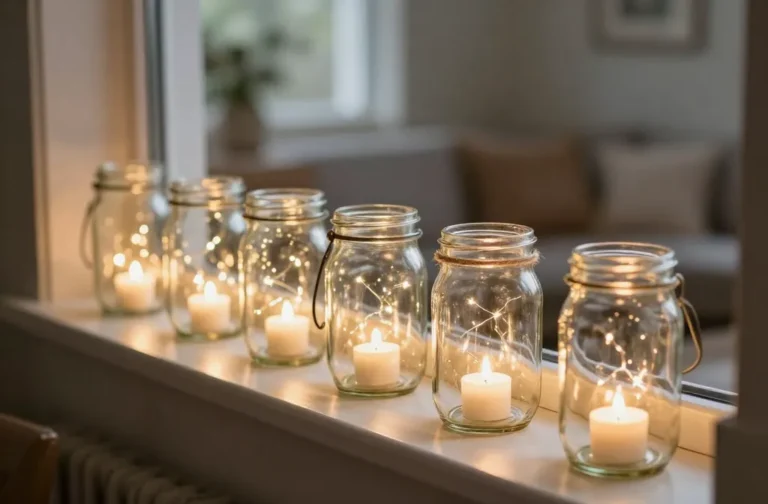
7. Light-Up Paper Lanterns With Surprise Inside
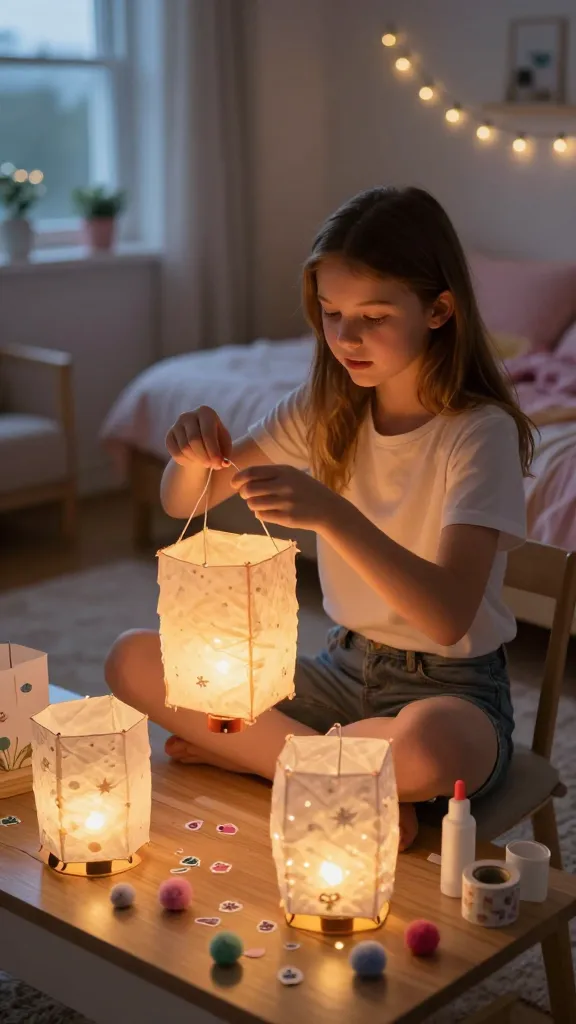
Charge up a night-time vibe with whimsical, light-up paper lanterns that reveal a tiny surprise when you flip the switch. These are perfect for sleepovers, bedrooms, or sunny classroom projects that actually glow at dusk.
Materials
- Paper lanterns (battery-operated LED string lights)
- Patterned paper or tissue for outer shells
- Glue or double-sided tape
- Small embellishments (stickers, pom-poms, washi tape)
How to Make It
- Wrap the lanterns with patterned paper or tissue, securing edges neatly.
- Decorate with stickers, tape, or small paper crafts along the outer surface.
- Insert the LED string light inside before sealing the final piece.
- Turn on the lights to reveal a soft, glowy effect.
Pro Tips / Styling Ideas
- Group several lanterns for a warm, ethereal ambiance in a corner or ceiling display.
- Use pastel or metallic papers for a different mood—romantic, whimsical, or bold.
- Make a few as a nightlight set for a sleepover setup.
End note: These lanterns are secretly magical, especially when the lights glow at night. They’re simple, charming, and a little bit magical—perfect for adding a soft, Pinterest-worthy glow to any space.
Conclusion
These 7 Trendy Craft Ideas for a 14-Year-Old Girl are easy, affordable, and bursting with personality. Grab a few supplies, pick your favorite ideas, and start crafting today. You’ll have a handful of unique pieces to decorate, wear, gift, and show off—plus a stack of brag-worthy photos for your pins and feeds. Ready to dive in? Pick one (or all) and get crafting with a smile.